1 概述
1.1 简介
Spring Boot是由Pivotal团队提供的全新框架 , 基于Spring4.0设计 , 简化了Spring应用的整个搭建和开发过程 , 使开发人员不再需要定义样板化的配置.
简单来说就是帮助开发人员更快搭建项目及开发 , 同时集成了大量的的框架避免了冲突以及提高稳定性.
1.2 特点
- 使用注解配置 , 无需xml(简单易用)
- 快速搭建 , 开发
- 简化的maven结构
- 更方便和三方框架集成(内部集成大量三方框架)
- 内嵌tomcat , 部署简单
- 内置健康检查 , 监控等
- 自动配置 , 让配置更加简单
2 项目搭建
2.1 创建第一个springboot项目
2.1.1 创建
- 创建普通maven项目
- 在pom.xml中添加依赖

- 创建配置类
@SpringBootApplication
public class ApplicationConfig {

    public static void main(String[] args) {
        SpringApplication.run(ApplicationConfig.class);
    }
}
- 创建controller
@RestController
public class Example {
	@RequestMapping("/")
	String home() {
		return "Hello SpringBoot!";
	}
}
- 浏览器访问默认端口http://localhost:8080/
2.1.2 解读
<parent>
  <groupId>org.springframework.boot</groupId>
  <artifactId>spring-boot-starter-parent</artifactId>
   <version>2.1.10.RELEASE  </version>
</parent>
- SpringBoot的父工程 , 其父工程(我们工程的爷爷)帮助我们管理了很多的集成框架
<dependency>
  <groupId>org.springframework.boot </groupId>
  <artifactId>spring-boot-starter-web</artifactId>
</dependency>
- SpringBoot和SpringMvc整合的jar包 , 并且导入了日志(springboot推荐使用logback) , tomcat , 等等相关的jar包
<packaging>jar</packaging>
- SpringBoot应用默认打jar包
@RestController
- @Controller+@ResponseBody
@EnableAutoConfiguration
- 开启自动配置功能 , 使用springboot默认的配置
@SpringBootApplication
- 包括三个标签组成 :
@SpringBootConfiguration --springboot默认配置
@EnableAutoConfiguration – 开启自动配置
@ComponentScan – 组件自动扫描
SpringApplication.run()
- 通过加载配置类字节码文件 , 然后加载各种监听器及环境等 , 启动SpringBoot应用
<dependencyManagement>...</dependencyManagement>
- 统一管理jar包的标签 . 该标签只是声明依赖 , 并不实现引入 , 因此子项目需要显示的声明需要用的依赖 . 只有在子项目中写了该依赖项
, 并且没有指定具体版本 , 才会从父项目中继承该项 , 并且version和scope都读取自父pom ; 另外如果子项目中指定了版本号
, 那么会使用子项目中指定的jar版本.
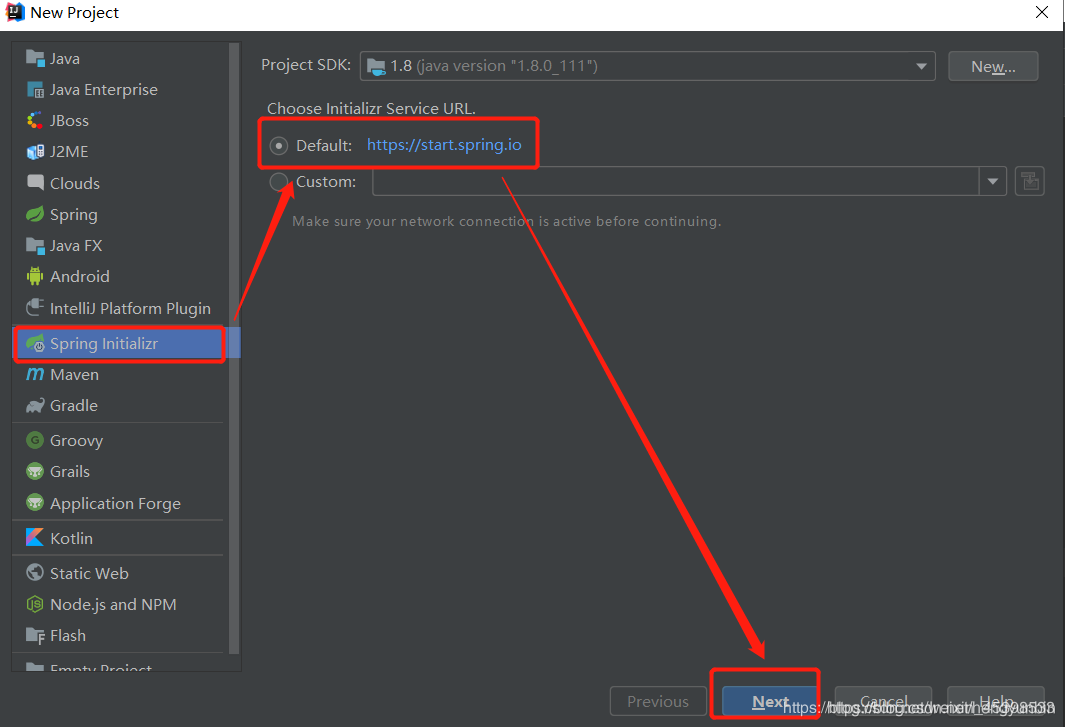
2.2 普通springboot项目安装步骤
- 使用idea 新建项目(需要联网)

- 修改以下两项 , 其余使用默认选项(打包方式packaging默认jar , 后面会介绍打包后运行方式)

- 选择需要的springboot版本 , 依赖框架 , next , 再next

- 当然 , 如果项目建成后还需要添加其他框架支持 , 直接在pom里面配置

- 项目结构

- 2.3 查看springboot内置集成的框架
打开新建项目的pom.xml , 点击标签下的spring-boot-starter-parent , 然后再点击标签下的spring-boot-dependencies , 该pom文件下的内即是springboot集成的指定版本的jar包.
- 2.4 打包独立运行
springboot打包方式有三种 , 下面将介绍推荐使用的一种方式 - 导入打包插件
<build>
    <plugins>
      <plugin>
        <groupId>org.springframework.boot</groupId>
        <artifactId>spring-boot-maven-plugin</artifactId>
      </plugin>
    </plugins>
</build>
- 使用插件package

打包命令会把jar打包至target目录下(控制台也会有路径显示) - cmd运行命令 , 路径建议使用绝对路径
java -jar D:\XXX\XXX.jar
3 配置类/文件
3.1 配置类
创建一个类 , 使用@configuration直接表明这是一个配置类
@Configuration
@ComponentScan("包名")
public class ConfigBeans {
  /*
  *创建bean方式一
  */
  @Autowired
  private MyBean MyBean;

  /*
  *创建bean方式二 类似xml文件配置bean标签
  */
  @Scope("singleton")
  @Lazy(value = false)
  @Bean(initMethod = "init", destroyMethod = "destroy")
  @Conditional(value = MyCondition.class)
  public MyBean myBean() {
    return new MyBean();
  }
}
下面是启动spring应用的类 , 需要将配置文件加载到类中
@SpringBootApplication
public class ConfigApplication {
  //声明为非web应用,只要加载容器即可
  public static void main(String[] args) {
      new SpringApplicationBuilder()
      	  //如果是非web应用,只加载容器,可以加上以下声明
          //.web(WebApplicationType.NONE)
          .sources(ConfigApplication.class)
          .run(args);
  }
3.1.1 注解解读
- @Configuration : 声明这是一个配置类 , 相当于applicationContext.xml
- @ComponentScan(“包名”) :
扫描指定包及其子包下的包含@controller/@service/@repository/@component的spring注解 , 不加value默认扫描当前所在包及其子包
属性lazyInit 表示懒初始化
属性excludeFilters 表示这些包排除在外不扫描
如有多个扫描包可以使用@ComponentScans
- @Scope(“singleton”) : 声明创建方式是单例singleton还是多例prototype
- @Lazy : 声明是否为懒加载 , 默认为true , 即迫切加载
- @Bean(initMethod = “init”, destroyMethod = “destroy”) : 声明bean的信息
这里加上了初始化及销毁的方法名(自定义的方法) - @Conditional(value = MyCondition.class) :
设值创建bean的条件,其value是一个自定义创建的类implement Condition , 然后实现matches方法
public class MyCondition implements Condition {
    /**
     * 匹配方法,返回值决定是否满足条件
     */
    @Override
    public boolean matches(ConditionContext context, AnnotatedTypeMetadata metadata) {
        //获取系统环境
        String systemName = context.getEnvironment().getProperty("os.name");
        if("Windows 10".equals(systemName)){
            return true;
        }
        return false;
    }
}
- @SpringBootApplication :
- @Import :
1 直接导入Bean或者配置类 , 其value是一个字节码文件
2 导入ImportSelector , 需要自定义ImportSelector实现ImportSelector
public class MyImportSelector implements ImportSelector {
    //选择导入,该方法返回我们需要导入的类的全限定名
    public String[] selectImports(AnnotationMetadata importingClassMetadata) {
        return new String[]{
                "com.carry.import_demo.MyBean",
                "com.carry.import_demo.OtherBean"};
    }
}
@Configuration
@Import(MyImportSelector.class)	//导入选择器
public class ConfigBeans
导入ImportBeanDefinitionRegistrar , 自定义注册器
public class MyBeanRegistrar implements ImportBeanDefinitionRegistrar {
    //注册bean , BeanDefinitionRegistry :注册bean的注册器
    public void registerBeanDefinitions(AnnotationMetadata importingClassMetadata, BeanDefinitionRegistry registry) {

        //参数:beanName :bean的名字
        RootBeanDefinition rootBeanDefinition = new RootBeanDefinition(MyBean.class);
        registry.registerBeanDefinition("myBean",rootBeanDefinition );
    }
}
@Configuration
@Import(MyBeanRegistor.class)	//导入bean注册器
public class ConfigBeans
3.2 配置文件
配置文件使用
springboot中默认配置文件的命名方式为:application.properties或者application.yml,
springboot项目启动会先加载上述两个文件 , 如果项目中有多个配置文件 , springboot同时提供了加载多个配置文件的机制
在默认配置文件中添加spring.profiles.active=test的方式来选择激活的配置文件 , 这些非默认配置文件的的命名方式为:application-{profile}.properties:
springboot使用的是一个全局的默认的配置文件 , 且文件名是固定的 , 文件内详细配置及解读请参考这位师兄 : SpringBoot配置文件最全最详细中文说明
如果默认配置不能满足使用或者有其他需求(例如修改访问端口号) , 可以自己创建application.yml文件进行重新配置 , 使用YAML语法编写 , 语法简单且idea有提示
server:
      port: 80
3.2.1 获取配置文件中的值
- 可以导入配置文件处理器 , 配置文件值在进行创建实体类的时候就会有提示
<dependency>
	<groupId>org.springframework.boot</groupId>
	<artifactId>spring-boot-configuration-processor</artifactId>
	<optional>true</optional>
</dependency>
- 准备yaml数据 , 必须放在默认全局配置文件的位置 , 也就是
application.properties的同一目录下
person:
  lastName: hello
  age: 18
  boss: false
  birth: 1999/12/12
  maps: {k1: v1,k2: 12}
  lists:
    - 扛把子
    - 妈蛋
  dog:
    name: 小狗
    age: 2
- 创建两个实体类Person和Dog , 同时附上getter/setter方法
@Component
@ConfigurationProperties(prefix = "person")
@Data
public class Person {
    private String lastName;
    private Integer age;
    private Boolean boss;
    private Date birth;
    private Map<String,Object> maps;
    private List<Object> lists;
    private Dog dog;
}
@Data
public class Dog {
    private String name;
    private Integer age;
}
使用@ConfigurationProperties , 告诉SpringBoot将本类中的所有属性和配置文件中相关的配置进行绑定;
(prefix = “person”) : 配置文件中哪个前缀下面的所有属性进行一一映射.
- 测试
@RunWith(SpringRunner.class)
@SpringBootTest(classes = ApplicationConfig.class)
public class TestDI {
    @Autowired
    private Person person;
    @Test
    public void test() throws Exception{
        System.out.println(person);
    }
}
4 SpringBoot整合
4.1 SpringBoot test
- 导入依赖
<dependency>
    <groupId>org.springframework</groupId>
    <artifactId>spring-test</artifactId>
    <version>5.2.1.RELEASE</version>
    <scope>compile</scope>
</dependency>
<dependency>
	<groupId>org.springframework.boot</groupId>
	<artifactId>spring-boot-starter-web</artifactId>
</dependency>

<dependency>
	<groupId>org.springframework.boot</groupId>
	<artifactId>spring-boot-starter-test</artifactId>
</dependency>
- 创建测试类
@RunWith(SpringRunner.class)
@SpringBootTest(classes = ApplicationConfig.class)
public class TestDI {
    @Test
    public void test() throws Exception{
    }
}
4.2 SpringBoot+日志
- SpringBoot底层使用slf4j+logback的方式记录日志 ,但是他能自动适配所有的日志 , 如果引入其他框架 ,
需要把这个框架依赖的日志框架排除掉即可 , 如spring框架

4.2.1 基本使用
在需要使用日志的类中
private Logger logger = LoggerFactory.getLogger(MySpringBootTest.class);

...
logger.error("error日志.....");
logger.warn("warn日志.....");
logger.info("info日志.....");
logger.debug("debug日志.....");
logger.trace("trace日志.....");
4.2.2 日志配置
日志配置文件logback.xml
<?xml version="1.0" encoding="UTF-8"?>

<configuration debug="true" scan="true" scanPeriod="1 seconds">

    <!-- 定义了一个变量 name = CONSOLE_LOG_PATTERN , 日志格式 -->
    <property name="CONSOLE_LOG_PATTERN" value="%d{yyyy-MM-dd HH:mm:ss.SSS} ----> [%thread] ---> %-5level %logger{50} - %msg%n"/>


    <!--ConsoleAppender 用于在屏幕上输出日志-->
    <appender name="printInConsole" class="ch.qos.logback.core.ConsoleAppender">
        <!--定义控制台输出格式-->
        <encoder>
            <pattern>${CONSOLE_LOG_PATTERN}</pattern>
            <!-- 设置字符集 -->
            <charset>UTF-8</charset>
        </encoder>
    </appender>

    <appender name="printInFile" class="ch.qos.logback.core.rolling.RollingFileAppender">

        <file>logs/springboot.log</file>

        <rollingPolicy class="ch.qos.logback.core.rolling.SizeAndTimeBasedRollingPolicy">

            <fileNamePattern>logs/springboot-%d{yyyyMMdd}-%i.log.gz</fileNamePattern>

            <maxFileSize>50KB</maxFileSize>
            <maxHistory>30</maxHistory>
            <!--总上限大小-->
            <totalSizeCap>5GB</totalSizeCap>
        </rollingPolicy>
        <!--定义控制台输出格式-->
        <encoder>
            <pattern>${CONSOLE_LOG_PATTERN}</pattern>
            <!-- 设置字符集 -->
            <charset>UTF-8</charset>
        </encoder>
    </appender>

    <!--root是默认的logger 这里设定输出级别是debug-->
    <root level="info">
        <!--定义了两个appender,日志会通过往这两个appender里面写-->
        <appender-ref ref="printInConsole"/>
        <appender-ref ref="printInFile"/>
    </root>


    <!--如果没有设置 additivity="false" ,就会导致一条日志在控制台输出两次的情况-->
    <!--additivity表示要不要使用rootLogger配置的appender进行输出-->
    <logger name="cn.itsource" level="trace" additivity="false">
        <appender-ref ref="printInConsole"/>
        <appender-ref ref="printInFile"/>
    </logger>
</configuration>
4.2.3 lombok使用日志
当我们项目集成了lombok插件是 , 使用日志将变得更加简单 , 只需要在类上加上注解@Log4j2 , 然后你就可以在任意地方使用log.info()等方法
