基于ASP.NET Core的交互式认证授权
上一篇中已经添加了一个认证授权中心服务,本篇在此前的基础上进行扩展,通过添加OpenID Connect协议以支持交互式用户身份验证。
本示例代码中,认证授权中心运行在
http://localhost:5000下,ASP.NET Core MVC 客户端网站运行在http://localhost:5002下
演示效果
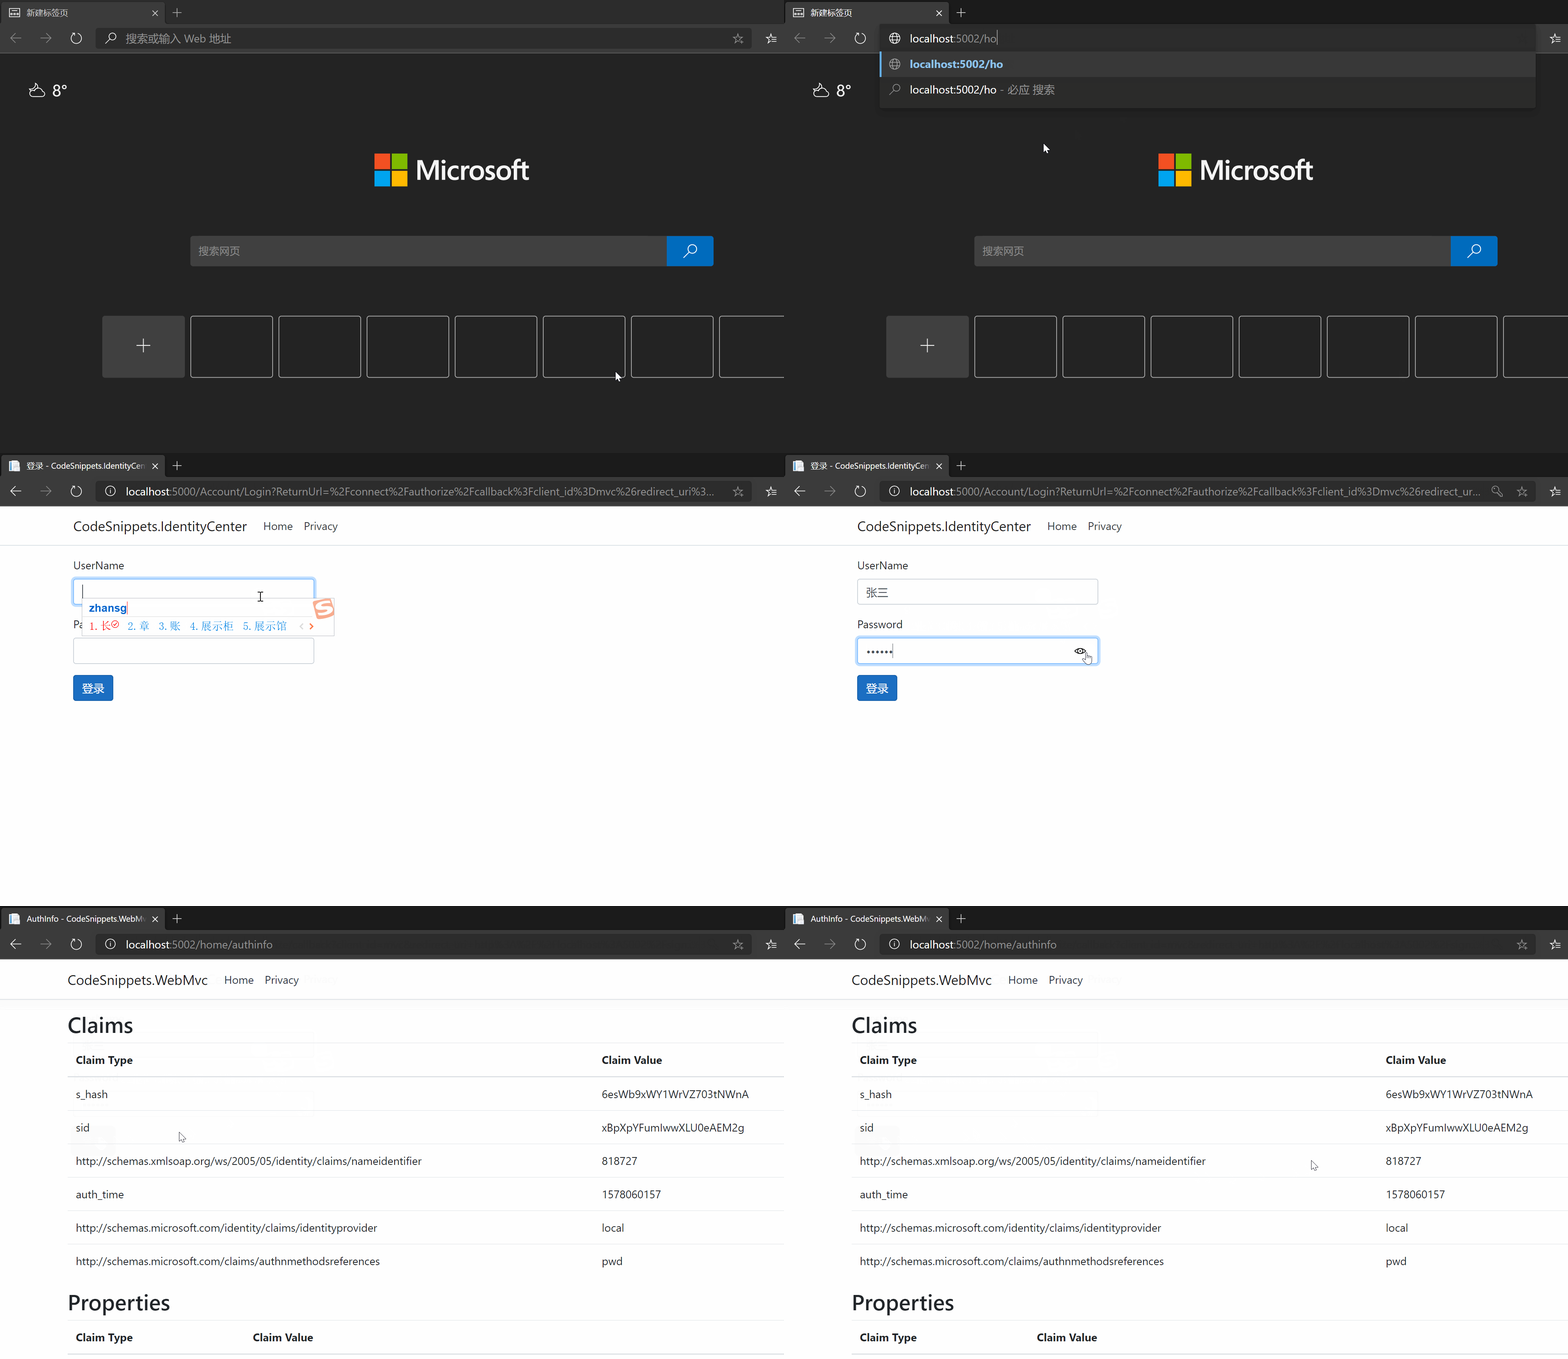
访问:http://localhost:5002/home/authinfo(此站点已配置为所有页面都需要授权才能访问)
如图,访问此站点后重定向到认证授权中心:http://localhost:5000。在认证授权中心输入凭据后,重新返回之前的访问页面。

打开开发者工具,可以看到相关cookie已写入:

服务端配置示例
- 在Config中添加客户端信息
基于
OpenID Connect的客户端与我们添加的OAuth 2.0客户端非常相似。但是,由于OIDC中的流始终是交互式的,因此我们需要在配置中添加一些重定向URL。
public static IEnumerable<Client> Clients => new List<Client>
{
    new Client
    {
        ClientId="mvc",
        ClientSecrets={new Secret("secret".Sha256())},

        AllowedGrantTypes=GrantTypes.Code,
        RequireConsent=false,
        RequirePkce=true,

        RedirectUris={ "http://localhost:5002/signin-oidc"},

        PostLogoutRedirectUris={ "http://localhost:/5002/signout-callback-oidc"},

        AllowedScopes=new List<string>{
            IdentityServerConstants.StandardScopes.OpenId,
            IdentityServerConstants.StandardScopes.Profile
        }
    }
};
- 在Config中添加对OpenID Connect Identity Scope的支持
与
OAuth 2.0相似,OpenID Connect也使用范围概念。同样,范围代表我们要保护的内容以及客户端要访问的内容。与OAuth相比,OIDC中的范围不代表API,而是诸如用户ID,姓名或电子邮件地址之类的身份数据。
// Defineing Identity Resource
public static IEnumerable<IdentityResource> Ids => new List<IdentityResource>
{
    new IdentityResources.OpenId(),
    new IdentityResources.Profile()
};
- 添加测试用户
public class TestUsers
{
    public static List<TestUser> Users = new List<TestUser>
    {
        new TestUser{SubjectId = "818727", Username = "张三", Password = "123456",
            Claims =
            {
                new Claim(JwtClaimTypes.Name, "张三"),
                new Claim(JwtClaimTypes.GivenName, "三"),
                new Claim(JwtClaimTypes.FamilyName, "张"),
                new Claim(JwtClaimTypes.Email, "[email protected]"),
                new Claim(JwtClaimTypes.EmailVerified, "true", ClaimValueTypes.Boolean),
                new Claim(JwtClaimTypes.WebSite, "http://zhangsan.com"),
                new Claim(JwtClaimTypes.Address, @"{ '城市': '杭州', '邮政编码': '310000' }", IdentityServer4.IdentityServerConstants.ClaimValueTypes.Json)
            }
        }
    };
}
- 添加服务到DI
public void ConfigureServices(IServiceCollection services)
{
    var builder = services.AddIdentityServer()
        .AddInMemoryIdentityResources(Config.Ids)
        .AddInMemoryApiResources(Config.Apis)
        .AddInMemoryClients(Config.Clients)
        .AddTestUsers(TestUsers.Users);
    builder.AddDeveloperSigningCredential();
}
创建一个MVC客户端网站
Install-Package Microsoft.AspNetCore.Authentication.OpenIdConnect -Version 3.1.0
- 添加服务到DI
public void ConfigureServices(IServiceCollection services)
{
	// 我们使用cookie来本地登录用户(通过“Cookies”作为DefaultScheme),并且将DefaultChallengeScheme设置为oidc。因为当我们需要用户登录时,我们将使用OpenID Connect协议。
	services.AddAuthentication(options =>
	{
	    options.DefaultScheme = "Cookies";
	    options.DefaultChallengeScheme = "oidc";
	})
	// 添加可以处理cookie的处理程序
	.AddCookie("Cookies")
	// 用于配置执行OpenID Connect协议的处理程序
	.AddOpenIdConnect("oidc", options =>
	{
	    options.Authority = "http://localhost:5000";    // 受信任令牌服务地址
	    options.RequireHttpsMetadata = false;

	    options.ClientId = "mvc";
	    options.ClientSecret = "secret";
	    options.ResponseType = "code";

	    options.SaveTokens = true;  // 用于将来自IdentityServer的令牌保留在cookie中
	});
}
- 确保服务对每个请求执行验证
public void Configure(IApplicationBuilder app, IHostingEnvironment env)
{
    app.UseStaticFiles();

    app.UseRouting();
    app.UseAuthentication();
    app.UseAuthorization();

    app.UseEndpoints(endpoints =>
    {
        endpoints.MapControllerRoute(
            name: "default",
            pattern: "{controller=Home}/{action=Index}/{id?}")
        .RequireAuthorization();    // RequireAuthorization方法禁用整个应用程序的匿名访问
    });
}
- 添加控制器方法
public class HomeController : Controller
{
    public IActionResult AuthInfo()
    {
        return View();
    }
}
- 添加视图
@using Microsoft.AspNetCore.Authentication;
<div class="text-left">
    <h2>Claims</h2>
    <table class="table">
        <thead>
            <tr>
                <th scope="col">Claim Type</th>
                <th scope="col">Claim Value</th>
            </tr>
        </thead>
        <tbody>
            @foreach (var claim in User.Claims)
            {
                <tr>
                    <td>@claim.Type</td>
                    <td>@claim.Value</td>
                </tr>
            }
        </tbody>
    </table>

    <h2>Properties</h2>
    <table class="table">
        <thead>
            <tr>
                <th scope="col">Claim Type</th>
                <th scope="col">Claim Value</th>
            </tr>
        </thead>
        <tbody>
            @foreach (var prop in (await Context.AuthenticateAsync()).Properties.Items)
            {
                <tr>
                    <td>@prop.Key</td>
                    <td>@prop.Value</td>
                </tr>
            }
        </tbody>
    </table>
</div>
