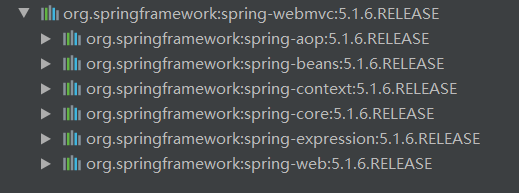
1.首先配置pom.xml文件
<?xml version="1.0" encoding="UTF-8"?>
<project xmlns="http://maven.apache.org/POM/4.0.0"
         xmlns:xsi="http://www.w3.org/2001/XMLSchema-instance"
         xsi:schemaLocation="http://maven.apache.org/POM/4.0.0 http://maven.apache.org/xsd/maven-4.0.0.xsd">
    <modelVersion>4.0.0</modelVersion>

    <groupId>org.javabay</groupId>
    <artifactId>xmlssm</artifactId>
    <version>1.0-SNAPSHOT</version>
    <packaging>war</packaging>

    <dependencies>
        <dependency>
            <groupId>org.springframework</groupId>
            <artifactId>spring-webmvc</artifactId>
            <version>5.1.6.RELEASE</version>
        </dependency>
    </dependencies>

</project>
pom.xml文件引入spring-webmvc之后就会导入aop,bean等一系列jar包

这些jar包是配置spring的必需品
2.创建applicationContext.xml文件
这个文件是配置spring的
<?xml version="1.0" encoding="UTF-8"?>
<beans xmlns="http://www.springframework.org/schema/beans"
       xmlns:xsi="http://www.w3.org/2001/XMLSchema-instance"
       xmlns:context="http://www.springframework.org/schema/context"
       xsi:schemaLocation="http://www.springframework.org/schema/beans http://www.springframework.org/schema/beans/spring-beans.xsd http://www.springframework.org/schema/context http://www.springframework.org/schema/context/spring-context.xsd">

    <!--spring除了controller之外都扫描-->
    <context:component-scan base-package="org.javaboy" use-default-filters="true">
        <context:exclude-filter type="annotation" expression="org.springframework.stereotype.Controller"/>
    </context:component-scan>

</beans>
3.创建spring-servlet.xml文件
这个文件是来配置springmvc的
<?xml version="1.0" encoding="UTF-8"?>
<beans xmlns="http://www.springframework.org/schema/beans"
       xmlns:xsi="http://www.w3.org/2001/XMLSchema-instance"
       xmlns:context="http://www.springframework.org/schema/context"
       xmlns:mvc="http://www.springframework.org/schema/mvc"
       xsi:schemaLocation="http://www.springframework.org/schema/beans http://www.springframework.org/schema/beans/spring-beans.xsd http://www.springframework.org/schema/context http://www.springframework.org/schema/context/spring-context.xsd http://www.springframework.org/schema/mvc http://www.springframework.org/schema/mvc/spring-mvc.xsd">

    <!--springmvc只扫描controller-->
    <!--这里use-default-filters="false"代表什么都不扫-->
    <context:component-scan base-package="org.javaboy" use-default-filters="false">
        <!--只扫描controller类-->
        <context:include-filter type="annotation" expression="org.springframework.stereotype.Controller"/>
    </context:component-scan>


    <!--<mvc:annotation-driven /> 会自动注册
    DefaultAnnotationHandlerMapping
    与AnnotationMethodHandlerAdapter
    两个bean,是spring MVC为@Controllers分发请求所必须的,
    即解决了@Controller注解使用的前提配置
    -->
    <mvc:annotation-driven/>
</beans>
4.现在要将配置的spring和springmvc的xml文件加载进来(在web.xml文件中加载)
<?xml version="1.0" encoding="UTF-8"?>
<web-app xmlns="http://xmlns.jcp.org/xml/ns/javaee"
         xmlns:xsi="http://www.w3.org/2001/XMLSchema-instance"
         xsi:schemaLocation="http://xmlns.jcp.org/xml/ns/javaee http://xmlns.jcp.org/xml/ns/javaee/web-app_4_0.xsd"
         version="4.0">

    <!--加载spring配置-->
    <context-param>
        <param-name>contextConfigLocation</param-name>
        <param-value>classpath:applicationContext.xml</param-value>
    </context-param>
    <!--ContextLoaderListener的作用就是启动Web容器时,
    自动装配ApplicationContext.xml的配置信息。-->
    <listener>
        <listener-class>org.springframework.web.context.ContextLoaderListener</listener-class>
    </listener>
    <!--加载springmvc的配置-->
    <servlet>
        <servlet-name>springmvc</servlet-name>
        <!--DispatcherServlet是前端控制器设计模式的实现,
        提供SpringWebMVC的集中访问点,而且负责职责的分派,
        而且与spring IOC容器无缝集成,从而可以获得Spring的优势。-->
        <servlet-class>org.springframework.web.servlet.DispatcherServlet</servlet-class>
        <init-param>
            <param-name>contextConfigLocation</param-name>
            <param-value>classpath:spring-servlet.xml</param-value>
        </init-param>
    </servlet>
    <servlet-mapping>
        <servlet-name>springmvc</servlet-name>
        <url-pattern>/</url-pattern>
    </servlet-mapping>
</web-app>
5.到目前位置配置都已经做完了,现在来做service类和控制类
HelloController
package org.javaboy.controller;

import org.javaboy.service.HelloService;
import org.springframework.beans.factory.annotation.Autowired;
import org.springframework.web.bind.annotation.GetMapping;
import org.springframework.web.bind.annotation.RestController;

@RestController
public class HelloController {

    @Autowired
    private HelloService helloService;

    //produces是告诉它返回的数据格式
    @GetMapping(value = "/hello",produces = "text/html;charset=utf-8")
    public String hello() {
        return helloService.sayHello();
    }
}
HelloService
package org.javaboy.service;


import org.springframework.stereotype.Service;

@Service
public class HelloService {

    public String sayHello() {
        return "hello Java 极客技术!";
    }

}
6.配置好tomcat访问http://localhost:8080/xmlssm_war/hello

简单的spring和springmvc的配置就做完了,现在来讲一下我做的过程中遇到的2个问题:
**1.**刚开始做完启动时报出了500的错

当时很懵逼,我先是以为tomcat配置出错了,结果允许了之前部署的项目(使用tomcat的)完全没问题,然后我有以为后端代码出粗,我仔细查了一遍发现发现service和controller都没问题。后来百度之后才知道是我配置springmvc的约束写的有问题:
我发现在写 <mvc:annotation-driven />的时候,idea推荐的XML约束是cache的,我们把它全换成mvc的就可以了

把上述箭头指的地方全替换成xml就启动成功了。
2.虽然启动成功了但是如果返回的是中文就会出现乱码
解决方案:
在控制类的方法写上返回的数据格式
produces = "text/html;charset=utf-8"
这样就能成功了
