目的:了解spring框架中的注解
前言:同样是使用idea创建一个普通的maven工程(如何创建一个普通的Maven工程可以参考mybatis入门第一天的详解)。
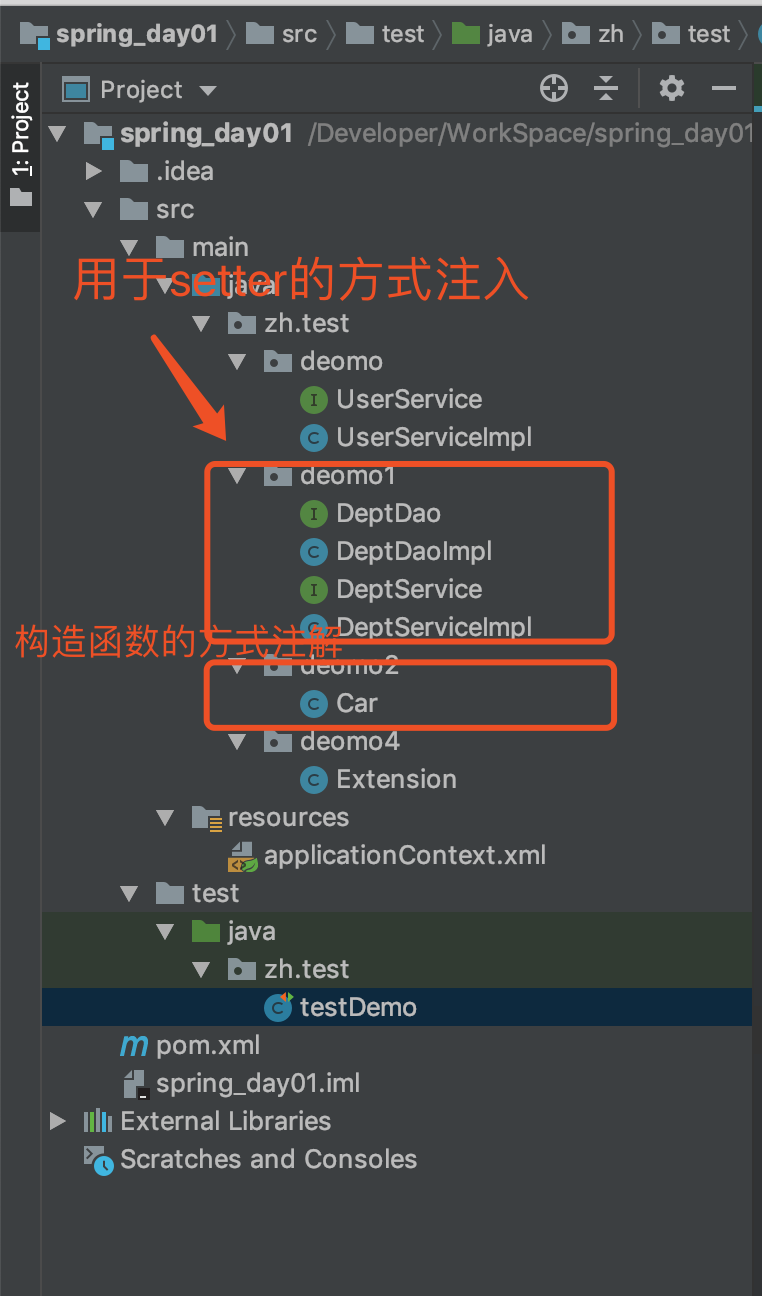
项目结构:
代码编辑:
在项目中引入需要的Maven开发坐标
 1 <dependencies>
 2         <dependency>
 3             <groupId>org.springframework</groupId>
 4             <artifactId>spring-context</artifactId>
 5             <version>5.0.2.RELEASE</version>
 6         </dependency>
 7         <dependency>
 8             <groupId>commons-logging</groupId>
 9             <artifactId>commons-logging</artifactId>
10             <version>1.2</version>
11         </dependency>
12         <dependency>
13             <groupId>log4j</groupId>
14             <artifactId>log4j</artifactId>
15             <version>1.2.12</version>
16         </dependency>
17         <dependency>
18             <groupId>junit</groupId>
19             <artifactId>junit</artifactId>
20             <version>4.12</version>
21             <scope>test</scope>
22         </dependency>
23     </dependencies>
- 在demo文件下 编写接口UserService
1 package zh.test.deomo;
2
3 public interface UserService {
4     public  void  sayHi();
5 }
- 实现接口,编写UserServiceImpl
1 package zh.test.deomo;
2
3 public class UserServiceImpl implements UserService {
4
5     public void sayHi() {
6         System.out.println("SayHi");
7     }
8 }
- 载demo1文件下,编写关于spring使用setter的方式注入
创建一个DeptDao的接口
1 package zh.test.deomo1;
2
3 public interface DeptDao {
4     public void save();
5 }
实现该接口,DeptDaoImpl
1 package zh.test.deomo1;
2
3 public class DeptDaoImpl implements DeptDao {
4     public void save() {
5         System.out.println("持久层。。保存。。。");
6     }
7 }
编写DeptService的接口
1 package zh.test.deomo1;
2
3 public interface DeptService {
4     public  void save();
5 }
实现接口DeptServiceImpl
 1 package zh.test.deomo1;
 2
 3 public class DeptServiceImpl implements DeptService {
 4     private DeptDao deptDao;
 5
 6     //普通的数据类型,也需要提供set的方法注入
 7     private String name;
 8     private int age;
 9
10     public void setName(String name) {
11         this.name = name;
12     }
13
14     public void setAge(int age) {
15         this.age = age;
16     }
17
18     //依赖注入通过set的方法传递进来
19     public void setDeptDao(DeptDao deptDao) {
20         System.out.println("set被调用。。。");
21         this.deptDao = deptDao;
22     }
23
24     public void save() {
25         System.out.println("业务层。。。保存");
26         System.out.println(name+":"+age);
27         deptDao.save();
28     }
29 }
- 在deomo2的文件下编写关于使用构造函数的方式注入Car.java文件
 1 package zh.test.deomo2;
 2
 3 public class Car {
 4     private String name;
 5     private Double money;
 6
 7     public String getName() {
 8         return name;
 9     }
10
11     public void setName(String name) {
12         this.name = name;
13     }
14
15     public Double getMoney() {
16         return money;
17     }
18
19     public void setMoney(Double money) {
20         this.money = money;
21     }
22
23     @Override
24     public String toString() {
25         return "Car{" +
26                 "name='" + name + '\'' +
27                 ", money=" + money +
28                 '}';
29     }
30
31     public Car(String name, Double money) {
32         this.name = name;
33         this.money = money;
34     }
35 }
- 在deomo4文件下编写扩展的类,主要是存放集合、数组、属性文件
 1 package zh.test.deomo4;
 2
 3
 4 import java.util.Arrays;
 5 import java.util.List;
 6 import java.util.Map;
 7 import java.util.Properties;
 8
 9 public class Extension {
10     //数组
11     private String [] strs;
12
13     //集合
14     private List<String> list;
15
16     //map
17     private Map<String,String> map;
18
19     //属性文件
20     private Properties properties;
21
22     @Override
23     public String toString() {
24         return "Extension{" +
25                 "strs=" + Arrays.toString(strs) +
26                 ", list=" + list +
27                 ", map=" + map +
28                 ", properties=" + properties +
29                 '}';
30     }
31
32     public String[] getStrs() {
33         return strs;
34     }
35
36     public void setStrs(String[] strs) {
37         this.strs = strs;
38     }
39
40     public List<String> getList() {
41         return list;
42     }
43
44     public void setList(List<String> list) {
45         this.list = list;
46     }
47
48     public Map<String, String> getMap() {
49         return map;
50     }
51
52     public void setMap(Map<String, String> map) {
53         this.map = map;
54     }
55
56     public Properties getProperties() {
57         return properties;
58     }
59
60     public void setProperties(Properties properties) {
61         this.properties = properties;
62     }
63 }
- 编写applicationContxt.xml文件在resources目录下
 1 <?xml version="1.0" encoding="UTF-8"?>
 2 <beans xmlns="http://www.springframework.org/schema/beans"
 3        xmlns:xsi="http://www.w3.org/2001/XMLSchema-instance" xmlns:util="http://www.springframework.org/schema/util"
 4        xsi:schemaLocation="http://www.springframework.org/schema/beans
 5                     http://www.springframework.org/schema/beans/spring-beans.xsd http://www.springframework.org/schema/util http://www.springframework.org/schema/util/spring-util.xsd">
 6
 7     <!--IOC管理bean-->
 8     <!--配置实现类,配置组建bean管理-->
 9     <!--
10     标签bean  用来管理类,把类交给IOC容器管理,IOC容器把当前的这个类创建对象,存入到IOC容器中。
11     id="唯一的值,自定义"
12     class="管理类的全路径,包名+类名    底层使用反射代码创建对象"
13     class.forName("zh.test.deomo.UserServiceImpl")
14
15
16     scope="是创建之后的对象是单例的还是多例的"  默认是单例的
17     scope="singleton" 单例的
18     scope="prototype"  多例的
19     区别:如果是多例的在程序加载配置文件的时候不会立即创建一个对象,而是什么时候用到什么时候会用到。
20          如果是单例的则是在程序已加载的时候就会创建一个对象。只要IOC的容器存在那么单例的对象就一直存在。
21     -->
22     <bean id="userService" class="zh.test.deomo.UserServiceImpl" />
23
24     <!--通过set的方法注入-->
25     <bean id="deptService" class="zh.test.deomo1.DeptServiceImpl">
26         <!--依赖注入 name="service中的属性"-->
27         <property name="deptDao" ref="deptDao"/>
28         <!--给普通的属性注入值-->
29         <property name="name" value="白天黑天阴天"/>
30         <property name="age" value="20"/>
31     </bean>
32     <bean id="deptDao" class="zh.test.deomo1.DeptDaoImpl"></bean>
33
34     <!--属性的构造方法-->
35     <bean id="car" class="zh.test.deomo2.Car">
36         <constructor-arg name="name" value="劳斯劳斯"/>
37         <constructor-arg name="money" value="11111"/>
38     </bean>
39
40     <!--扩展方法-->
41     <bean id="extension" class="zh.test.deomo4.Extension">
42         <!--数组-->
43         <property name="strs">
44             <array>
45                 <value>l</value>
46                 <value>g</value>
47             </array>
48         </property>
49
50         <!--集合-->
51         <property name="list">
52             <list>
53                 <value>james</value>
54                 <value>davis</value>
55             </list>
56         </property>
57
58         <!--map-->
59         <property name="map">
60             <map>
61                 <entry key="lakers" value="lebron"/>
62                 <entry key="lakers1" value="davis"/>
63             </map>
64         </property>
65
66         <!--属性文件-->
67         <property name="properties">
68             <props>
69                 <prop key="lakers">london</prop>
70                 <prop key="lakers1">kuzma</prop>
71             </props>
72         </property>
73     </bean>
74 </beans>
- 最后写一个测试的方法,对以上的注入进行测试
 1 package zh.test;
 2
 3 import org.junit.Test;
 4 import org.springframework.context.ApplicationContext;
 5 import org.springframework.context.support.ClassPathXmlApplicationContext;
 6 import zh.test.deomo.UserService;
 7 import zh.test.deomo.UserServiceImpl;
 8 import zh.test.deomo1.DeptService;
 9 import zh.test.deomo2.Car;
10 import zh.test.deomo4.Extension;
11
12 public class testDemo {
13     @Test
14     public  void test()
15     {
16         //原始写法:
17         UserServiceImpl userService = new UserServiceImpl();
18         userService.sayHi();
19         //使用Spring框架
20
21     }
22
23     @Test
24     public void testSpring(){
25         //创建SpringIOC的工厂(容器) ,需要加载配置文件,就会将配置文件中的类通过反射的方式创建成对象
26         //将对象存入到容器中,以key : value 的方式,k="userService"  v="UserServiceImpl对象(默认是单例的)"
27         //
28         ApplicationContext ac=new ClassPathXmlApplicationContext("applicationContext.xml");
29         //从容器中获取对象  面向接口的编程
30         UserService userService = (UserService) ac.getBean("userService");
31         //调用对象
32         userService.sayHi();
33     }
34
35 //    setter的方式注入
36     @Test
37     public void testSpringDI(){
38         //创建SpringIOC的工厂(容器) ,需要加载配置文件,就会将配置文件中的类通过反射的方式创建成对象
39         //将对象存入到容器中,以key : value 的方式,k="userService"  v="UserServiceImpl对象(默认是单例的)"
40         //
41         ApplicationContext ac=new ClassPathXmlApplicationContext("applicationContext.xml");
42         //从容器中获取对象  面向接口的编程
43         DeptService deptService = (DeptService) ac.getBean("deptService");
44         //调用对象
45         deptService.save();
46     }
47
48 //    属性的构造方法注入
49     @Test
50     public void testCar(){
51         ApplicationContext ac=new ClassPathXmlApplicationContext("applicationContext.xml");
52         //从容器中获取对象  面向接口的编程
53         Car car = (Car) ac.getBean("car");
54         //调用对象
55         System.out.println(car);
56     }
57
58     //扩展方法  数组、集合、map、属性文件
59     @Test
60     public void testExtension(){
61         ApplicationContext ac=new ClassPathXmlApplicationContext("applicationContext.xml");
62         //从容器中获取对象  面向接口的编程
63         Extension extension = (Extension) ac.getBean("extension");
64         //调用对象
65         System.out.println(extension);
66     }
67
68 }
分享之路,欢迎交流。。。