SpringMVC第一天
一、内容介绍
1、三层架构和MVC设计模式
2、spring mvc概念
3、spring mvc入门程序
4、入门案例的执行过程及原理分析
5、@RequestMapping注解(重点)
6、参数的绑定(重点)
7、编码过滤器(重点)
二、三层架构和MVC设计模式
a、三层架构
web层-- 表现层: 处理用户的请求和相应
	技术:servlet
service层:业务层, 编写业务,处理业务逻辑,编写事务
	技术:spring
dao层:持久层,数据的增删改查
	技术:jdbcTemplate -- mybatis
b、mvc设计模式
M:model --模型: pojo类,封装数据 , 广义上:dao + service + model = 业务模型层
V:view -- 视图: jsp,html,freemarker:展示数据, 广义上:只要能展示数据就是视图
C:cotroller --控制层:servlet :处理用户的请求和相应
三、springMVC的概念
springMVC是满足了mvc设计的模式的一个表现层框架
四、SpringMVC的入门(重点)
1、引入依赖
<!--spring的核心-->
    <dependency>
      <groupId>org.springframework</groupId>
      <artifactId>spring-context</artifactId>
      <version>5.0.2.RELEASE</version>
    </dependency>
    <!--springMVC的jar包-->
    <dependency>
      <groupId>org.springframework</groupId>
      <artifactId>spring-webmvc</artifactId>
      <version>5.0.2.RELEASE</version>
    </dependency>
    <!-- servlet-api -->
    <dependency>
      <groupId>javax.servlet</groupId>
      <artifactId>servlet-api</artifactId>
      <version>2.5</version>
      <!--
        maven 项目执行分为三个阶段
          编译(需要)  测试(需要)  运行(不需要)
          provided : 编译器生效,测试生效,运行不生效

         servlet-api ,jsp-api:这两个包,需要配置依赖范围为provided ,其他都不需要
      -->
      <scope>provided</scope>
    </dependency>
    <dependency>
      <groupId>javax.servlet</groupId>
      <artifactId>jsp-api</artifactId>
      <version>2.0</version>
      <scope>provided</scope>
    </dependency>
关于 <scope>provided</scope>的应用:
由于tomcat中也有这两个包,于是会发生冲突报错
所以加上依赖范围,编译测试用自己的包,运行用tomcat的包
具体可见 关于maven依赖中的provided使用
2、spring-mvc.xml配置
<?xml version="1.0" encoding="UTF-8"?>
<beans xmlns="http://www.springframework.org/schema/beans"
       xmlns:xsi="http://www.w3.org/2001/XMLSchema-instance"
       xmlns:context="http://www.springframework.org/schema/context"
       xsi:schemaLocation="http://www.springframework.org/schema/beans http://www.springframework.org/schema/beans/spring-beans.xsd http://www.springframework.org/schema/context http://www.springframework.org/schema/context/spring-context.xsd">

    <!--开启注解,扫描包-->
    <context:component-scan base-package="com.itheima"></context:component-scan>

    <!--视图解析器-->
    <bean class="org.springframework.web.servlet.view.InternalResourceViewResolver">
        <property name="prefix" value="/WEB-INF/"></property>
        <property name="suffix" value=".jsp"></property>
    </bean>

	<!--mvc的注解驱动:加载了springmvc的映射器、处理器等等-->
    <mvc:annotation-driven></mvc:annotation-driven>
</beans>
3、web.xml配置
<!--配置servlet:前端控制器-->
  <servlet>
    <servlet-name>DispatcherServlet</servlet-name>
    <servlet-class>org.springframework.web.servlet.DispatcherServlet</servlet-class>
    <!--servlet中配置初始化参数,用于读取 SpringMVC 的配置文件-->
    <init-param>
      <param-name>contextConfigLocation</param-name>
      <param-value>classpath:spring-mvc.xml</param-value>
    </init-param>
    <!-- 配置 servlet 的对象的创建时间点:
    在启动tomcat时创建servlet对象,如果不创建 在第一次访问servlet时创建
			取值只能是非 0 正整数,表示启动顺序 -->
	<load-on-startup>1</load-on-startup>
  </servlet>
  <servlet-mapping>
    <servlet-name>DispatcherServlet</servlet-name>

<!--
      /  拦截所有的请求: 包括http请求, 静态资源请求:img,js ,css
      /*  拦截请求:不包含静态资源
      *.do , *.action : 拦截以 .do, .action结尾的请求, 默认拦截.action
    -->
    <url-pattern>/</url-pattern>
  </servlet-mapping>
4、自定义核心控制类
@Controller
public class TestController {

    @RequestMapping("/test")
    public void test(){
        System.out.println("helloWorld--测试成功");
    }

}
5、页面配置
<!-- 第一种访问方式 -->
<a href="${pageContext.request.contextPath}/test">请求1</a>
<!-- 第二种访问方式 -->
<a href="test">请求2</a>
在 jsp 中第二种写法时,不要在访问 URL 前面加/,否则无法找到资源。
五、入门案例的执行过程及原理分析
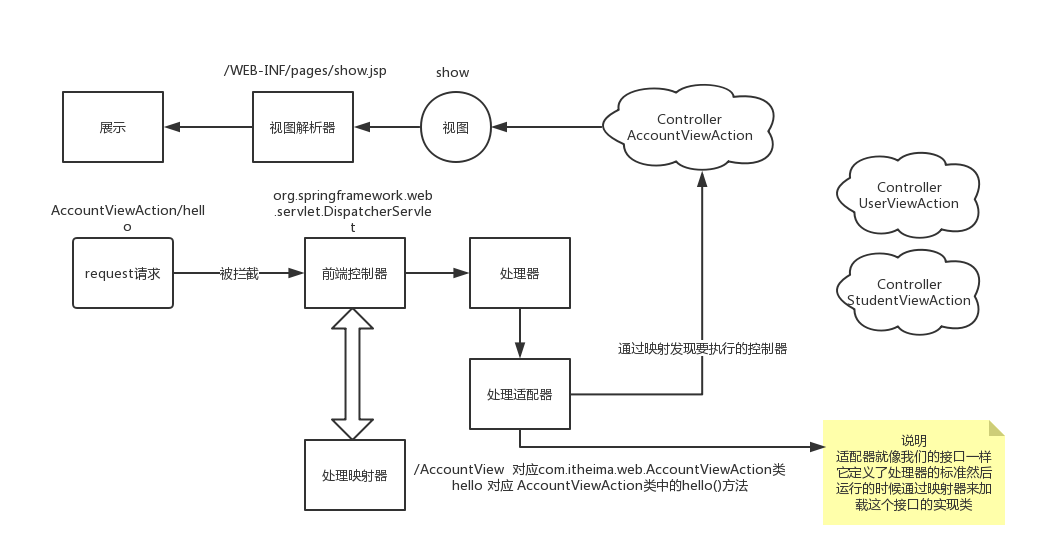
DispatcherServlet(前端控制器):
用户请求到达前端控制器,它就相当于 mvc 模式中的 c,dispatcherServlet 是整个流程控制的中心,由它调用其它组件处理用户的请求,dispatcherServlet 的存在降低了组件之间的耦合性。
HandlerMapping(处理器映射器):返回一个执行链
HandlerMapping 负责根据用户请求找到 Handler 即处理器,SpringMVC 提供了不同的映射器实现不同的映射方式,例如:配置文件方式,实现接口方式,注解方式等。
Handler(处理器):也是我们编写的controller
它就是我们开发中要编写的具体业务控制器。由 DispatcherServlet 把用户请求转发到 Handler。由Handler 对具体的用户请求进行处理。
HandlAdapter(处理器适配器):
HandlerAdapter 对处理器进行执行,通过扩展适配器可以对更多类型的处理器进行执行。
六、@RequestMapping注解(重点)
- @RequestMapping 请求路径映射,该注解可以标记在方法上,也可以标记在类上
类上:
   请求 URL 的第一级访问目录。此处不写的话,就相当于应用的根目录。
方法上:
	请求 URL 的第二级访问目录。

@RequestMapping("/account")
public class AccountController {

	@RequestMapping("/findAccount")
	public String findAccount() {}
}
- 属性
	path:指定请求路径,别名value,所以属性名可以省略
	method: 请求方式:
		get: 路径和超链接请求都是get请求
		post: 必须在表单中实现
	params:声明请求路径的规则 -- 了解
		"name":路径中必须有name
		"age>20":路径中必须有age>20
		"!name" :路径中不存在name

	@RequestMapping(value = "/hello",method = RequestMethod.POST,params = {"!name","age>20"})
    public String hello(){}
七、参数的绑定(重点)
- 表单中提交的name值与方法中的参数(简单类型)名称一致,就可以直接获取到
- 方法的参数:pojo类型
只要保证表单提交的name值与pojo的属性名一致,就可以封装数据
<form action="${pageContext.request.contextPath}/user/saveUser" method="post">
       用户名: <input type="text" name="username"> <br>

        list集合参数: <input type="text" name="list[0]">
                       <input type="text" name="list[1]"><br>

        一个角色对象:<input type="text" name="role.id">
                    <input type="text" name="role.roleName"><br>

        多个角色对象:<input type="text" name="roleList[0].id">
                    <input type="text" name="roleList[0].roleName">
                    <input type="text" name="roleList[1].id">
                    <input type="text" name="roleList[1].roleName">

        map集合:<input type="text" name="map[one]">
                <input type="text" name="map[two]">
                <input type="text" name="map[three]">

        <input type="submit" value="提交">
    </form>
- @RequestParam:请求参数绑定,name与参数名不一致
属性: value, name可以指定页面表单中的name值
requird: 是否必须的 , false :不必要的(可有可无);true:必须有该参数
defaultValue: 默认值,如果页面传参了,则使用页面传参的值,如果没有指定,则使用默认值
@RequestMapping("/testParam2")
public String testParam2(@RequestParam(value = "username",required = false,defaultValue = "rose") String name){
      System.out.println(name);
      return "show";
}
- 特殊情况:(自定义类型转换器)要转换类型是Date类型(了解)
/**
 *
 * 自定义类型转换器
 *      将字符串格式转换为日期格式
 *      1. 实现接口converter<S,T>
 *                S:源类型 -- String
 *                T:目标类型-- Date
 */
public class StringToDateConverter implements Converter<String ,Date>{
    /**
     * 类型转换方法
     * @param source  源
     * @return  目标
     */
    @Override
    public Date convert(String source) {
        //日期类型的转换对象
        SimpleDateFormat sdf = new SimpleDateFormat("yyyy/MM/dd");
        Date date = null;
        try {
            date = sdf.parse(source);
        } catch (ParseException e) {
            e.printStackTrace();
        }
        return date;
    }
}

在springmvc.xml文件中配置类型转换工厂
<!--类型转换工厂-->
    <bean id="conversionService" class="org.springframework.context.support.ConversionServiceFactoryBean">
        <property name="converters">
            <set>
                <bean class="com.itheima.converter.StringToDateConverter"></bean>
            </set>
        </property>
    </bean>

 在注解驱动中引入类型转换工厂
 <!--注解驱动: 关联类型转换工厂-->
<mvc:annotation-driven conversion-service="conversionService"></mvc:annotation-driven>
八、编码过滤器(重点)
web.xml
<!--编码过滤器-->
  <filter>
    <filter-name>CharactorEncoding</filter-name>
    <filter-class>org.springframework.web.filter.CharacterEncodingFilter</filter-class>
    <!--配置初始化参数,指定编码格式:拦截的是post请求-->
    <init-param>
      <param-name>encoding</param-name>
      <param-value>utf-8</param-value>
    </init-param>
    <!--
      指定请求编码格式和响应编码格式: 了解,一般不用指定
    -->
    <init-param>
      <param-name>forceEncoding</param-name>
      <param-value>true</param-value>
    </init-param>
  </filter>
  <filter-mapping>
    <filter-name>CharactorEncoding</filter-name>
    <!--拦截所有的请求:不包含静态资源的-->
    <url-pattern>/*</url-pattern>
  </filter-mapping>
