文章目录
- 一 : Apache简介
- 二 :编译安装httpd服务器
- 三:安装MySQL
- 3.1 步骤一样,先去解压源码包
- 3.2 然后安装环境包
- 3.3 环境包安装完毕,接下来就开始配置属性
- 3.4 make编译,会很久
- 3.5 接着make install
- 3.6依旧是配置主配置文件和脚本文件
- 3.7 初始化数据库
- 3.8 接下来配置脚本文件
- 3.9 配置完毕,可以开启服务,查看接口
- 四:安装PHP
- 4.1 安装依赖包,解压源码包
- 4.2 然后切换到源码包内去配置属性
- 4.3 然后make
- 4.4 make install
- 4.5 编译安装结束,开始配置主配置文件和启动脚本
- 4.6 接下来需要配置httpd的配置文件,使apache 支持php
- 4.7 新建一个php网页
- 4.8 注意:
- 五 :安装一个论坛体验一波
前言
- Apache网站服务
- MySQL服务
- LAMP架构应用实例
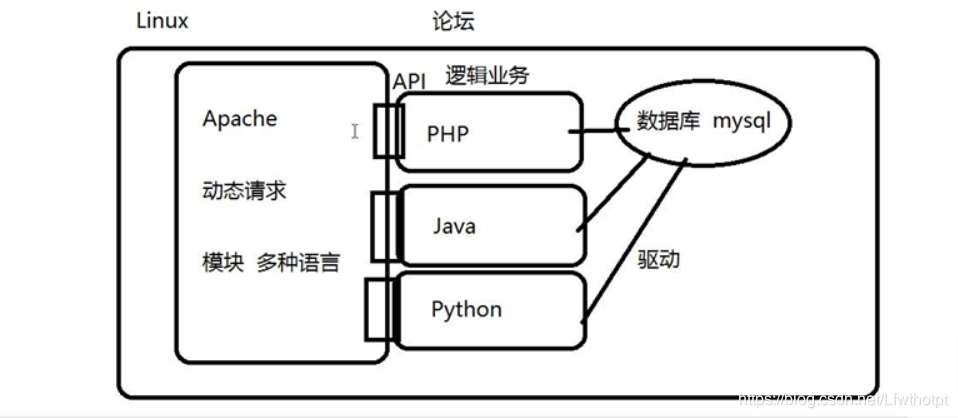
LAMP解释
linux apache mysql php/python
一 : Apache简介
1.1 Apache 起源
- 源于a patchy server, 著名的开源Web服务软件
- 1995年时,发布apache服务程序的1.0版本
- 有apache软件基金会(ASF)负责维护
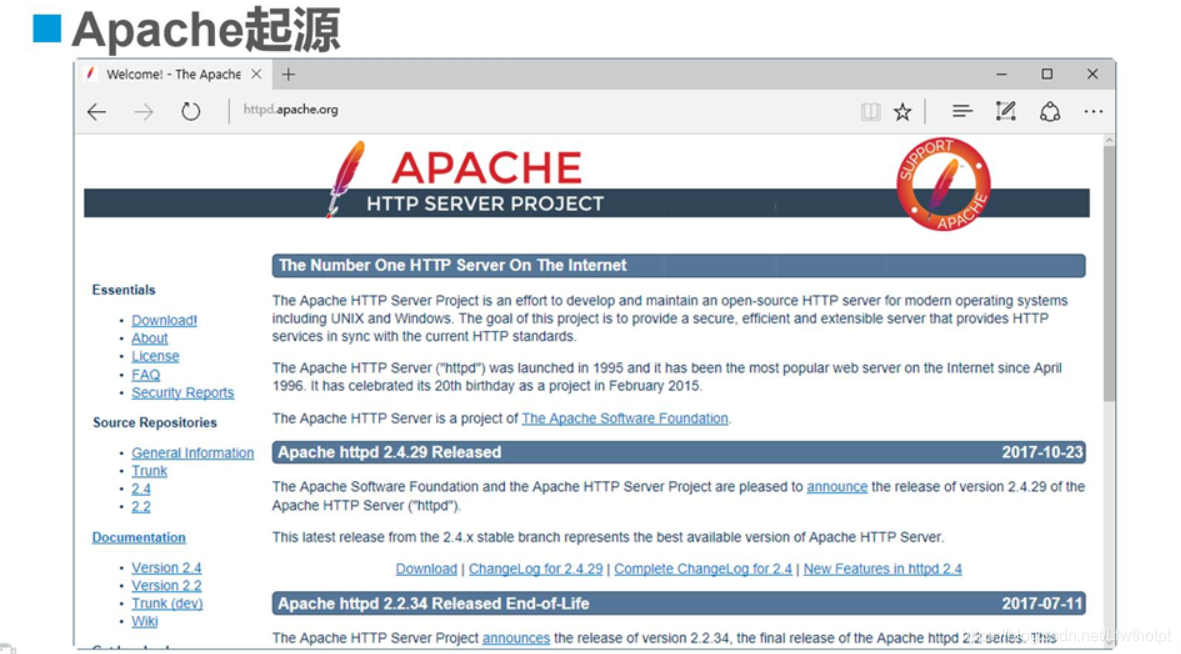
- 官方站点:http://httpd.apache.org/
1.2 apache 官方网页
1.3 apache 主要特点
- 开放源代码、跨平台应用
- 支持多种网页编程语言
- 模块化设计、运行稳定、良好的安全性
1.4 软件版本
- 1.X
- 目前最高版本的是1.3,运行稳定
- 向下兼容性较好,但缺乏一些较新的功能
- 2.X
- 目前最高版本是2.6
- 具有更多的功能特性
- 与1.X相比,配置管理风格存在较大差异
二 :编译安装httpd服务器
1.1 编译安装的优点
- 具有较大的自由度,功能可定制
- 可及时获得最新的软件版本
- 普遍适用于大多数Linux版本,便于移植使用
1.2 获得apache服务器的软件包
- 参考地址:http://httpd.apache.org/download.cgi
1.2 编译安装httpd步骤
1.2.1 准备工作
- 卸载httpd及相关依赖包————把环境清空
1.2.2 解压相关文件
- 挂载共享文件夹,使用mount.cifs,若是没有该命令,需要安装一个cifs-utils组件
[root@localhost ~]# cd /
[root@localhost /]# mkdir abc
[root@localhost /]# mount.cifs //192.168.254.10/linuxs /abc
Password for root@//192.168.254.10/linuxs:
[root@localhost /]# cd /abc
[root@localhost abc]# ls
apr-1.4.6.tar.gz           MAC 记录与端口扫描脚本.txt
apr-util-1.4.1.tar.gz      pxe.txt
dhcp.txt                   vsftpd添加虚拟用户脚本.TXT
extundelete-0.2.4.tar.bz2  修改网卡为静态IP地址.txt
httpd-2.4.2.tar.gz         开发系统监控脚本.txt
john-1.8.0.tar.gz          引导系统脚本.txt
LAMP-C7                    测试网段是否存活,测试存活网段的21端口.txt
LAMP-C7.rar                监控系统内存cpu磁盘容量1.0.txt
LAMP-php5.6.txt
[root@localhost abc]# cd LAMP-C7/
[root@localhost LAMP-C7]# ls
apr-1.6.2.tar.gz         httpd-2.4.29.tar.bz2  php-5.6.11.tar.bz2
apr-util-1.6.0.tar.gz    LAMP-php5.6.txt
Discuz_X2.5_SC_UTF8.zip  mysql-5.6.26.tar.gz
[root@localhost LAMP-C7]#
- 解压压缩包,apr* 是支持跨平台的组件
[root@localhost LAMP-C7]# tar xvjf httpd-2.4.29.tar.bz2 -C /opt
root@localhost LAMP-C7]# tar xvzf apr-util-1.6.0.tar.gz -C /opt
[root@localhost LAMP-C7]# tar xvzf apr-1.6.2.tar.gz -C /opt
[root@localhost LAMP-C7]# cd /opt
[root@localhost opt]# ls
apr-1.6.2  apr-util-1.6.0  httpd-2.4.29  rh
[root@localhost opt]# mv apr-1.6.2/ httpd-2.4.29/s
server/  srclib/  support/
[root@localhost opt]# mv apr-1.6.2/ httpd-2.4.29/srclib/apr
[root@localhost opt]# mv apr-util-1.6.0/ httpd-2.4.29/srclib/apr-util
[root@localhost opt]# ls
httpd-2.4.29  rh
[root@localhost opt]#
[root@localhost opt]# cd httpd-2.4.29/
[root@localhost httpd-2.4.29]# ls
ABOUT_APACHE     buildconf       httpd.dsp       libhttpd.mak   README.cmake
acinclude.m4     CHANGES         httpd.mak       LICENSE        README.platforms
Apache-apr2.dsw  CMakeLists.txt  httpd.spec      Makefile.in    ROADMAP
Apache.dsw       config.layout   include         Makefile.win   server
apache_probes.d  configure       INSTALL         modules        srclib
ap.d             configure.in    InstallBin.dsp  NOTICE         support
build            docs            LAYOUT          NWGNUmakefile  test
BuildAll.dsp     emacs-style     libhttpd.dep    os             VERSIONING
BuildBin.dsp     httpd.dep       libhttpd.dsp    README
- yum安装编译包,环境包,gcc、gcc-c++、make、pcre-devel、expat-devel、perl,安装过了就不用安了
[root@localhost yum.repos.d]# yum install gcc gcc-c++ pcre-devel pcre expat-devel.x86_64 make -y
Installed:
  expat-devel.x86_64 0:2.1.0-10.el7_3        gcc.x86_64 0:4.8.5-39.el7
  gcc-c++.x86_64 0:4.8.5-39.el7              pcre-devel.x86_64 0:8.32-17.el7

Dependency Installed:
  cpp.x86_64 0:4.8.5-39.el7            glibc-devel.x86_64 0:2.17-292.el7
  glibc-headers.x86_64 0:2.17-292.el7  kernel-headers.x86_64 0:3.10.0-1062.9.1.el7
  libmpc.x86_64 0:1.0.1-3.el7          libstdc++-devel.x86_64 0:4.8.5-39.el7

Updated:
  make.x86_64 1:3.82-24.el7

Dependency Updated:
  glibc.x86_64 0:2.17-292.el7            glibc-common.x86_64 0:2.17-292.el7
  libgcc.x86_64 0:4.8.5-39.el7           libgomp.x86_64 0:4.8.5-39.el7
  libstdc++.x86_64 0:4.8.5-39.el7

Complete!
- 在软件解压包目录下,去配置相关属性:
./configure \ 启用配置
–prefix=/usr/local/httpd \ 指定安装路径
–enable-so \ 核心模块功能开启
–enable-rewrite \ 开启重写功能,用于编辑防盗链等功能
–enable-charset-lite \ 开启字符集功能
–enable-cgi \ 开启识别不同的网关接口功能
[root@localhost httpd-2.4.29]# ./configure \
> --prefix=/usr/local/httpd \
> --enable-so \
> --enable-rewrite \
> --enable-charset-lite \
> --enable-cgi
configure: summary of build options:

    Server Version: 2.4.29
    Install prefix: /usr/local/httpd
    C compiler:     gcc -std=gnu99
    CFLAGS:          -g -O2 -pthread
    CPPFLAGS:        -DLINUX -D_REENTRANT -D_GNU_SOURCE
    LDFLAGS:
    LIBS:
    C preprocessor: gcc -E
[root@localhost httpd-2.4.29]#
然后make编译
[root@localhost httpd-2.4.29]# make
make          makedb        makedeltarpm  makedumpfile
[root@localhost httpd-2.4.29]# make
make[4]: Leaving directory `/opt/httpd-2.4.29/modules/mappers'
make[3]: Leaving directory `/opt/httpd-2.4.29/modules/mappers'
make[2]: Leaving directory `/opt/httpd-2.4.29/modules'
make[2]: Entering directory `/opt/httpd-2.4.29/support'
make[2]: Leaving directory `/opt/httpd-2.4.29/support'

make[1]: Leaving directory `/opt/httpd-2.4.29'
[root@localhost httpd-2.4.29]#
接着make install 安装
[root@localhost httpd-2.4.29]# make install
mkdir /usr/local/httpd/man
mkdir /usr/local/httpd/man/man1
mkdir /usr/local/httpd/man/man8
mkdir /usr/local/httpd/manual
make[1]: Leaving directory `/opt/httpd-2.4.29'
[root@localhost httpd-2.4.29]#
中间如果出现错错误,就需要重新查看错在哪里
此时已经安装好了,软件目录在/usr/local/httpd,
注意:手动编译安装的核心在配置两个文件,分别是主配置文件和启动脚本文件
先去配置脚本文件
[root@localhost httpd-2.4.29]# cd /usr/local/
[root@localhost local]# ls
bin  etc  games  httpd  include  lib  lib64  libexec  sbin  share  src
[root@localhost local]# cd httpd/
[root@localhost httpd]# ls
bin    cgi-bin  error   icons    lib   man     modules
build  conf     htdocs  include  logs  manual
[root@localhost httpd]# cd htdocs/
[root@localhost htdocs]# ls
index.html						'首页'
[root@localhost htdocs]# cd..
bash: cd..: command not found...
[root@localhost htdocs]# cd ..
[root@localhost httpd]# cd conf
[root@localhost conf]# ls
extra  httpd.conf  magic  mime.types  original			'有主配置文件'
[root@localhost conf]#
[root@localhost conf]# cd ..
[root@localhost httpd]# ls
bin    cgi-bin  error   icons    lib   man     modules
build  conf     htdocs  include  logs  manual
[root@localhost httpd]# cd bin/
[root@localhost bin]# ls
ab            apu-1-config  dbmmanage    fcgistarter   htdigest  httxt2dbm
apachectl     apxs          envvars      htcacheclean  htpasswd  logresolve
apr-1-config  checkgid      envvars-std  htdbm         httpd     rotatelogs
[root@localhost bin]#
- 开始配置脚本
[root@localhost bin]# cp /usr/local/httpd/bin/apachectl /etc/init.d/httpd
//把/usr/local/httpd/bin/aoachectl 文件 复制到/etc/init.d/下,更名为httpd
[root@localhost bin]# vim /etc/init.d/httpd
//编辑脚本文件,增加注释信息
#!/bin/sh
# chkconfig: 35 85 21				'增加 //35级别自动运行  第85个启动 第21个关闭'
# description: Apache is a World Wide Web server		'增加'
#
[root@localhost bin]# chkconfig --add httpd
//把脚本文件加入到service服务器中,让service去管理
[root@localhost bin]# chkconfig --level 35 httpd on
//这条命令是让httpd开启自启动,优先级别35,可设可不设
- 脚本配置完毕,接下来开始配置主配置文件
[root@localhost bin]# cd ..
[root@localhost httpd]# ls
bin    cgi-bin  error   icons    lib   man     modules
build  conf     htdocs  include  logs  manual
[root@localhost httpd]# cd conf/
[root@localhost conf]# pwd
/usr/local/httpd/conf
[root@localhost conf]# ln -s /usr/local/httpd/conf/httpd.conf /etc/httpd.conf
//新建配置文件软连接到到/etc/目录下,便于去找
[root@localhost conf]#
- 修改配置文件
[root@localhost conf]# vim /etc/httpd.conf
:set nu
 51 Listen 192.168.247.147:80
 52 #Listen 80
197 ServerName www.gsy.com:80
[root@localhost conf]# cd /usr/local/httpd/bin/
[root@localhost bin]# ls
ab            apu-1-config  dbmmanage    fcgistarter   htdigest  httxt2dbm
apachectl     apxs          envvars      htcacheclean  htpasswd  logresolve
apr-1-config  checkgid      envvars-std  htdbm         httpd     rotatelogs
[root@localhost bin]# ln -s /usr/local/httpd/bin/* /usr/local/bin/
//把安装目录/usr/local/httpd/bin/*中的脚本软连接到/usr/local/bin下,便于使用,可以制表符补全
[root@localhost bin]#
- 查询验证是否加入到/bin中
[root@localhost bin]# httpd -t
Syntax OK
[root@localhost bin]#
- 开启服务,关闭防火墙增强服务
[root@localhost bin]# service httpd start
[root@localhost bin]#
[root@localhost bin]# netstat -natp | grep 'httpd'
tcp        0      0 192.168.247.147:80      0.0.0.0:*               LISTEN      16643/httpd
[root@localhost bin]#
[root@localhost bin]# systemctl stop firewalld.service
[root@localhost bin]# setenforce 0

- 可以修改首页信息
[root@localhost bin]# cd /usr/local/
[root@localhost local]# ls
bin  etc  games  httpd  include  lib  lib64  libexec  sbin  share  src
[root@localhost local]# cd httpd/
[root@localhost httpd]# ls
bin    cgi-bin  error   icons    lib   man     modules
build  conf     htdocs  include  logs  manual
[root@localhost httpd]# cd htdocs/
[root@localhost htdocs]# ls
index.html
[root@localhost htdocs]# cat index.html
<html><body><h1>It works!</h1></body></html>
[root@localhost htdocs]# vim index.html
[root@localhost htdocs]# cat index.html
<html><body><h1>从萌新到小白</h1></body></html>
[root@localhost htdocs]#
显示结果如下,因为没有使用utf-8 字符集

三:安装MySQL
3.1 步骤一样,先去解压源码包
[root@localhost LAMP-C7]# tar zxvf mysql-5.6.26.tar.gz -C /opt
3.2 然后安装环境包
[root@localhost LAMP-C7]# yum install -y ncurses-devel autoconf cmake
已安装:
  ncurses-devel.x86_64 0:5.9-14.20130511.el7_4

作为依赖被升级:
  ncurses.x86_64 0:5.9-14.20130511.el7_4
  ncurses-base.noarch 0:5.9-14.20130511.el7_4
  ncurses-libs.x86_64 0:5.9-14.20130511.el7_4
已安装:
  autoconf.noarch 0:2.69-11.el7              cmake.x86_64 0:2.8.12.2-2.el7

作为依赖被安装:
  m4.x86_64 0:1.4.16-10.el7            perl-Data-Dumper.x86_64 0:2.145-3.el7

完毕!
3.3 环境包安装完毕,接下来就开始配置属性
切换到源码包内可以发现到里面并没有configure脚本,有一个cmake脚本,这也就是为什么需要安装cmake环境包
[root@localhost LAMP-C7]# cd /opt/mysql-5.6.26/
[root@localhost mysql-5.6.26]# ls
BUILD            dbug                 libmysqld    regex          unittest
BUILD-CMAKE      Docs                 libservices  scripts        VERSION
client           Doxyfile-perfschema  man          sql            vio
cmake            extra                mysql-test   sql-bench      win
CMakeLists.txt   include              mysys        sql-common     zlib
cmd-line-utils   INSTALL-SOURCE       mysys_ssl    storage
config.h.cmake   INSTALL-WIN-SOURCE   packaging    strings
configure.cmake  libevent             plugin       support-files
COPYING          libmysql             README       tests
[root@localhost mysql-5.6.26]# cmake  -DCMAKE_INSTALL_PREFIX=/usr/local/mysql -DDEFAULT_CHARSET=utf8 -DDEFAULT_COLLATION=utf8_general_ci -DEXTRA_CHARSETS=all -DSYSCONFIDIR=/etc -DMYSQL_DATADIR=/home/mysql/ -DMYSQL_UNIX_ADDR=/home/mysql/mysql.sock
3.4 make编译,会很久
[root@localhost mysql-5.6.26]# make
Scanning dependencies of target my_safe_process
[100%] Building CXX object mysql-test/lib/My/SafeProcess/CMakeFiles/my_safe_process.dir/safe_process.cc.o
Linking CXX executable my_safe_process
[100%] Built target my_safe_process
3.5 接着make install
[root@localhost mysql-5.6.26]# make install
-- Installing: /usr/local/mysql/sql-bench/innotest2
-- Installing: /usr/local/mysql/sql-bench/test-wisconsin
-- Installing: /usr/local/mysql/sql-bench/compare-results
-- Installing: /usr/local/mysql/sql-bench/bench-init.pl
3.6依旧是配置主配置文件和脚本文件
[root@localhost mysql-5.6.26]# cp /usr/local/mysql/support-files/my-default.cnf /etc/my.cnf
cp:是否覆盖"/etc/my.cnf"? y
[root@localhost mysql-5.6.26]# cp /usr/local/mysql/support-files/mysql.server /etc/init.d/mysqld
[root@localhost mysql-5.6.26]# chmod 755 /etc/init.d/mysqld
[root@localhost mysql-5.6.26]# chkconfig --add /etc/init.d/mysqld
[root@localhost mysql-5.6.26]# chkconfig --level 35 mysqld on
[root@localhost mysql-5.6.26]# cd /usr/local/mysql
[root@localhost mysql]# ls
bin      data  include         lib  mysql-test  scripts  sql-bench
COPYING  docs  INSTALL-BINARY  man  README      share    support-files
[root@localhost mysql]# ln -s bin/* /usr/local/bin/
//若是使用软连接方式到/usr/bin/下验证无效,就用第二种追加定义环境变量的方式
echo "PATH=$PATH:/usr/local/mysql/bin" >> /etc/profile
source /etc/profile
echo $PATH
[root@localhost mysql]# useradd -s /sbin/nologin mysql
[root@localhost mysql]# chown -R mysql.mysql /usr/local/mysql/
3.7 初始化数据库
[root@localhost mysql]# /usr/local/mysql/scripts/mysql_install_db --user=mysql --ldata=/var/lib/mysql --basedir=/usr/local/mysql --datadir=/home/mysql
New default config file was created as /usr/local/mysql/my.cnf and
will be used by default by the server when you start it.
You may edit this file to change server settings

WARNING: Default config file /etc/my.cnf exists on the system
This file will be read by default by the MySQL server
If you do not want to use this, either remove it, or use the
--defaults-file argument to mysqld_safe when starting the server
3.8 接下来配置脚本文件
[root@localhost lib]# vim /etc/init.d/mysqld
45 basedir=/usr/local/mysql
 46 datadir=/home/mysql
3.9 配置完毕,可以开启服务,查看接口
[root@localhost lib]# service mysqld start
Starting MySQL SUCCESS!
[root@localhost lib]# netstat -natp | grep 3306
tcp6       0      0 :::3306                 :::*                    LISTEN      54080/mysqld
[root@localhost lib]#
四:安装PHP
4.1 安装依赖包,解压源码包
[root@localhost lib]# yum -y install gd libpng libpng-devel pcre pcre-devel libxml2-devel libjpeg-devel
[root@localhost LAMP-C7]# tar xjvf php-5.6.11.tar.bz2 -C /opt
4.2 然后切换到源码包内去配置属性
[root@localhost LAMP-C7]# cd /opt/php-5.6.11/
[root@localhost php-5.6.11]# ls
configure         pear                          sapi
里面是configure脚本文件
[root@localhost php-5.6.11]# ./configure --prefix=/usr/local/php5 --with-gd --with-zlib --with-apxs2=/usr/local/httpd/bin/apxs --with-mysql=/usr/local/mysql --with-config-file-path=/usr/local/php5 --enable-mbstring
Thank you for using PHP.

config.status: creating php5.spec
config.status: creating main/build-defs.h
config.status: creating scripts/phpize
config.status: creating scripts/man1/phpize.1
config.status: creating scripts/php-config
config.status: creating scripts/man1/php-config.1
config.status: creating sapi/cli/php.1
config.status: creating sapi/cgi/php-cgi.1
config.status: creating ext/phar/phar.1
config.status: creating ext/phar/phar.phar.1
config.status: creating main/php_config.h
config.status: executing default commands
4.3 然后make
[root@localhost php-5.6.11]# make
Build complete.
Don't forget to run 'make test'.
4.4 make install
[root@localhost php-5.6.11]# make install
Wrote PEAR system config file at: /usr/local/php5/etc/pear.conf
You may want to add: /usr/local/php5/lib/php to your php.ini include_path
/opt/php-5.6.11/build/shtool install -c ext/phar/phar.phar /usr/local/php5/bin
ln -s -f phar.phar /usr/local/php5/bin/phar
Installing PDO headers:          /usr/local/php5/include/php/ext/pdo/
4.5 编译安装结束,开始配置主配置文件和启动脚本
主配置文件此时安装目录内没有,需要从源码包内复制一份过去
[root@localhost php-5.6.11]# cp php.ini-development /usr/local/php5/php.ini
[root@localhost php-5.6.11]# ln -s /usr/local/php5/bin/* /usr/local/bin/
4.6 接下来需要配置httpd的配置文件,使apache 支持php
[root@localhost php-5.6.11]# vim /etc/httpd.conf
256     DirectoryIndex index.html index.php
394     AddType application/x-httpd-php .php
395     AddType application/x-httpd-php-source .phps
html网页

4.7 新建一个php网页
[root@localhost php-5.6.11]# cd /usr/local/httpd/htdocs/
[root@localhost htdocs]# ls -l
总用量 4
-rw-r--r--. 1 root root 45 6月 12 2007 index.html
[root@localhost htdocs]# cp index.html index.php
[root@localhost htdocs]# vim index.php
[root@localhost htdocs]# cat index.php
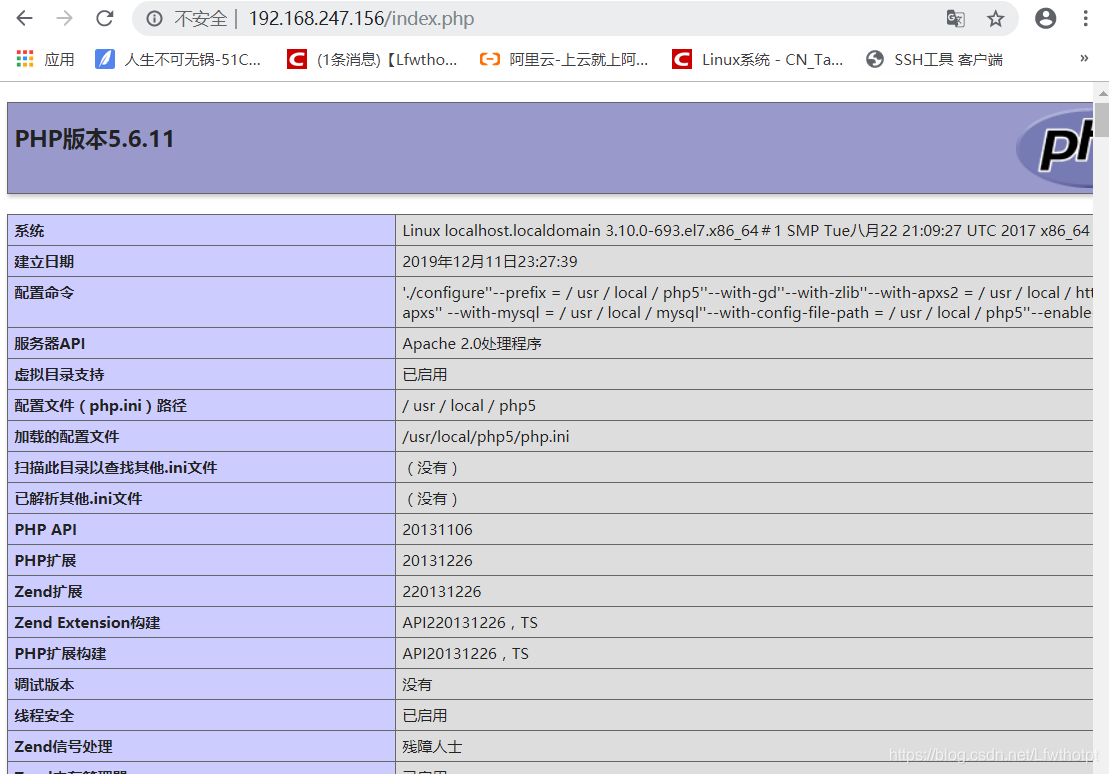
<?php
phpinfo();
?>
[root@localhost htdocs]#
[root@localhost htdocs]# service httpd restart
[root@localhost htdocs]# service mysqld restart
Shutting down MySQL.. SUCCESS!
Starting MySQL. SUCCESS!
4.8 注意:
若是没有下面这一行,php需要重新安装
[root@localhost htdocs]# vim /etc/httpd.conf
156 LoadModule php5_module        modules/libphp5.so
五 :安装一个论坛体验一波
5.1 创建mysql管理员
[root@localhost /]# mysqladmin -uroot -p password "abc123"
Enter password:
Warning: Using a password on the command line interface can be insecure.
[root@localhost /]#
5.2 设置bbs数据库
[root@localhost /]# mysql -uroot -p
Enter password:
Welcome to the MySQL monitor.  Commands end with ; or \g.
Your MySQL connection id is 3
Server version: 5.6.26 Source distribution

Copyright (c) 2000, 2015, Oracle and/or its affiliates. All rights reserved.

Oracle is a registered trademark of Oracle Corporation and/or its
affiliates. Other names may be trademarks of their respective
owners.

Type 'help;' or '\h' for help. Type '\c' to clear the current input statement.

mysql> show databases
    -> ;
+--------------------+
| Database           |
+--------------------+
| information_schema |
| mysql              |
| performance_schema |
| test               |
+--------------------+
4 rows in set (0.01 sec)

mysql> create database bbs
    -> ;
Query OK, 1 row affected (0.00 sec)

mysql> use bbs;
Database changed
mysql> show tables
    -> ;
Empty set (0.00 sec)

mysql> show databases
    -> ;
+--------------------+
| Database           |
+--------------------+
| information_schema |
| bbs                |
| mysql              |
| performance_schema |
| test               |
+--------------------+
5 rows in set (0.00 sec)

mysql> grant all on bbs.* to 'bbsuser'@'%' identified by 'admin123';
Query OK, 0 rows affected (0.01 sec)

mysql> flush privileges;
Query OK, 0 rows affected (0.01 sec)

mysql> exit
Bye
安装论坛中
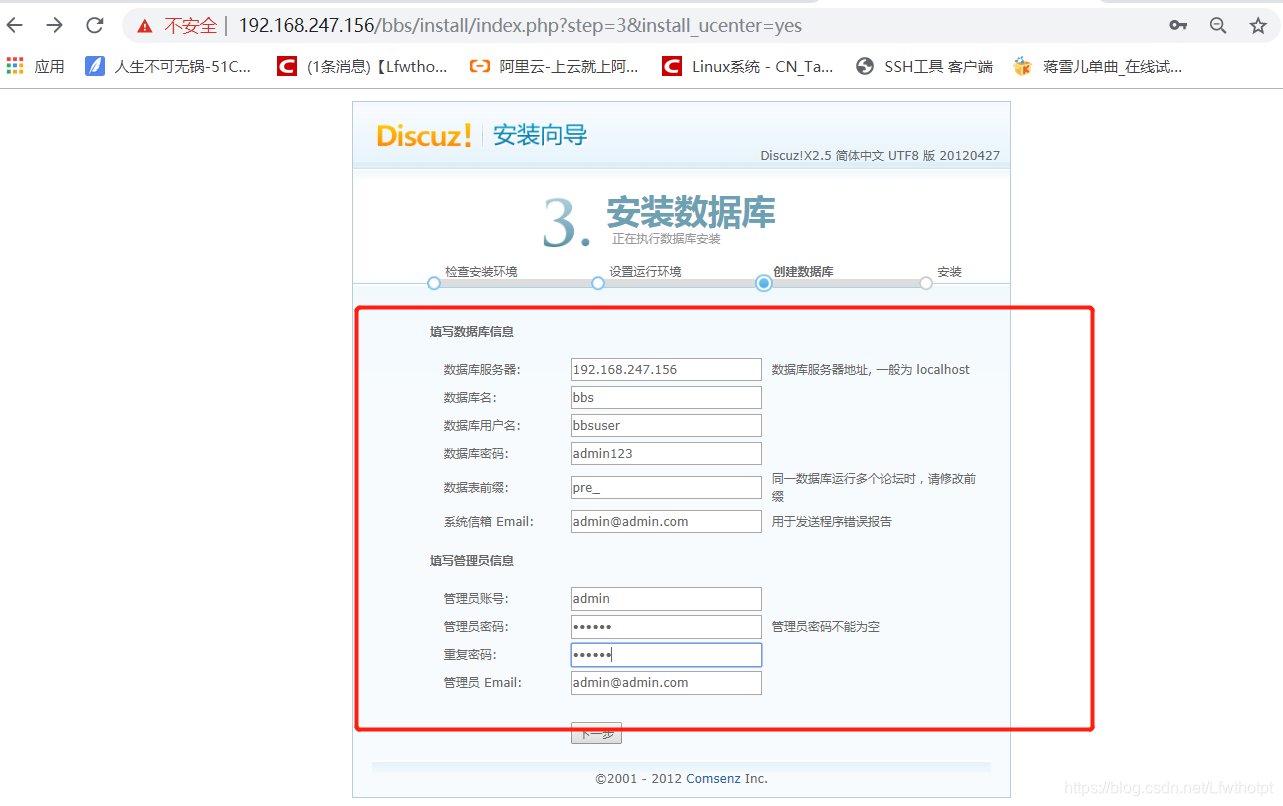
bbs 数据库 授权给bbsuser用户 @ % 百分号代表所有终端 flush 刷新数据库
5.4 解压bbs软件包
[root@localhost LAMP-C7]# unzip Discuz_X2.5_SC_UTF8.zip -d /opt
Archive:  Discuz_X2.5_SC_UTF8.zip
[root@localhost LAMP-C7]# cd /opt
[root@localhost opt]# ls
httpd-2.4.29  mysql-5.6.26  php-5.6.11  readme  rh  upload  utility
[root@localhost opt]# cp -r upload /usr/local/httpd/htdocs/bbs
[root@localhost opt]# cd /usr/local/httpd/htdocs/bbs/
[root@localhost bbs]# ls
admin.php  connect.php      forum.php  member.php  search.php  uc_server
api        cp.php           group.php  misc.php    source      userapp.php
api.php    crossdomain.xml  home.php   plugin.php  static
archiver   data             index.php  portal.php  template
config     favicon.ico      install    robots.txt  uc_client
[root@localhost bbs]# chown -R daemon ./config
[root@localhost bbs]# chown -R daemon ./data
[root@localhost bbs]# chown -R daemon ./uc_client
[root@localhost bbs]# chown -R daemon ./uc_server/data
t@localhost bbs]# service httpd restart
5.5 在线安装bbs
5.5.1 点我同意
5.5.2 最下面,点击下一步
5.5.3 全新安装,点击下一步
5.5.4 按照最开始的配置去设置,下面的管理员密码是新创建的,得记牢
5.5.5 出现这个界面就重新输入地址进入首页

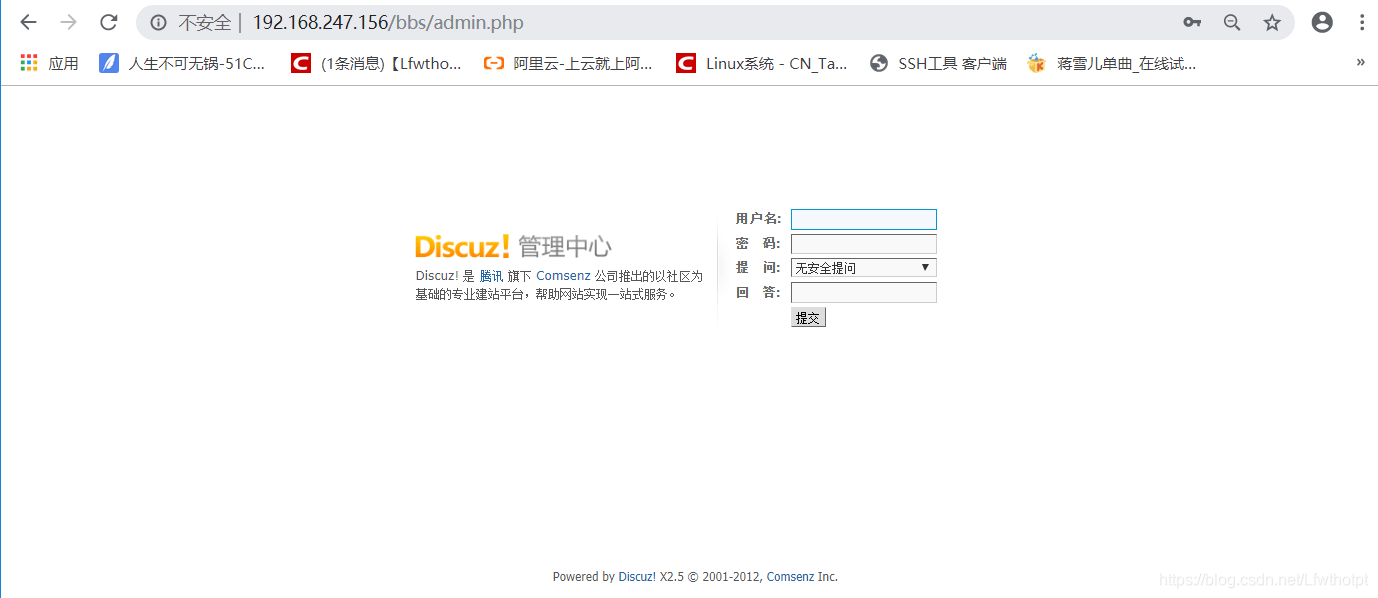
5.5.6 在服务器地址后面加/bbs/admin.php会到后台管理员登陆界面