[TOC]
前言:
LVM是逻辑卷管理的简称,它是Linux环境下对磁盘分区管理的一种机制,实现文件系统跨越不同磁盘和分区,工作原理是将若干个磁盘分区连接成一个整块卷组,在卷组上随意创建逻辑卷组,最后在逻辑卷组上创建文件系统,管理员可以动态调整逻辑卷的大小,不会丢失现有的数据,通过创建LVM可以对磁盘进行动态管理。
一:LVM(逻辑卷)概述
1.1 Logical Volume Manager,逻辑卷管理
-
动态调整磁盘容量,从而提高磁盘管理的灵活性
-
/boot(系统内核)分区用于存放引导文件,不能基于LVM创建
-
图形界面管理工具
system-config-lvm(用的少)
逻辑卷管理是动态磁盘管理
逻辑卷有灵活性,可以自由扩容,相当于windows中的跨区卷
逻辑卷的缺点:不可靠,读写性能一般
1.2 LVM机制的基本概念
- PV(物理卷)文件类型8e格式
-
VG(卷组)
- LV(逻辑卷)
一个PE是4M,多个PE组成物理卷(PV);
多个物理卷(PV)组成卷组(VG);
对卷组(VG)进行划分,就是建立逻辑分区(LV)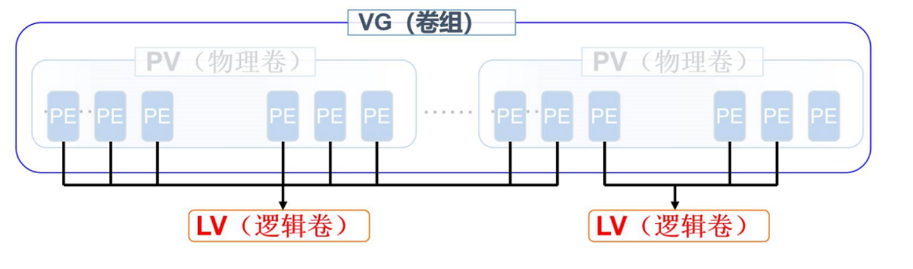
二:LVM的管理命令
2.1 主要命令
| 功能 | 物理卷管理 | 卷组管理 | 逻辑卷管理 |
|---|---|---|---|
| Scan 扫描设备 | pvscan | vgscan | lvscan |
| Create 建立 | pvcreate | vgcreate | lvcreate |
| Display 显示详细信息 | pvdisplay | vgdispaly | lvdispaly |
| Remove 删除 | pvremove | vgremove | lvremove |
| Extend 扩展 | ———— | vgextend | lvextend |
| Reduce 减少 | ———— | vgreduce | lvreduce |
pvcreate 设备名(磁盘) 【设备名2 ... ...】
vgcreate 卷组名 物理卷名1 物理卷名2
lvcreate -L 容量大小 -n 逻辑卷名 卷组名
lvextend -l +大小 /dev/卷组名/逻辑卷名
t换格式,转换成8e格式,就是物理卷格式
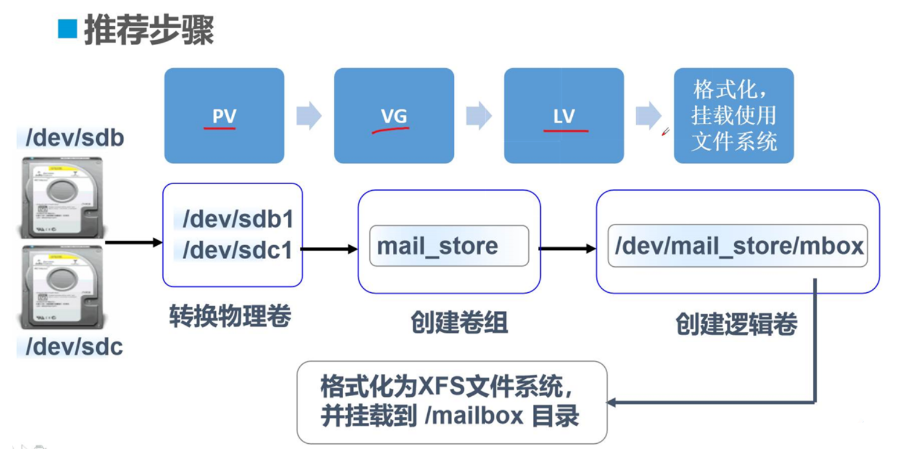
三:LVM应用实例
案例环境
公司准备在Internet中搭建邮件服务器(CentOS7.3系统平台),面向全国各地的员工及部分VIP客户提供电子邮箱空间
需求描述
由于用户数量众多,邮件存储需要大量的空间,考虑到动态扩容的需要,计划增加两块SCSI硬盘并构建LVM逻辑卷(挂载“mailbox”目录下)专门用于存放邮件数据
先加磁盘dev/sdb,dev/sdc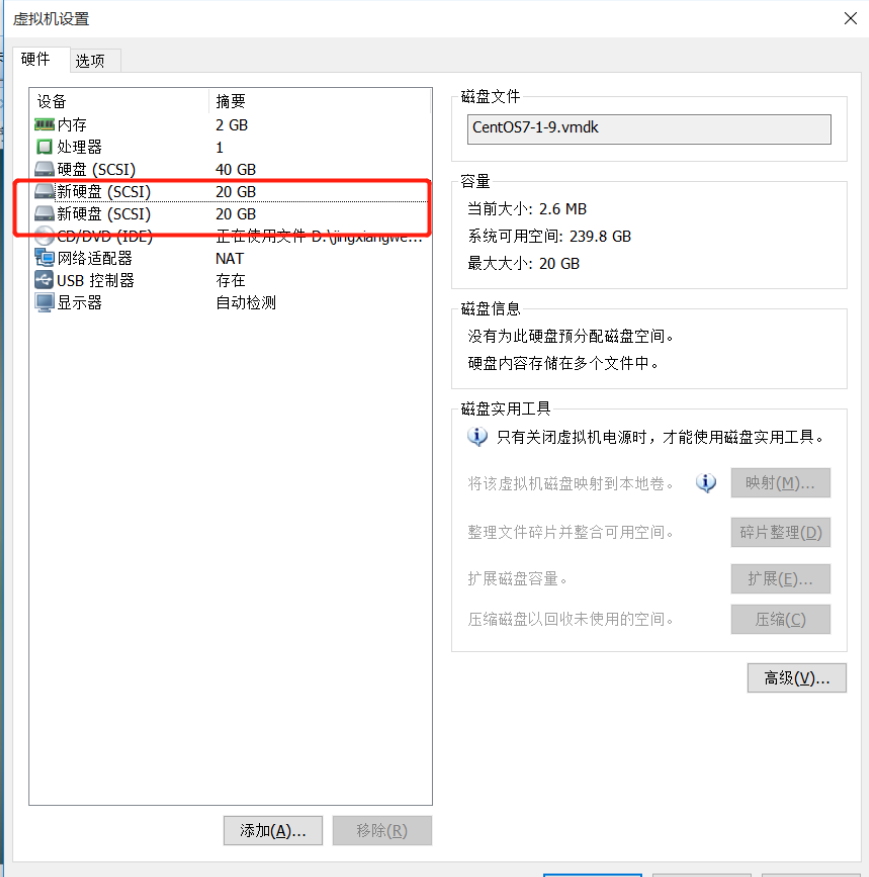
重启系统以识别新加的磁盘
[root@localhost ~]# init 6
[root@localhost dev]# ls    #重启后查看/dev/,sdb和sdc已添加
agpgart          input               sda1      tty2   tty45  uhid
autofs           kmsg                sda2      tty20  tty46  uinput
block            log                 sdb       tty21  tty47  urandom
bsg              loop-control        sdc       tty22  tty48  usbmon0
btrfs-control    lp0                 sg0       tty23  tty49  usbmon1
bus              lp1                 sg1       tty24  tty5   usbmon2
cdrom            lp2                 sg2       tty25  tty50  vcs
centos           lp3                 sg3       tty26  tty51  vcs1
char             mapper              shm       tty27  tty52  vcs2
console          mcelog              snapshot  tty28  tty53  vcs3
core             mem                 snd       tty29  tty54  vcs4
cpu              mqueue              sr0       tty3   tty55  vcs5
cpu_dma_latency  net                 stderr    tty30  tty56  vcs6
crash            network_latency     stdin     tty31  tty57  vcsa
disk             network_throughput  stdout    tty32  tty58  vcsa1
dm-0             null                tty       tty33  tty59  vcsa2
dm-1             nvram               tty0      tty34  tty6   vcsa3
dm-2             oldmem              tty1      tty35  tty60  vcsa4
dri              port                tty10     tty36  tty61  vcsa5
fb0              ppp                 tty11     tty37  tty62  vcsa6
fd               ptmx                tty12     tty38  tty63  vfio
full             pts                 tty13     tty39  tty7   vga_arbiter
fuse             random              tty14     tty4   tty8   vhci
hidraw0          raw                 tty15     tty40  tty9   vhost-net
hpet             rfkill              tty16     tty41  ttyS0  vmci
hugepages        rtc                 tty17     tty42  ttyS1  vsock
hwrng            rtc0                tty18     tty43  ttyS2  zero
initctl          sda                 tty19     tty44  ttyS3
fdisk配置磁盘创建分区,用t 转换格式成8e变成pv物理卷
[root@localhost dev]# fdisk /dev/sdb        #给/dev/sdb创建分区
欢迎使用 fdisk (util-linux 2.23.2)。

更改将停留在内存中,直到您决定将更改写入磁盘。
使用写入命令前请三思。

Device does not contain a recognized partition table
使用磁盘标识符 0x76bc7491 创建新的 DOS 磁盘标签。

命令(输入 m 获取帮助):n
Partition type:
   p   primary (0 primary, 0 extended, 4 free)
   e   extended
Select (default p):
Using default response p
分区号 (1-4,默认 1):
起始 扇区 (2048-41943039,默认为 2048):
将使用默认值 2048
Last 扇区, +扇区 or +size{K,M,G} (2048-41943039,默认为 41943039):
将使用默认值 41943039
分区 1 已设置为 Linux 类型,大小设为 20 GiB

命令(输入 m 获取帮助):t     #更改格式
已选择分区 1
Hex 代码(输入 L 列出所有代码):
Hex 代码(输入 L 列出所有代码):8e      #LVM格式为8e
已将分区“Linux”的类型更改为“Linux LVM”

命令(输入 m 获取帮助):w
The partition table has been altered!

Calling ioctl() to re-read partition table.
正在同步磁盘。
[root@localhost dev]# fdisk /dev/sdc    #给dev/sdc磁盘创建分区
欢迎使用 fdisk (util-linux 2.23.2)。

更改将停留在内存中,直到您决定将更改写入磁盘。
使用写入命令前请三思。

Device does not contain a recognized partition table
使用磁盘标识符 0x3bdb9041 创建新的 DOS 磁盘标签。

命令(输入 m 获取帮助):n
Partition type:
   p   primary (0 primary, 0 extended, 4 free)
   e   extended
Select (default p):
Using default response p
分区号 (1-4,默认 1):
起始 扇区 (2048-41943039,默认为 2048):
将使用默认值 2048
Last 扇区, +扇区 or +size{K,M,G} (2048-41943039,默认为 41943039):
将使用默认值 41943039
分区 1 已设置为 Linux 类型,大小设为 20 GiB

命令(输入 m 获取帮助):t
已选择分区 1
Hex 代码(输入 L 列出所有代码):8e  #格式转换为LVM
已将分区“Linux”的类型更改为“Linux LVM”

命令(输入 m 获取帮助):w
The partition table has been altered!

Calling ioctl() to re-read partition table.
正在同步磁盘。
命令(输入 m 获取帮助):p     #可以再fdisk /dev/sdc中去查看

磁盘 /dev/sdc:21.5 GB, 21474836480 字节,41943040 个扇区
Units = 扇区 of 1 * 512 = 512 bytes
扇区大小(逻辑/物理):512 字节 / 512 字节
I/O 大小(最小/最佳):512 字节 / 512 字节
磁盘标签类型:dos
磁盘标识符:0x3bdb9041

   设备 Boot      Start         End      Blocks   Id  System
/dev/sdc1            2048    41943039    20970496   8e  Linux LVM
两块磁盘分区完毕,接下来创建LVM逻辑卷
[root@localhost dev]# pvcreate /dev/sd[b-c]1    #把两块磁盘创建为pv物理卷
  Physical volume "/dev/sdb1" successfully created.
  Physical volume "/dev/sdc1" successfully created.
[root@localhost dev]# vgcreate mailbox /dev/sd[b-c]1    #创建名叫mailbox的vg卷组,目标pv物理卷是sdb1和sdc1
  Volume group "mailbox" successfully created
[root@localhost dev]# lvcreate -L 25G -n mailbox mailbox    #创建容量25G、名叫mailbox的lv逻辑卷,目标vg卷组是mailbox
  Logical volume "mailbox" created
可以用display去查看pv、vg、lv的详细信息
[root@localhost dev]# mkdir /mailbox #创建挂载点/mailbox
给逻辑卷格式化
[root@localhost dev]# mkfs.xfs /dev/mailbox/mailbox #将/dev下的mialbox卷组内的mailbox逻辑卷格式化
meta-data=/dev/mailbox/mailbox   isize=512    agcount=4, agsize=1638400 blks
         =                       sectsz=512   attr=2, projid32bit=1
         =                       crc=1        finobt=0, sparse=0
data     =                       bsize=4096   blocks=6553600, imaxpct=25
         =                       sunit=0      swidth=0 blks
naming   =version 2              bsize=4096   ascii-ci=0 ftype=1
log      =internal log           bsize=4096   blocks=3200, version=2
         =                       sectsz=512   sunit=0 blks, lazy-count=1
realtime =none                   extsz=4096   blocks=0, rtextents=0
现在可以进行挂载
[root@localhost dev]# mount /dev/mailbox/mailbox /mailbox   #手动挂载
[root@localhost mailbox]# df -Th        #查看已挂载
文件系统                    类型      容量  已用  可用 已用% 挂载点
/dev/mapper/centos-root     xfs        20G  3.3G   17G   17% /
devtmpfs                    devtmpfs  977M     0  977M    0% /dev
tmpfs                       tmpfs     993M     0  993M    0% /dev/shm
tmpfs                       tmpfs     993M  9.1M  984M    1% /run
tmpfs                       tmpfs     993M     0  993M    0% /sys/fs/cgroup
/dev/sda1                   xfs       6.0G  161M  5.9G    3% /boot
/dev/mapper/centos-home     xfs        10G   50M   10G    1% /home
tmpfs                       tmpfs     199M   12K  199M    1% /run/user/42
tmpfs                       tmpfs     199M     0  199M    0% /run/user/0
/dev/mapper/mailbox-mailbox xfs        25G   33M   25G    1% /mailbox
还可以使用修改配置文件/dev/fstab挂载
[root@localhost mailbox]# umount /mailbox   #先取消之前的手动挂载
[root@localhost mailbox]# vim /etc/fstab    #vim编辑/etc/fstab配置问价

#
# /etc/fstab
# Created by anaconda on Wed Oct 23 13:35:20 2019
#
# Accessible filesystems, by reference, are maintained under '/dev/disk'
# See man pages fstab(5), findfs(8), mount(8) and/or blkid(8) for more info
#
/dev/mapper/centos-root /                       xfs     defaults        0 0
UUID=bef26af3-cd25-4754-bbc6-abd7fb09ef45 /boot                   xfs     defaults        0 0
/dev/mapper/centos-home /home                   xfs     defaults        0 0
/dev/mapper/centos-swap swap                    swap    defaults        0 0
/dev/mailbox/mailbox    /mailbox        xfs     defaults        0       0
:wq保存
[root@localhost mailbox]# mount -a  #重新挂载
[root@localhost mailbox]# df -Th    #查看挂载信息
文件系统                    类型      容量  已用  可用 已用% 挂载点
/dev/mapper/centos-root     xfs        20G  3.3G   17G   17% /
devtmpfs                    devtmpfs  977M     0  977M    0% /dev
tmpfs                       tmpfs     993M     0  993M    0% /dev/shm
tmpfs                       tmpfs     993M  9.1M  984M    1% /run
tmpfs                       tmpfs     993M     0  993M    0% /sys/fs/cgroup
/dev/sda1                   xfs       6.0G  161M  5.9G    3% /boot
/dev/mapper/centos-home     xfs        10G   50M   10G    1% /home
tmpfs                       tmpfs     199M   12K  199M    1% /run/user/42
tmpfs                       tmpfs     199M     0  199M    0% /run/user/0
/dev/mapper/mailbox-mailbox xfs        25G   33M   25G    1% /mailbox   已自动挂载
进行扩容配置
[root@localhost mailbox]# lvextend -L +2G /dev/mailbox/mailbox  #给mailbox增加2G容量
  Size of logical volume mailbox/mailbox changed from 25.00 GiB (6400 extents) to 27.00 GiB (6912 extents).
  Logical volume mailbox/mailbox successfully resized.  #显示成功
[root@localhost mailbox]# df -Th    #查看
文件系统                    类型      容量  已用  可用 已用% 挂载点
/dev/mapper/centos-root     xfs        20G  3.3G   17G   17% /
devtmpfs                    devtmpfs  977M     0  977M    0% /dev
tmpfs                       tmpfs     993M     0  993M    0% /dev/shm
tmpfs                       tmpfs     993M  9.1M  984M    1% /run
tmpfs                       tmpfs     993M     0  993M    0% /sys/fs/cgroup
/dev/sda1                   xfs       6.0G  161M  5.9G    3% /boot
/dev/mapper/centos-home     xfs        10G   50M   10G    1% /home
tmpfs                       tmpfs     199M   12K  199M    1% /run/user/42
tmpfs                       tmpfs     199M     0  199M    0% /run/user/0
/dev/mapper/mailbox-mailbox xfs        25G   33M   25G    1% /mailbox   #发现没有增加
需要用xfs_growfs 命令去更新配置
[root@localhost mailbox]# xfs_growfs /dev/mailbox/mailbox   #更新mailbox配置
meta-data=/dev/mapper/mailbox-mailbox isize=512    agcount=4, agsize=1638400 blks
         =                       sectsz=512   attr=2, projid32bit=1
         =                       crc=1        finobt=0 spinodes=0
data     =                       bsize=4096   blocks=6553600, imaxpct=25
         =                       sunit=0      swidth=0 blks
naming   =version 2              bsize=4096   ascii-ci=0 ftype=1
log      =internal               bsize=4096   blocks=3200, version=2
         =                       sectsz=512   sunit=0 blks, lazy-count=1
realtime =none                   extsz=4096   blocks=0, rtextents=0
data blocks changed from 6553600 to 7077888
[root@localhost mailbox]# df -Th    #查看挂载
文件系统                    类型      容量  已用  可用 已用% 挂载点
/dev/mapper/centos-root     xfs        20G  3.3G   17G   17% /
devtmpfs                    devtmpfs  977M     0  977M    0% /dev
tmpfs                       tmpfs     993M     0  993M    0% /dev/shm
tmpfs                       tmpfs     993M  9.1M  984M    1% /run
tmpfs                       tmpfs     993M     0  993M    0% /sys/fs/cgroup
/dev/sda1                   xfs       6.0G  161M  5.9G    3% /boot
/dev/mapper/centos-home     xfs        10G   50M   10G    1% /home
tmpfs                       tmpfs     199M   12K  199M    1% /run/user/42
tmpfs                       tmpfs     199M     0  199M    0% /run/user/0
/dev/mapper/mailbox-mailbox xfs        27G   33M   27G    1% /mailbox
xfs文件格式只能添加,不能减少
EXT4格式可以添加和减少 (使用 resize2fs 命令更新设备磁盘)
四:磁盘配额概述
4.1 实现磁盘限额的条件
-
需要Linux内核支持
- 安装xfsprogs与quota软件包 (CentOS 6.0需要额外安装quota软件包,CentOS 7.0中,quota包含在xfsprogs内,不需要额外安装)
4.2 Linux磁盘限额的特点
-
作用范围:针对指定的文件系统(分区)
- 限制对象:用户账号、组账号
-
限制类型:磁盘容量、文件数量 (两者只要有一个触发,就会被限制)
-
限制方法:软限制(有一个临时的弹性空间,空间大小是硬限制减软限制,这个临时空间有一个时间限制,默认为7天,超过七天就会把超出部分删除)、硬限制(固定空间)
- 限额目的:防止用户恶意侵占空间
软限制的空间=<硬限制的空间
五:磁盘配额管理
5.1磁盘配额管理步骤
| 序号 | 步骤 |
|---|---|
| 1 | 以支持配额功能的方式挂载文件系统 |
| 2 | 编辑用户和组账号的配额设置 |
| 3 | 验证磁盘配额功能 |
| 4 | 查看磁盘配额使用情况 |
配置配额功能挂载文件系统的时效有临时生效和永久生效
临时生效就是用mount -o 命令(临时设置,关机后会失效),永久需要配置相关配置文件(大部分)
备注:大部分的命令设置都是临时生效,重启失效;配置文件设置是永久生效,随着开机自动启动挂载
5.2启用磁盘配额 (支持 quota命令)
1)启用文件系统的配额支持 usrquota grpquota
- 添加usrquota、grpquota挂载参数
2)命令实例: /etc/fstab配置文件

手动临时启用对挂载点的mount -o 用户和组的配额权限
配置目录权限 chmod 777 /mailbox/
配置文件/etc/fstab中添加相应属性,后面会在实操中演示
5.3)编辑用户和组账号的配额设置 xfs_quota
在启用磁盘配额管理的基础上:
使用xfs_quota命令编辑配额设置
xfs_quota -x -c 'limit -u bsoft=N bhard=N isoft=N ihard=N 用户名' 挂载点常用选项
| 选项 | 解释 |
|---|---|
| -u | 指定用户 |
| -g | 指定组 |
| -x | 开启专家模式 |
| -c | 指定 ‘命令’ |
限制字段
bsoft(容量软限制) bhard(容量硬限制) isoft(数量,i类似ls中的文件节点) ihard(数量硬限制)
limit 代表上限
5.4)验证磁盘配额功能
-
切换到设置配额的分区(挂载目录)下
-
创建指定数量的文件:使用touch命令,或者cp命令
- 创建指定容量的文件:使用dd命令,或者cp命令 (dd命令类似于复制,在实操中会有一个详细介绍)
5.5)查看配额使用情况

xfs_quota -x -c ‘report 选项 ’ 挂载点
report常用选项
| 选项 | 解释 |
|---|---|
| -a | 查看该挂载点的所有配额使用情况 |
| -i | 查看该挂载点的文件数量的配额使用情况 |
| -b | 查看该挂载点的磁盘容量的配额使用情况 |
| -u | 查看该挂载点的用户的配额使用情况 |
| -g | 查看该挂载点的组账号的配额使用情况 |
dd命令等同于辅助,
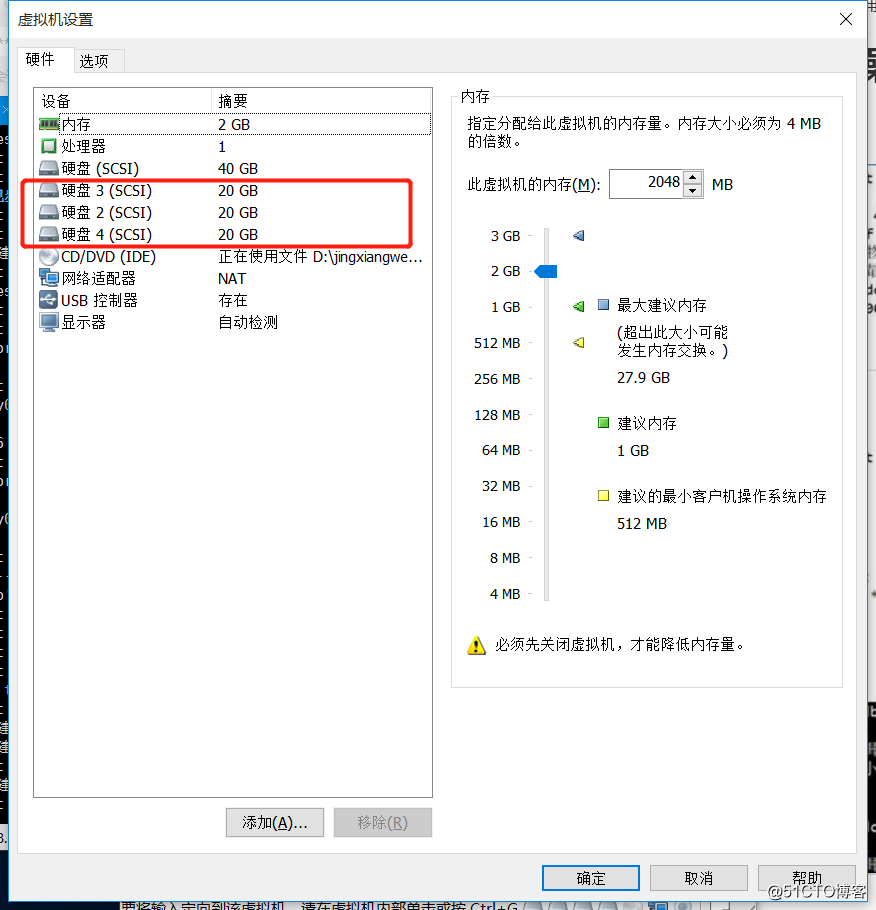
六: 命令实操
添加三块磁盘
查看目前磁盘情况
[root@localhost ~]# fdisk -l        查看所有磁盘
磁盘 /dev/sda:42.9 GB, 42949672960 字节,83886080 个扇区
Units = 扇区 of 1 * 512 = 512 bytes
扇区大小(逻辑/物理):512 字节 / 512 字节
I/O 大小(最小/最佳):512 字节 / 512 字节
磁盘标签类型:dos
磁盘标识符:0x000a55e9

   设备 Boot      Start         End      Blocks   Id  System
/dev/sda1   *        2048    12584959     6291456   83  Linux
/dev/sda2        12584960    79710207    33562624   8e  Linux LVM

磁盘 /dev/mapper/centos-root:21.5 GB, 21474836480 字节,41943040 个扇区
Units = 扇区 of 1 * 512 = 512 bytes
扇区大小(逻辑/物理):512 字节 / 512 字节
I/O 大小(最小/最佳):512 字节 / 512 字节

磁盘 /dev/mapper/centos-swap:2147 MB, 2147483648 字节,4194304 个扇区
Units = 扇区 of 1 * 512 = 512 bytes
扇区大小(逻辑/物理):512 字节 / 512 字节
I/O 大小(最小/最佳):512 字节 / 512 字节

磁盘 /dev/mapper/centos-home:10.7 GB, 10737418240 字节,20971520 个扇区
Units = 扇区 of 1 * 512 = 512 bytes
扇区大小(逻辑/物理):512 字节 / 512 字节
I/O 大小(最小/最佳):512 字节 / 512 字节
关机重启去识别新增加的三块硬盘
[root@localhost dev]# init 6    #重启
磁盘 /dev/sdb:21.5 GB, 21474836480 字节,41943040 个扇区    #这里只展示新增磁盘sdb
Units = 扇区 of 1 * 512 = 512 bytes
扇区大小(逻辑/物理):512 字节 / 512 字节
I/O 大小(最小/最佳):512 字节 / 512 字节

磁盘 /dev/sdc:21.5 GB, 21474836480 字节,41943040 个扇区    #sdc
Units = 扇区 of 1 * 512 = 512 bytes
扇区大小(逻辑/物理):512 字节 / 512 字节
I/O 大小(最小/最佳):512 字节 / 512 字节

磁盘 /dev/sdd:21.5 GB, 21474836480 字节,41943040 个扇区    #sdd
Units = 扇区 of 1 * 512 = 512 bytes
扇区大小(逻辑/物理):512 字节 / 512 字节
I/O 大小(最小/最佳):512 字节 / 512 字节
还可以切换到/dev/下去查看磁盘,这里就不演示了
[root@localhost dev]# fdisk sdb #给sdb磁盘创建分区
欢迎使用 fdisk (util-linux 2.23.2)。

更改将停留在内存中,直到您决定将更改写入磁盘。
使用写入命令前请三思。

Device does not contain a recognized partition table
使用磁盘标识符 0x0edec45d 创建新的 DOS 磁盘标签。
命令(输入 m 获取帮助):n     #创建新分区
Partition type:
   p   primary (0 primary, 0 extended, 4 free)
   e   extended
Select (default p): p   #选择主分区
分区号 (1-4,默认 1):     #回车默认为1
起始 扇区 (2048-41943039,默认为 2048): #回车默认为2048
将使用默认值 2048
Last 扇区, +扇区 or +size{K,M,G} (2048-41943039,默认为 41943039):  #回车视为把全部容量都给一个分区
将使用默认值 41943039
分区 1 已设置为 Linux 类型,大小设为 20 GiB
创建分区成功,这里用LVM跨区卷去做,需要改一下格式
分区 1 已设置为 Linux 类型,大小设为 20 GiB

命令(输入 m 获取帮助):t #修改格式
已选择分区 1     #选则分区
Hex 代码(输入 L 列出所有代码):
Hex 代码(输入 L 列出所有代码):8e  LVM的代码是8e
已将分区“Linux”的类型更改为“Linux LVM”

命令(输入 m 获取帮助):w     写入磁盘保存
The partition table has been altered!

Calling ioctl() to re-read partition table.
正在同步磁盘。
也可以在fdisk状态中p查看磁盘配置情况
这里再配置好sdc和sdd
[root@localhost dev]# fdisk sdc
欢迎使用 fdisk (util-linux 2.23.2)。

更改将停留在内存中,直到您决定将更改写入磁盘。
使用写入命令前请三思。

Device does not contain a recognized partition table
使用磁盘标识符 0x3e687331 创建新的 DOS 磁盘标签。

命令(输入 m 获取帮助):n
Partition type:
   p   primary (0 primary, 0 extended, 4 free)
   e   extended
Select (default p): p
分区号 (1-4,默认 1):
起始 扇区 (2048-41943039,默认为 2048):
将使用默认值 2048
Last 扇区, +扇区 or +size{K,M,G} (2048-41943039,默认为 41943039):
将使用默认值 41943039
分区 1 已设置为 Linux 类型,大小设为 20 GiB

命令(输入 m 获取帮助):t
已选择分区 1
Hex 代码(输入 L 列出所有代码):8e
已将分区“Linux”的类型更改为“Linux LVM”

命令(输入 m 获取帮助):w
The partition table has been altered!

Calling ioctl() to re-read partition table.
正在同步磁盘。
[root@localhost dev]# fdisk sdd
欢迎使用 fdisk (util-linux 2.23.2)。

更改将停留在内存中,直到您决定将更改写入磁盘。
使用写入命令前请三思。

Device does not contain a recognized partition table
使用磁盘标识符 0xd8be1cdf 创建新的 DOS 磁盘标签。

命令(输入 m 获取帮助):n
Partition type:
   p   primary (0 primary, 0 extended, 4 free)
   e   extended
Select (default p): p
分区号 (1-4,默认 1):
起始 扇区 (2048-41943039,默认为 2048):
将使用默认值 2048
Last 扇区, +扇区 or +size{K,M,G} (2048-41943039,默认为 41943039):
将使用默认值 41943039
分区 1 已设置为 Linux 类型,大小设为 20 GiB

命令(输入 m 获取帮助):w
The partition table has been altered!

Calling ioctl() to re-read partition table.
正在同步磁盘。
配置完毕,然后把三块磁盘配置成为物理卷(pv)
[root@localhost dev]# pvcreate sd[b-d]1     #用中括号进行简写
  Physical volume "sdb1" successfully created.
  Physical volume "sdc1" successfully created.
  Physical volume "sdd1" successfully created.
把sd【b-d】1三块磁盘组成卷组,卷组名为ky02
[root@localhost dev]# vgcreate ky02 /dev/sd[b-d]1
  Volume group "ky02" successfully created
每个分区20G,这个卷组ky02为60G,从卷组中划分-L 40G创建LVM逻辑卷,名字-n 为ky02_gsy
[root@localhost dev]# lvcreate -L 40G -n ky02_gsy ky02
  Logical volume "ky02_gsy" created.
这时可以/dev/目录中查看配置情况
[root@localhost ~]# cd /dev     #切换到/dev
[root@localhost dev]# ls        #查看
agpgart          hpet                ptmx      stderr  tty28  tty50    usbmon0
autofs           hugepages           pts       stdin   tty29  tty51    usbmon1
block            hwrng               random    stdout  tty3   tty52    usbmon2
bsg              initctl             raw       tty     tty30  tty53    vcs
btrfs-control    input               rfkill    tty0    tty31  tty54    vcs1
bus              kmsg                rtc       tty1    tty32  tty55    vcs2
cdrom            ky02                rtc0      tty10   tty33  tty56    vcs3
centos           log                 sda       tty11   tty34  tty57    vcs4
char             loop-control        sda1      tty12   tty35  tty58    vcs5
console          lp0                 sda2      tty13   tty36  tty59    vcs6
core             lp1                 sdb       tty14   tty37  tty6     vcsa
cpu              lp2                 sdb1      tty15   tty38  tty60    vcsa1
cpu_dma_latency  lp3                 sdc       tty16   tty39  tty61    vcsa2
crash            mapper              sdc1      tty17   tty4   tty62    vcsa3
disk             mcelog              sdd       tty18   tty40  tty63    vcsa4
dm-0             mem                 sdd1      tty19   tty41  tty7     vcsa5
dm-1             mqueue              sg0       tty2    tty42  tty8     vcsa6
dm-2             net                 sg1       tty20   tty43  tty9     vfio
dm-3             network_latency     sg2       tty21   tty44  ttyS0    vga_arbiter
dri              network_throughput  sg3       tty22   tty45  ttyS1    vhci
fb0              null                sg4       tty23   tty46  ttyS2    vhost-net
fd               nvram               shm       tty24   tty47  ttyS3    vmci
full             oldmem              snapshot  tty25   tty48  uhid     vsock
fuse             port                snd       tty26   tty49  uinput   zero
hidraw0          ppp                 sr0       tty27   tty5   urandom
[root@localhost dev]# ls ky02/  查看中间的ky02目录
ky02_gsy        逻辑卷已被创建
[root@localhost dev]# lvdisplay ky02    #查看逻辑卷的详细信息,后面加卷名只查看该卷,不加查看所有
  --- Logical volume ---
  LV Path                /dev/ky02/ky02_gsy
  LV Name                ky02_gsy
  VG Name                ky02
  LV UUID                HhEtsz-SUGG-2bFg-8Vl5-nYz2-2f6p-jU4Jnw
  LV Write Access        read/write
  LV Creation host, time localhost.localdomain, 2019-11-02 10:25:21 +0800
  LV Status              available
  # open                 0
  LV Size                40.00 GiB
  Current LE             10240
  Segments               3
  Allocation             inherit
  Read ahead sectors     auto
  - currently set to     8192
  Block device           253:3
分区完毕,接下来格式化后挂载就可以正常使用
[root@localhost dev]# mkfs.xfs /dev/ky02/ky02_gsy
meta-data=/dev/ky02/ky02_gsy     isize=512    agcount=4, agsize=2621440 blks
         =                       sectsz=512   attr=2, projid32bit=1
         =                       crc=1        finobt=0, sparse=0
data     =                       bsize=4096   blocks=10485760, imaxpct=25
         =                       sunit=0      swidth=0 blks
naming   =version 2              bsize=4096   ascii-ci=0 ftype=1
log      =internal log           bsize=4096   blocks=5120, version=2
         =                       sectsz=512   sunit=0 blks, lazy-count=1
realtime =none                   extsz=4096   blocks=0, rtextents=0
这里配置/etc/fstab配置文件去自动挂载,即vim /etc/fstab
#
# /etc/fstab
# Created by anaconda on Wed Oct 23 13:35:20 2019
#
# Accessible filesystems, by reference, are maintained under '/dev/disk'
# See man pages fstab(5), findfs(8), mount(8) and/or blkid(8) for more info
#
/dev/mapper/centos-root /                       xfs     defaults        0 0
UUID=bef26af3-cd25-4754-bbc6-abd7fb09ef45 /boot                   xfs     defaults        0 0
/dev/mapper/centos-home /home                   xfs     defaults        0 0
/dev/mapper/centos-swap swap                    swap    defaults        0 0
/dev/ky02/ky02_gsy      /mnt    xfs     defaults        0       0
    设备地址            挂载点     文件类型    权限功能        不容灾     第0个被加载
:wq保存退出
[root@localhost dev]# mount -a      #全部重新挂载
[root@localhost dev]# df -Th        #查看已挂载
文件系统                  类型      容量  已用  可用 已用% 挂载点
/dev/mapper/centos-root   xfs        20G  3.3G   17G   17% /
devtmpfs                  devtmpfs  977M     0  977M    0% /dev
tmpfs                     tmpfs     993M     0  993M    0% /dev/shm
tmpfs                     tmpfs     993M  9.0M  984M    1% /run
tmpfs                     tmpfs     993M     0  993M    0% /sys/fs/cgroup
/dev/sda1                 xfs       6.0G  161M  5.9G    3% /boot
/dev/mapper/centos-home   xfs        10G   50M   10G    1% /home
tmpfs                     tmpfs     199M   12K  199M    1% /run/user/42
tmpfs                     tmpfs     199M     0  199M    0% /run/user/0
/dev/mapper/ky02-ky02_gsy xfs        40G   33M   40G    1% /mnt #挂载成功
然后配置磁盘配额权限等相关管理,首先先查看
[root@localhost dev]# mount     #查看全部挂载,内容很多,这里只看刚刚配置的逻辑卷,
/dev/mapper/ky02-ky02_gsy on /mnt type xfs (rw,relatime,seclabel,attr2,inode64,noquota) #noquota,代表没有配置权限
配置磁盘配额权限需要先查看自己的系统里面有没有xfsprogs软件,没有的话需要安装
[root@localhost dev]# rpm -q xfsprogs   查看已安装软件,带软件名定点查看
xfsprogs-4.5.0-12.el7.x86_64        显示已安装,版本号4.5.0
那么就可以直接进行配置,这里我选择配置/etc/fstab文件中的信息(这里需要注意,当前跨区卷已经被挂载,就算此时开启磁盘配额管理权限,也得需要取消挂载umont /mnt之后再重新挂载mount -a才可以触发)
vim编辑,wq保存退出
#
# /etc/fstab
# Created by anaconda on Wed Oct 23 13:35:20 2019
#
# Accessible filesystems, by reference, are maintained under '/dev/disk'
# See man pages fstab(5), findfs(8), mount(8) and/or blkid(8) for more info
#
/dev/mapper/centos-root /                       xfs     defaults        0 0
UUID=bef26af3-cd25-4754-bbc6-abd7fb09ef45 /boot                   xfs     defaults        0 0
/dev/mapper/centos-home /home                   xfs     defaults        0 0
/dev/mapper/centos-swap swap                    swap    defaults        0 0
/dev/ky02/ky02_gsy      /mnt    xfs     defaults,usrquota,grpquota      0       0
~
[root@localhost dev]# umount /mnt #取消挂载/mnt
[root@localhost dev]# mount -a #重新挂载
[root@localhost dev]# mount #查看挂载
/dev/mapper/ky02-ky02_gsy on /mnt type xfs (rw,relatime,seclabel,attr2,inode64,usrquota,grpquota) #显示可以配置用户组账号的磁盘配额
[root@localhost dev]# xfs.quota -x -c 'limit -u ihard=6 isoft=5 bhard=100M bsoft=50M gsy' /mnt  #给gsy用户的磁盘权限配额
[root@localhost dev]# xfs_quota -c 'quota -uv gsy' /mnt #查看gsy用户的容量配额
Disk quotas for User gsy (1000)
Filesystem              Blocks      Quota      Limit  Warn/Time      Mounted on
/dev/mapper/ky02-ky02_gsy
                             0      51200     102400   00 [--------] /mnt
[root@localhost dev]# xfs_quota -c 'quota -iuv gsy' /mnt    #查看gsy用户的数量配额
Disk quotas for User gsy (1000)
Filesystem               Files      Quota      Limit  Warn/Time      Mounted on
/dev/mapper/ky02-ky02_gsy
                             0          5          6   00 [--------] /mnt
[root@localhost dev]# xfs_quota -c 'quota -biuv gsy' /mnt   #同时查看两种配额
Disk quotas for User gsy (1000)
Filesystem              Blocks      Quota      Limit  Warn/Time            Files      Quota      Limit  Warn/Time      Mounted on
/dev/mapper/ky02-ky02_gsy
                             0      51200     102400   00 [--------]           0          5          6   00 [--------] /mnt
[gsy@localhost mnt]$ xfs_quota -x -c 'report -a' /mnt   #用report去查看,查看的是所有用户,包含用户和组,查看内容是默认是容量
User quota on /mnt (/dev/mapper/ky02-ky02_gsy)
                               Blocks
User ID          Used       Soft       Hard    Warn/Grace
---------- --------------------------------------------------
gsy                 0      51200     102400     00 [--------]
Group quota on /mnt (/dev/mapper/ky02-ky02_gsy)
                               Blocks
Group ID         Used       Soft       Hard    Warn/Grace
---------- --------------------------------------------------
gsy                 0          0          0     00 [--------]
[root@localhost dev]# su - gsy  #切换gsy用户
上一次登录:三 10月 23 13:44:51 CST 2019:0 上
[gsy@localhost ~]$ cd /mnt  #切换到挂载点
[gsy@localhost mnt]$ ls     #查看,目录内是空的
[gsy@localhost mnt]$ touch test{1..5}.text  #创建五个空文件
touch: 无法创建"test1.text": 权限不够   #显示权限不够,但是5个是满足磁盘权限配额
touch: 无法创建"test2.text": 权限不够
touch: 无法创建"test3.text": 权限不够
touch: 无法创建"test4.text": 权限不够
touch: 无法创建"test5.text": 权限不够
[gsy@localhost mnt]$ ls -al     #这里查看目录权限
总用量 0
drwxr-xr-x.  2 root root   6 11月  2 10:27 . #当前目录权限,755,普通用户gsy没有写入权限
dr-xr-xr-x. 17 root root 224 10月 23 13:41 ..
[gsy@localhost mnt]$ exit   #登出
登出
[root@localhost dev]# chmod 777 /mnt    #root配置挂载点目录权限为777
[root@localhost dev]# su - gsy      切换到gsy用户
上一次登录:六 11月  2 12:19:26 CST 2019pts/0 上
[gsy@localhost mnt]$ touch test{1..7}.text  #创建7个空文件
touch: 无法创建"test7.text": 超出磁盘限额     显示无法创建第七个文件
[gsy@localhost mnt]$ ls
test1.text  test2.text  test3.text  test4.text  test5.text  test6.text
[gsy@localhost mnt]$ xfs_quota -c 'quota -biuv gsy' /mnt    #查看gsy用户在/mnt的磁盘配额情况
Disk quotas for User gsy (1000)
Filesystem              Blocks      Quota      Limit  Warn/Time            Files      Quota      Limit  Warn/Time      Mounted on
/dev/mapper/ky02-ky02_gsy
                             0      51200     102400   00 [--------]           6          5          6   00  [6 days] /mnt      #已超过六个
[gsy@localhost mnt]$ rm -rf /mnt/*  #删除/mnt/下的所有文件
[gsy@localhost mnt]$ ls
[gsy@localhost mnt]$ xfs_quota -c 'quota -iuv gsy' /mnt #查看gsy用户的i磁盘配额情况
Disk quotas for User gsy (1000)
Filesystem               Files      Quota      Limit  Warn/Time      Mounted on
/dev/mapper/ky02-ky02_gsy
                             0          5          6   00 [--------] /mnt
files变成了0,之前创建文件的时候是6
测试了文件数量的权限,接下来测试磁盘容量的权限
[gsy@localhost mnt]$ dd if=/dev/zero of=/mnt/demo01.txt bs=1M count=80  dd命令
记录了80+0 的读入         源路径         目标路径        一次读写的大小     循环次数
记录了80+0 的写出
83886080字节(84 MB)已复制,0.562914 秒,149 MB/秒
[gsy@localhost mnt]$ xfs_quota -c 'quota -uv gsy' /mnt
Disk quotas for User gsy (1000)
Filesystem              Blocks      Quota      Limit  Warn/Time      Mounted on
/dev/mapper/ky02-ky02_gsy
                         81920      51200     102400   00  [6 days] /mnt
                         已用大小   软限制  硬限制        超出软限制的容量的失效时间
[gsy@localhost mnt]$ dd if=/dev/zero of=/mnt/demo02.txt bs=1M count=80  写入第二个文件
dd: 写入"/mnt/demo02.txt" 出错: 超出磁盘限额  #出现错误
记录了21+0 的读入 在第101次是出现错误
记录了20+0 的写出
20971520字节(21 MB)已复制,0.140281 秒,149 MB/秒
[gsy@localhost mnt]$ xfs_quota -c 'quota -uv gsy' /mnt  #再次查看
Disk quotas for User gsy (1000)
Filesystem              Blocks      Quota      Limit  Warn/Time      Mounted on
/dev/mapper/ky02-ky02_gsy
                        102400      51200     102400   00  [6 days] /mnt
                        已被占满
[gsy@localhost mnt]$ ls -lh #查看目录容量
总用量 100M    #用了100M
-rw-rw-r--. 1 gsy gsy 80M 11月  2 15:30 demo01.txt
-rw-rw-r--. 1 gsy gsy 20M 11月  2 15:30 demo02.txt
总结:
物理卷管理(pvscan、pvcreate、pvdisplay、pbremove)
卷组管理(vgscan、vgcreate、vgdisplay、vgremove、vgextend、vgreduce)
逻辑卷管理(lvscan、lvcreate、lvdisplay、lvremove、lvextend、lvreduce)
物理卷不能增加减少,没有extend和reduce命令,除此之外,所有命令格式都是一致的,前面为自己的缩写
磁盘配额的作用范围是磁盘,限制对象有用户和组,限制类型有通过使用磁盘用量和创建文件数量去限制,限制方法主要是依靠软限制和硬限制
磁盘配额管理可以幼稚用户恶意侵占空间,优化资源配置。