在Windows下编译boost库时,参考网上文章:https://blog.csdn.net/zengraoli/article/details/70187556时报错,原来是按照博主文章编译时,在执行bjam stage之前要先运行b2.exe.
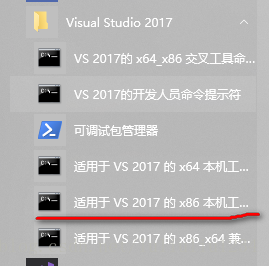
编译32位的boost库
下载并解压boost后,在当前目录下使用VS的32位命令行工具:
①运行bootstrap.bat
②运行boost源码目录下的b2.exe文件,生成/stage/lib
③执行如下操作,对boost进行编译
(msvc版本14.1对应的是vs2017,–stagedir是指定编译后存放的目录,文章附录有vs版本对应编号)
bjam stage --toolset=msvc-14.1 architecture=x86 address-model=32 --without-graph --without-graph_parallel --stagedir="J:\boost_1_67_0\bin\vc15_64" link=static runtime-link=shared runtime-link=static threading=multi debug release这样得到的就是32位的库
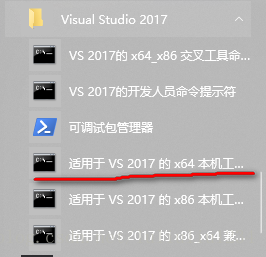
编译64位的boost库
打开vs的64位命令行工具
①在boost源码文件夹中运行bootstrap.bat
②运行boost源码目录下的b2.exe文件,生成/stage/lib
③执行如下操作,对boost进行编译
(msvc版本14.1对应的是vs2017,–stagedir是指定编译后存放的目录)
bjam stage --toolset=msvc-14.1 architecture=x86 address-model=64 --without-graph --without-graph_parallel --stagedir="J:\boost_1_67_0\bin\vc15_64" link=static runtime-link=shared runtime-link=static threading=multi debug release这样得到的是就是64位的boot库
随后使用时将boost库配置到VS上即可