项目源码地址 https://github.com/nieandsun/security
1 JWT特点
在《从cookie/session和token的角度来认识一下spring security oauth》那篇文章里我简单提到过普通的token和JWT的概念,本篇不再过多叙述。相信通过前面几篇文章的介绍大家对普通的token(即spring security oauth使用的默认令牌)已经比较了解了,这篇文章来讲讲如何使用JWT替换默认令牌,并从源码角度来看一看JWT到底是怎么生成的。
在此之前先介绍一下JWT的几个特点:
(1)自包含 — ★ JWT里面包含信息
(2)可扩展 — 即JWT生成时会包含一些默认信息,我们可以再往JWT里加入一些额外的信息
(3)密签 — 在生成JWT时指定一个密钥,然后校验时再拿着这个密钥进行校验(看了源码后可以理解的更清楚)
我想大多数人应该并不一定明白这三个特点究竟讲的是什么。在下篇文章进行完源码解析后,我将会按照自己的理解再叙述一遍。
2 使用JWT替换默认令牌
2.1 代码开发
主要包括:
- 配置TokenStore
TokenStore只负责token的存取,存到redis用到的TokenStore的实现类为RedisTokenStore,存到mysql用到的实现类为JdbcTokenStore。。。生成的token为JWT时要使用JwtTokenStore —》其实JwtTokenStore对对存、取token的操作就是啥也不做,因为jwt的自包含特性,服务端根本没必要去存储token。— 有兴趣的可以追踪一下源码
- 配置JwtAccessTokenConverter — 真正生产JWT的类
JwtAccessTokenConverter 其实是一个TokenEnhancer。 通过阅读源码可知:TokenEnhancer是对生成的Token进行后续处理的(或者说是对Token进行增强的) 其实JwtAccessTokenConverter就是将默认生成的token做进一步处理使其成为一个JWT。
- 将JwtTokenStore和JwtAccessTokenConverter设置到token的生成类中
具体代码如下:
(1)配置TokenStore和JwtAccessTokenConverter
package com.nrsc.security.app.config;

import com.nrsc.security.core.properties.NrscSecurityProperties;
import org.springframework.beans.factory.annotation.Autowired;
import org.springframework.boot.autoconfigure.condition.ConditionalOnProperty;
import org.springframework.context.annotation.Bean;
import org.springframework.context.annotation.Configuration;
import org.springframework.data.redis.connection.RedisConnectionFactory;
import org.springframework.security.oauth2.provider.token.TokenStore;
import org.springframework.security.oauth2.provider.token.store.JwtAccessTokenConverter;
import org.springframework.security.oauth2.provider.token.store.JwtTokenStore;
import org.springframework.security.oauth2.provider.token.store.redis.RedisTokenStore;

/**
 * @author : Sun Chuan
 * @date : 2019/10/24 13:56
 * Description: TokenStore的实现类有5个,可以在yml里通过配置指定使用RedisTokenStore还是JwtTokenStore
 */
@Configuration
public class TokenStoreConfig {

    /***
     * RedisTokenStore需要一个连接工厂,这里可以直接注入进来
     */
    @Autowired
    private RedisConnectionFactory redisConnectionFactory;

    /***
     * 将RedisTokenStore注入到spring容器
     * 当yml配置文件里配置了nrsc.security.oauth2.tokenStore = redis时 ---> 下面的配置生效
     * @return
     */
    @Bean
    @ConditionalOnProperty(prefix = "nrsc.security.oauth2", name = "tokenStore", havingValue = "redis")
    public TokenStore redisTokenStore() {
        return new RedisTokenStore(redisConnectionFactory);
    }

    /***
     * 当yml配置文件里配置了nrsc.security.oauth2.tokenStore = jwt或者根本就没配置该属性时 ---> 下面的配置生效
     */
    @Configuration
    @ConditionalOnProperty(prefix = "nrsc.security.oauth2", name = "tokenStore", havingValue = "jwt", matchIfMissing = true)
    public static class JwtConfig {

        @Autowired
        private NrscSecurityProperties securityProperties;

        /***
         * 配置JwtTokenStore ---> TokenStore只负责token的存储,不负责token的生成
         * @return
         */
        @Bean
        public TokenStore jwtTokenStore() {
            return new JwtTokenStore(jwtAccessTokenConverter());
        }

        /***
         * JwtAccessTokenConverter 其实就是一个TokenEnhancer
         * 通过阅读源码可知:TokenEnhancer是对生成的Token进行后续处理的(或者说增强),
         * 其实JwtAccessTokenConverter就是将默认生成的token做进一步处理使其成为一个JWT
         * @return
         */
        @Bean
        public JwtAccessTokenConverter jwtAccessTokenConverter() {
            JwtAccessTokenConverter converter = new JwtAccessTokenConverter();
            converter.setSigningKey(securityProperties.getOauth2().getJwtSigningKey());
            return converter;
        }
    }
}
(2)将JwtTokenStore和JwtAccessTokenConverter设置到token的生成类中
注意:具体代码可看本篇文章对应的commit记录

    @Override
    public void configure(AuthorizationServerEndpointsConfigurer endpoints) throws Exception {
        endpoints
                //指定使用的TokenStore,tokenStore用来存取token,默认使用InMemoryTokenStore
                .tokenStore(tokenStore)
                //下面的配置主要用来指定"对正在进行授权的用户进行认证+校验"的类
                //在实现了AuthorizationServerConfigurerAdapter适配器类后,必须指定下面两项
                .authenticationManager(authenticationManager)
                .userDetailsService(NRSCDetailsService);
        //将JwtAccessTokenConverter设置到token的生成类中
        if (jwtAccessTokenConverter != null) {
            endpoints
                    .accessTokenConverter(jwtAccessTokenConverter);
        }
    }
2.2 测试
(1)获取token
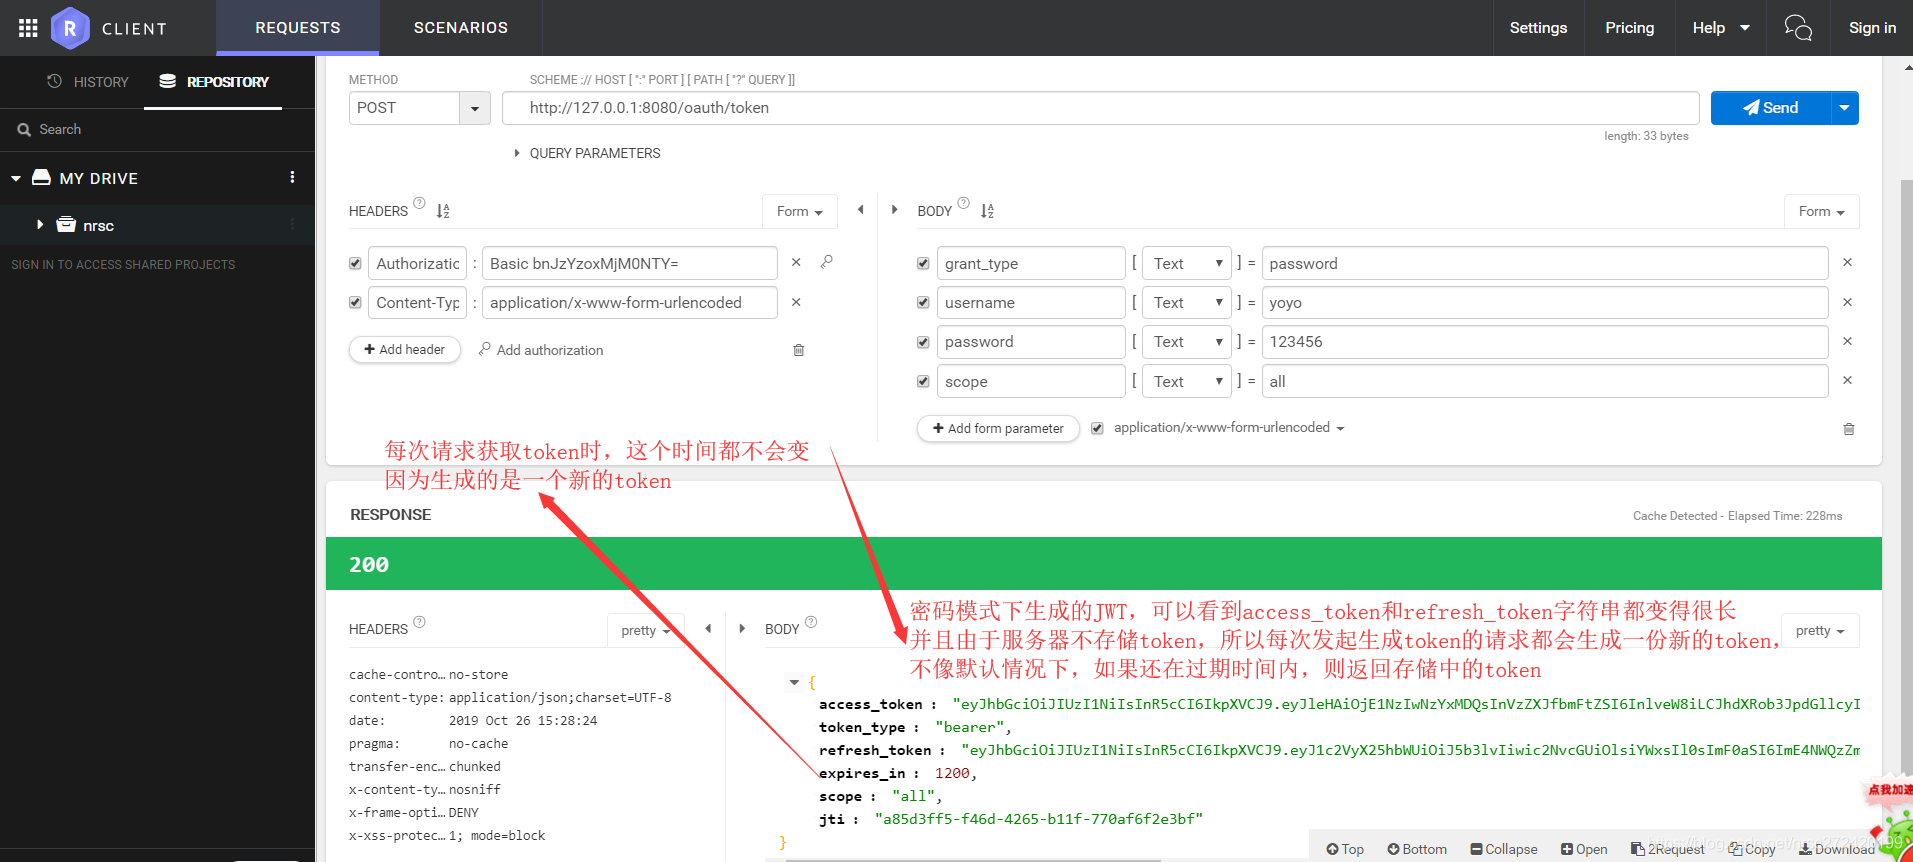
(2)拿着token请求用户信息

注意: 通过JWT解析到的Authentication对象 (我代码里的/user/me1和/user/me2是获取Authentication对象)如下。其中principal为一个字符串,但是之前无论用户名+密码模式、短息登陆还是社交登陆过程中生成的Authentication对象里的principal都是一个UserDetails对象。— 》 这是一个很多的区别。
{
	"authorities": [
		{
			"authority": "admin"
		}
	],
	"details": {
		"remoteAddress": "127.0.0.1",
		"sessionId": null,
		"tokenValue": "eyJhbGciOiJIUzI1NiIsInR5cCI6IkpXVCJ9.eyJleHAiOjE1NzIwNzYxMDQsInVzZXJfbmFtZSI6InlveW8iLCJhdXRob3JpdGllcyI6WyJhZG1pbiJdLCJqdGkiOiJhODVkM2ZmNS1mNDZkLTQyNjUtYjExZi03NzBhZjZmMmUzYmYiLCJjbGllbnRfaWQiOiJucnNjIiwic2NvcGUiOlsiYWxsIl19.i0hJ5zomniZgSA6m4xkpsU6Sqj5YLHwLoJcFRffKA6E",
		"tokenType": "bearer",
		"decodedDetails": null
	},
	"authenticated": true,
	"userAuthentication": {
		"authorities": [
			{
				"authority": "admin"
			}
		],
		"details": null,
		"authenticated": true,
		"principal": "yoyo",
		"credentials": "N/A",
		"name": "yoyo"
	},
	"credentials": "",
	"oauth2Request": {
		"clientId": "nrsc",
		"scope": [
			"all"
		],
		"requestParameters": {
			"client_id": "nrsc"
		},
		"resourceIds": [],
		"authorities": [],
		"approved": true,
		"refresh": false,
		"redirectUri": null,
		"responseTypes": [],
		"extensions": {},
		"refreshTokenRequest": null,
		"grantType": null
	},
	"clientOnly": false,
	"principal": "yoyo",
	"name": "yoyo"
}
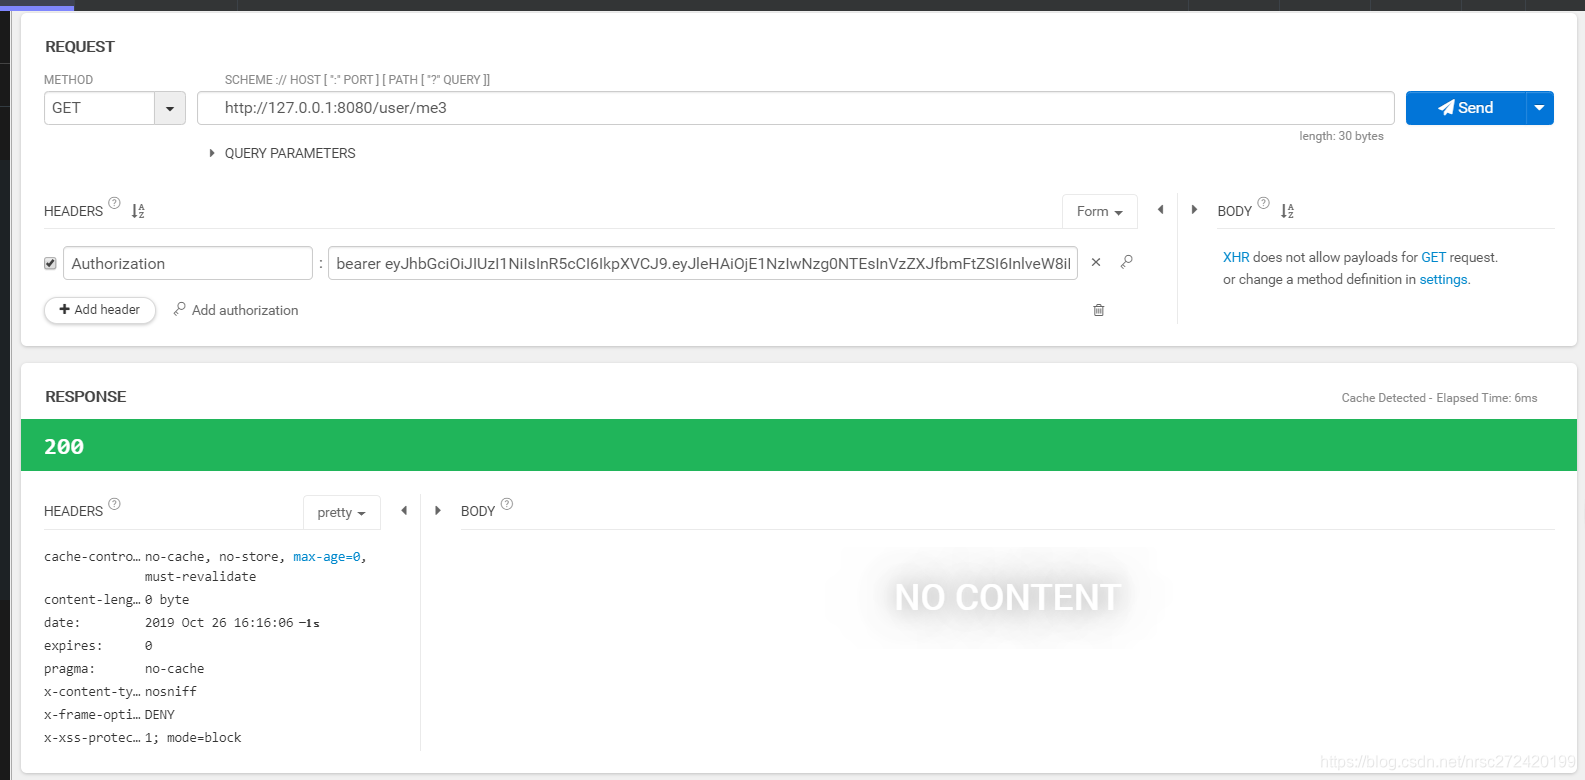
(3)正是由于通过JWT生成的Authentication对象里的principal为一个字符串而不是UserDetails对象的原因,请求下面这个接口将获取不到任何信息
 @GetMapping("/me3")
 public Object getCurrentUser3(@AuthenticationPrincipal UserDetails user) {
     //方式3,只获取User对象
     return user;
 }
测试结果如下:
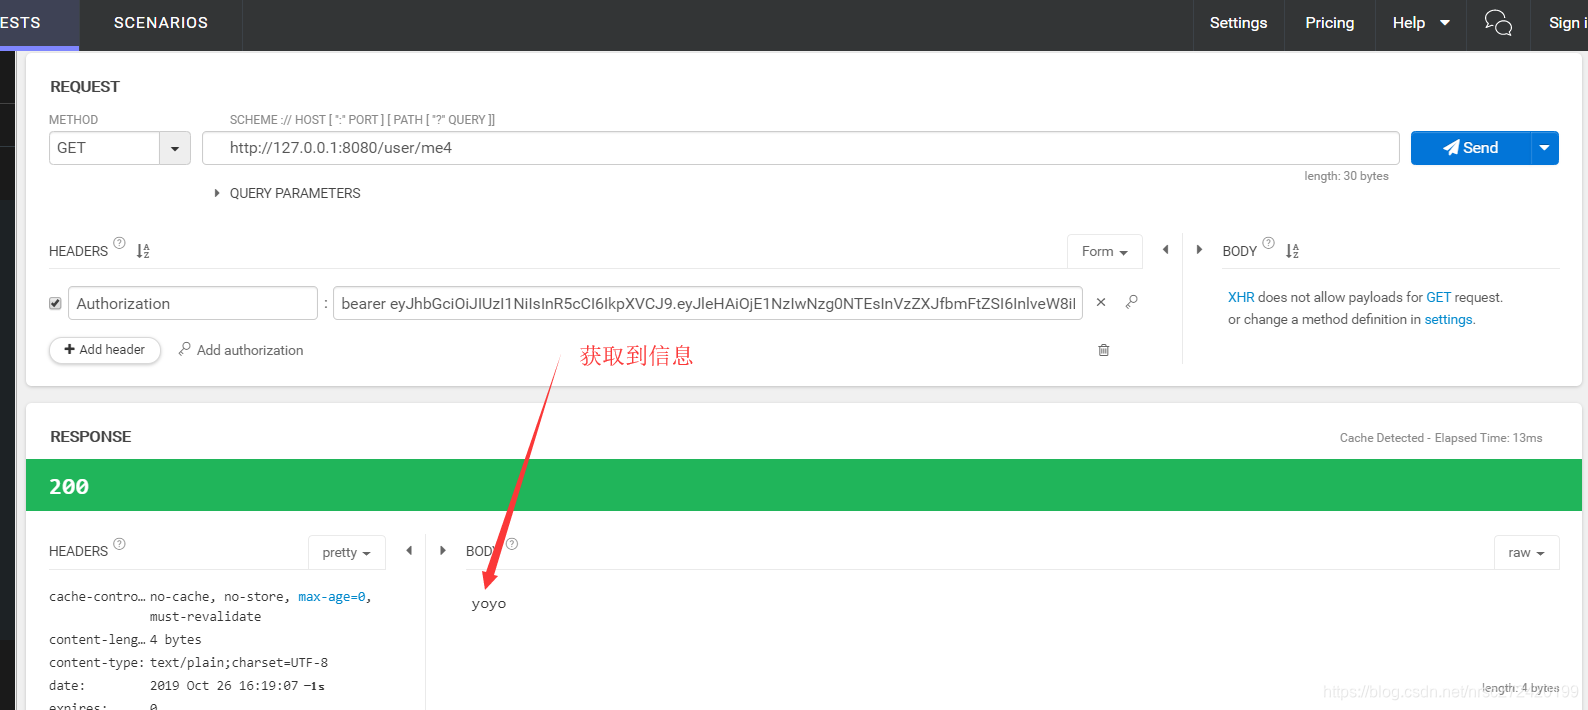
(4)但是下面这样可以
    /***
     * JWT 情况下获取的principal是一个字符串
     * @param user
     * @return
     */
    @GetMapping("/me4")
    public Object getCurrentUser4(@AuthenticationPrincipal String user) {
        //方式3,只获取User对象
        return user;
    }
测试如下: