| 服务器 | ip | 角色 | 备注 |
|---|---|---|---|
| centos7 | 192.168.1.6 | primary 主机 | repmgr4.0.5 |
| centos7 | 192.168.1.7 | slave从机 | repmgr4.0.5 |
| centos7 | 192.168.1.8 | slave从机 | repmgr4.0.5 |
第二象限公司(2ndQuadrant)于10月24日发布了repmgr 4.2,以对最新版本PostgreSQL 11提供支持。
repmgr 是一款开源的、用于 PostgreSQL 服务器集群复制管理和故障转移的工具。它扩展了 PostgreSQL 内建的 hot-standby 能力,可以设置热备份 服务器 、监控复制与执行管理任务(故障转移、手工切换等)。
一、安装单机PostgreSQL
(三台服务器执行相同操作,安装PostgreSQL)
安装步骤参考
PostgreSQL(二)------centos下安装PostgreSQL9.6数据库
二、安装repmgr
(三台服务器执行相同操作,安装repmgr)
repmgr 是一款开源的、用于 PostgreSQL 服务器集群复制管理和故障转移的工具。它扩展了 PostgreSQL 内建的 hot-standby 能力,可以设置热备份服务器、监控复制与执行管理任务(故障转移、手工切换等)。
版本4.0开始,repmgr与9.3以上的所有PostgreSQL版本(包括PostgreSQL 10)兼容。请注意,某些repmgr功能在PostgreSQL 9.3和PostgreSQL 9.4中不可用。
官网手册
https://repmgr.org/docs/4.0/index.html
repmgr版本需要与PostgreSQL对应,这里安装repmgr4.xx
参考yum源
https://yum.postgresql.org/9.6/redhat/rhel-7-x86_64/
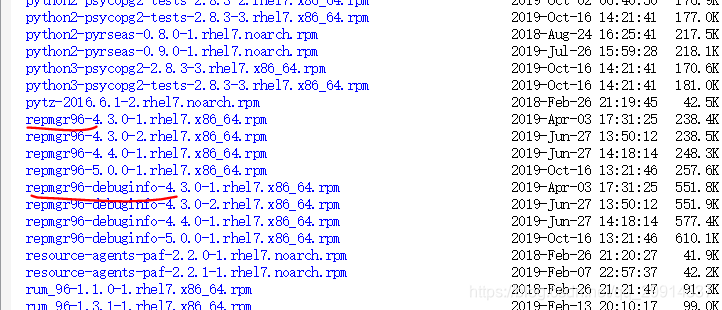
下载
wget https://yum.postgresql.org/9.6/redhat/rhel-7-x86_64/repmgr96-4.3.0-1.rhel7.x86_64.rpm

wget https://yum.postgresql.org/9.6/redhat/rhel-7-x86_64/repmgr96-debuginfo-4.3.0-1.rhel7.x86_64.rpm
安装
rpm -ivh repmgr96-4.3.0-1.rhel7.x86_64.rpm

rpm  -ivh repmgr96-debuginfo-4.3.0-1.rhel7.x86_64.rpm
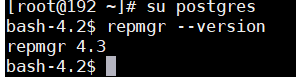
检查安装是否成功
su postgres
repmgr --version
如何提示repmgr命令不存在,可能是未将postgresql 加入系统PATH,参考上一章
PostgreSQL(二)------centos下安装PostgreSQL9.6数据库
三、构建 ssh 免密互通
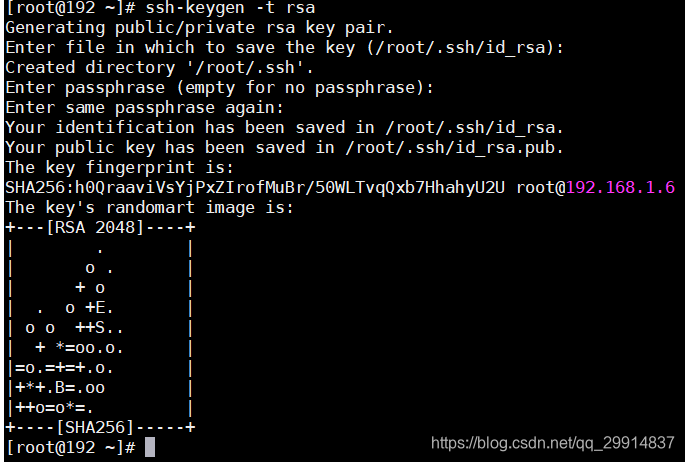
3.1、 生成密钥
(只在主机192.168.1.6服务器上生成密钥)
(不要指定密码,即 空密码即可)
ssh-keygen -t rsa
生成的密钥保存在以下路径
私钥密钥保存至:~/.ssh/id_rsa 当前生成用户的目录下
公钥密钥保存至:~/.ssh/id_rsa.pub
-t rsa|dsa 指定加密算法rsa算法或dsa算法
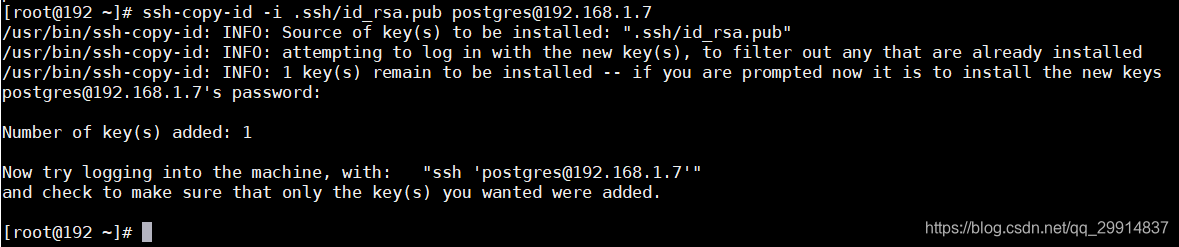
3.2、将公钥传输至远程服务器(slave从机)上并验证
(在主机上执行命令,将公钥传输至远程服务器–两个从机服务器)
ssh-copy-id -i .ssh/id_rsa.pub [email protected]
ssh-copy-id -i .ssh/id_rsa.pub [email protected]
将公钥传输至远程服务器 ~/.ssh/id_rsa.pub公钥的保存位置
ssh-copy-id 该命令并不是所有linux版本都支持
注意:这里需要输入192.168.1.7、192.168.1.8服务器postgres系统用户密码,这里密码我设置的是@2020qazQAZ
四、创建 repmgr账号用来管理 集群维护等操作
4.1、repmgr创建用户帐户和数据库
(在三台服务上做相同操作)
注意:这里的命令同时在postgres用户下操作。
su - postgres
#创建用户(-s 的意思是以superuser的身份创建用户repmgr)
createuser --login --superuser repmgr
#以repmgr用户创建数据库repmgr
createdb repmgr -O repmgr
#登录数据库(postgres),-U 后面接连接数据库名称
psql -U postgres
#修改数据库用户repmgr 的密码
ALTER USER repmgr with encrypted password 'repmgr';
psql -c "alter user repmgr with password 'repmgr'"
psql -c "alter user repmgr set search_path to repmgr, \"\$user\", public";
4.2、删除用户
#dropuser repmgr
三台服务器执行相同操作。
4.2、验证是否互通
在从机192.168.1.7、192.168.1.8上执行
su  -  postgres

psql -h 192.168.1.6 -U repmgr -d postgres -c "select version()"

psql -h  192.168.1.6 -U repmgr -d repmgr -c "select version()"

五、编辑 repmgr.conf 配置文件
对于主机192.168.1.6
vi /etc/repmgr/9.6/repmgr.conf
log_file='/var/log/repmgr/repmgr.log'
pg_bindir=/usr/pgsql-9.6/bin
promote_command='/usr/pgsql-9.6/bin/repmgr standby promote -f /etc/repmgr/9.6/repmgr.conf'
follow_command='/usr/pgsql-9.6/bin/repmgr standby follow -f /etc/repmgr/9.6/repmgr.conf'

node_id=19216816
node_name=192.168.1.6
conninfo='host=192.168.1.6 dbname=repmgr user=repmgr password=repmgr'
data_directory='/var/lib/pgsql/9.6/data/'
service_start_command = 'sudo systemctl start postgresql-9.6'
service_stop_command = 'sudo systemctl stop postgresql-9.6'
service_restart_command = 'sudo systemctl restart postgresql-9.6'
service_reload_command = 'sudo systemctl reload postgresql-9.6'
ssh_options=-o "StrictHostKeyChecking no"
chown postgres:postgres /etc/repmgr/9.6/repmgr.conf
对于从机192.168.1.7
vi /etc/repmgr/9.6/repmgr.conf
log_file='/var/log/repmgr/repmgr.log'
pg_bindir=/usr/pgsql-9.6/bin
promote_command='/usr/pgsql-9.6/bin/repmgr standby promote -f /etc/repmgr/9.6/repmgr.conf'
follow_command='/usr/pgsql-9.6/bin/repmgr standby follow -f /etc/repmgr/9.6/repmgr.conf'

node_id=19216817
node_name=192.168.1.7
conninfo='host=192.168.1.7 dbname=repmgr user=repmgr  password=repmgr'
data_directory='/var/lib/pgsql/9.6/data/'
service_start_command = 'sudo systemctl start postgresql-9.6'
service_stop_command = 'sudo systemctl stop postgresql-9.6'
service_restart_command = 'sudo systemctl restart postgresql-9.6'
service_reload_command = 'sudo systemctl reload postgresql-9.6'
ssh_options=-o "StrictHostKeyChecking no"
chown postgres:postgres /etc/repmgr/9.6/repmgr.conf
对于从机192.168.1.8
vi /etc/repmgr/9.6/repmgr.conf
log_file='/var/log/repmgr/repmgr.log'
pg_bindir=/usr/pgsql-9.6/bin
promote_command='/usr/pgsql-9.6/bin/repmgr standby promote -f /etc/repmgr/9.6/repmgr.conf'
follow_command='/usr/pgsql-9.6/bin/repmgr standby follow -f /etc/repmgr/9.6/repmgr.conf'

node_id=19216818
node_name=192.168.1.8
conninfo='host=192.168.1.8 dbname=repmgr user=repmgr  password=repmgr'
data_directory='/var/lib/pgsql/9.6/data/'
service_start_command = 'sudo systemctl start postgresql-9.6'
service_stop_command = 'sudo systemctl stop postgresql-9.6'
service_restart_command = 'sudo systemctl restart postgresql-9.6'
service_reload_command = 'sudo systemctl reload postgresql-9.6'
ssh_options=-o "StrictHostKeyChecking no"
chown postgres:postgres /etc/repmgr/9.6/repmgr.conf
六、注册主服务
(在主机192.168.1.6上执行)
要启用repmgr以支持复制群集,主节点必须注册repmgr。这将安装repmgr 扩展和元数据对象,并为主服务器添加元数据记录:
(注意这里操作都是在postgres用户下执行)
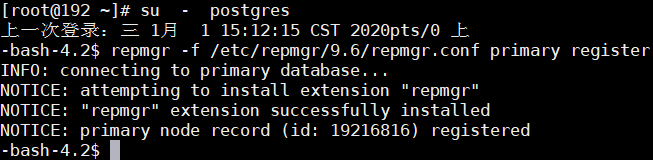
6.1、注册repmgr
su - postgres
repmgr -f /etc/repmgr/9.6/repmgr.conf primary register
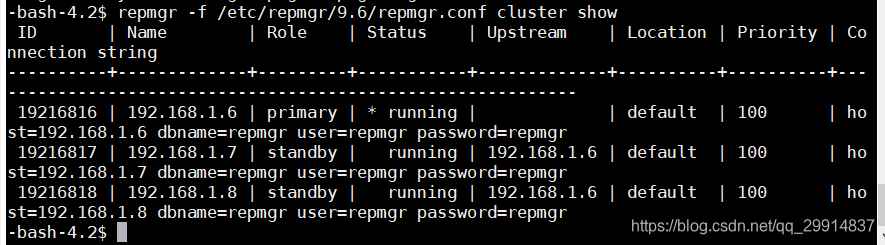
6.2、验证集群的状态:
repmgr -f /etc/repmgr/9.6/repmgr.conf cluster show

6.3、切换数据库登录用户
psql -U repmgr

因为前面修改了repmgr用户的密码为repmgr,解决方案看6.4
6.4、配置.pgpass密码文件
(在三台服务器上同时配置密码文件)
.pgpass 是 连接 postgresql 时使用的密码文件,通常位置为 ~/.pgpass。
在使用某些组件时还真的必须使用。具体的格式为:hostname:port:database:username:password
su - postgres
vi ~/.pgpass

 #内容如下

192.168.1.6:5432:repmgr:repmgr:repmgr
192.168.1.7:5432:repmgr:repmgr:repmgr
192.168.1.8:5432:repmgr:repmgr:repmgr
#~/.pgpass 上的权限必须是600
chmod 0600 ~/.pgpass
6.5、启动监控
repmgrd -f /etc/repmgr/9.6l/repmgr.conf --verbose --monitoring-history > /var/log/repmgr/repmgr.log 2>&1 &
七、主库配置
此处的操作都是在主库(192.168.1.6)上进行的,首先打开数据目录下的postgresql.conf文件然后做以下修改:
listen_addresses = ‘*’(默认localhost)
wal_level = logical(默认是minimal)
max_wal_senders=2(默认是0) #注意这个选项配置值要小于max_connections
max_connections=100 (默认是100)#要确保max_connections大于max_wal_senders
wal_keep_segments=64(默认是0)
wal_log_hints=on (默认注释掉了) #执行pg_rewind需要配置
hot_standby=on (默认注释掉了) #只对slaver有效,以便master倒掉时,slaver可以热切换到master
max_wal_senders则需要设置为一个大于0的数,它表示主库最多可以有多少个并发的standby数据库,
wal_keep_segments也应当设置为一个尽量大的值,以防止主库生成WAL日志太快,日志还没有来得及传送到standby就被覆盖,但是需要考虑磁盘空间允许,一个WAL日志一个WAL日志文件是16M,如果wal_keep_segments设置为64,也就是说将为standby库保留64个WAL日志文件,那么就会占用16*64=1GB的磁盘空间,所以需要综合考虑,在磁盘空间允许的情况下设置大一些,就会减少standby重新搭建的风险。
八、修改 pg_hba.conf 文件
三台服务器配置一致即可
vi /var/lib/pgsql/9.6/data/pg_hba.conf
local       all             all                                    peer
host        all             all           0.0.0.0/0                md5


local       repmgr          repmgr                                   trust
host        repmgr          repmgr        127.0.0.1/32               trust

host        repmgr          repmgr        192.168.1.6/32       trust
host        repmgr          repmgr        192.168.1.7/32       trust
host        postgres        repmgr        192.168.1.7/32       trust
host        repmgr            repmgr        192.168.1.8/32       trust
host        postgres          repmgr        192.168.1.8/32       trust

local       replication     repmgr                                      trust
host        replication     repmgr        127.0.0.1/32         trust
host        replication     repmgr        192.168.1.6/32       trust
host        replication     repmgr        192.168.1.7/32       trust
host        replication     repmgr        192.168.1.8/32       trust
九、克隆备用服务器
9.1、使用–dry-run选项检查可以克隆的待机状态
在从机192.168.1.7、从机192.168.1.8 上分配执行
–dry-run:展示行动会发生什么,但不要执行它
su - postgres
repmgr -h 192.168.1.6 -U repmgr -d repmgr -f /etc/repmgr/9.6/repmgr.conf -F standby clone --dry-run

如果有相关报错信息,请参考第六节-主库配置:
报错信息一:

解决方案:关闭从机上的postgresql服务: systemctl stop postgresql-9.6
报错信息二:

解决方案:
(三台服务器建议做相同改动),重启服务
vi /var/lib/pgsql/9.6/data/postgresql.conf

报错信息三:

解决方案:

9.2、正式开始克隆
在从机192.168.1.7、从机192.168.1.8 上分别执行
su - postgres
repmgr -h 192.168.1.6 -U repmgr -d repmgr -f /etc/repmgr/9.6/repmgr.conf -F standby clone
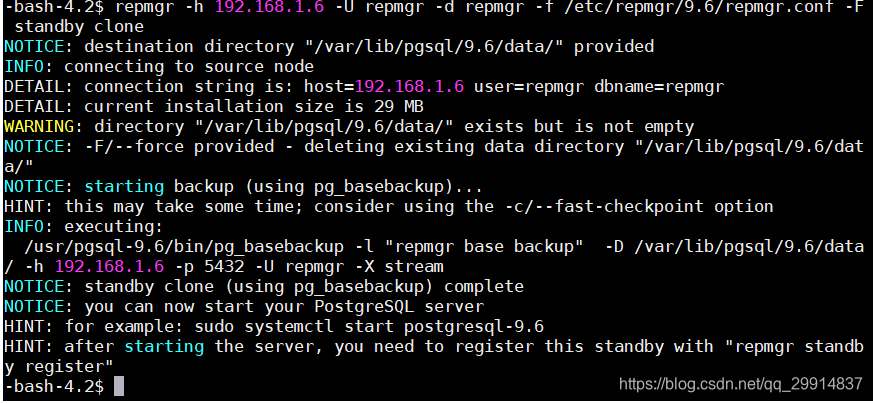
注意: 默认情况下,主数据目录中的任何配置文件都将被复制到备用数据库。通常这些将是postgresql.conf, postgresql.auto.conf,pg_hba.conf和 pg_ident.conf。
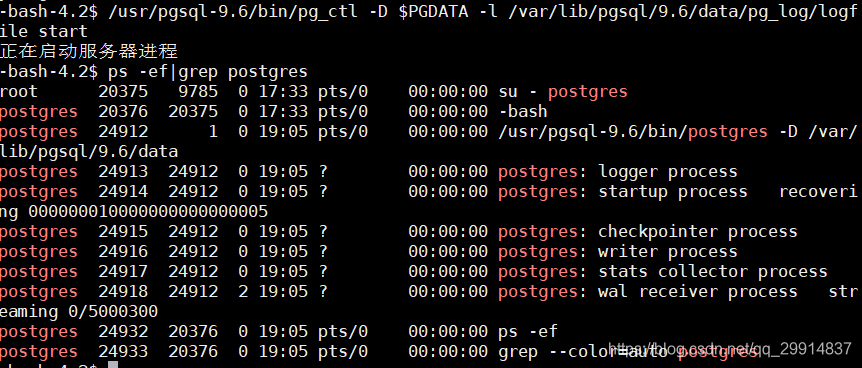
9.3、启动slave从服务器
在从机192.168.1.7、从机192.168.1.8 上分别执行
/usr/pgsql-9.6/bin/pg_ctl -D $PGDATA -l /var/lib/pgsql/9.6/data/pg_log/logfile start
9.4、在从机服务器节点上启动监控进程
在从机192.168.1.7、从机192.168.1.8 上分别执行
repmgrd -f /etc/repmgr/9.6l/repmgr.conf --verbose --monitoring-history > /var/log/repmgr/repmgr.log 2>&1 &

十、注册从机服务器
分别在两台从机服务器上执行
#注册备用服务器
repmgr -f /etc/repmgr/9.6/repmgr.conf standby register
#检查节点是否已注册
repmgr -f /etc/repmgr/9.6/repmgr.conf cluster show
十一、测试集群安装是否成功
11.1、测试在主机(192.168.1.6)插入数据,从机是否同步
如果在主机中插入数据,从机同步更新,证明数据同步备份无误!
主机(192.168.1.6)执行
psql -U postgres
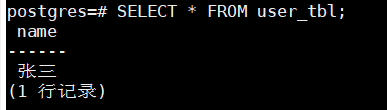
#查询数据
SELECT * FROM user_tbl;
#插入数据
INSERT INTO user_tbl(name) VALUES('张三');
在从机(192.168.1.7、192.168.1.8)发现数据同步更新
11.2、在从机中执行修改操作
主机负责写入操作,从机负责读操作,实现读写分类。如果对从机中数据进行修改失败,证明读写操作配置正确!
在从机(192.168.1.7、192.168.1.8)执行
#删除数据
DELETE FROM user_tbl WHERE name = '张三' ;

证明读写分离配置无误!
11.3、从机服务器断开连接,测试重连后是否自动同步数据
从机服务器断开连接后,重新启动后,正常应该会自动和主机服务器同步更新数据
在从机192.168.1.7上,关闭服务器
在主机192.168.1.6上,插入新数据
从机服务器重新启动,查询数据同步无误!
