| 机器 | 操作系统 | IP | 安装组件 | 版本 |
|---|---|---|---|---|
| psql1 | CentOS 7.3 | 10.10.0.1 | postgresql/etcd/patroni | 12.1/3.3.11/1.6.1 |
| psql2 | CentOS 7.3 | 10.10.0.2 | postgresql/etcd/patroni | 12.1/3.3.11/1.6.1 |
| psql3 | CentOS 7.3 | 10.10.0.3 | postgresql/etcd/patroni | 12.1/3.3.11/1.6.1 |
| haproxy1 | CentOS 7.3 | 10.10.0.4 | haproxy/keepalived | 1.5.18/2.0.20 |
| haproxy2 | CentOS 7.3 | 10.10.0.5 | haproxy/keepalived | 1.5.18/2.0.20 |
本文用到的所有文件
链接:https://pan.baidu.com/s/1lwaX_DuTcJwegLuJFZTH5w
提取码:5615
1、基础环境(所有节点)
1.1、修改主机名及hosts
hostnamectl set-hostname psql1
hostnamectl set-hostname psql2
hostnamectl set-hostname psql3
hostnamectl set-hostname haproxy1
hostnamectl set-hostname haproxy2
...
cat >> /etc/hosts <<EOF
10.10.0.1 psql1
10.10.0.2 psql2
10.10.0.3 psql3
10.10.0.4 haproxy1
10.10.0.5 haproxy2
EOF
1.2、修改系统进程打开最大文件数
echo "*   soft    nofile  655350" >> /etc/security/limits.conf
echo "*   hard    nofile  655350" >> /etc/security/limits.conf
1.3、关闭防火墙及selinux
systemctl stop firewalld && systemctl disable firewalld

setenforce 0

sed -i 's/^SELINUX=.*/SELINUX=disabled/' /etc/selinux/config
1.4、配置yum源
此处配置离线yum源安装,如果是外网环境直接yum安装即可
unzip pgsql_yum.zip && rm -rf pgsql_yum.zip && mv pgsql_yum /
mkdir -p /etc/yum.repos.d/yum.bak && mv /etc/yum.repos.d/*.repo /etc/yum.repos.d/yum.bak
cat > /etc/yum.repos.d/local.repo <<EOF
[local]
name=local
enabled=1
baseurl=file:///pgsql_yum/
gpgcheck=0
EOF
yum clean all && yum makecache
2、PostgreSQL(psql节点)
2.1、安装依赖
yum -y install readline readline-devel zlib zlib-devel vim
2.2、安装PostgreSQL
选择空间较大的磁盘
tar -xvf postgresql-12.1.tar.gz && rm -rf postgresql-12.1.tar.gz && cd postgresql-12.1
./configure --prefix=/usr/local/pgsql

make && make install
3、Etcd(etcd节点)
3.1、安装chrony同步集群系统时间
建议集群所有节点均安装配置
- 安装chrony
yum -y install chrony
- 启动并加入开机自启
systemctl start chronyd && systemctl enable chronyd && systemctl status chronyd
- 系统时钟同步,以psql1机器为时钟服务器
vim /etc/chrony.conf
- 将以下内容注释掉:

- 添加时钟服务器配置,即psql1机器
server 10.10.0.1 iburst
- 强制同步时间
chronyc -a makestep
- 重启service
systemctl daemon-reload && systemctl restart chronyd
3.2、安装Etcd
yum -y install etcd
3.3、配置Etcd
vim /etc/etcd/etcd.conf
- etcd1(10.10.0.1)
ETCD_DATA_DIR="/var/lib/etcd/etcd1.etcd"
ETCD_LISTEN_PEER_URLS="http://10.10.0.1:2380"
ETCD_LISTEN_CLIENT_URLS="http://10.10.0.1:2379,http://127.0.0.1:2379"
ETCD_NAME="etcd1"
ETCD_INITIAL_ADVERTISE_PEER_URLS="http://10.10.0.1:2380"
ETCD_ADVERTISE_CLIENT_URLS="http://10.10.0.1:2379"
ETCD_INITIAL_CLUSTER="etcd1=http://10.10.0.1:2380,etcd2=http://10.10.0.2:2380,etcd3=http://10.10.0.3:2380"
ETCD_INITIAL_CLUSTER_TOKEN="etcd-cluster"
ETCD_INITIAL_CLUSTER_STATE="new"
- etcd2(10.10.0.2)
ETCD_DATA_DIR="/var/lib/etcd/etcd2.etcd"
ETCD_LISTEN_PEER_URLS="http://10.10.0.2:2380"
ETCD_LISTEN_CLIENT_URLS="http://10.10.0.2:2379,http://127.0.0.1:2379"
ETCD_NAME="etcd2"
ETCD_INITIAL_ADVERTISE_PEER_URLS="http://10.10.0.2:2380"
ETCD_ADVERTISE_CLIENT_URLS="http://10.10.0.2:2379"
ETCD_INITIAL_CLUSTER="etcd1=http://10.10.0.1:2380,etcd2=http://10.10.0.2:2380,etcd3=http://10.10.0.3:2380"
ETCD_INITIAL_CLUSTER_TOKEN="etcd-cluster"
ETCD_INITIAL_CLUSTER_STATE="new"
- etcd3(10.10.0.3)
ETCD_DATA_DIR="/var/lib/etcd/etcd3.etcd"
ETCD_LISTEN_PEER_URLS="http://10.10.0.3:2380"
ETCD_LISTEN_CLIENT_URLS="http://10.10.0.3:2379,http://127.0.0.1:2379"
ETCD_NAME="etcd3"
ETCD_INITIAL_ADVERTISE_PEER_URLS="http://10.10.0.3:2380"
ETCD_ADVERTISE_CLIENT_URLS="http://10.10.0.3:2379"
ETCD_INITIAL_CLUSTER="etcd1=http://10.10.0.1:2380,etcd2=http://10.10.0.2:2380,etcd3=http://10.10.0.3:2380"
ETCD_INITIAL_CLUSTER_TOKEN="etcd-cluster"
ETCD_INITIAL_CLUSTER_STATE="new"
3.4、修改etcd.service
vim /usr/lib/systemd/system/etcd.service
直接删除原有内容,替换为以下配置
[Unit]
Description=Etcd Server
After=network.target
After=network-online.target
Wants=network-online.target

[Service]
Type=notify
WorkingDirectory=/var/lib/etcd/
EnvironmentFile=/etc/etcd/etcd.conf
User=etcd
# set GOMAXPROCS to number of processors
ExecStart=/bin/bash -c "GOMAXPROCS=$(nproc) /usr/bin/etcd \
--name=\"${ETCD_NAME}\" \
--data-dir=\"${ETCD_DATA_DIR}\" \
--listen-peer-urls=\"${ETCD_LISTEN_PEER_URLS}\" \
--listen-client-urls=\"${ETCD_LISTEN_CLIENT_URLS}\" \
--initial-advertise-peer-urls=\"${ETCD_INITIAL_ADVERTISE_PEER_URLS}\" \
--advertise-client-urls=\"${ETCD_ADVERTISE_CLIENT_URLS}\" \
--initial-cluster=\"${ETCD_INITIAL_CLUSTER}\"  \
--initial-cluster-token=\"${ETCD_INITIAL_CLUSTER_TOKEN}\" \
--initial-cluster-state=\"${ETCD_INITIAL_CLUSTER_STATE}\""
Restart=on-failure
LimitNOFILE=65536

[Install]
WantedBy=multi-user.target
3.5、启动Etcd
systemctl daemon-reload && systemctl enable etcd && systemctl start etcd
3.6、验证Etcd
- 任意节点查看集群状态
etcdctl cluster-health

etcdctl member list

4、Patroni(patroni节点)
4.1、安装setuptools
unzip setuptools-42.0.2.zip && rm -rf setuptools-42.0.2.zip && cd setuptools-42.0.2
python setup.py install
4.2、安装pip
tar -xvf pip-19.3.1.tar.gz && rm -rf pip-19.3.1.tar.gz && cd pip-19.3.1
python setup.py install
- 查看pip版本
pip -V

4.3、安装patroni
- 如果安装过程中提示缺少依赖可去pypi下载安装即可
https://pypi.org/
yum -y install python-devel
pip install *.whl
pip install psutil-5.6.7.tar.gz
pip install cdiff-1.0.tar.gz
pip install python-etcd-0.4.5.tar.gz
pip install PyYAML-5.3.tar.gz
pip install prettytable-0.7.2.tar.gz
pip install patroni-1.6.1.tar.gz
4.4、查看patroni版本
patronictl version

4.5、配置patroni
4.5.1、集群psql1节点配置
- 创建配置文件目录
mkdir -p /data/patroni/conf
- 拷贝相关文件
unzip patroni.zip

cp -r patroni /data/patroni/conf/
cp /data/patroni/conf/patroni/postgres0.yml /data/patroni/conf/
- 编辑配置文件
vim /data/patroni/conf/postgres0.yml
scope: batman
#namespace: /service/
name: postgresql0

restapi:
  listen: 10.10.0.1:8008
  connect_address: 10.10.0.1:8008
#  certfile: /etc/ssl/certs/ssl-cert-snakeoil.pem
#  keyfile: /etc/ssl/private/ssl-cert-snakeoil.key
#  authentication:
#    username: username
#    password: password

# ctl:
#   insecure: false # Allow connections to SSL sites without certs
#   certfile: /etc/ssl/certs/ssl-cert-snakeoil.pem
#   cacert: /etc/ssl/certs/ssl-cacert-snakeoil.pem

etcd:
  host: 10.10.0.1:2379

bootstrap:
  # this section will be written into Etcd:/<namespace>/<scope>/config after initializing new cluster
  # and all other cluster members will use it as a `global configuration`
  dcs:
    ttl: 30
    loop_wait: 10
    retry_timeout: 10
    maximum_lag_on_failover: 1048576
#    master_start_timeout: 300
    synchronous_mode: false
    #standby_cluster:
      #host: 127.0.0.1
      #port: 1111
      #primary_slot_name: patroni
    postgresql:
      use_pg_rewind: true
      use_slots: true
      parameters:
         wal_level: logical
         hot_standby: "on"
         max_connections: 5000
         wal_keep_segments: 1000
         max_wal_senders: 10
         max_replication_slots: 10
         wal_log_hints: "on"
         archive_mode: "on"
         archive_timeout: 1800s
         archive_command: mkdir -p ../wal_archive && test ! -f ../wal_archive/%f && cp %p ../wal_archive/%f
      recovery_conf:
         restore_command: cp ../wal_archive/%f %p

  # some desired options for 'initdb'
  initdb:  # Note: It needs to be a list (some options need values, others are switches)
  - encoding: UTF8
  - data-checksums

  pg_hba:  # Add following lines to pg_hba.conf after running 'initdb'
  # For kerberos gss based connectivity (discard @.*$)
  #- host replication replicator 127.0.0.1/32 gss include_realm=0
  #- host all all 0.0.0.0/0 gss include_realm=0
  - host replication replicator 0.0.0.0/0 md5
  - host all admin 0.0.0.0/0 md5
  - host all all 0.0.0.0/0 md5

  # Additional script to be launched after initial cluster creation (will be passed the connection URL as parameter)
# post_init: /usr/local/bin/setup_cluster.sh

  # Some additional users users which needs to be created after initializing new cluster
  users:
    admin:
      password: postgres
      options:
        - createrole
        - createdb
    replicator:
      password: replicator
      options:
        - replication
postgresql:
  listen: 0.0.0.0:5432
  connect_address: 10.10.0.1:5432
  data_dir: /data/postgres
  bin_dir: /usr/local/pgsql/bin
#  config_dir:
#  pgpass: /tmp/pgpass0
  authentication:
    replication:
      username: replicator
      password: replicator
    superuser:
      username: admin
      password: postgres
#    rewind:  # Has no effect on postgres 10 and lower
#      username: rewind_user
#      password: rewind_password
  # Server side kerberos spn
#  krbsrvname: postgres
  parameters:
    # Fully qualified kerberos ticket file for the running user
    # same as KRB5CCNAME used by the GSS
#   krb_server_keyfile: /var/spool/keytabs/postgres
    unix_socket_directories: '.'

#watchdog:
#  mode: automatic # Allowed values: off, automatic, required
#  device: /dev/watchdog
#  safety_margin: 5

tags:
    nofailover: false
    noloadbalance: false
    clonefrom: false
    nosync: false
4.5.2、集群psql2节点配置
- 创建配置文件目录
mkdir -p /data/patroni/conf
- 拷贝相关文件
unzip patroni.zip

cp -r patroni /data/patroni/conf/
cp /data/patroni/conf/patroni/postgres1.yml /data/patroni/conf/
- 编辑配置文件
vim /data/patroni/conf/postgres1.yml
scope: batman
#namespace: /service/
name: postgresql1

restapi:
  listen: 10.10.0.2:8008
  connect_address: 10.10.0.2:8008
#  certfile: /etc/ssl/certs/ssl-cert-snakeoil.pem
#  keyfile: /etc/ssl/private/ssl-cert-snakeoil.key
#  authentication:
#    username: username
#    password: password

# ctl:
#   insecure: false # Allow connections to SSL sites without certs
#   certfile: /etc/ssl/certs/ssl-cert-snakeoil.pem
#   cacert: /etc/ssl/certs/ssl-cacert-snakeoil.pem

etcd:
  host: 10.10.0.2:2379

bootstrap:
  # this section will be written into Etcd:/<namespace>/<scope>/config after initializing new cluster
  # and all other cluster members will use it as a `global configuration`
  dcs:
    ttl: 30
    loop_wait: 10
    retry_timeout: 10
    maximum_lag_on_failover: 1048576
#    master_start_timeout: 300
    synchronous_mode: false
    #standby_cluster:
      #host: 127.0.0.1
      #port: 1111
      #primary_slot_name: patroni
    postgresql:
      use_pg_rewind: true
      use_slots: true
      parameters:
         wal_level: logical
         max_connections: 5000
         hot_standby: "on"
         wal_keep_segments: 1000
         max_wal_senders: 10
         max_replication_slots: 10
         wal_log_hints: "on"
         archive_mode: "on"
         archive_timeout: 1800s
         archive_command: mkdir -p ../wal_archive && test ! -f ../wal_archive/%f && cp %p ../wal_archive/%f
      recovery_conf:
         restore_command: cp ../wal_archive/%f %p

  # some desired options for 'initdb'
  initdb:  # Note: It needs to be a list (some options need values, others are switches)
  - encoding: UTF8
  - data-checksums

  pg_hba:  # Add following lines to pg_hba.conf after running 'initdb'
  # For kerberos gss based connectivity (discard @.*$)
  #- host replication replicator 127.0.0.1/32 gss include_realm=0
  #- host all all 0.0.0.0/0 gss include_realm=0
  - host replication replicator 0.0.0.0/0 md5
  - host all admin 0.0.0.0/0 md5
  - host all all 0.0.0.0/0 md5

  # Additional script to be launched after initial cluster creation (will be passed the connection URL as parameter)
# post_init: /usr/local/bin/setup_cluster.sh

  # Some additional users users which needs to be created after initializing new cluster
  users:
    admin:
      password: postgres
      options:
        - createrole
        - createdb
    replicator:
      password: replicator
      options:
        - replication
postgresql:
  listen: 0.0.0.0:5432
  connect_address: 10.10.0.2:5432
  data_dir: /data/postgres
  bin_dir: /usr/local/pgsql/bin
#  config_dir:
#  pgpass: /tmp/pgpass0
  authentication:
    replication:
      username: replicator
      password: replicator
    superuser:
      username: admin
      password: postgres
#    rewind:  # Has no effect on postgres 10 and lower
#      username: rewind_user
#      password: rewind_password
  # Server side kerberos spn
#  krbsrvname: postgres
  parameters:
    # Fully qualified kerberos ticket file for the running user
    # same as KRB5CCNAME used by the GSS
#   krb_server_keyfile: /var/spool/keytabs/postgres
    unix_socket_directories: '.'

#watchdog:
#  mode: automatic # Allowed values: off, automatic, required
#  device: /dev/watchdog
#  safety_margin: 5

tags:
    nofailover: false
    noloadbalance: false
    clonefrom: false
    nosync: false
4.5.3、集群psql3节点配置
- 创建配置文件目录
mkdir -p /data/patroni/conf
- 拷贝相关文件
unzip patroni.zip

cp -r patroni /data/patroni/conf/
cp /data/patroni/conf/patroni/postgres2.yml /data/patroni/conf/
- 编辑配置文件
vim /data/patroni/conf/postgres2.yml
scope: batman
#namespace: /service/
name: postgresql2

restapi:
  listen: 10.10.0.3:8008
  connect_address: 10.10.0.3:8008
#  certfile: /etc/ssl/certs/ssl-cert-snakeoil.pem
#  keyfile: /etc/ssl/private/ssl-cert-snakeoil.key
#  authentication:
#    username: username
#    password: password

# ctl:
#   insecure: false # Allow connections to SSL sites without certs
#   certfile: /etc/ssl/certs/ssl-cert-snakeoil.pem
#   cacert: /etc/ssl/certs/ssl-cacert-snakeoil.pem

etcd:
  host: 10.10.0.3:2379

bootstrap:
  # this section will be written into Etcd:/<namespace>/<scope>/config after initializing new cluster
  # and all other cluster members will use it as a `global configuration`
  dcs:
    ttl: 30
    loop_wait: 10
    retry_timeout: 10
    maximum_lag_on_failover: 1048576
#    master_start_timeout: 300
    synchronous_mode: false
    #standby_cluster:
      #host: 127.0.0.1
      #port: 1111
      #primary_slot_name: patroni
    postgresql:
      use_pg_rewind: true
      use_slots: true
      parameters:
         wal_level: logical
         max_connections: 5000
         hot_standby: "on"
         wal_keep_segments: 1000
         max_wal_senders: 10
         max_replication_slots: 10
         wal_log_hints: "on"
         archive_mode: "on"
         archive_timeout: 1800s
         archive_command: mkdir -p ../wal_archive && test ! -f ../wal_archive/%f && cp %p ../wal_archive/%f
      recovery_conf:
         restore_command: cp ../wal_archive/%f %p

  # some desired options for 'initdb'
  initdb:  # Note: It needs to be a list (some options need values, others are switches)
  - encoding: UTF8
  - data-checksums

  pg_hba:  # Add following lines to pg_hba.conf after running 'initdb'
  # For kerberos gss based connectivity (discard @.*$)
  #- host replication replicator 127.0.0.1/32 gss include_realm=0
  #- host all all 0.0.0.0/0 gss include_realm=0
  - host replication replicator 0.0.0.0/0 md5
  - host all admin 0.0.0.0/0 md5
  - host all all 0.0.0.0/0 md5

  # Additional script to be launched after initial cluster creation (will be passed the connection URL as parameter)
# post_init: /usr/local/bin/setup_cluster.sh

  # Some additional users users which needs to be created after initializing new cluster
  users:
    admin:
      password: postgres
      options:
        - createrole
        - createdb
    replicator:
      password: replicator
      options:
        - replication
postgresql:
  listen: 0.0.0.0:5432
  connect_address: 10.10.0.3:5432
  data_dir: /data/postgres
  bin_dir: /usr/local/pgsql/bin
#  config_dir:
#  pgpass: /tmp/pgpass0
  authentication:
    replication:
      username: replicator
      password: replicator
    superuser:
      username: admin
      password: postgres
#    rewind:  # Has no effect on postgres 10 and lower
#      username: rewind_user
#      password: rewind_password
  # Server side kerberos spn
#  krbsrvname: postgres
  parameters:
    # Fully qualified kerberos ticket file for the running user
    # same as KRB5CCNAME used by the GSS
#   krb_server_keyfile: /var/spool/keytabs/postgres
    unix_socket_directories: '.'

#watchdog:
#  mode: automatic # Allowed values: off, automatic, required
#  device: /dev/watchdog
#  safety_margin: 5

tags:
    nofailover: false
    noloadbalance: false
    clonefrom: false
    nosync: false
4.6、修改目录权限
- 记下data_dir上述yml配置文件中的值。该目录需要确保postgres用户具备写入的权限。如果此目录不存在,则创建,在所有patroni节点分别进行如下操作
groupadd postgres
useradd -g postgres postgres
chown -R postgres /usr/local/pgsql
mkdir -p /data/postgres
chown -Rf postgres:postgres /data/postgres
chmod 700 /data/postgres
4.7、启动patroni
在psql1节点执行
chown -Rf postgres:postgres /data/patroni/conf
- 创建service文件,修改其中的可执行目录及配置文件
cat > /etc/systemd/system/patroni.service <<EOF
[Unit]
Description=Runners to orchestrate a high-availability PostgreSQL
After=network.target

[Service]
Type=simple

User=postgres
Group=postgres

ExecStart=/usr/bin/patroni /data/patroni/conf/postgres0.yml

KillMode=process

TimeoutSec=30

Restart=no

[Install]
WantedBy=multi-user.target
EOF
- 启动patroni初始化数据库
systemctl daemon-reload && systemctl start patroni && systemctl enable patroni
- 切换到postgres用户查看patroni是否托管数据库
su postgres

/usr/local/pgsql/bin/psql -h 127.0.0.1 -U admin postgres

在psql2节点执行
chown -Rf postgres:postgres /data/patroni/conf
- 创建service文件,修改其中的可执行目录及配置文件
cat > /etc/systemd/system/patroni.service <<EOF
[Unit]
Description=Runners to orchestrate a high-availability PostgreSQL
After=network.target

[Service]
Type=simple

User=postgres
Group=postgres

ExecStart=/usr/bin/patroni /data/patroni/conf/postgres1.yml

KillMode=process

TimeoutSec=30

Restart=no

[Install]
WantedBy=multi-user.target
EOF
- 启动patroni初始化数据库
systemctl daemon-reload && systemctl start patroni && systemctl enable patroni
- 切换到postgres用户查看patroni是否托管数据库
su postgres

/usr/local/pgsql/bin/psql -h 127.0.0.1 -U admin postgres

在psql3节点执行
chown -Rf postgres:postgres /data/patroni/conf
- 创建service文件,修改其中的可执行目录及配置文件
cat > /etc/systemd/system/patroni.service <<EOF
[Unit]
Description=Runners to orchestrate a high-availability PostgreSQL
After=network.target

[Service]
Type=simple

User=postgres
Group=postgres

ExecStart=/usr/bin/patroni /data/patroni/conf/postgres2.yml

KillMode=process

TimeoutSec=30

Restart=no

[Install]
WantedBy=multi-user.target
EOF
- 启动patroni初始化数据库
systemctl daemon-reload && systemctl start patroni && systemctl enable patroni
- 切换到postgres用户查看patroni是否托管数据库
su postgres

/usr/local/pgsql/bin/psql -h 127.0.0.1 -U admin postgres

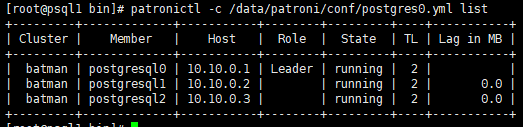
4.8、查看集群
- 任意节点查看即可
patronictl -c /data/patroni/conf/postgres0.yml list
- 如果需要切换master,运行如下命令即可
patronictl -c /data/patroni/conf/postgres0.yml switchover

5、HAProxy(HAProxy节点)
5.1、安装haproxy
各节点配置相同
yum -y install haproxy
5.2、修改配置文件
- 备份原有配置文件
cp -r /etc/haproxy/haproxy.cfg /etc/haproxy/haproxy.cfg_bak
- 修改配置文件,直接替换为新的配置,修改其中的IP、端口、页面用户名密码
cat > /etc/haproxy/haproxy.cfg <<EOF
#---------------------------------------------------------------------
# 全局定义
global
    # log语法:log [max_level_1]
    # 全局的日志配置,使用log关键字,指定使用127.0.0.1上的syslog服务中的local0日志设备,
    # 记录日志等级为info的日志
#   log         127.0.0.1 local0 info
    log         127.0.0.1 local1 notice
    chroot      /var/lib/haproxy
    pidfile     /var/run/haproxy.pid

    # 定义每个haproxy进程的最大连接数 ,由于每个连接包括一个客户端和一个服务器端,
    # 所以单个进程的TCP会话最大数目将是该值的两倍。
    maxconn     4096

    # 用户,组
    user        haproxy
    group       haproxy

    # 以守护进程的方式运行
    daemon

    # turn on stats unix socket
    stats socket /var/lib/haproxy/stats

#---------------------------------------------------------------------
# 默认部分的定义
defaults
    # mode语法:mode {http|tcp|health} 。http是七层模式,tcp是四层模式,health是健康检测,返回OK
    mode tcp
    # 使用127.0.0.1上的syslog服务的local3设备记录错误信息
    log 127.0.0.1 local3 err

    #if you set mode to http,then you nust change tcplog into httplog
    option     tcplog

    # 启用该项,日志中将不会记录空连接。所谓空连接就是在上游的负载均衡器或者监控系统为了
    #探测该服务是否存活可用时,需要定期的连接或者获取某一固定的组件或页面,或者探测扫描
    #端口是否在监听或开放等动作被称为空连接;官方文档中标注,如果该服务上游没有其他的负
    #载均衡器的话,建议不要使用该参数,因为互联网上的恶意扫描或其他动作就不会被记录下来
    option     dontlognull

    # 定义连接后端服务器的失败重连次数,连接失败次数超过此值后将会将对应后端服务器标记为不可用
    retries    3

    # 当使用了cookie时,haproxy将会将其请求的后端服务器的serverID插入到cookie中,以保证
    #会话的SESSION持久性;而此时,如果后端的服务器宕掉了,但是客户端的cookie是不会刷新的
    #,如果设置此参数,将会将客户的请求强制定向到另外一个后端server上,以保证服务的正常
    option redispatch

    #等待最大时长  When a server's maxconn is reached, connections are left pending in a queue  which may be server-specific or global to the backend.
    timeout queue           1m

    # 设置成功连接到一台服务器的最长等待时间,默认单位是毫秒
    timeout connect         1m

    # 客户端非活动状态的超时时长   The inactivity timeout applies when the client is expected to acknowledge or  send data.
    timeout client          15m

    # Set the maximum inactivity time on the server side.The inactivity timeout applies when the server is expected to acknowledge or  send data.
    timeout server          15m
    timeout check           30s
    maxconn                 5120

#---------------------------------------------------------------------
# 配置haproxy web监控,查看统计信息
listen status
    bind 0.0.0.0:1080
    mode http
    log global

    stats enable
    # stats是haproxy的一个统计页面的套接字,该参数设置统计页面的刷新间隔为30s
    stats refresh 30s
    stats uri /haproxy-stats
    # 设置统计页面认证时的提示内容
    stats realm Private lands
    # 设置统计页面认证的用户和密码,如果要设置多个,另起一行写入即可
    stats auth admin:Gsld1234!
    # 隐藏统计页面上的haproxy版本信息
#    stats hide-version

#---------------------------------------------------------------------
listen master
    bind *:5000
        mode tcp
        option tcplog
        balance roundrobin
    option httpchk OPTIONS /master
    http-check expect status 200
    default-server inter 3s fall 3 rise 2 on-marked-down shutdown-sessions
        server node1 10.10.0.1:5432 maxconn 1500 check port 8008 inter 5000 rise 2 fall 2
        server node2 10.10.0.2:5432 maxconn 1500 check port 8008 inter 5000 rise 2 fall 2
        server node3 10.10.0.3:5432 maxconn 1500 check port 8008 inter 5000 rise 2 fall 2
listen replicas
    bind *:5001
        mode tcp
        option tcplog
        balance roundrobin
    option httpchk OPTIONS /replica
    http-check expect status 200
    default-server inter 3s fall 3 rise 2 on-marked-down shutdown-sessions
        server node1 10.10.0.1:5432 maxconn 1500 check port 8008 inter 5000 rise 2 fall 2
        server node2 10.10.0.2:5432 maxconn 1500 check port 8008 inter 5000 rise 2 fall 2
        server node3 10.10.0.3:5432 maxconn 1500 check port 8008 inter 5000 rise 2 fall 2
EOF
5.3、启动
systemctl start haproxy && systemctl enable haproxy && systemctl status haproxy
5.4、页面访问
浏览器访问http://10.10.0.4:1080/haproxy-stats,输入前面配置文件中设置的用户名密码即可进入,这里是admin/Gsld1234!

- 页面中我们可以看到当前的主节点及从节点

- 我们通过5000端口和5001端口分别来提供写服务和读服务,如果需要对数据库写入数,只需要对外提供10.10.0.4:5000即可,可以模拟主库故障,即关闭其中的master节点来验证是否会进行自动主从切换
6、Keepalived(Keepalived节点)
6.1、安装依赖
yum -y install openssl-devel
6.2、获取Keepalived
https://www.keepalived.org/download.html
6.3、安装
tar -xvf keepalived-2.0.20.tar.gz && rm -rf keepalived-2.0.20.tar.gz && cd keepalived-2.0.20
./configure --prefix=/usr/local/keepalived

make && make install
6.4、版本查看
/usr/local/keepalived/sbin/keepalived -v
![[外链图片转存失败,源站可能有防盗链机制,建议将图片保存下来直接上传(img-5vcA8WZE-1583740056005)(FE2C4B0EF49342B199BBE1A0D7CBE60E)]](https://img-blog.csdnimg.cn/20200309155154329.png?x-oss-process=image/watermark,type_ZmFuZ3poZW5naGVpdGk,shadow_10,text_aHR0cHM6Ly9ibG9nLmNzZG4ubmV0L3l3ZDE5OTI=,size_16,color_FFFFFF,t_70)
6.5、配置文件
- 配置文件参数详解
https://www.cnblogs.com/arjenlee/p/9258188.html
- 创建配置文件目录及配置文件
mkdir -p /etc/keepalived
自带配置文件:/usr/local/keepalived/etc/keepalived/keepalived.conf,可作参考,这里直接创建新的配置文件即可
- 主服务器,即haproxy1
vim /etc/keepalived/keepalived.conf


global_defs {
    router_id haproxy1
}

vrrp_script haproxy_check {
   script "/usr/local/keepalived/check.sh"
   interval 2
   weight -20
}

vrrp_instance VI_1 {
    state MASTER
    interface eth0
    virtual_router_id 51
    priority 80
    advert_int 1

    track_script {
       haproxy_check
    }
    authentication {
        auth_type PASS
        auth_pass 123456
    }
    virtual_ipaddress {
        10.10.0.8
    }
}
- 从服务器,即haproxy2
vim /etc/keepalived/keepalived.conf


global_defs {
    router_id haproxy2
}

vrrp_script haproxy_check {
   script "/usr/local/keepalived/check.sh"
   interval 2
   weight:-20
}

vrrp_instance VI_1 {
    state BACKUP
    interface eth0
    virtual_router_id 51
    priority 70
    advert_int 1

    track_script {
       haproxy_check
    }
    authentication {
        auth_type PASS
        auth_pass 123456
    }
    virtual_ipaddress {
        10.10.0.8
    }
}
- vrrp_script:检查脚本,检查haproxy状态,如果挂掉,VIP漂移
- script:脚本命令
- interval:检查间隔
- weight:权重
- state:标记该节点是master还是backup
- interface:配置VIP绑定的网卡,这里使用和外网通信的网卡
- virtual_router_id:取1-255之间的值,主备需要相同,这样才能成为一个组
- priority:权重,数值高的主机是master,所以主节点要比从节点大,这是影响主备的关键
- advert_int:主备之间通讯的间隔秒数,用于判断主节点是否存活
- auth_type:进行安全认证的方式,PASS或者AH方式,推荐PASS
- auth_pass:PASS的密码
- virtual_ipaddress:VIP地址,最多可以写20个,keepalive启动后会自动配置该VIP
6.6、检测脚本
放置到配置文件所指定目录并添加权限
vim /usr/local/keepalived/check.sh

#!/bin/bash
count=`ps aux | grep -v grep | grep haproxy | wc -l`
if [ $count -eq 0 ]; then
    exit 1
else
    exit 0
fi
chmod +x /usr/local/keepalived/check.sh
6.7、启动
- 创建service文件
cat > /etc/systemd/system/keepalived.service <<EOF
[Unit]
Description=LVS and VRRP High Availability Monitor
After=syslog.target network-online.target

[Service]
Type=forking
KillMode=process
ExecStart=/usr/local/keepalived/sbin/keepalived

[Install]
WantedBy=multi-user.target
EOF
systemctl daemon-reload

systemctl enable keepalived && systemctl start keepalived && systemctl status keepalived
6.8、主从查看
在主节点查看网络信息,可以发现我们设置的VIP,当主节点、haproxy、keepalived任意一个挂掉时,VIP都会自动漂移到从节点实现高可用

