环境:
vlnx107001.firstshare.cn primary
vlnx107002.firstshare.cn slave
centos7
postresql9.6
repmgr4.0.5
开启防火墙
firewall-cmd --zone=public --add-port=5432/tcp --permanent
重新载入
firewall-cmd --reload
查看
firewall-cmd --zone=public --query-port=5432/tcp
一
、pg9.6 安装
1、安装存储库rpm包
yum install
https://download.postgresql.org/pub/repos/yum/9.6/redhat/rhel-7-x86_64/pgdg-centos96-9.6-3.noarch.rpm
2、安装客户端软件包
yum install postgresql96
3、安装服务器软件包
yum install postgresql96-server
4、初始化数据库启用自动启动
/usr/pgsql-9.6/bin/postgresql96-setup initdb
systemctl enable postgresql-9.6

systemctl start postgresql-9.6
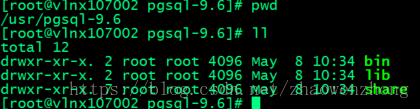
安装完毕后
默认数据目录为 :/var/lib/pgsql/9.6/data/
bin二进制文件目录:/usr/pgsql-9.6/bin
或者
直接RPM下载
[root@vlnx107001 zhaowzh]# wget
https://yum.postgresql.org/9.6/redhat/rhel-7-x86_64/postgresql96-9.6.8-1PGDG.rhel7.x86_64.rpm
[root@vlnx107001 zhaowzh]# wget
https://yum.postgresql.org/9.6/redhat/rhel-7-x86_64/postgresql96-contrib-9.6.8-1PGDG.rhel7.x86_64.rpm
[root@vlnx107001 zhaowzh]# wget
https://yum.postgresql.org/9.6/redhat/rhel-7-x86_64/postgresql96-libs-9.6.8-1PGDG.rhel7.x86_64.rpm
[root@vlnx107001 zhaowzh]# wget
https://yum.postgresql.org/9.6/redhat/rhel-7-x86_64/postgresql96-server-9.6.8-1PGDG.rhel7.x86_64.rpm
[root@vlnx107001 zhaowzh]# rpm -i postgresql96-libs-9.6.8-1PGDG.rhel7.x86_64.rpm
[root@vlnx107001 zhaowzh]# rpm -i postgresql96-9.6.8-1PGDG.rhel7.x86_64.rpm
[root@vlnx107001 zhaowzh]# rpm -i postgresql96-contrib-9.6.8-1PGDG.rhel7.x86_64.rpm
[root@vlnx107001 zhaowzh]# rpm -i postgresql96-server-9.6.8-1PGDG.rhel7.x86_64.rpm
二、安装repmgr
[root@vlnx107001 zhaowzh]# wget
https://yum.postgresql.org/9.6/redhat/rhel-7-x86_64/repmgr96-4.0.5-1.rhel7.x86_64.rpm
[root@vlnx107001 zhaowzh]# wget
https://yum.postgresql.org/9.6/redhat/rhel-7-x86_64/repmgr96-debuginfo-4.0.5-1.rhel7.x86_64.rpm
[root@vlnx107001 zhaowzh]# rpm -i repmgr96-4.0.5-1.rhel7.x86_64.rpm
[root@vlnx107001 zhaowzh]# rpm -i repmgr96-debuginfo-4.0.5-1.rhel7.x86_64.rpm
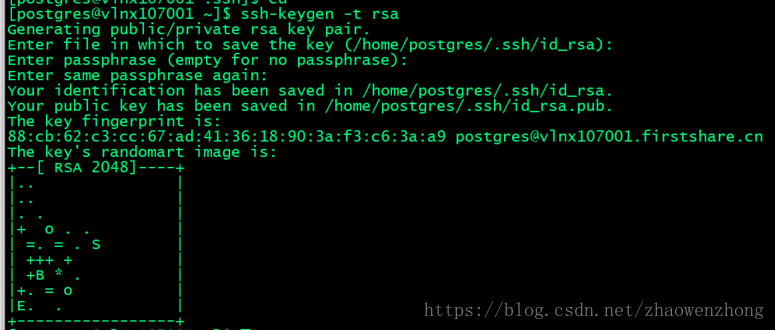
三、构建 ssh 免密互通(以 vlnx107001上操作为例)
[postgres@vlnx107001 ~]$ ssh-keygen -t rsa
注 不要指定密码,即 空密码即可
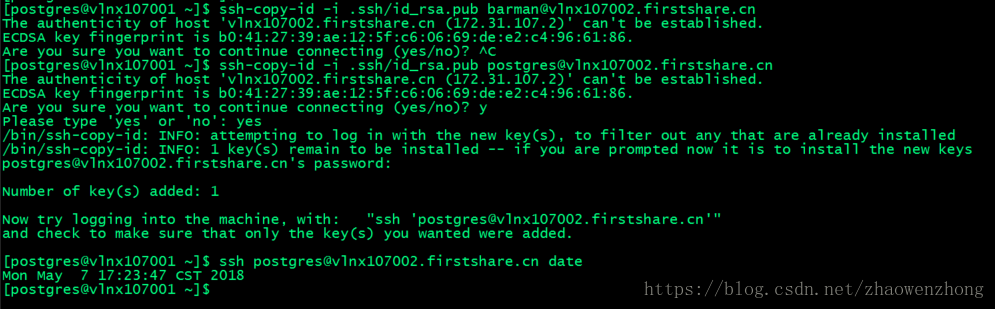
将密钥传递到 slave服务器上并验证
[postgres@vlnx107001 ~]$ ssh-copy-id -i .ssh/id_rsa.pub [email protected]
[postgres@vlnx107001 ~]$ ssh
[email protected] date
四、编辑
pg_hba.conf 并重新加载配置
local repmgr repmgr trust
host repmgr repmgr 127.0.0.1/32 trust
host repmgr repmgr 172.31.107.2/32 trust
host repmgr repmgr 172.31.107.1/32 trust
host postgres repmgr 172.31.107.2/32 trust
local replication repmgr trust
host replication repmgr 127.0.0.1/32 trust
host replication repmgr 172.31.107.2/32 trust
host replication repmgr 172.31.107.1/32 trust
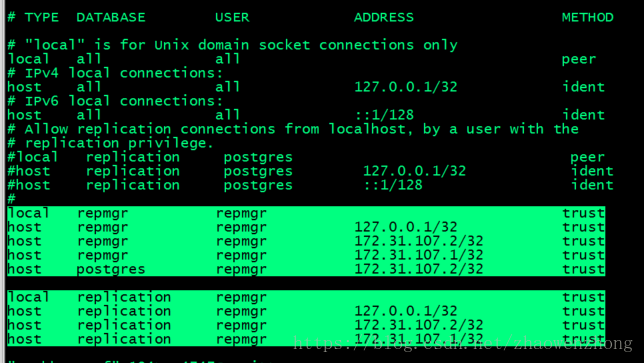
[postgres@vlnx107001 data]$ pg_ctl -D $PGDATA reload
五、创建 repmgr账号用来管理 集群维护等操作
为repmgr元数据创建专用的PostgreSQL超级用户帐户和数据库
[postgres@vlnx107001 ~]$ createuser --login --superuser repmgr
[postgres@vlnx107001 ~]$ createdb repmgr -O repmgr
验证是否互通
[postgres@vlnx107002 ~]$ psql -h vlnx107001.firstshare.cn -U repmgr -d postgres -c "select version()"
[postgres@vlnx107002 postgresql]$ psql -h vlnx107001.firstshare.cn -U repmgr -d repmgr -c "select version()"

六、编辑 repmgr.conf 配置文件
[root@vlnx107001 ~]# vim /etc/repmgr/9.6/repmgr.conf
#-----------------------------------------------------------------------------
#zhaowenzhong
#----------------------------------------------------------------------------
log_file='/var/log/repmgr/repmgr.log'
pg_bindir=/usr/pgsql-9.6/bin
promote_command='/usr/pgsql-9.6/bin/repmgr standby promote -f /etc/repmgr/9.6/repmgr.conf'
follow_command='/usr/pgsql-9.6/bin/repmgr standby follow -f /etc/repmgr/9.6/repmgr.conf'
cluster=vpgs107001
node_id=107001
node_name=vlnx107001
conninfo='host=172.31.107.1 dbname=repmgr user=repmgr'
data_directory='/var/lib/pgsql/9.6/data/'
service_start_command = 'sudo systemctl start postgresql-9.6'
service_stop_command = 'sudo systemctl stop postgresql-9.6'
service_restart_command = 'sudo systemctl restart postgresql-9.6'
service_reload_command = 'sudo systemctl reload postgresql-9.6'
ssh_options=-o "StrictHostKeyChecking no"

七、注册主服务
要启用repmgr以支持复制群集,主节点必须注册repmgr。这将安装repmgr 扩展和元数据对象,并为主服务器添加元数据记录:
[postgres@vlnx107001 ~]$ repmgr -f /etc/repmgr/9.6/repmgr.conf primary register

验证集群的状态:
[postgres@vlnx107001 ~]$ repmgr -f /etc/repmgr/9.6/repmgr.conf cluster show

repmgr元数据表中

复制群集中的每个服务器都有自己的记录。如果repmgrd 正在使用,则节点的状态或角色更改时会更新字段upstream_node_id,active和 type。
启动监控
[postgres@vlnx107001 ~]$ repmgrd -f /etc/repmgr/9.6l/repmgr.conf --verbose --monitoring-history > /var/log/repmgr/repmgr.log 2>&1 &
八、克隆备用服务器
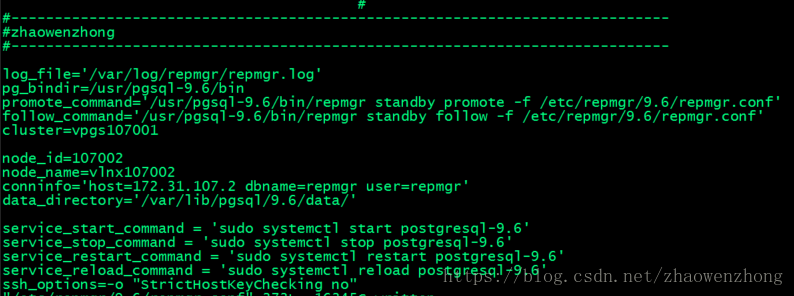
vlnx107002 上安装 repmgr 省略 (同上)
配置 repmgr.conf
#----------------------------------------------------------------------------
#zhaowenzhong
#----------------------------------------------------------------------------
log_file='/var/log/repmgr/repmgr.log'
pg_bindir=/usr/pgsql-9.6/bin
promote_command='/usr/pgsql-9.6/bin/repmgr standby promote -f /etc/repmgr/9.6/repmgr.conf'
follow_command='/usr/pgsql-9.6/bin/repmgr standby follow -f /etc/repmgr/9.6/repmgr.conf'
cluster=vpgs107001
node_id=107002
node_name=vlnx107002
conninfo='host=172.31.107.2 dbname=repmgr user=repmgr'
data_directory='/var/lib/pgsql/9.6/data/'
service_start_command = 'sudo systemctl start postgresql-9.6'
service_stop_command = 'sudo systemctl stop postgresql-9.6'
service_restart_command = 'sudo systemctl restart postgresql-9.6'
service_reload_command = 'sudo systemctl reload postgresql-9.6'
ssh_options=-o "StrictHostKeyChecking no"
使用--dry-run选项检查可以克隆的待机状态:
[postgres@vlnx107002 ~]$ repmgr -h vlnx107001.firstshare.cn -U repmgr -d repmgr -f /etc/repmgr/9.6/repmgr.conf -F standby clone --dry-run

开始克隆
[postgres@vlnx107002 ~]$ repmgr -h vlnx107001.firstshare.cn -U repmgr -d repmgr -f /etc/repmgr/9.6/repmgr.conf standby clone

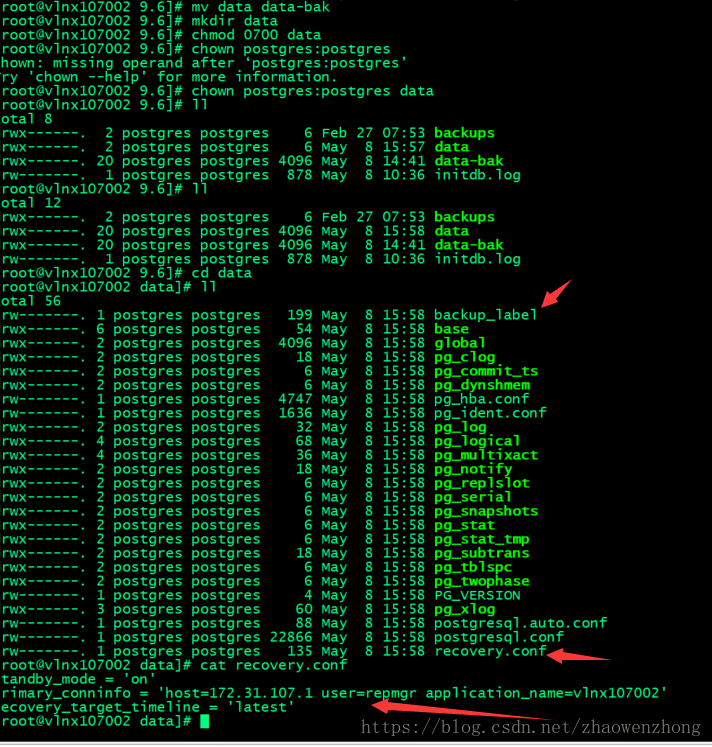
克隆从主PostgreSQL的数据目录中的文件节点 使用PostgreSQL的pg_basebackup效用。 将会自动创建一个recovery.conf文件,其中包含从此主服务器开始流式传输的正确参数。
注意: 默认情况下,主数据目录中的任何配置文件都将被复制到备用数据库。通常这些将是postgresql.conf, postgresql.auto.conf,pg_h
ba.conf和 pg_ident.conf。这些可能需要在待机启动之前进行修改
开启slave
[postgres@vlnx107002 data]$ /usr/pgsql-9.6/bin/pg_ctl -D $PGDATA -l /var/lib/pgsql/9.6/data/pg_log/logfile start
在备用服务器节点上启动监控进程
[postgres@vlnx107002 ~]$ repmgrd -f /etc/repmgr/9.6l/repmgr.conf --verbose --monitoring-history > /var/log/repmgr/repmgr.log 2>&1 &

九、验证是否数据同步
登录 primary
repmgr=# SELECT * FROM pg_stat_replication;

注册备用服务器:
[postgres@vlnx107002 pg_log]$ repmgr -f /etc/repmgr/9.6/repmgr.conf standby register
通过在待机状态下执行repmgr cluster show来检查节点是否已注册:
[postgres@vlnx107002 pg_log]$ repmgr -f /etc/repmgr/9.6/repmgr.conf cluster show
