前言
记录一下安装部署nginx+ant-design-pro的过程
nginx安装
nginx的安装直接看官网的,可以是源码编译安装(百度搜索出来的大多是这种安装方式,例如:https://www.cnblogs.com/xxoome/p/5866475.html) ,也可以是yum直接安装最新稳定版1.16.1,安装步骤也可以直接用官网的,
- 云平台准备centos机器
centos7.6.1810_base-kvm-50g-none这个模板投递一台机器,yum remove firewalld NetworkManager -y关闭防火墙, 安装nginx
https://nginx.org/en/linux_packages.html#RHEL-CentOS 这个是官方文档,先创建repo镜像地址文件:/etc/yum.repos.d/nginx.repo,内容为:[nginx-stable] name=nginx stable repo baseurl=http://nginx.org/packages/centos/$releasever/$basearch/ gpgcheck=1 enabled=1 gpgkey=https://nginx.org/keys/nginx_signing.key module_hotfixes=true [nginx-mainline] name=nginx mainline repo baseurl=http://nginx.org/packages/mainline/centos/$releasever/$basearch/ gpgcheck=1 enabled=0 gpgkey=https://nginx.org/keys/nginx_signing.key module_hotfixes=true然后,执行命令:
sudo yum install yum-utils安装前置的依赖包,接着安装nginx包:sudo yum install nginx这样就安装好了目前的最新稳定版nginx,浏览器访问ip:80能访问到nginx的页面。启动命令:/usr/sbin/nginx,重新加载配置并启动命令:/usr/sbin/nginx -s reload,停止命令:/usr/sbin/nginx -s stop
部署ant-design-pro前端程序
前端工程通过跑npm run build来执行vue-cli-service build编译工程到dist目录下,把编译好的dist目录下内容上传到 /usr/share/nginx/html 目录下,默认安装好nginx的配置文件是:/etc/nginx/nginx.conf,这个配置文件加载的是:/etc/nginx/conf.d/default.conf,参考:https://pro.loacg.com/docs/deploy 文档中nginx的配置修改default.conf文件,添加了location /的配置和location /MonitorCenter的配置,后端地址配置在proxy_pass的值中,如图: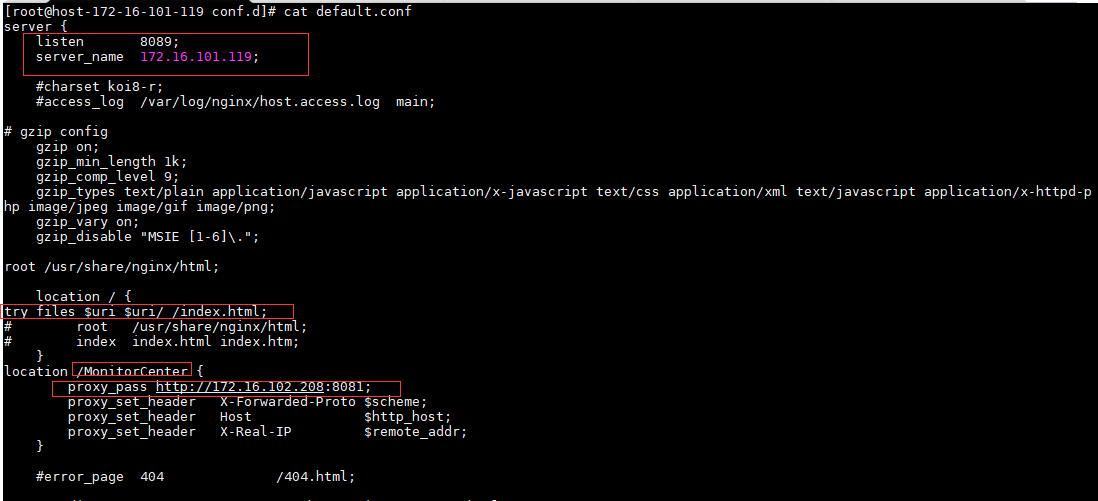
更多参考文档
- 官方文档(能按照文档来学习是最好的):https://nginx.org/en/docs/
- 一篇介绍nginx的中文blog:https://blog.csdn.net/qq_33454884/article/details/89212702
- docker部署nginx文档: https://cli.vuejs.org/zh/guide/deployment.html#docker-nginx