HBase的基本读写流程
写入流程
读取流程
HBase的模块与协作
HBase启动
RegionServer失效
HMaster失效
HBase常用的Shell命令
进入shell
help命令
查询服务器状态
查看所有表
创建一个表
获得表的描述
添加一个列族
删除一个列族
插入数据
查询表中有多少行
获取一个rowkey的所有数据
获得一个id,一个列簇(一个列)中的所有数据
查询整表数据
扫描整个列簇
指定扫描其中的某个列
使用limit
使用Filter是
delete命令
删除整行的值
禁用和启用
使用exists来检查表是否存在
删除表需要先将表disable
java操作hbase
pom配置
application.yml
编写java的配置类
编写测试类,测试操作HBase
执行结果
HBase的基本读写流程
写入流程
Client先访问Zookeeper,得到RegionServer的地址
Client对RegionServer发起写请求,RegionServer接受请求并将数据写入内存
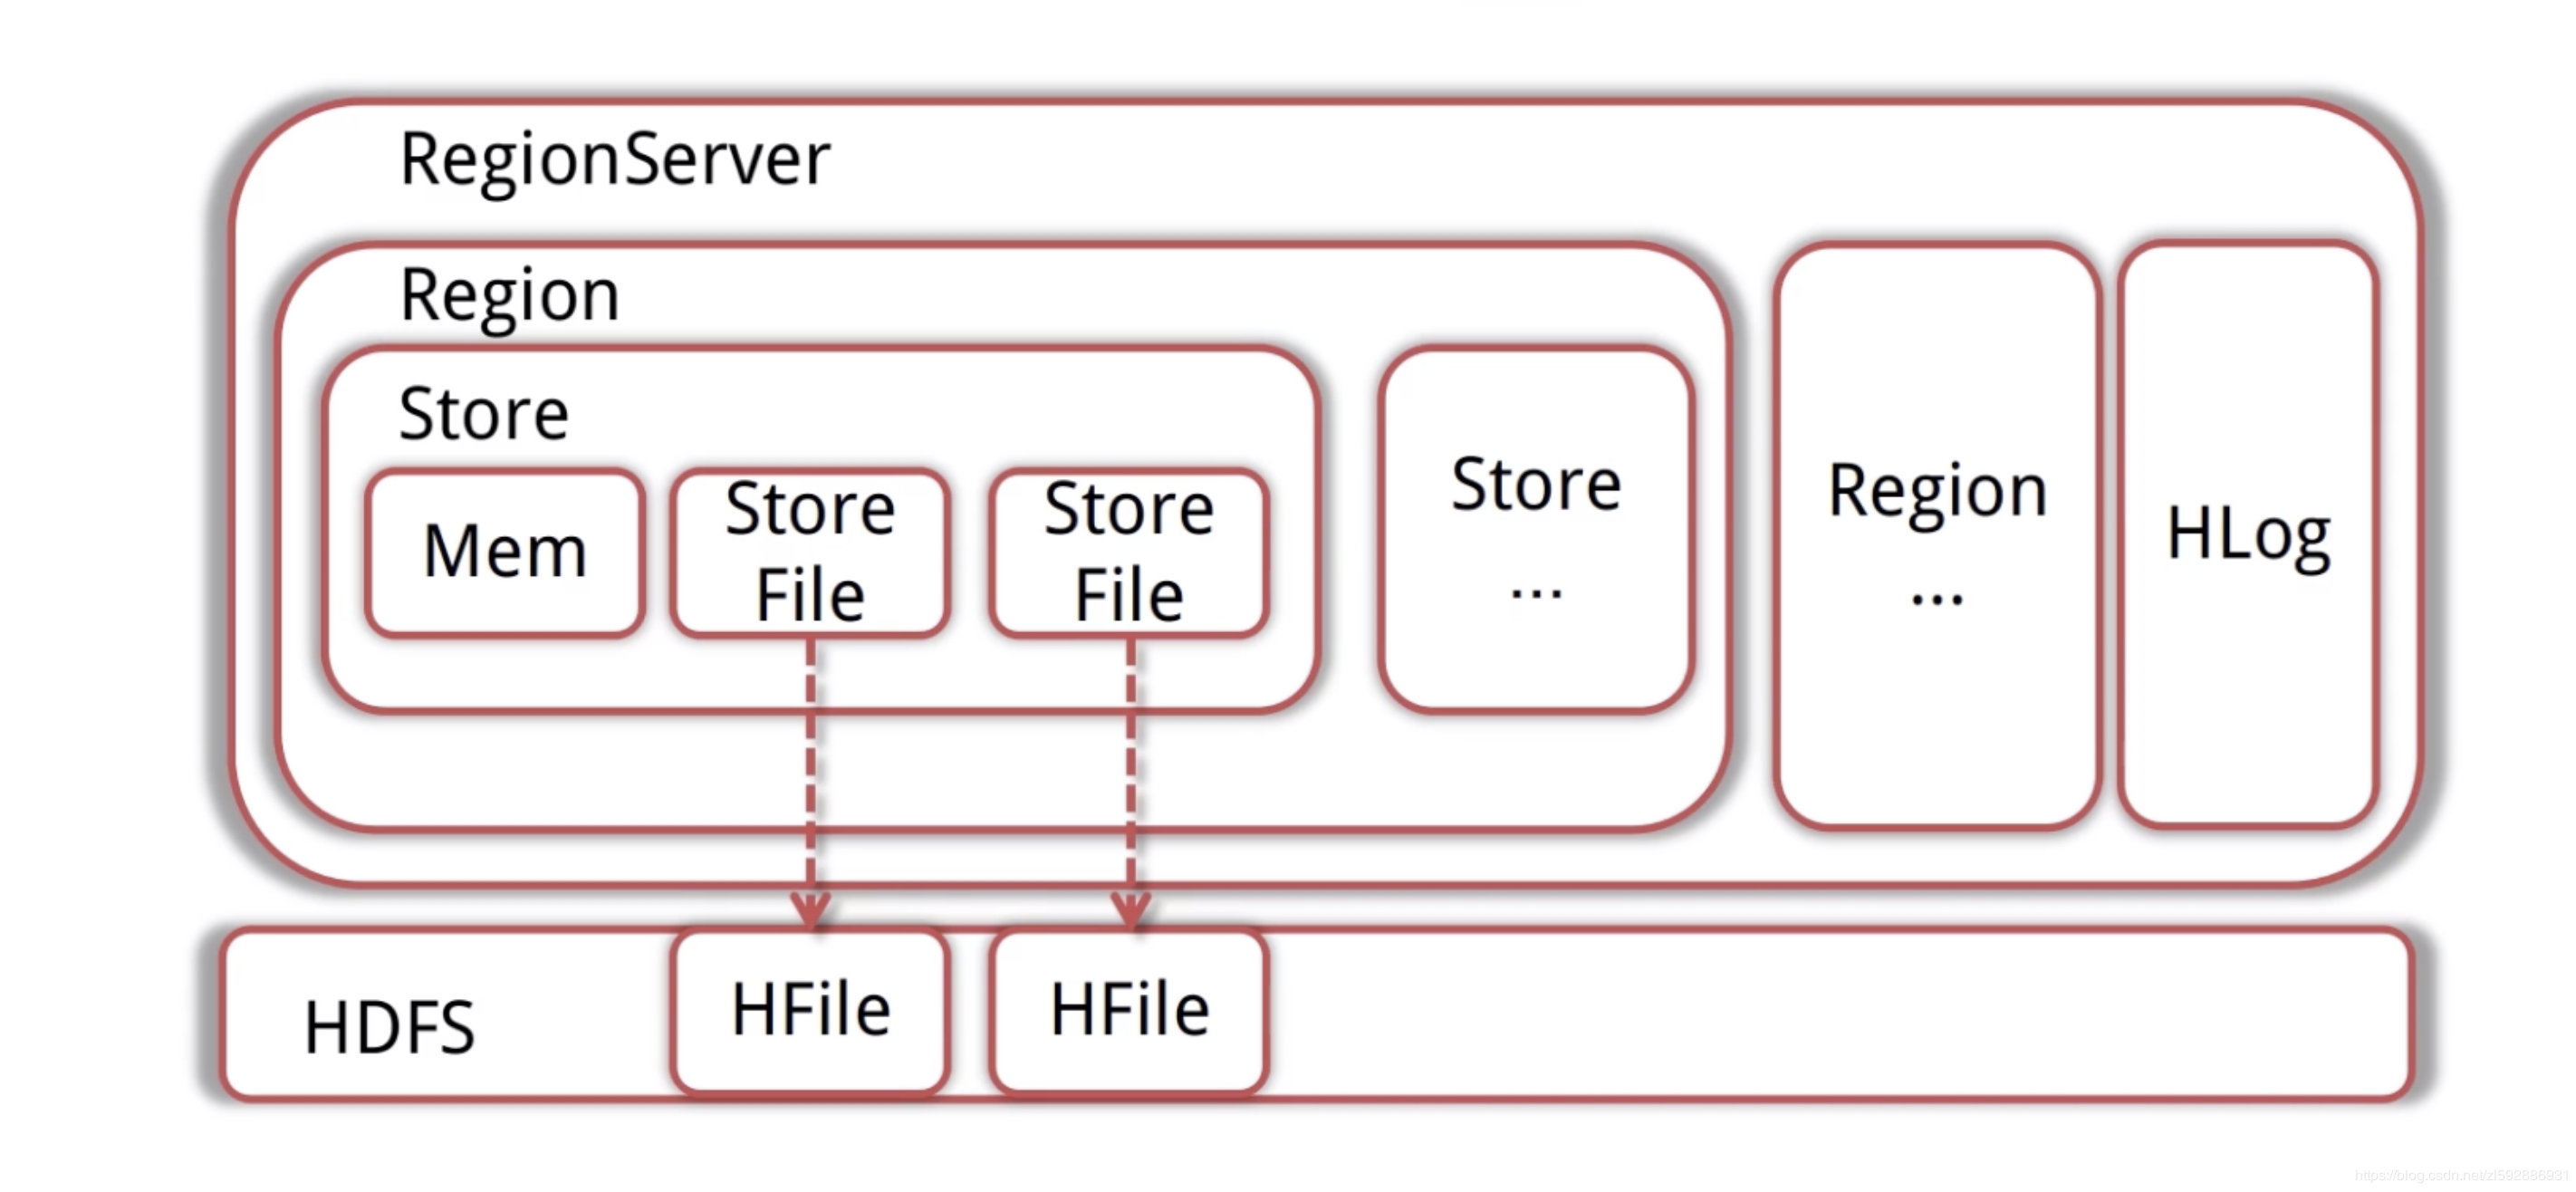
当MemStore(数据在内存的实体)达到一定值后(可设定),flush到StoreFile(HFile的封装)并写入HDFS
读取流程
Client先访问Zookeeper,得到RegionServer的地址
Client对RegionServer发起读取请求
RegionServer收到请求,先扫描自己的MemStore,再扫描BlockCache,如果没找到就去读取StoreFile,然后将数据返回给客户端
HBase的模块与协作
HBase共有HMaster(老板)、Zookeeper(秘书)、RegionServer(员工)三个模块
HBase启动
HMaster启动,注册到ZK,等待RegionServer的汇报
RegionServer注册到ZK,并且向HMaster汇报
对各个RegionServer(包含失效的)的数据进行整理,分配Region与Meta信息
RegionServer失效
HMaster将失效的RegionServer上的Region分配给其他节点
HMaster更新HBase的Meta表,保证数据可以正常访问
HMaster失效
高可用集群:HMaster失效后,处于Backup的其他HMaster节点推选出一个(老板)转为Active(类似于老板出差玩了,有backup的人选,保证集群继续高可用)
如果集群没有配置高可用,数据可以正常读写,但是不能创建删除更改表(结构),会抛出异常(类似老板出去了,没有backup,员工还是要继续干活【读写数据】,但是有新的需求【删除、添加表】,秘书会告诉客户我们老板不在,然后向他丢了一个异常)
HBase常用的Shell命令
进入shell
我们先进入shell,进入hbase目录下的bin
./hbase shell
help命令
使用help获得全部命令的列表,使用help ‘xxx’获得xxx命令的详细信息
help ‘status’
查询服务器状态
status
查看所有表
list
创建一个表
第一个参数是表名称,后面是列蔟
create ‘hbase_demo’,‘family1’,‘family2’
获得表的描述
describe ‘hbase_demo’
添加一个列族
alter ‘hbase_demo’, ‘family3’
删除一个列族
alter ‘hbase_demo’, {NAME => ‘family3’, METHOD => ‘delete’}
插入数据
put ‘hbase_demo’, ‘rowkey1’,‘family1:name’,‘file1.txt’
put ‘hbase_demo’, ‘rowkey1’,‘family1:type’,‘txt’
put ‘hbase_demo’, ‘rowkey1’,‘family1:size’,‘1024’
put ‘hbase_demo’, ‘rowkey1’,‘family2:path’,’/home’
put ‘hbase_demo’, ‘rowkey1’,‘family2:creator’,‘tom’
put ‘hbase_demo’, ‘rowkey2’,‘family1:name’,‘file2.jpg’
put ‘hbase_demo’, ‘rowkey2’,‘family1:type’,‘jpg’
put ‘hbase_demo’, ‘rowkey2’,‘family1:size’,‘2048’
put ‘hbase_demo’, ‘rowkey2’,‘family2:path’,’/home/pic’
put ‘hbase_demo’, ‘rowkey2’,‘family2:creator’,‘jerry’
rowkey、列蔟、列形成唯一,比如先执行:
put ‘hbase_demo’, ‘rowkey1’,‘family1:name’,‘file1.txt’
在执行
put ‘hbase_demo’, ‘rowkey1’,‘family1:name’,‘file2222.txt’
最终结果以file2222.txt为主
查询表中有多少行
count ‘hbase_demo’
获取一个rowkey的所有数据
get ‘hbase_demo’, ‘rowkey1’
获得一个id,一个列簇(一个列)中的所有数据
get ‘hbase_demo’, ‘rowkey1’, ‘family1’
查询整表数据
scan ‘hbase_demo’
扫描整个列簇
scan ‘hbase_demo’, {COLUMN=>‘family1’}
指定扫描其中的某个列
scan ‘hbase_demo’, {COLUMNS=> ‘family1:name’}
使用limit
除了列(COLUMNS)修饰词外,HBase还支持Limit(限制查询结果行数),STARTROW(ROWKEY起始行。会先根据这个key定位到region,再向后扫描)、STOPROW(结束行)、TIMERANGE(限定时间戳范围)、VERSIONS(版本数)、和FILTER(按条件过滤行)等。比如我们从RowKey1这个rowkey开始,找下一个行的最新版本
scan ‘hbase_demo’, { STARTROW => ‘rowkey1’, LIMIT=>1, VERSIONS=>1}
使用Filter是
限制名称为file1.txt
scan ‘hbase_demo’, FILTER=>“ValueFilter(=,‘name:file21.txt’)”
filter中支持多个过滤条件通过括号、AND和OR的条件组合
scan ‘hbase_demo’, FILTER=>“ColumnPrefixFilter(‘typ’) AND ValueFilter ValueFilter(=,‘substring:10’)”
delete命令
delete ‘hbase_demo’,‘rowkey1’,‘family1:size’
get ‘hbase_demo’,‘rowkey1’,‘family1:size’
删除整行的值
deleteall ‘hbase_demo’,‘rowkey1’
get ‘hbase_demo’,‘rowkey1’
禁用和启用
enable ‘hbase_demo’
is_enabled ‘hbase_demo’
disable ‘hbase_demo’
is_disabled ‘hbase_demo’
使用exists来检查表是否存在
exists ‘hbase_demo’
删除表需要先将表disable
disable ‘hbase_demo’
drop ‘hbase_demo’
java操作hbase
pom配置
<dependencies>
<dependency>
<groupId>org.springframework.data</groupId>
<artifactId>spring-data-hadoop-boot</artifactId>
<version>2.5.0.RELEASE</version>
<exclusions>
<exclusion>
<groupId>javax.servlet</groupId>
<artifactId>servlet-api</artifactId>
</exclusion>
</exclusions>
</dependency>
<dependency>
<groupId>org.springframework.data</groupId>
<artifactId>spring-data-hadoop</artifactId>
<version>2.5.0.RELEASE</version>
<exclusions>
<exclusion>
<groupId>org.slf4j</groupId>
<artifactId>slf4j-log4j12</artifactId>
</exclusion>
<exclusion>
<groupId>log4j</groupId>
<artifactId>log4j</artifactId>
</exclusion>
<exclusion>
<groupId>javax.servlet</groupId>
<artifactId>servlet-api</artifactId>
</exclusion>
</exclusions>
</dependency>
<dependency>
<groupId>org.apache.hbase</groupId>
<artifactId>hbase-client</artifactId>
<version>1.4.4</version>
<exclusions>
<exclusion>
<groupId>org.slf4j</groupId>
<artifactId>slf4j-log4j12</artifactId>
</exclusion>
<exclusion>
<groupId>log4j</groupId>
<artifactId>log4j</artifactId>
</exclusion>
<exclusion>
<groupId>javax.servlet</groupId>
<artifactId>servlet-api</artifactId>
</exclusion>
</exclusions>
</dependency>
<dependency>
<groupId>org.apache.logging.log4j</groupId>
<artifactId>log4j-1.2-api</artifactId>
<version>2.11.0</version>
</dependency>
<dependency>
<groupId>com.alibaba</groupId>
<artifactId>fastjson</artifactId>
<version>1.2.47</version>
</dependency>
<dependency>
<groupId>org.springframework.boot</groupId>
<artifactId>spring-boot-starter-test</artifactId>
<scope>test</scope>
</dependency>
<dependency>
<groupId>junit</groupId>
<artifactId>junit</artifactId>
<version>4.12</version>
<scope>test</scope>
</dependency>
</dependencies>
application.yml
这里根据大家自己的hbase集群ip,博主是在电脑上配置类profile
hbase:
config:
hbase.zookeeper.quorum: master,node1,node2
hbase.zookeeper.property.clientPort: 2181
编写java的配置类
HBaseConfig:
package codemperor.hbase.config;
import java.util.Map;
import java.util.Set;
import org.apache.hadoop.hbase.HBaseConfiguration;
import org.springframework.boot.context.properties.EnableConfigurationProperties;
import org.springframework.context.annotation.Bean;
import org.springframework.context.annotation.Configuration;
import org.springframework.data.hadoop.hbase.HbaseTemplate;
@Configuration
@EnableConfigurationProperties(HBaseProperties.class)
public class HBaseConfig {
private final HBaseProperties properties;
public HBaseConfig(HBaseProperties properties) {
this.properties = properties;
}
@Bean
public HbaseTemplate hbaseTemplate() {
HbaseTemplate hbaseTemplate = new HbaseTemplate();
hbaseTemplate.setConfiguration(configuration());
hbaseTemplate.setAutoFlush(true);
return hbaseTemplate;
}
public org.apache.hadoop.conf.Configuration configuration() {
org.apache.hadoop.conf.Configuration configuration = HBaseConfiguration.create();
Map<String, String> config = properties.getConfig();
Set<String> keySet = config.keySet();
for (String key : keySet) {
configuration.set(key, config.get(key));
}
return configuration;
}
}
HBaseProperties:
package codemperor.hbase.config;
import org.springframework.boot.context.properties.ConfigurationProperties;
import java.util.Map;
@ConfigurationProperties(prefix = "hbase")
public class HBaseProperties {
private Map<String, String> config;
public Map<String, String> getConfig() {
return config;
}
public void setConfig(Map<String, String> config) {
this.config = config;
}
}
编写测试类,测试操作HBase
HBaseSpringbootTest:
package codemperor.hbase;
import lombok.extern.slf4j.Slf4j;
import org.apache.hadoop.hbase.client.Result;
import org.apache.hadoop.hbase.util.Bytes;
import org.junit.Test;
import org.junit.runner.RunWith;
import org.springframework.beans.factory.annotation.Autowired;
import org.springframework.boot.test.context.SpringBootTest;
import org.springframework.data.hadoop.hbase.HbaseTemplate;
import org.springframework.data.hadoop.hbase.RowMapper;
import org.springframework.test.context.junit4.SpringJUnit4ClassRunner;
@RunWith(SpringJUnit4ClassRunner.class)
@SpringBootTest(classes = Application.class)
@Slf4j
public class HBaseSpringbootTest {
@Autowired
private HbaseTemplate hbaseTemplate;
@Test
public void putTest() {
hbaseTemplate.put("hbase_demo", "rowKey1", "family1", "column1", Bytes.toBytes("test for data"));
}
@Test
public void getTest() {
HBaseMapper mapper = new HBaseMapper();
hbaseTemplate.get("hbase_demo", "rowKey1", mapper);
}
public class HBaseMapper implements RowMapper {
@Override
public Object mapRow(Result result, int i) throws Exception {
System.out.println("rowkey=" + Bytes.toString(result.getRow()));
System.out.println("value=" + Bytes
.toString(result.getValue(Bytes.toBytes("family1"), Bytes.toBytes("column1"))));
return result;
}
}
}
执行结果
上面我们在博主阿里云上存入了一条数据:
rowKey1 column=family1:column1, timestamp=1557658487147, value=test for data
我们运行上面测试类中getTest方法,最终得到结果如下:
已经成功~~
————————————————
版权声明:本文为CSDN博主「codemperor」的原创文章,遵循 CC 4.0 BY-SA 版权协议,转载请附上原文出处链接及本声明。
原文链接:https://blog.csdn.net/zl592886931/article/details/90143356