目录
HBase的基本读写流程
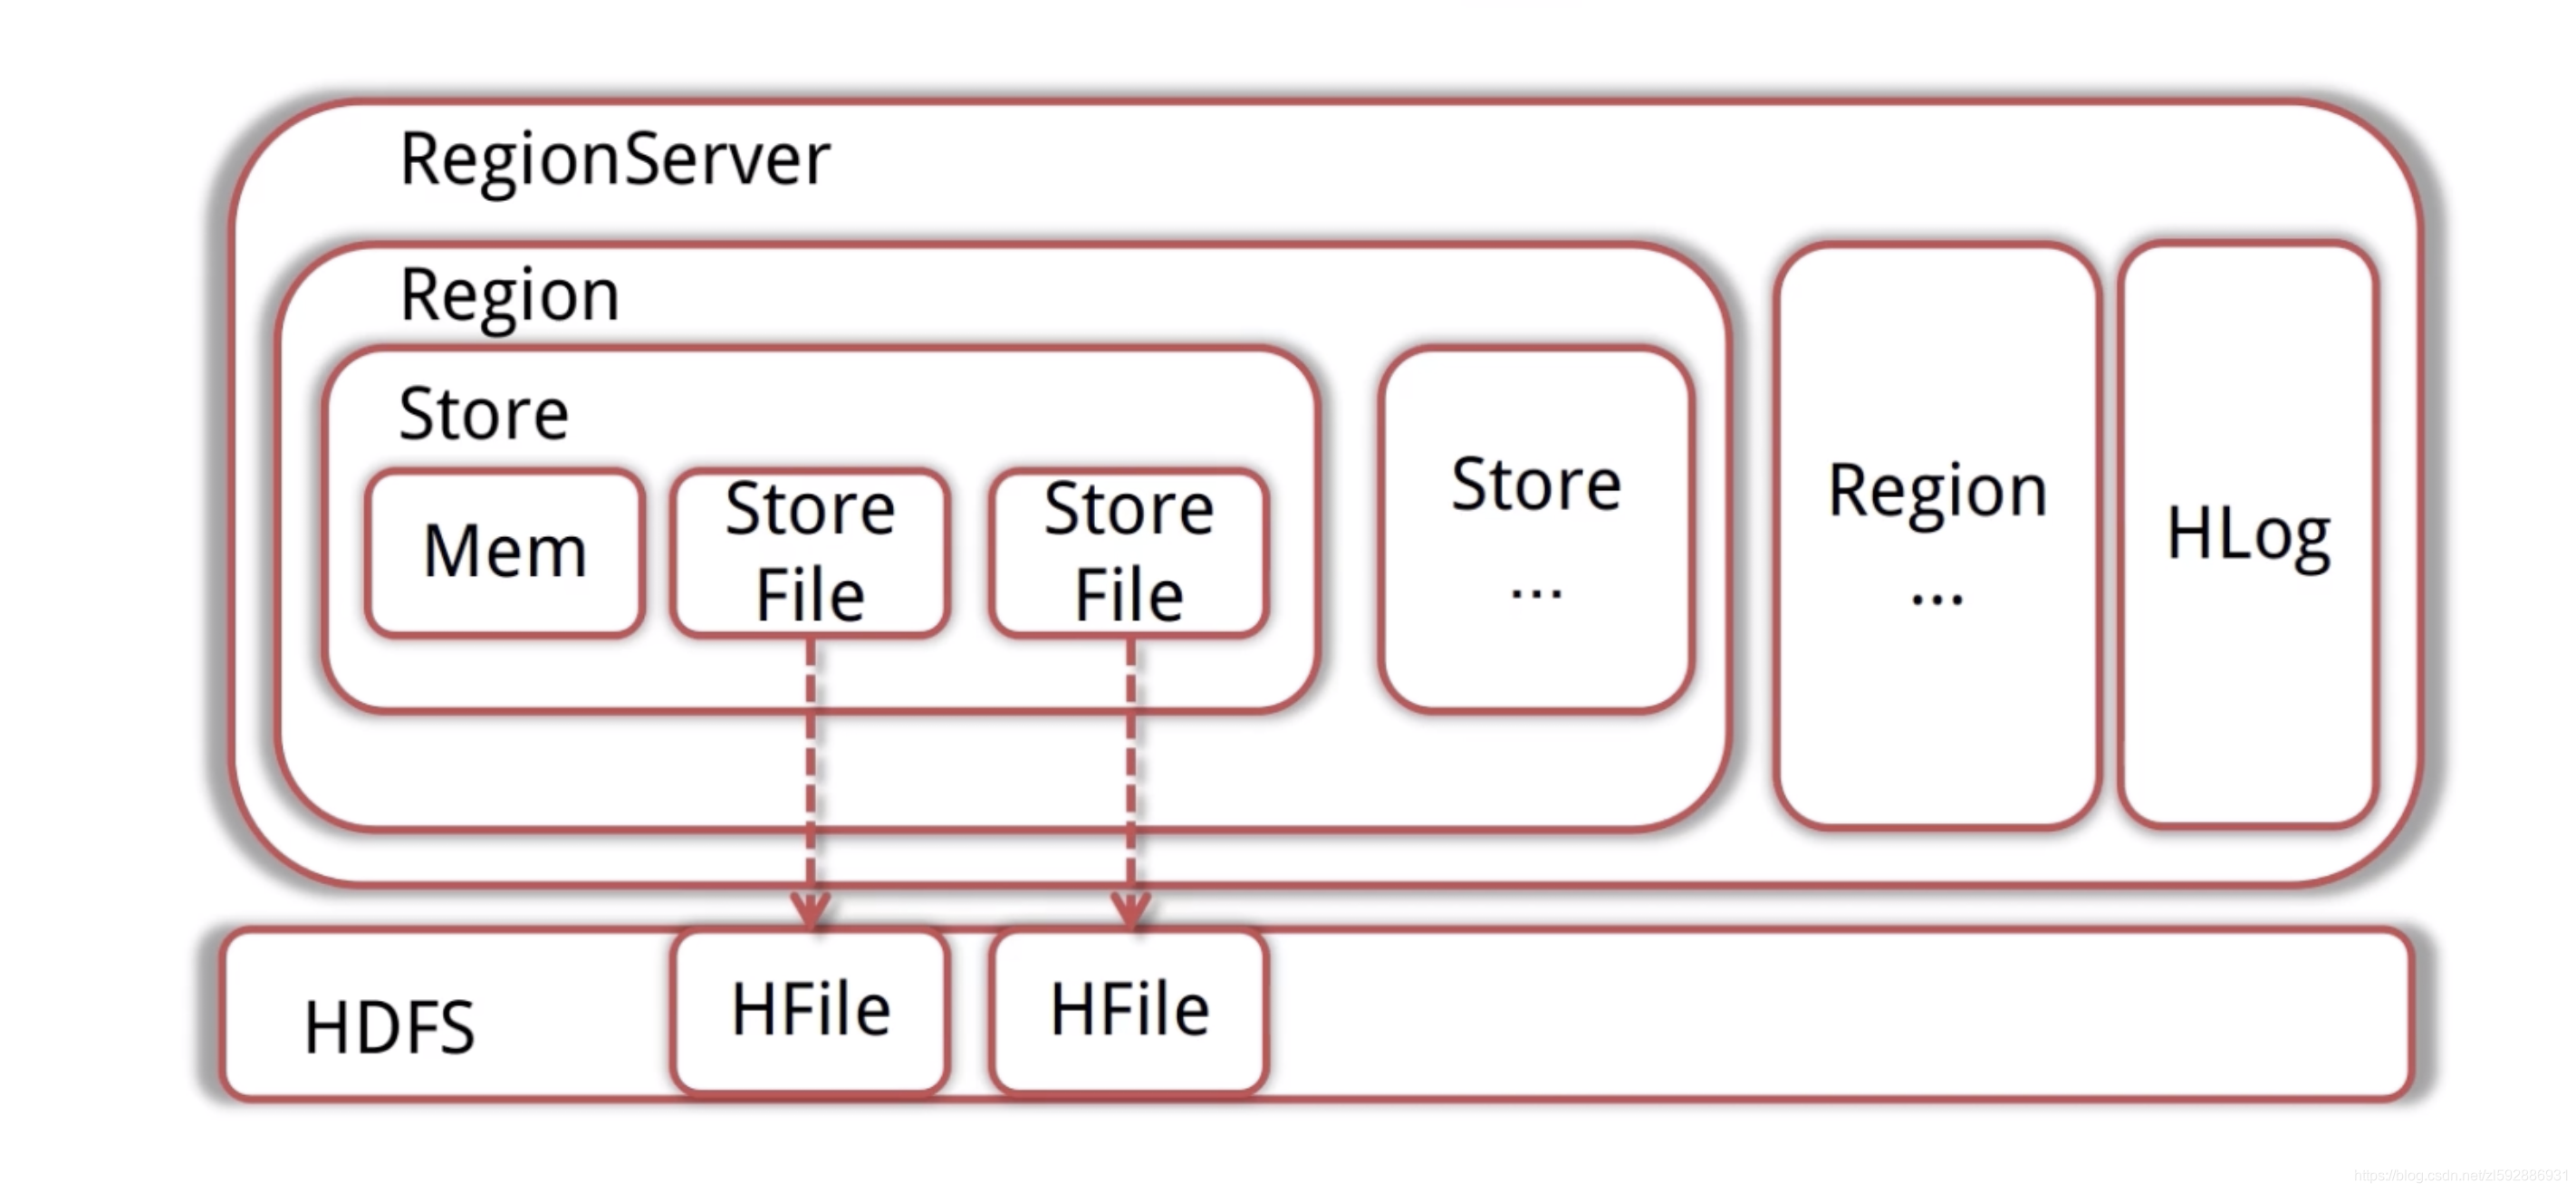
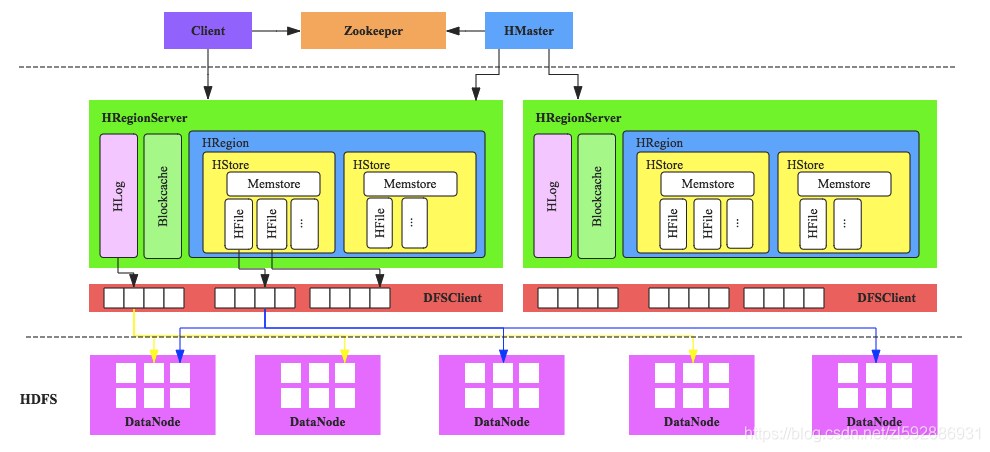
写入流程
- Client先访问Zookeeper,得到RegionServer的地址
- Client对RegionServer发起写请求,RegionServer接受请求并将数据写入内存
- 当MemStore(数据在内存的实体)达到一定值后(可设定),flush到StoreFile(HFile的封装)并写入HDFS
读取流程
- Client先访问Zookeeper,得到RegionServer的地址
- Client对RegionServer发起读取请求
- RegionServer收到请求,先扫描自己的MemStore,再扫描BlockCache,如果没找到就去读取StoreFile,然后将数据返回给客户端
HBase的模块与协作
HBase共有HMaster(老板)、Zookeeper(秘书)、RegionServer(员工)三个模块
HBase启动
- HMaster启动,注册到ZK,等待RegionServer的汇报
- RegionServer注册到ZK,并且向HMaster汇报
- 对各个RegionServer(包含失效的)的数据进行整理,分配Region与Meta信息
RegionServer失效
- HMaster将失效的RegionServer上的Region分配给其他节点
- HMaster更新HBase的Meta表,保证数据可以正常访问
HMaster失效
- 高可用集群:HMaster失效后,处于Backup的其他HMaster节点推选出一个(老板)转为Active(类似于老板出差玩了,有backup的人选,保证集群继续高可用)
- 如果集群没有配置高可用,数据可以正常读写,但是不能创建删除更改表(结构),会抛出异常(类似老板出去了,没有backup,员工还是要继续干活【读写数据】,但是有新的需求【删除、添加表】,秘书会告诉客户我们老板不在,然后向他丢了一个异常)
HBase常用的Shell命令
进入shell
我们先进入shell,进入hbase目录下的bin
./hbase shell
help命令
使用help获得全部命令的列表,使用help ‘xxx’获得xxx命令的详细信息
help ‘status’
查询服务器状态
status
查看所有表
list
创建一个表
第一个参数是表名称,后面是列蔟
create ‘hbase_demo’,‘family1’,‘family2’
获得表的描述
describe ‘hbase_demo’
添加一个列族
alter ‘hbase_demo’, ‘family3’
删除一个列族
alter ‘hbase_demo’, {NAME => ‘family3’, METHOD => ‘delete’}
插入数据
put ‘hbase_demo’, ‘rowkey1’,‘family1:name’,‘file1.txt’
put ‘hbase_demo’, ‘rowkey1’,‘family1:type’,‘txt’
put ‘hbase_demo’, ‘rowkey1’,‘family1:size’,‘1024’
put ‘hbase_demo’, ‘rowkey1’,‘family2:path’,’/home’
put ‘hbase_demo’, ‘rowkey1’,‘family2:creator’,‘tom’
put ‘hbase_demo’, ‘rowkey2’,‘family1:name’,‘file2.jpg’
put ‘hbase_demo’, ‘rowkey2’,‘family1:type’,‘jpg’
put ‘hbase_demo’, ‘rowkey2’,‘family1:size’,‘2048’
put ‘hbase_demo’, ‘rowkey2’,‘family2:path’,’/home/pic’
put ‘hbase_demo’, ‘rowkey2’,‘family2:creator’,‘jerry’
rowkey、列蔟、列形成唯一,比如先执行:
put ‘hbase_demo’, ‘rowkey1’,‘family1:name’,‘file1.txt’
在执行
put ‘hbase_demo’, ‘rowkey1’,‘family1:name’,‘file2222.txt’
最终结果以file2222.txt为主
查询表中有多少行
count ‘hbase_demo’
获取一个rowkey的所有数据
get ‘hbase_demo’, ‘rowkey1’
获得一个id,一个列簇(一个列)中的所有数据
get ‘hbase_demo’, ‘rowkey1’, ‘family1’
查询整表数据
scan ‘hbase_demo’
扫描整个列簇
scan ‘hbase_demo’, {COLUMN=>‘family1’}
指定扫描其中的某个列
scan ‘hbase_demo’, {COLUMNS=> ‘family1:name’}
使用limit
除了列(COLUMNS)修饰词外,HBase还支持Limit(限制查询结果行数),STARTROW(ROWKEY起始行。会先根据这个key定位到region,再向后扫描)、STOPROW(结束行)、TIMERANGE(限定时间戳范围)、VERSIONS(版本数)、和FILTER(按条件过滤行)等。比如我们从RowKey1这个rowkey开始,找下一个行的最新版本
scan ‘hbase_demo’, { STARTROW => ‘rowkey1’, LIMIT=>1, VERSIONS=>1}
使用Filter是
限制名称为file1.txt
scan ‘hbase_demo’, FILTER=>“ValueFilter(=,‘name:file21.txt’)”
filter中支持多个过滤条件通过括号、AND和OR的条件组合
scan ‘hbase_demo’, FILTER=>“ColumnPrefixFilter(‘typ’) AND ValueFilter ValueFilter(=,‘substring:10’)”
delete命令
delete ‘hbase_demo’,‘rowkey1’,‘family1:size’
get ‘hbase_demo’,‘rowkey1’,‘family1:size’
删除整行的值
deleteall ‘hbase_demo’,‘rowkey1’
get ‘hbase_demo’,‘rowkey1’
禁用和启用
enable ‘hbase_demo’
is_enabled ‘hbase_demo’
disable ‘hbase_demo’
is_disabled ‘hbase_demo’
使用exists来检查表是否存在
exists ‘hbase_demo’
删除表需要先将表disable
disable ‘hbase_demo’
drop ‘hbase_demo’
java操作hbase
pom配置
<dependencies>
        <dependency>
            <groupId>org.springframework.data</groupId>
            <artifactId>spring-data-hadoop-boot</artifactId>
            <version>2.5.0.RELEASE</version>
            <exclusions>
                <exclusion>
                    <groupId>javax.servlet</groupId>
                    <artifactId>servlet-api</artifactId>
                </exclusion>
            </exclusions>
        </dependency>
        <dependency>
            <groupId>org.springframework.data</groupId>
            <artifactId>spring-data-hadoop</artifactId>
            <version>2.5.0.RELEASE</version>
            <exclusions>
                <exclusion>
                    <groupId>org.slf4j</groupId>
                    <artifactId>slf4j-log4j12</artifactId>
                </exclusion>
                <exclusion>
                    <groupId>log4j</groupId>
                    <artifactId>log4j</artifactId>
                </exclusion>
                <exclusion>
                    <groupId>javax.servlet</groupId>
                    <artifactId>servlet-api</artifactId>
                </exclusion>
            </exclusions>
        </dependency>
        <dependency>
            <groupId>org.apache.hbase</groupId>
            <artifactId>hbase-client</artifactId>
            <version>1.4.4</version>
            <exclusions>
                <exclusion>
                    <groupId>org.slf4j</groupId>
                    <artifactId>slf4j-log4j12</artifactId>
                </exclusion>
                <exclusion>
                    <groupId>log4j</groupId>
                    <artifactId>log4j</artifactId>
                </exclusion>
                <exclusion>
                    <groupId>javax.servlet</groupId>
                    <artifactId>servlet-api</artifactId>
                </exclusion>
            </exclusions>
        </dependency>
        <dependency>
            <groupId>org.apache.logging.log4j</groupId>
            <artifactId>log4j-1.2-api</artifactId>
            <version>2.11.0</version>
        </dependency>
        <dependency>
            <groupId>com.alibaba</groupId>
            <artifactId>fastjson</artifactId>
            <version>1.2.47</version>
        </dependency>
        <dependency>
            <groupId>org.springframework.boot</groupId>
            <artifactId>spring-boot-starter-test</artifactId>
            <scope>test</scope>
        </dependency>
        <dependency>
            <groupId>junit</groupId>
            <artifactId>junit</artifactId>
            <version>4.12</version>
            <scope>test</scope>
        </dependency>
    </dependencies>
application.yml
这里根据大家自己的hbase集群ip,博主是在电脑上配置类profile
hbase:
  config:
    hbase.zookeeper.quorum: master,node1,node2
    hbase.zookeeper.property.clientPort: 2181
编写java的配置类
HBaseConfig:
package codemperor.hbase.config;
import java.util.Map;
import java.util.Set;

import org.apache.hadoop.hbase.HBaseConfiguration;
import org.springframework.boot.context.properties.EnableConfigurationProperties;
import org.springframework.context.annotation.Bean;
import org.springframework.context.annotation.Configuration;
import org.springframework.data.hadoop.hbase.HbaseTemplate;

@Configuration
@EnableConfigurationProperties(HBaseProperties.class)
public class HBaseConfig {
    private final HBaseProperties properties;

    public HBaseConfig(HBaseProperties properties) {
        this.properties = properties;
    }

    @Bean
    public HbaseTemplate hbaseTemplate() {
        HbaseTemplate hbaseTemplate = new HbaseTemplate();
        hbaseTemplate.setConfiguration(configuration());
        hbaseTemplate.setAutoFlush(true);
        return hbaseTemplate;
    }

    public org.apache.hadoop.conf.Configuration configuration() {

        org.apache.hadoop.conf.Configuration configuration = HBaseConfiguration.create();

        Map<String, String> config = properties.getConfig();
        Set<String> keySet = config.keySet();
        for (String key : keySet) {
            configuration.set(key, config.get(key));
        }

        return configuration;
    }
}
HBaseProperties:
package codemperor.hbase.config;

import org.springframework.boot.context.properties.ConfigurationProperties;

import java.util.Map;

@ConfigurationProperties(prefix = "hbase")
public class HBaseProperties {
    private Map<String, String> config;

    public Map<String, String> getConfig() {
        return config;
    }

    public void setConfig(Map<String, String> config) {
        this.config = config;
    }
}
编写测试类,测试操作HBase
HBaseSpringbootTest:
package codemperor.hbase;

import lombok.extern.slf4j.Slf4j;
import org.apache.hadoop.hbase.client.Result;
import org.apache.hadoop.hbase.util.Bytes;
import org.junit.Test;
import org.junit.runner.RunWith;
import org.springframework.beans.factory.annotation.Autowired;
import org.springframework.boot.test.context.SpringBootTest;
import org.springframework.data.hadoop.hbase.HbaseTemplate;
import org.springframework.data.hadoop.hbase.RowMapper;
import org.springframework.test.context.junit4.SpringJUnit4ClassRunner;

@RunWith(SpringJUnit4ClassRunner.class)
@SpringBootTest(classes = Application.class)
@Slf4j
public class HBaseSpringbootTest {
    @Autowired
    private HbaseTemplate hbaseTemplate;

    @Test
    public void putTest() {
        hbaseTemplate.put("hbase_demo", "rowKey1", "family1", "column1", Bytes.toBytes("test for data"));
    }

    @Test
    public void getTest() {
        HBaseMapper mapper = new HBaseMapper();
        hbaseTemplate.get("hbase_demo", "rowKey1", mapper);
    }

    public class HBaseMapper implements RowMapper {

        @Override
        public Object mapRow(Result result, int i) throws Exception {
            System.out.println("rowkey=" + Bytes.toString(result.getRow()));
            System.out.println("value=" + Bytes
                    .toString(result.getValue(Bytes.toBytes("family1"), Bytes.toBytes("column1"))));

            return result;
        }
    }
}
执行结果
上面我们在博主阿里云上存入了一条数据:
rowKey1 column=family1:column1, timestamp=1557658487147, value=test for data
我们运行上面测试类中getTest方法,最终得到结果如下:

已经成功~~
