一、简介
官方网站:http://cocodataset.org/
全称:Microsoft Common Objects in Context (MS COCO)
支持任务:Detection、Keypoints、Stuff、Panoptic、Captions
说明:COCO数据集目前有三个版本,即2014、2015和2017,其中2015版只有测试集,其他两个有训练集、验证集和测试集。
(本贴内容来源于官网+个人理解与描述)
二、数据集下载
方法一:直接官网下载(需要FQ)。方法二:本人已把官网数据集放在百度云网盘,可自行下载(无需FQ)。
三、数据集说明
COCO数据集包括两大部分:Images和Annotations
Images:“任务+版本”命名的文件夹(例如:train2014),里面为xxx.jpg的图像文件;
Annotations:文件夹,里面为xxx.json格式的文本文件(例如:instances_train2014.json);
使用COCO数据集的核心就在于xxx.json文件的读取操作,下面详细介绍annotation文件的组织结构和使用方法。
3.1 通用字段
COCO有五种注释类型对应五种任务:目标检测、关键点检测、实物分割、全景分割和图像描述。注释使用JSON文件存储。每个xxx.json的内容整体为一个字典,key为“info”、“images“、”annotations“和”licenses“,如下所示:
1 {
2     "info"            :info,
3     "images"          :[image],
4     "annotations"     :[annotation],
5     "licenses"        :[license],
6 }
value为对应的数据类型,其中,info是一个字典,images是一个list,annotations是一个list,licenses是一个list。除annotation外,每部分的内容定义如下:
 1 info{
 2     "year"            : int,    # 数据集年份号
 3     "version"         : str,    # 数据集版本
 4     "description"     : str,    # 数据集描述
 5     "contributor"     : str,    # 贡献者
 6     "url"             : str,    # 数据集官方网址
 7     "date_created"    : datetime,    # 数据集创建详细时间
 8 }
 9
10 image{
11     "id"               : int,     # 图像id
12     "width"            : int,     # 图像宽度
13     "height"           : int,     # 图像高度
14     "file_name"        : str,     # 图像文件名
15     "license"          : int,     # 许可证
16     "flickr_url"       : str,     # flickr链接
17     "coco_url"         : str,     # coco链接
18     "date_captured"    : datetime,    # 拍摄时间
19 }
20
21 license{
22     "id"     : int,    # license的编号,1-8
23     "name"   : str,    # 许可证名称
24     "url"    : str,    # 许可证网址
25 }
key为”annotation“的value对应不同的xxx.json略有不同,但表示内容含义是一样的,即对图片和实例的描述。同时除了annotation外,还有一个key为”categories“表示类别。以下分别对不同任务的annotation和categories进行说明。
3.2 非通用字段
3.2.1 Object Detection(目标检测)
以检测任务为例,对于每一张图片,至少包含一个对象,COCO数据集对每一个对象进行描述,而不是对一张图片。每个对象都包含一系列字段,包括对象的类别id和mask码,mask码的分割格式取决于图像里的对象数目,当一张图像里就一个对象时(iscrowd=0),mask码用RLE格式,当大于一个对象时(iscrowd=1),采用polyhon格式。
 1 annotation{
 2     "id"            : int,    # annotation的id,每个对象对应一个annotation
 3     "image_id"      : int,     # 该annotation的对象所在图片的id
 4     "category_id"   : int,     # 类别id,每个对象对应一个类别
 5     "segmentation"  : RLE or [polygon],
 6     "area"          : float,     # 面积
 7     "bbox"          : [x,y,width,height],     # x,y为左上角坐标
 8     "iscrowd"       : 0 or 1,    # 0时segmentation为REL,1为polygon
 9 }
10
11 categories[{
12     "id"         : int,    # 类别id
13     "name"            : str,     # 类别名称
14     "supercategory"  : str,    # 类别的父类,例如:bicycle的父类是vehicle
15 }]
3.2.2 Keypoint Detection(关键点检测)
与检测任务一样,一个图像包干若干对象,一个对象对应一个keypoint注释,一个keypoint注释包含对象注释的所有数据(包括id、bbox等)和两个附加字段。
首先,key为”keypoints“的value是一个长度为3k的数组,其中k是类别定义的关键点总数(例如人体姿态关键点的k为17).每个关键点都有一个0索引的位置x、y和可见性标志v(v=0表示未标记,此时x=y=0;v=1时表示标记,但不可见,不可见的原因在于被遮挡了;v=2时表示标记且可见),如果一个关键点落在对象段内,则认为是可见的。
 1 annotation{
 2     "keypoints"        : [x1,y1,v1,...],
 3     "num_keypoints"    : int,     # v=1,2的关键点的个数,即有标记的关键点个数
 4     "[cloned]"         : ...,
 5 }
 6
 7 categories[{
 8     "keypoints"    : [str],     # 长度为k的关键点名字符串
 9     "skeleton"     : [edge],     # 关键点的连通性,主要是通过一组关键点边缘队列表的形式表示,用于可视化.
10     "[cloned]" : ..., 11 }]
其中,[cloned]表示从上面定义的Object Detection注释中复制的字段。因为keypoint的json文件包含detection任务所需的字段。
3.2.3 Stuff Segmentation(实例分割)
分割任务的对象注释格式与上面的Object Detection相同且完全兼容(除了iscrowd是不必要的,默认值为0),分割任务主要字段是“segmentation”。
3.2.4 Panoptic Segmentation(全景分割)
对于全景分割任务,每个注释结构是每个图像的注释,而不是每个对象的注释,与上面三个有区别。每个图像的注释有两个部分:1)存储与类无关的图像分割的PNG;2)存储每个图像段的语义信息的JSON结构。
- 要将注释与图像匹配,使用image_id字段(即:annotation.image_id==image.id);
- 对于每个注释,每个像素段的id都存储为一个单独的PNG,PNG位于与JSON同名的文件夹中。每个分割都有唯一的id,未标记的像素为0;
- 对于每个注释,每个语义信息都存储在annotation.segments_info. segment_info.id,该存储段存储唯一的id,并用于从PNG检索相应的掩码(ids==segment_info.id)。iscrowd表示段内包含一组对象。bbox和area字段表示附加信息。
 1 annotation{
 2     "image_id"    : int,
 3     "file_name"    : str,
 4     "segments_info"  : [segment_info],
 5 }
 6
 7 segment_info{ 8 "id"      : int,. 9 "category_id" : int, 10 "area"     : int, 11 "bbox"     : [x,y,width,height], 12 "iscrowd"   : 0 or 1, 13 } 14 15 categories[{ 16 "id"        : int, 17 "name"       : str, 18 "supercategory" : str, 19 "isthing" : 0 or 1, 20 "color"      : [R,G,B], 21 }]
3.2.5 Image Captioning(图像字幕)
图像字幕任务的注释用于存储图像标题,每个标题描述指定的图像,每个图像至少有5个标题。
1 annotation{
2     "id"      : int,
3     "image_id"   : int,
4     "caption"   : str,
5 }
四、数据集的使用(Python)
4.1 COCOAPI
通过上面的介绍可知COCO数据集的标签有一定复杂度,需要通过各种文件读取来获取注释,为了让用户更好地使用 COCO 数据集, COCO 提供了各种 API,即下面要介绍的cocoapi。
4.2 API安装
首先安装依赖包:
1 ~$ pip install numpy Cython matplotlab
git下载地址:https://github.com/cocodataset/cocoapi.git
下载后进入到PythonAPI目录下:
1 ~$ cd coco/PythonAPI
2 ~/cocoapi$ make
4.3 COCO API使用(官方例程)
安装完在site-packages文件夹可以看到pycocotools包,该包是COCO数据集的Python API,帮助加载、解析和可视化COCO中的注释。使用API的方法是直接使用API提供的函数加载注释文件和读取Python字典。API函数定义如下:
- COCO:加载COCO注释文件并准备数据结构的COCO api类。
- decodeMask:通过运行长度编码解码二进制掩码M。
- encodeMask:使用运行长度编码对二进制掩码M进行编码。
- getAnnIds:得到满足给定过滤条件的annotation的id。
- getCatIds:获得满足给定过滤条件的category的id。
- getImgIds:得到满足给定过滤条件的imgage的id。
- loadAnns:使用指定的id加载annotation。
- loadCats:使用指定的id加载category。
- loadImgs:使用指定的id加载imgage。
- annToMask:将注释中的segmentation转换为二进制mask。
- showAnns:显示指定的annotation。
- loadRes:加载算法结果并创建访问它们的API。
- download:从mscoco.org服务器下载COCO图像。
下面展示了数据加载、解析和可视化注释等内容,步骤如下:
1、首先导入必要的包
1 %matplotlib inline
2 from pycocotools.coco import COCO
3 import numpy as np
4 import skimage.io as io
5 import matplotlib.pyplot as plt
6 import pylab 7 pylab.rcParams['figure.figsize'] = (8.0, 10.0)
2、定义annotation文件路径(以“instances_val2014.json”为例)
1 dataDir='..'
2 dataType='val2014'
3 annFile='{}/annotations/instances_{}.json'.format(dataDir,dataType)
3、读取instances_val2014.json文件到COCO类
1 # initialize COCO api for instance annotations
2 coco = COCO(annFile)
输出如下:
loading annotations into memory…
Done (t=4.19s)
creating index…
index created!
4、COCO图像类别的读取
1 # display COCO categories and supercategories
2 cats = coco.loadCats(coco.getCatIds())
3 nms=[cat['name'] for cat in cats]
4 print('COCO categories: \n{}\n'.format(' '.join(nms)))
5
6 nms = set([cat['supercategory'] for cat in cats])
7 print('COCO supercategories: \n{}'.format(' '.join(nms)))
输出如下:
COCO categories:
person bicycle car motorcycle airplane bus train truck boat traffic light fire hydrant stop sign parking meter bench bird cat dog horse sheep cow elephant bear zebra giraffe backpack umbrella handbag tie suitcase frisbee skis snowboard sports ball kite baseball bat baseball glove skateboard surfboard tennis racket bottle wine glass cup fork knife spoon bowl banana apple sandwich orange broccoli carrot hot dog pizza donut cake chair couch potted plant bed dining table toilet tv laptop mouse remote keyboard cell phone microwave oven toaster sink refrigerator book clock vase scissors teddy bear hair drier toothbrush
COCO supercategories:
sports furniture electronic food appliance vehicle animal kitchen outdoor indoor person accessory
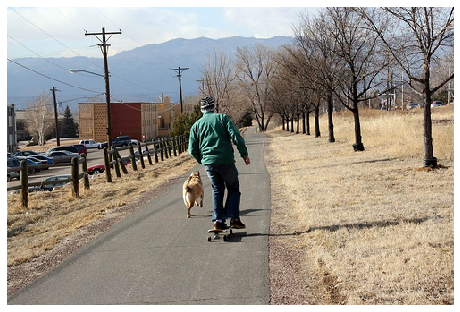
5、COCO原始图像读取
 1 # 找到符合'person','dog','skateboard'过滤条件的category_id
 2 catIds = coco.getCatIds(catNms=['person','dog','skateboard']);
 3 # 找出符合category_id过滤条件的image_id
 4 imgIds = coco.getImgIds(catIds=catIds );
 5 # 找出imgIds中images_id为324158的image_id
 6 imgIds = coco.getImgIds(imgIds = [324158])
 7 # 加载图片,获取图片的数字矩阵
 8 img = coco.loadImgs(imgIds[np.random.randint(0,len(imgIds))])[0]
 9 # 显示图片
10 I = io.imread(img['coco_url'])
11 plt.axis('off') 12 plt.imshow(I) 13 plt.show()
输出如下:
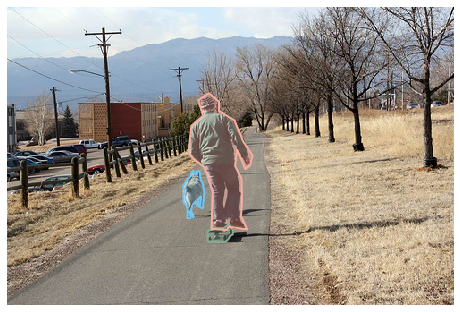
6、加载并显示annotations
1 # load and display instance annotations
2 plt.imshow(I); plt.axis('off')
3 annIds = coco.getAnnIds(imgIds=img['id'], catIds=catIds, iscrowd=None)
4 anns = coco.loadAnns(annIds)
5 coco.showAnns(anns)
输出如下:
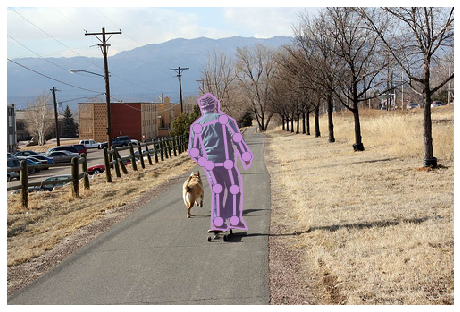
7、加载并显示person_keypoints_2014.json的annotations
 1 # initialize COCO api for person keypoints annotations
 2 annFile = '{}/annotations/person_keypoints_{}.json'.format(dataDir,dataType)
 3 coco_kps=COCO(annFile)
 4
 5 # load and display keypoints annotations
 6 plt.imshow(I); plt.axis('off')
 7 ax = plt.gca()
 8 annIds = coco_kps.getAnnIds(imgIds=img['id'], catIds=catIds, iscrowd=None)
 9 anns = coco_kps.loadAnns(annIds) 10 coco_kps.showAnns(anns)
输出如下:
loading annotations into memory…
Done (t=2.08s)
creating index…
index created!
8、加载并显示captions_2014.json.json的annotations
1 # initialize COCO api for caption annotations
2 annFile = '{}/annotations/captions_{}.json'.format(dataDir,dataType)
3 coco_caps=COCO(annFile)
4
5 # load and display caption annotations
6 annIds = coco_caps.getAnnIds(imgIds=img['id']);
7 anns = coco_caps.loadAnns(annIds)
8 coco_caps.showAnns(anns)
9 plt.imshow(I); plt.axis('off'); plt.show()
输出如下:
loading annotations into memory…
Done (t=0.41s)
creating index…
index created!
A man is skate boarding down a path and a dog is running by his side.
A man on a skateboard with a dog outside.
A person riding a skate board with a dog following beside.
This man is riding a skateboard behind a dog.
A man walking his dog on a quiet country road.

五、COCO数据集的评估
5.1 IOU值计算
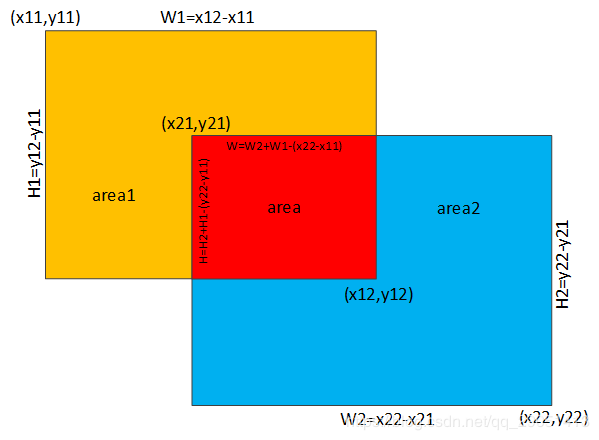
上图所示的IOU计算如下:

5.2 COCO评估指标

- 除非另有说明,否则AP和AR在多个交汇点(IoU)值上取平均值,使用0.50到0.95共10个IOU阈值下的mAP求平均,结果就是COCO数据集定义的AP,与只用一个IOU=0.50下计算的AP相比,是一个突破;
- AP是所有类别的平均值。传统上,这被称为“平均准确度”(mAP,mean average precision)。官方没有区分AP和mAP(同样是AR和mAR),并假定从上下文中可以清楚地看出差异。
- AP(所有10个IoU阈值和所有80个类别的平均值)将决定赢家。在考虑COCO性能时,这应该被认为是最重要的一个指标。
- 在COCO中,比大物体相比有更多的小物体。具体地说,大约41%的物体很小(area<322),34%是中等(322 < area < 962)),24%大(area > 962)。测量的面积(area)是分割掩码(segmentation mask)中的像素数量。
- AR是在每个图像中检测到固定数量的最大召回(recall),在类别和IoU上平均。AR与proposal evaluation中使用的同名度量相关,但是按类别计算。
- 所有度量标准允许每个图像(在所有类别中)最多100个最高得分检测进行计算。
- 除了IoU计算(分别在框(box)或掩码(mask)上执行)之外,用边界框和分割掩码检测的评估度量在所有方面是相同的。
5.3 COCO结果文件统一格式
Object Detection
1 [{
2     "image_id"        : int,
3     "category_id"    : int,
4     "bbox"            : [x,y,width,height],
5     "score"            : float,
6 }]
框坐标是从图像左上角测量的浮点数(并且是0索引的)。官方建议将坐标舍入到最接近十分之一像素的位置,以减少JSON文件的大小。
对于对象segments的检测(实例分割),请使用以下格式:
1 [{
2     "image_id"        : int,
3     "category_id"     : int,
4     "segmentation"    : RLE,
5     "score"           : float,
6 }]
Keypoint Detection
1 [{
2     "image_id"      : int,
3     "category_id"   : int,
4      "keypoints"    : [x1,y1,v1,...,xk,yk,vk],
5      "score"        : float,
6 }]
关键点坐标是从左上角图像角测量的浮点数(并且是0索引的)。官方建议四舍五入坐标到最近的像素,以减少文件大小。还请注意,目前还没有使用vi的可视性标志(除了控制可视化之外),官方建议简单地设置vi=1。
Stuff Segmentation
1 [{
2     "image_id"       : int,
3     "category_id"    : int,
4     "segmentation"   : RLE,
5 }]
除了不需要score字段外,Stuff 分割格式与Object分割格式相同。注意:官方建议用单个二进制掩码对图像中出现的每个标签进行编码。二进制掩码应该使用MaskApi函数encode()通过RLE进行编码。例如,参见cocostuffhelper.py中的segmentationToCocoResult()。为了方便,官方还提供了JSON和png格式之间的转换脚本。
Panoptic Segmentation
 1 annotation{
 2     "image_id"    : int,
 3     "file_name"   : str,
 4     "segments_info" : [segment_info],
 5 }
 6
 7 segment_info{ 8 "id"      : int, 9 "category_id" : int, 10 }
Image Captioning
1 [{
2     "image_id": int,
3     "caption": str,
4 }]
5.4 COCOEVAL API使用(官方例程)
COCO还提供了一个计算评估指标的API,即当自己的模型按照官方定义的格式输出后,可以使用API进行快速评估模型的一系列指标。
1、导入必要的包
1 %matplotlib inline
2 import matplotlib.pyplot as plt
3 from pycocotools.coco import COCO
4 from pycocotools.cocoeval import COCOeval
5 import numpy as np
6 import skimage.io as io 7 import pylab 8 pylab.rcParams['figure.figsize'] = (10.0, 8.0)
2、选择任务
1 annType = ['segm','bbox','keypoints']
2 annType = annType[1]      #specify type here
3 prefix = 'person_keypoints' if annType=='keypoints' else 'instances'
4 print('Running demo for *%s* results.'%(annType))
输出如下:
Running demo for bbox results.
3、加载json注释文件(即:Ground Truth)
1 #initialize COCO ground truth api
2 dataDir='../'
3 dataType='val2014'
4 annFile = '%s/annotations/%s_%s.json'%(dataDir,prefix,dataType)
5 cocoGt=COCO(annFile)
输出如下:
loading annotations into memory…
Done (t=3.16s)
creating index…
index created!
4、加载result文件(即:Predict)
COCO.loadRes(resFile)返回的也是一个COCO类,与COCO(annFile)不同的是,前者加载官方规定格式的result文件,后者加载官方提供的json文件。
1 #initialize COCO detections api
2 resFile='%s/results/%s_%s_fake%s100_results.json'
3 resFile = resFile%(dataDir, prefix, dataType, annType)
4 cocoDt=cocoGt.loadRes(resFile)
输出如下:
Loading and preparing results…
DONE (t=0.03s)
creating index…
index created!
5、使用测试集当中的100张图片进行评估
1 imgIds=sorted(cocoGt.getImgIds())    # 把测试集的图像id按从小到达排列
2 imgIds=imgIds[0:100]    # 取出前面100个图像
3 imgId = imgIds[np.random.randint(100)]    # 顺序打乱
6、执行评估
1 # running evaluation
2 cocoEval = COCOeval(cocoGt,cocoDt,annType)
3 cocoEval.params.imgIds  = imgIds
4 cocoEval.evaluate()
5 cocoEval.accumulate()
6 cocoEval.summarize()
输出如下:
Running per image evaluation…
Evaluate annotation type bbox
DONE (t=0.21s).
Accumulating evaluation results…
DONE (t=0.25s).
Average Precision (AP) @[ IoU=0.50:0.95 | area= all | maxDets=100 ] = 0.505
Average Precision (AP) @[ IoU=0.50 | area= all | maxDets=100 ] = 0.697
Average Precision (AP) @[ IoU=0.75 | area= all | maxDets=100 ] = 0.573
Average Precision (AP) @[ IoU=0.50:0.95 | area= small | maxDets=100 ] = 0.586
Average Precision (AP) @[ IoU=0.50:0.95 | area=medium | maxDets=100 ] = 0.519
Average Precision (AP) @[ IoU=0.50:0.95 | area= large | maxDets=100 ] = 0.501
Average Recall (AR) @[ IoU=0.50:0.95 | area= all | maxDets= 1 ] = 0.387
Average Recall (AR) @[ IoU=0.50:0.95 | area= all | maxDets= 10 ] = 0.594
Average Recall (AR) @[ IoU=0.50:0.95 | area= all | maxDets=100 ] = 0.595
Average Recall (AR) @[ IoU=0.50:0.95 | area= small | maxDets=100 ] = 0.640
Average Recall (AR) @[ IoU=0.50:0.95 | area=medium | maxDets=100 ] = 0.566
Average Recall (AR) @[ IoU=0.50:0.95 | area= large | maxDets=100 ] = 0.564
六、总结
以上为COCO数据集官方例程+个人理解,作为本人的学习笔记,同时供新手了解。若有错漏,请在评论区指出。(转载请注明来源)