参考文档:
- Github介绍:https://github.com/kubernetes/heapster
-
或者(source code):https://github.com/kubernetes/heapster/releases
- cAdvisor:https://github.com/google/cadvisor
- Influxdb:http://influxdb.com
- Grafana:http://grafana.org
开源软件cAdvisor(Container Advisor)用于监控所在节点的容器运行状态,当前已经被默认集成到kubelet组件内,默认使用tcp 4194端口。
在大规模容器集群,一般使用Heapster+Influxdb+Grafana平台实现集群性能数据的采集,存储与展示。
组件 |
版本 |
Remark |
kubernetes |
v1.9.2 |
|
heapster |
v1.5.1 |
|
Influxdb |
v1.3.3 |
|
grafana |
v4.4.3 |
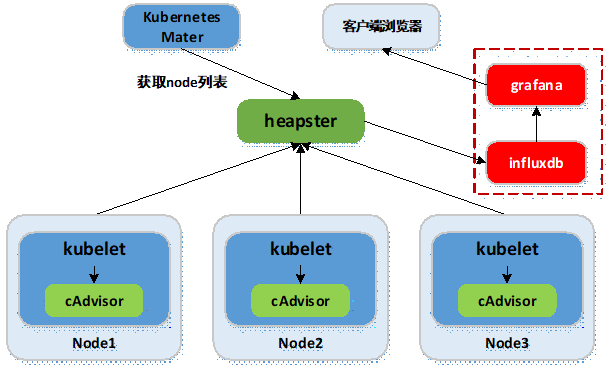
- Heapster:集群中各node节点的cAdvisor的数据采集汇聚系统,通过调用node上kubelet的api,再通过kubelet调用cAdvisor的api来采集所在节点上所有容器的性能数据。Heapster对性能数据进行聚合,并将结果保存到后端存储系统,heapster支持多种后端存储系统,如memory,Influxdb等。
- Influxdb:分布式时序数据库(每条记录有带有时间戳属性),主要用于实时数据采集,时间跟踪记录,存储时间图表,原始数据等。Influxdb提供rest api用于数据的存储与查询。
- Grafana:通过dashboard将Influxdb中的时序数据展现成图表或曲线等形式,便于查看集群运行状态。
kubernetes部署服务时,为避免部署时发生pull镜像超时的问题,建议提前将相关镜像pull到相关所有节点(以下以kubenode1为例),或搭建本地镜像系统。
- 基础环境已做了镜像加速,可参考:http://www.cnblogs.com/netonline/p/7420188.html
- 需要从gcr.io pull的镜像,已利用Docker Hub的"Create Auto-Build GitHub"功能(Docker Hub利用GitHub上的Dockerfile文件build镜像),在个人的Docker Hub build成功,可直接pull到本地使用。
# heapster
[root@kubenode1 ~]# docker pull netonline/heapster-amd64:v1.5.1
# influxdb
[root@kubenode1 ~]# docker pull netonline/heapster-influxdb-amd64:v1.3.3
# grafana
[root@kubenode1 ~]# docker pull netonline/heapster-grafana-amd64:v4.4.3
下载yaml范本
# release下载页:https://github.com/kubernetes/heapster/releases
# release中的yaml范本有时较https://github.com/kubernetes/heapster/tree/master/deploy/kube-config/influxdb
的yaml新,但区别不大
[root@kubenode1 ~]# cd /usr/local/src/
[root@kubenode1 src]# wget -O heapster-v1.5.1.tar.gz https://github.com/kubernetes/heapster/archive/v1.5.1.tar.gz
# yaml范本在heapster/deploy/kube-config/influxdb目录,另有1个heapster-rbac.yaml在heapster/deploy/kube-config/rbac目录,两者目录结构同github
[root@kubenode1 src]# tar -zxvf heapster-v1.5.1.tar.gz -C /usr/local/
[root@kubenode1 src]# mv /usr/local/heapster-1.5.1 /usr/local/heapster
本实验使用yaml文件(修改版):https://github.com/Netonline2016/kubernetes/tree/master/addons/heapster
heapster-rbac.yaml
# heapster需要向kubernetes-master请求node列表,需要设置相应权限;
# 默认不需要对heapster-rbac.yaml修改,将kubernetes集群自带的ClusterRole :system:heapster做ClusterRoleBinding,完成授权
[root@kubenode1 ~]# cd /usr/local/heapster/deploy/kube-config/rbac/
[root@kubenode1 rbac]# cat heapster-rbac.yaml
kind: ClusterRoleBinding
apiVersion: rbac.authorization.k8s.io/v1beta1
metadata:
name: heapster
roleRef:
apiGroup: rbac.authorization.k8s.io
kind: ClusterRole
name: system:heapster
subjects:
- kind: ServiceAccount
name: heapster
namespace: kube-system
heapster.yaml
hepster.yaml由3个模块组成:ServiceAccout,Deployment,Service。
ServiceAccount
默认不需要修改ServiceAccount部分,设置ServiceAccount资源,获取rbac中定义的权限。
Deployment
# 修改处:第23行,变更镜像名;
# --source:配置采集源,使用安全端口调用kubernetes集群api;
# --sink:配置后端存储为influxdb;地址采用influxdb的service名,需要集群dns正常工作,如果没有配置dns服务,可使用service的ClusterIP地址
[root@kubenode1 ~]# cd /usr/local/heapster/deploy/kube-config/influxdb/
[root@kubenode1 influxdb]# sed -i 's|gcr.io/google_containers/heapster-amd64:v1.5.1|netonline/heapster-amd64:v1.5.1|g' heapster.yaml
[root@kubenode1 influxdb]# cat heapster.yaml
……
apiVersion: extensions/v1beta1
kind: Deployment
metadata:
name: heapster
namespace: kube-system
spec:
replicas: 1
template:
metadata:
labels:
task: monitoring
k8s-app: heapster
spec:
serviceAccountName: heapster
containers:
- name: heapster
image: netonline/heapster-amd64:v1.5.1
imagePullPolicy: IfNotPresent
command:
- /heapster
- --source=kubernetes:https://kubernetes.default
- --sink=influxdb:http://monitoring-influxdb.kube-system.svc:8086
……
Service
默认不需要修改Service部分。
influxdb.yaml
influxdb.yaml由2个模块组成:Deployment,Service。
Deployment
# 修改处:第16行,变更镜像名;
[root@kubenode1 influxdb]# sed -i 's|gcr.io/google_containers/heapster-influxdb-amd64:v1.3.3|netonline/heapster-influxdb-amd64:v1.3.3|g' influxdb.yaml
Service
默认不需要修改Service部分,注意Service名字的对应即可。
grafana.yaml
grafana.yaml由2个模块组成:Deployment,Service。
Deployment
# 修改处:第16行,变更镜像名;
# 修改处:第43行,取消注释;"GF_SERVER_ROOT_URL"的value值设定后,只能通过API Server proxy访问grafana;
# 修改处:第44行,注释本行;
# INFLUXDB_HOST的value值设定为influxdb的service名,依赖于集群dns,或者直接使用ClusterIP
[root@kubenode1 influxdb]# sed -i 's|gcr.io/google_containers/heapster-grafana-amd64:v4.4.3|netonline/heapster-grafana-amd64:v4.4.3|g' grafana.yaml
[root@kubenode1 influxdb]# sed -i '43s|# value:|value:|g' grafana.yaml
[root@kubenode1 influxdb]# sed -i '44s|value:|# value:|g' grafana.yaml
[root@kubenode1 influxdb]# cat grafana.yaml
……
apiVersion: extensions/v1beta1
kind: Deployment
metadata:
name: monitoring-grafana
namespace: kube-system
spec:
replicas: 1
template:
metadata:
labels:
task: monitoring
k8s-app: grafana
spec:
containers:
- name: grafana
image: netonline/heapster-grafana-amd64:v4.4.3
ports:
- containerPort: 3000
protocol: TCP
volumeMounts:
- mountPath: /etc/ssl/certs
name: ca-certificates
readOnly: true
- mountPath: /var
name: grafana-storage
env:
- name: INFLUXDB_HOST
value: monitoring-influxdb
- name: GF_SERVER_HTTP_PORT
value: "3000"
# The following env variables are required to make Grafana accessible via
# the kubernetes api-server proxy. On production clusters, we recommend
# removing these env variables, setup auth for grafana, and expose the grafana
# service using a LoadBalancer or a public IP.
- name: GF_AUTH_BASIC_ENABLED
value: "false"
- name: GF_AUTH_ANONYMOUS_ENABLED
value: "true"
- name: GF_AUTH_ANONYMOUS_ORG_ROLE
value: Admin
- name: GF_SERVER_ROOT_URL
# If you're only using the API Server proxy, set this value instead:
value: /api/v1/namespaces/kube-system/services/monitoring-grafana/proxy
# value: /
volumes:
- name: ca-certificates
hostPath:
path: /etc/ssl/certs
- name: grafana-storage
emptyDir: {}
……
Service
默认不需要修改Service部分,注意Service名字的对应即可。
验证
启动监控相关服务
# 将heapster-rbac.yaml复制到influxdb/目录;
[root@kubenode1 ~]# cd /usr/local/heapster/deploy/kube-config/influxdb/
[root@kubenode1 influxdb]# cp /usr/local/heapster/deploy/kube-config/rbac/heapster-rbac.yaml .
[root@kubenode1 influxdb]# kubectl create -f .

查看相关服务
# 查看deployment与Pod运行状态
[root@kubenode1 ~]# kubectl get deploy -n kube-system | grep -E 'heapster|monitoring'
[root@kubenode1 ~]# kubectl get pods -n kube-system | grep -E 'heapster|monitoring'

# 查看service运行状态
[root@kubenode1 ~]# kubectl get svc -n kube-system | grep -E 'heapster|monitoring'

访问dashboard
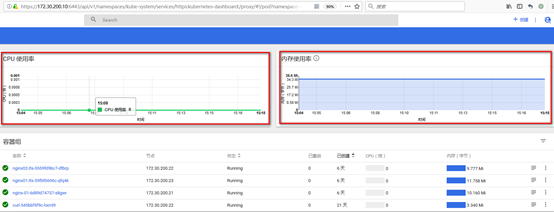
浏览器访问访问dashboard:https://172.30.200.10:6443/api/v1/namespaces/kube-system/services/https:kubernetes-dashboard:/proxy
注意:Dasheboard没有配置hepster监控平台时,不能展示node,Pod资源的CPU与内存等metric图形
Node资源CPU/内存metric图形:

Pod资源CPU/内存metric图形:
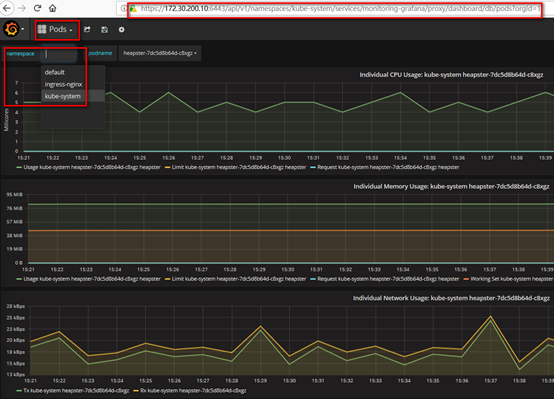
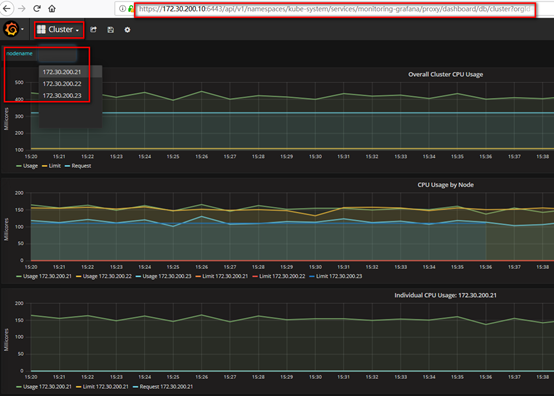
访问grafana
# 通过kube-apiserver访问
[root@kubenode1 ~]# kubectl cluster-info

浏览器访问访问dashboard:https://172.30.200.10:6443/api/v1/namespaces/kube-system/services/monitoring-grafana/proxy
集群节点信息:
Pod信息: