参考文档:
- Github介绍:https://github.com/kubernetes/dashboard
-
https://github.com/kubernetes/dashboard/blob/master/src/deploy/recommended/kubernetes-dashboard.yaml
或者(各服务模块独立保存):https://github.com/kubernetes/kubernetes/tree/master/cluster/addons/dashboard
- 访问dashboard:https://github.com/kubernetes/dashboard/wiki/Accessing-Dashboard---1.7.X-and-above
- 访问dashboard的问题(基于1.6.x版本):https://github.com/opsnull/follow-me-install-kubernetes-cluster/issues/5
Kubernetes-dashboard是kubernetes的ui网页管理工具,可提供部署应用,资源对象管理,容器日志查询,系统监控等常用的集群功能。
组件 |
版本 |
Remark |
kubernetes |
v1.9.2 |
|
kubernetes-dashboard |
v1.8.3 |
kubernetes部署服务时,为避免部署时发生pull镜像超时的问题,建议提前将相关镜像pull到相关所有节点(实验),或搭建本地镜像系统。
- 基础环境已做了镜像加速,可参考:http://www.cnblogs.com/netonline/p/7420188.html
- 需要从gcr.io pull的镜像,已利用Docker Hub的"Create Auto-Build GitHub"功能(Docker Hub利用GitHub上的Dockerfile文件build镜像),在个人的Docker Hub build成功,可直接pull到本地使用。
# kubernetes-dashboard
[root@kubenode1 ~]# docker pull netonline/kubernetes-dashboard-amd64:v1.8.3
下载kubernetes-dashboard相关yaml范本
# https://github.com/kubernetes/kubernetes/tree/master/cluster/addons/dashboard
# 也可以将多种服务资源置于1个yaml文件
[root@kubenode1 ~]# mkdir -p /usr/local/src/yaml/dashboard
[root@kubenode1 ~]# cd /usr/local/src/yaml/dashboard
# ConfigMap
[root@kubenode1 dashboard]# wget https://raw.githubusercontent.com/kubernetes/kubernetes/master/cluster/addons/dashboard/dashboard-configmap.yaml
# Secret
[root@kubenode1 dashboard]# wget https://raw.githubusercontent.com/kubernetes/kubernetes/master/cluster/addons/dashboard/dashboard-secret.yaml
# RBAC
[root@kubenode1 dashboard]# wget https://raw.githubusercontent.com/kubernetes/kubernetes/master/cluster/addons/dashboard/dashboard-rbac.yaml
# dashboard-controller
[root@kubenode1 dashboard]# wget https://raw.githubusercontent.com/kubernetes/kubernetes/master/cluster/addons/dashboard/dashboard-controller.yaml
# Service
[root@kubenode1 dashboard]# wget https://raw.githubusercontent.com/kubernetes/kubernetes/master/cluster/addons/dashboard/dashboard-service.yaml
本实验使用yaml文件(修改版):https://github.com/Netonline2016/kubernetes/tree/master/addons/dashboard
dashboard-configmap.yaml
暂不修改,针对此次验证,dashboard-controller也未使用到configmap。
dashboard-rbac.yaml
因api-server做了双向数字证书认证,而dashboard的展示与操作都是通过调用api-server的接口实现的,所以需要为dashboard授权,采用rbac授权模式。
# 默认dashboard-rbac.yaml定义了1个name为"kubernetes-dashboard-minimal"的Role;并做了name为"kubernetes-dashboard-minimal"的RoleBinding,向name为"kubernetes-dashboard"的ServiceAccount授权;
# 但默认的dashboard-rbac.yaml定义的Role权限太小,不太方便验证;
# 重新定义rbac,只需要定义新的ClusterRoleBinding: kubernetes-dashboard,将kubernetes自身的具有全部权限的ClusterRole: cluster-admin赋予ClusterRoleBinding;此授权方式在生产环境慎用;
# 注意红色加粗字体
[root@kubenode1 ~]# cd /usr/local/src/yaml/dashboard/
[root@kubenode1 dashboard]# vim dashboard-rbac.yaml
apiVersion: rbac.authorization.k8s.io/v1
kind: ClusterRoleBinding
metadata:
name: kubernetes-dashboard
namespace: kube-system
labels:
k8s-app: kubernetes-dashboard
addonmanager.kubernetes.io/mode: Reconcile
roleRef:
apiGroup: rbac.authorization.k8s.io
kind: ClusterRole
name: cluster-admin
subjects:
- kind: ServiceAccount
name: kubernetes-dashboard
namespace: kube-system
dashboard-secret.yaml
kubernetes 1.8.x 与1.9.x版本中,dashboard服务默认启用https端口,而非1.6.x版本中默认的http 9090端口,需要secret资源调用相关证书。
dashboard-secret.yaml不做修改。
dashboard-controller.yaml
# dashboard-controller.yaml定义了ServiceAccount资源(授权)与Deployment(服务Pod);
# 修改第33行默认使用的dashboard镜像
dashboard-controller.yaml
[root@kubenode1 dashboard]# sed -i 's|k8s.gcr.io/kubernetes-dashboard-amd64:v1.8.3|netonline/kubernetes-dashboard-amd64:v1.8.3|g' dashboard-controller.yaml
dashboard-service.yaml
# dashboard-service.yaml定义服务,红色加粗字体为修改或新增部分;
# 定义"NodePort" type,为验证通过控制节点直接访问dashboard(生产环境中建议不使用 方式),"nodePort: 18443"定义具体的端口,不设置则在服务端口范围中随机产生
[root@kubenode1 dashboard]# vim dashboard-service.yaml
apiVersion: v1
kind: Service
metadata:
name: kubernetes-dashboard
namespace: kube-system
labels:
k8s-app: kubernetes-dashboard
kubernetes.io/cluster-service: "true"
addonmanager.kubernetes.io/mode: Reconcile
spec:
selector:
k8s-app: kubernetes-dashboard
type: NodePort
ports:
- port: 443
targetPort: 8443
nodePort: 18443
验证Kubernetes-dashboard
启动dashboard
# 启动rbac,secret,controller,service4个yaml文件定义的服务即可;
# 或者kubectl create -f .
[root@kubenode1 ~]# cd /usr/local/src/yaml/dashboard/
[root@kubenode1 dashboard]# kubectl create -f dashboard-rbac.yaml
[root@kubenode1 dashboard]# kubectl create -f dashboard-secret.yaml
[root@kubenode1 dashboard]# kubectl create -f dashboard-controller.yaml
[root@kubenode1 dashboard]# kubectl create -f dashboard-service.yaml

查看相关服务
# 查看service,已按定义的端口做了nodePort
[root@kubenode1 dashboard]# kubectl get svc -n kube-system

# 查看deployment与pod服务
[root@kubenode1 dashboard]# kubectl get deployment -n kube-system
[root@kubenode1 dashboard]# kubectl get pod -n kube-system
通过kube-apiserver访问dashboard
访问dashboard有3种方式:
- 通过kube-apiserver访问dashboar,;
- 通过kubectl proxy访问dashboard;
- 通过nodePort访问dashboard,建议在实验环境中使用。
参考:https://github.com/kubernetes/dashboard/wiki/Accessing-Dashboard---1.7.X-and-above
生成kube-apiserver的访问证书
# 因kube-apiserver启用了双向认证,而本地浏览器访问kube-apiserver时使用匿名证书(在没有导入相关证书时),导致授权失败而不能访问;
# 客户端工具kubectl访问kube-apiserver的证书之前已经生成,这里只需要转换位浏览器客户端可识别的证书即可;
# 转换时输入密码可留空,否则导入时需要输入密码
[root@kubenode1 ~]# cd /etc/kubernetes/admin/
[root@kubenode1 admin]# openssl pkcs12 -export -in admin.pem -out admin-dashboard.p12 -inkey admin-key.pem

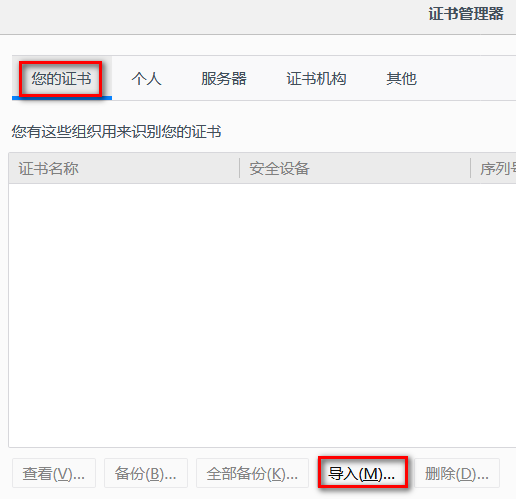
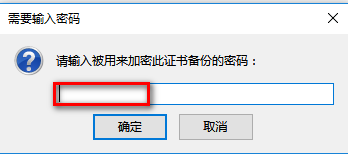
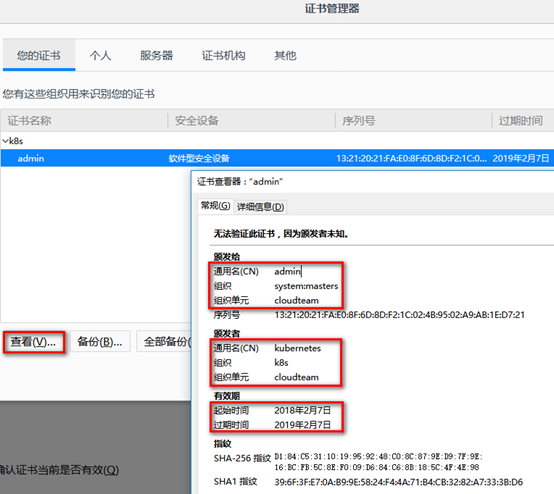
导入kube-apiserver的访问证书
以firefox浏览器为例导入证书,密码输入转换时使用的密码,这里留空。

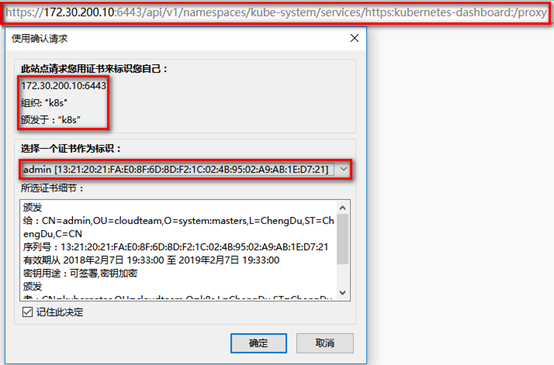
通过kube-apiserver访问dashboard
# 获取dashboard的kube-apiserver访问地址
[root@kubenode1 ~]# kubectl cluster-info

浏览器安全方式访问访问https://<kube-apiserver>:<port>:https://172.30.200.10:6443/api/v1/namespaces/kube-system/services/https:kubernetes-dashboard:/proxy
- 使用"Kubeconfig"访问,需要导入kubeconfig文件,这里即生成客户端工具kubectl访问需要的kubeconfig文件:/etc/kubernetes/admin/admin.conf;
- 使用令牌访问,需要输入令牌,这里通过"kubectl get secret -n kube-system | grep kubernetes-dashboard-token"获得令牌名名,再通过"kubectl describe secret kubernetes-dashboard-token-wl2wq -n kube-system"获得令牌("kubernetes-dashboard-token-wl2wq "即令牌名);
- 或者直接"跳过"。
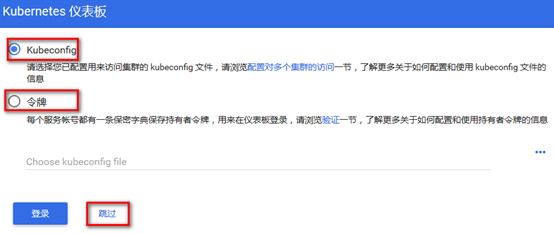
进入kubernetes首页后,默认在default命名空间。

通过kube-proxy访问dashboard
# kubectl proxy可启用代理,代理不一定启用在pod所在的节点,如下例pod在172.30.200.23节点,而在172.30.200.21节点启动代理亦可
[root@kubenode1 dashboard]# kubectl get pod -n kube-system -o wide
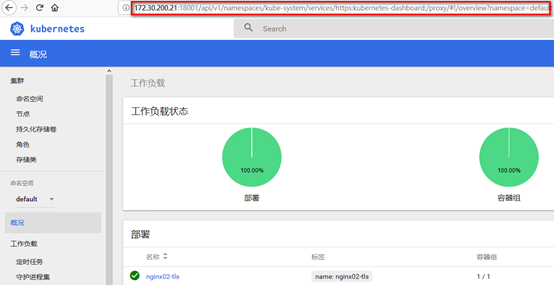
[root@kubenode1 ~]# kubectl proxy --address='172.30.200.21' --port=18001 --accept-hosts='^*$'

浏览器非安全方式访问http://<代理节点>:<port>:http://172.30.200.21:18001/api/v1/namespaces/kube-system/services/https:kubernetes-dashboard:/proxy
通过NodePort访问dashboard
在定义dashboard-service.yaml时,已定义NodePort" type,并指定"nodePort: 18443",此方式在生产环境不建议采用。
通过浏览器安全访问https://<node>:<port>(不同于代理方式,node一定是pod所在节点):https://172.30.200.23:18443
