导航到新的屏幕并返回
大多数应用程序包含几个用于显示不同类型信息的屏幕 例如,我们可能有一个显示产品的屏幕。 然后,我们的用户可以在新屏幕上点击产品以获取更多信息。
在Android条款中,我们的屏幕将是新的活动。 在iOS中,新的ViewControllers。 在Flutter中,屏幕只是部件!
那么我们如何导航到新屏幕? 使用Navigator!
路线
- 创建两个屏幕
- 使用Navigator.push导航到第二个屏幕
- 使用Navigator.pop返回到第一个屏幕
1.创建两个屏幕
首先,我们需要两个屏幕来处理。 由于这是一个基本的例子,我们将创建两个屏幕,每个屏幕包含一个按钮。 点击第一个屏幕上的按钮将导航到第二个屏幕。 点击第二个屏幕上的按钮将使我们的用户回到第一个!
首先,我们将设置视觉结构。
class FirstScreen extends StatelessWidget {
  @override
  Widget build(BuildContext context) {
    return new Scaffold(
      appBar: new AppBar(
        title: new Text('First Screen'),
      ),
      body: new Center(
        child: new RaisedButton(
          child: new Text('Launch new screen'),
          onPressed: () {
            // Navigate to second screen when tapped!
          },
        ),
      ),
    );
  }
}

class SecondScreen extends StatelessWidget {
  @override
  Widget build(BuildContext context) {
    return new Scaffold(
      appBar: new AppBar(
        title: new Text("Second Screen"),
      ),
      body: new Center(
        child: new RaisedButton(
          onPressed: () {
            // Navigate back to first screen when tapped!
          },
          child: new Text('Go back!'),
        ),
      ),
    );
  }
}
2.使用Navigator.push导航到第二个屏幕
为了导航到新的屏幕,我们需要使用Navigator.push方法。 push方法会将Route添加到由导航器管理的路由堆栈中!
push方法需要Route,但Route从哪里来? 我们可以创建自己的,或者使用MaterialPageRoute开箱即用。 MaterialPageRoute很方便,因为它使用平台特定的动画转换到新屏幕。
在我们的FirstScreen部件的build方法中,我们将更新onPressed回调:
// Within the `FirstScreen` Widget
onPressed: () {
  Navigator.push(
    context,
    new MaterialPageRoute(builder: (context) => new SecondScreen()),
  );
}
3.使用Navigator.pop返回到第一个屏幕
现在我们在第二个屏幕上,我们如何关闭它并返回到第一个屏幕? 使用Navigator.pop方法!pop方法将从由导航器管理的路线堆栈中移除当前Route。
对于这部分,我们需要更新在SecondScreen部件中找到的onPressed回调
// Within the SecondScreen Widget
onPressed: () {
  Navigator.pop(context);
}
完整例子
import 'package:flutter/material.dart';

void main() {
  runApp(new MaterialApp(
    title: 'Navigation Basics',
    home: new FirstScreen(),
  ));
}

class FirstScreen extends StatelessWidget {
  @override
  Widget build(BuildContext context) {
    return new Scaffold(
      appBar: new AppBar(
        title: new Text('First Screen'),
      ),
      body: new Center(
        child: new RaisedButton(
          child: new Text('Launch new screen'),
          onPressed: () {
            Navigator.push(
              context,
              new MaterialPageRoute(builder: (context) => new SecondScreen()),
            );
          },
        ),
      ),
    );
  }
}

class SecondScreen extends StatelessWidget {
  @override
  Widget build(BuildContext context) {
    return new Scaffold(
      appBar: new AppBar(
        title: new Text("Second Screen"),
      ),
      body: new Center(
        child: new RaisedButton(
          onPressed: () {
            Navigator.pop(context);
          },
          child: new Text('Go back!'),
        ),
      ),
    );
  }
}
将数据发送到新屏幕
通常,我们不仅要导航到新的屏幕,还要将一些数据传递到屏幕。 例如,我们经常想传递关于我们点击的项目的信息。
请记住:屏幕只是部件™。 在这个例子中,我们将创建一个Todos列表。 当点击一个待办事项时,我们将导航到一个显示关于待办事项信息的新屏幕(部件)。
路线
- 定义一个Todo类
- 创建Todos列表
- 创建一个可以显示关于待办事项信息的详情屏幕
- 导航并将数据传递到详情屏幕
1.定义一个Todo类
首先,我们需要一种简单的方法来表示Todos。 在这个例子中,我们将创建一个包含两部分数据的类:title和description。
class Todo {
  final String title;
  final String description;

  Todo(this.title, this.description);
}
2.创建Todos列表
其次,我们要显示一个Todos列表。 在这个例子中,我们将生成20个待办事项并使用ListView显示它们。 有关使用列表的更多信息,请参阅基本列表配方。
生成Todos列表
final todos = new List<Todo>.generate(
  20,
  (i) => new Todo(
        'Todo $i',
        'A description of what needs to be done for Todo $i',
      ),
);
使用ListView显示Todos列表
new ListView.builder(
  itemCount: todos.length,
  itemBuilder: (context, index) {
    return new ListTile(
      title: new Text(todos[index].title),
    );
  },
);
到现在为止还挺好。 我们将生成20个Todos并将它们显示在ListView中!
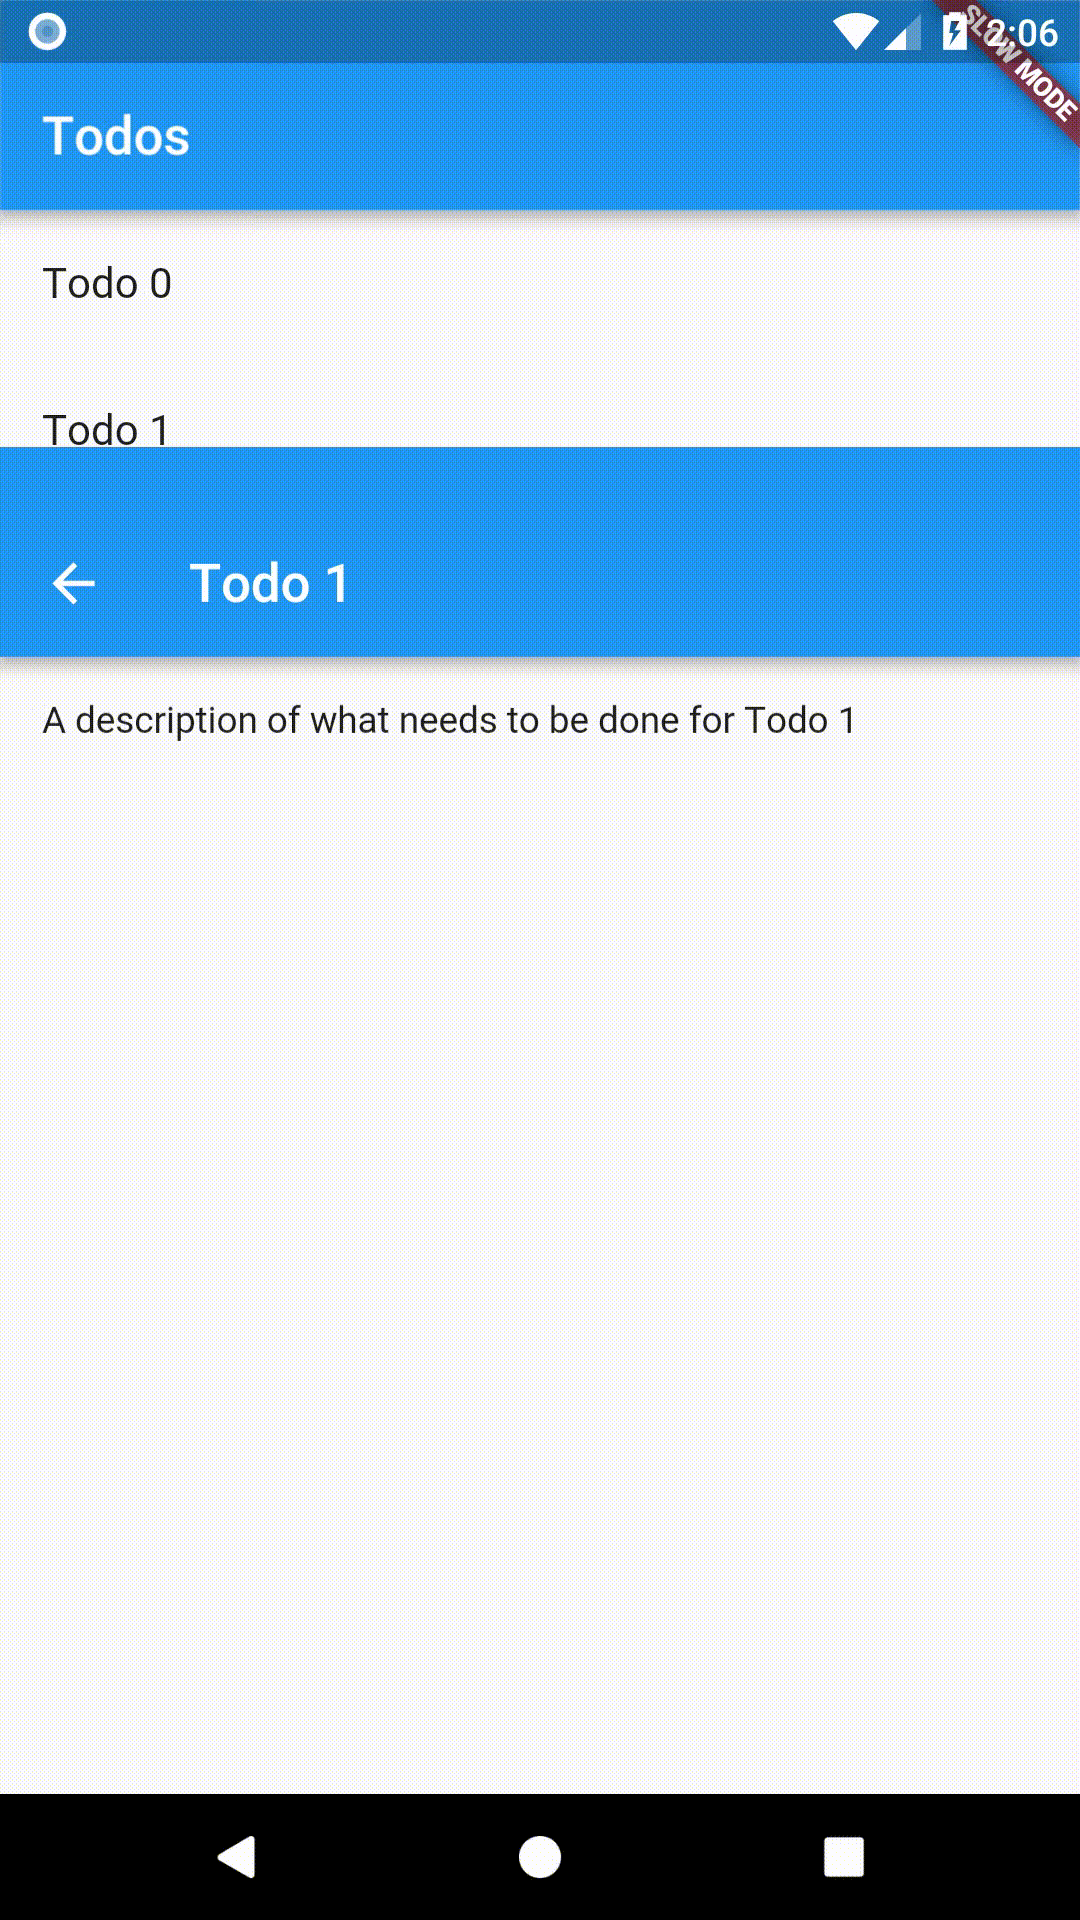
3.创建一个可以显示关于待办事项信息的详情屏幕
现在,我们将创建我们的第二个屏幕。 屏幕的标题将包含待办事项的title,屏幕正文将显示description。
由于这是一个普通的StatelessWidget,我们只需要创建屏幕的用户传送Todo! 然后,我们将使用给定的Todo来构建UI。
class DetailScreen extends StatelessWidget {
  // Declare a field that holds the Todo
  final Todo todo;

  // In the constructor, require a Todo
  DetailScreen({Key key, @required this.todo}) : super(key: key);

  @override
  Widget build(BuildContext context) {
    // Use the Todo to create our UI
    return new Scaffold(
      appBar: new AppBar(
        title: new Text("${todo.title}"),
      ),
      body: new Padding(
        padding: new EdgeInsets.all(16.0),
        child: new Text('${todo.description}'),
      ),
    );
  }
}
4.导航并将数据传递到详情屏幕
通过我们的DetailScreen,我们准备好执行导航! 在我们的例子中,当用户点击我们列表中的Todo时,我们需要导航到DetailScreen。 当我们这样做时,我们也想将Todo传递给DetailScreen。
为了达到这个目的,我们将为我们的ListTile部件编写一个onTap回调函数。 在我们的onTap回调中,我们将再次使用Navigator.push方法。
new ListView.builder(
  itemCount: todos.length,
  itemBuilder: (context, index) {
    return new ListTile(
      title: new Text(todos[index].title),
      // When a user taps on the ListTile, navigate to the DetailScreen.
      // Notice that we're not only creating a new DetailScreen, we're
      // also passing the current todo to it!
      onTap: () {
        Navigator.push(
          context,
          new MaterialPageRoute(
            builder: (context) => new DetailScreen(todo: todos[index]),
          ),
        );
      },
    );
  },
);
完整例子
import 'package:flutter/foundation.dart';
import 'package:flutter/material.dart';

class Todo {
  final String title;
  final String description;

  Todo(this.title, this.description);
}

void main() {
  runApp(new MaterialApp(
    title: 'Passing Data',
    home: new TodosScreen(
      todos: new List.generate(
        20,
        (i) => new Todo(
              'Todo $i',
              'A description of what needs to be done for Todo $i',
            ),
      ),
    ),
  ));
}

class TodosScreen extends StatelessWidget {
  final List<Todo> todos;

  TodosScreen({Key key, @required this.todos}) : super(key: key);

  @override
  Widget build(BuildContext context) {
    return new Scaffold(
      appBar: new AppBar(
        title: new Text('Todos'),
      ),
      body: new ListView.builder(
        itemCount: todos.length,
        itemBuilder: (context, index) {
          return new ListTile(
            title: new Text(todos[index].title),
            // When a user taps on the ListTile, navigate to the DetailScreen.
            // Notice that we're not only creating a new DetailScreen, we're
            // also passing the current todo through to it!
            onTap: () {
              Navigator.push(
                context,
                new MaterialPageRoute(
                  builder: (context) => new DetailScreen(todo: todos[index]),
                ),
              );
            },
          );
        },
      ),
    );
  }
}

class DetailScreen extends StatelessWidget {
  // Declare a field that holds the Todo
  final Todo todo;

  // In the constructor, require a Todo
  DetailScreen({Key key, @required this.todo}) : super(key: key);

  @override
  Widget build(BuildContext context) {
    // Use the Todo to create our UI
    return new Scaffold(
      appBar: new AppBar(
        title: new Text("${todo.title}"),
      ),
      body: new Padding(
        padding: new EdgeInsets.all(16.0),
        child: new Text('${todo.description}'),
      ),
    );
  }
}
从屏幕返回数据
在某些情况下,我们可能想要从新屏幕返回数据。 例如,假设我们推出一个新的屏幕,向用户呈现两个选项。 当用户点击某个选项时,我们需要通知第一个屏幕用户的选择,以便它能够处理这些信息!
我们怎样才能做到这一点? 使用Navigator.pop!
路线
- 定义主屏幕
- 添加一个启动选择屏幕的按钮
- 在选择屏幕上创建两个按钮
- 轻触一个按钮时,关闭选择屏幕
- 在主屏幕上使用snackbar显示选择
1.定义主屏幕
主屏幕将显示一个按钮。 点击后,它将启动选择屏幕!
class HomeScreen extends StatelessWidget {
  @override
  Widget build(BuildContext context) {
    return new Scaffold(
      appBar: new AppBar(
        title: new Text('Returning Data Demo'),
      ),
      // We'll create the SelectionButton Widget in the next step
      body: new Center(child: new SelectionButton()),
    );
  }
}
2.添加一个启动选择屏幕的按钮
现在,我们将创建我们的SelectionButton。 我们的选择按钮将会:
- 点击时启动SelectionScreen
- 等待SelectionScreen返回结果
class SelectionButton extends StatelessWidget {
  @override
  Widget build(BuildContext context) {
    return new RaisedButton(
      onPressed: () {
        _navigateAndDisplaySelection(context);
      },
      child: new Text('Pick an option, any option!'),
    );
  }

  // A method that launches the SelectionScreen and awaits the result from
  // Navigator.pop
  _navigateAndDisplaySelection(BuildContext context) async {
    // Navigator.push returns a Future that will complete after we call
    // Navigator.pop on the Selection Screen!
    final result = await Navigator.push(
      context,
      // We'll create the SelectionScreen in the next step!
      new MaterialPageRoute(builder: (context) => new SelectionScreen()),
    );
  }
}
3.在选择屏幕上创建两个按钮
现在,我们需要构建一个选择屏幕! 它将包含两个按钮。 当用户点击按钮时,应该关闭选择屏幕并让主屏幕知道哪个按钮被点击!
现在,我们将定义UI,并确定如何在下一步中返回数据。
class SelectionScreen extends StatelessWidget {
  @override
  Widget build(BuildContext context) {
    return new Scaffold(
      appBar: new AppBar(
        title: new Text('Pick an option'),
      ),
      body: new Center(
        child: new Column(
          mainAxisAlignment: MainAxisAlignment.center,
          children: <Widget>[
            new Padding(
              padding: const EdgeInsets.all(8.0),
              child: new RaisedButton(
                onPressed: () {
                  // Pop here with "Yep"...
                },
                child: new Text('Yep!'),
              ),
            ),
            new Padding(
              padding: const EdgeInsets.all(8.0),
              child: new RaisedButton(
                onPressed: () {
                  // Pop here with "Nope"
                },
                child: new Text('Nope.'),
              ),
            )
          ],
        ),
      ),
    );
  }
}
4.轻触一个按钮时,关闭选择屏幕
现在,我们要更新两个按钮的onPressed回调! 为了将数据返回到第一个屏幕,我们需要使用Navitator.pop方法。
Navigator.pop接受一个可选的第二个参数result。 如果我们提供了result,它将在我们的SelectionButton中返回到Future!
Yep 按钮
new RaisedButton(
  onPressed: () {
    // Our Yep button will return "Yep!" as the result
    Navigator.pop(context, 'Yep!');
  },
  child: new Text('Yep!'),
);
Nope 按钮
new RaisedButton(
  onPressed: () {
    // Our Nope button will return "Nope!" as the result
    Navigator.pop(context, 'Nope!');
  },
  child: new Text('Nope!'),
);
5.在主屏幕上使用snackbar显示选择
既然我们正在启动一个选择屏幕并等待结果,那么我们会想要对返回的信息进行一些操作!
在这种情况下,我们将显示一个显示结果的Snackbar。 为此,我们将更新SelectionButton中的_navigateAndDisplaySelection方法。
_navigateAndDisplaySelection(BuildContext context) async {
  final result = await Navigator.push(
    context,
    new MaterialPageRoute(builder: (context) => new SelectionScreen()),
  );

  // After the Selection Screen returns a result, show it in a Snackbar!
  Scaffold
      .of(context)
      .showSnackBar(new SnackBar(content: new Text("$result")));
}
完整例子
import 'package:flutter/material.dart';

void main() {
  runApp(new MaterialApp(
    title: 'Returning Data',
    home: new HomeScreen(),
  ));
}

class HomeScreen extends StatelessWidget {
  @override
  Widget build(BuildContext context) {
    return new Scaffold(
      appBar: new AppBar(
        title: new Text('Returning Data Demo'),
      ),
      body: new Center(child: new SelectionButton()),
    );
  }
}

class SelectionButton extends StatelessWidget {
  @override
  Widget build(BuildContext context) {
    return new RaisedButton(
      onPressed: () {
        _navigateAndDisplaySelection(context);
      },
      child: new Text('Pick an option, any option!'),
    );
  }

  // A method that launches the SelectionScreen and awaits the result from
  // Navigator.pop!
  _navigateAndDisplaySelection(BuildContext context) async {
    // Navigator.push returns a Future that will complete after we call
    // Navigator.pop on the Selection Screen!
    final result = await Navigator.push(
      context,
      new MaterialPageRoute(builder: (context) => new SelectionScreen()),
    );

    // After the Selection Screen returns a result, show it in a Snackbar!
    Scaffold
        .of(context)
        .showSnackBar(new SnackBar(content: new Text("$result")));
  }
}

class SelectionScreen extends StatelessWidget {
  @override
  Widget build(BuildContext context) {
    return new Scaffold(
      appBar: new AppBar(
        title: new Text('Pick an option'),
      ),
      body: new Center(
        child: new Column(
          mainAxisAlignment: MainAxisAlignment.center,
          children: <Widget>[
            new Padding(
              padding: const EdgeInsets.all(8.0),
              child: new RaisedButton(
                onPressed: () {
                  // Close the screen and return "Yep!" as the result
                  Navigator.pop(context, 'Yep!');
                },
                child: new Text('Yep!'),
              ),
            ),
            new Padding(
              padding: const EdgeInsets.all(8.0),
              child: new RaisedButton(
                onPressed: () {
                  // Close the screen and return "Nope!" as the result
                  Navigator.pop(context, 'Nope.');
                },
                child: new Text('Nope.'),
              ),
            )
          ],
        ),
      ),
    );
  }
}
跨屏幕设置动画部件
在屏幕之间导航时,指导用户浏览我们的应用通常很有帮助。 通过应用引导用户的常用技术是将部件从一个屏幕动画到下一个屏幕。 这会创建一个连接两个屏幕的视觉锚点。
我们如何使用Flutter将部件从一个屏幕动画到下一个屏幕? 使用Hero部件!
路线
- 创建两个屏幕显示相同的图像
- 将英雄部件添加到第一个屏幕
- 将英雄部件添加到第二个屏幕
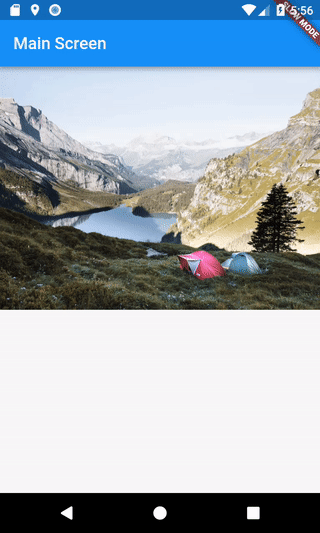
1.创建两个屏幕显示相同的图像
在这个例子中,我们将在两个屏幕上显示相同的图像。 当用户点击图像时,我们希望将图像从第一个屏幕动画到第二个屏幕。 现在,我们将创建视觉结构,并在接下来的步骤中处理动画!
class MainScreen extends StatelessWidget {
  @override
  Widget build(BuildContext context) {
    return new Scaffold(
      appBar: new AppBar(
        title: new Text('Main Screen'),
      ),
      body: new GestureDetector(
        onTap: () {
          Navigator.push(context, new MaterialPageRoute(builder: (_) {
            return new DetailScreen();
          }));
        },
        child: new Image.network(
          'https://raw.githubusercontent.com/flutter/website/master/_includes/code/layout/lakes/images/lake.jpg',
        ),
      ),
    );
  }
}

class DetailScreen extends StatelessWidget {
  @override
  Widget build(BuildContext context) {
    return new Scaffold(
      body: new GestureDetector(
        onTap: () {
          Navigator.pop(context);
        },
        child: new Center(
          child: new Image.network(
            'https://raw.githubusercontent.com/flutter/website/master/_includes/code/layout/lakes/images/lake.jpg',
          ),
        ),
      ),
    );
  }
}
2.将Hero部件添加到第一个屏幕
为了用动画将两个屏幕连接起来,我们需要在两个屏幕上的Hero部件中包装Image部件。 Hero部件需要两个参数:
- tag:标识英雄的对象。 它们在两个屏幕上必须相同。
- child:我们希望跨屏幕进行动画制作的部件。
new Hero(
  tag: 'imageHero',
  child: new Image.network(
    'https://raw.githubusercontent.com/flutter/website/master/_includes/code/layout/lakes/images/lake.jpg',
  ),
);
3.将Hero部件添加到第二个屏幕
要完成与第一个屏幕的连接,我们需要使用Hero部件将Image封装在第二个屏幕上! 它必须使用与第一个屏幕相同的tag。
将Hero部件应用到第二个屏幕后,屏幕之间的动画将起作用!
new Hero(
  tag: 'imageHero',
  child: new Image.network(
    'https://raw.githubusercontent.com/flutter/website/master/_includes/code/layout/lakes/images/lake.jpg',
  ),
);
注意:此代码与我们在第一个屏幕上的代码相同! 通常,您可以创建可重用的部件,而不是重复代码,但对于此示例,我们将复制代码以进行演示。
完整例子
import 'package:flutter/material.dart';

void main() => runApp(new HeroApp());

class HeroApp extends StatelessWidget {
  @override
  Widget build(BuildContext context) {
    return new MaterialApp(
      title: 'Transition Demo',
      home: new MainScreen(),
    );
  }
}

class MainScreen extends StatelessWidget {
  @override
  Widget build(BuildContext context) {
    return new Scaffold(
      appBar: new AppBar(
        title: new Text('Main Screen'),
      ),
      body: new GestureDetector(
        child: new Hero(
          tag: 'imageHero',
          child: new Image.network(
            'https://raw.githubusercontent.com/flutter/website/master/_includes/code/layout/lakes/images/lake.jpg',
          ),
        ),
        onTap: () {
          Navigator.push(context, new MaterialPageRoute(builder: (_) {
            return new DetailScreen();
          }));
        },
      ),
    );
  }
}

class DetailScreen extends StatelessWidget {
  @override
  Widget build(BuildContext context) {
    return new Scaffold(
      body: new GestureDetector(
        child: new Center(
          child: new Hero(
            tag: 'imageHero',
            child: new Image.network(
              'https://raw.githubusercontent.com/flutter/website/master/_includes/code/layout/lakes/images/lake.jpg',
            ),
          ),
        ),
        onTap: () {
          Navigator.pop(context);
        },
      ),
    );
  }
}