1.什么是API网关
API网关是微服务架构中的唯一入口,它提供一个单独且统一的API入口用于访问内部一个或多个API。它可以具有身份验证,监控,负载均衡,缓存,请求分片与管理,静态响应处理等。API网关方式的核心要点是,所有的客户端和消费端都通过统一的网关接入微服务,在网关层处理所有的非业务功能。通常,网关也是提供REST/HTTP的访问API。服务端通过API-GW注册和管理服务。
2.Ocelot介绍
Ocelot是用.net Core实现的一款开源的网关,Ocelot其实就是一组按照顺序排列的.net core中间件。它接受到请求之后用request builder构建一个HttpRequestMessage对象并发送到下游服务,当下游请求返回到Ocelot管道时再由一个中间件将HttpRequestMessage映射到HttpResponse上返回客户端。
3.使用Ocelot傻瓜式转发
新建三个项目webApi项目,分别命名为ApiGateway,Api_A,Api_B
![ZFGUV6N4@P[]DTRP`0CI5T8.png](https://i.loli.net/2019/11/28/aNVmDcjG7flRFEn.png)
设置Api_A端口为5001,Api_B端口为5002,ApiGateway为5000
为ApiGateway项目安装Ocelot,在Nuget中搜索Ocelot或者直接使用Install-Package Ocelot进行安装。最新版本为13.8.x支持core3.0。
在ApiGateway新建一个configuration.json配置文件。
{
  "ReRoutes": [
    {
      //上游Api请求格式
      "UpstreamPathTemplate": "/Api_A/{controller}/{action}",
      //网关转发到下游格式
      "DownstreamPathTemplate": "/api/{controller}/{action}",
      //上下游支持请求方法
      "UpstreamHttpMethod": [ "GET", "POST", "DELETE", "PUT" ],
      "DownstreamScheme": "http",
      //下游服务配置
      "DownstreamHostAndPorts": [
        {
          //下游地址
          "Host": "localhost",
          //下游端口号
          "Port": 5001
        }
      ]
    },
    {
      "UpstreamPathTemplate": "/Api_B/{controller}/{action}",
      "DownstreamPathTemplate": "/api/{controller}/{action}",
      "UpstreamHttpMethod": [ "GET", "POST", "DELETE", "PUT" ],
      "DownstreamScheme": "http",
      "DownstreamHostAndPorts": [
        {
          "Host": "localhost",
          "Port": 5002
        }
      ]
    }
  ]
}在Startup.cs 的ConfigureServices和Configure中配置Ocelot
public void ConfigureServices(IServiceCollection services)
{
    services.AddMvc().SetCompatibilityVersion(CompatibilityVersion.Version_2_2);
    services.AddOcelot(new ConfigurationBuilder()
      .AddJsonFile("configuration.json")
      .Build());
}
public void Configure(IApplicationBuilder app, IHostingEnvironment env)
{
    app.UseOcelot();
    if (env.IsDevelopment())
    {
        app.UseDeveloperExceptionPage();
    }
    app.UseMvc();
}
分别为Api_A,和Api_B分别添加一个print接口。
[HttpGet("print")]
public string Print()
{
    return "Api_A";
}
[HttpGet("print")]
public string Print()
{
return "Api_B";
}4.测试网关
启动三个项目,使用postman来调用网关
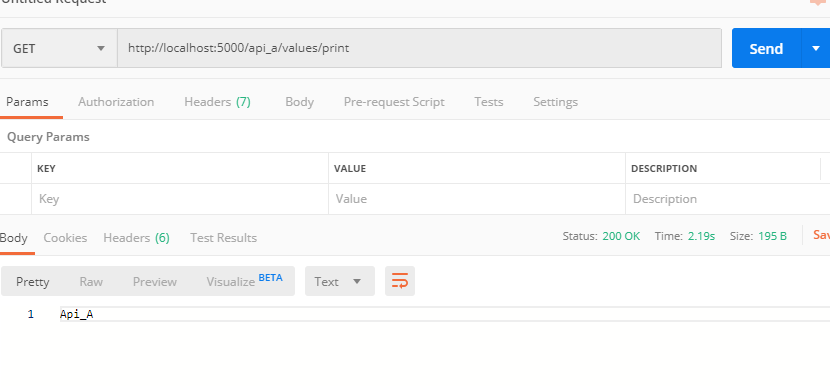
访问Api_A服务
访问Api_B服务
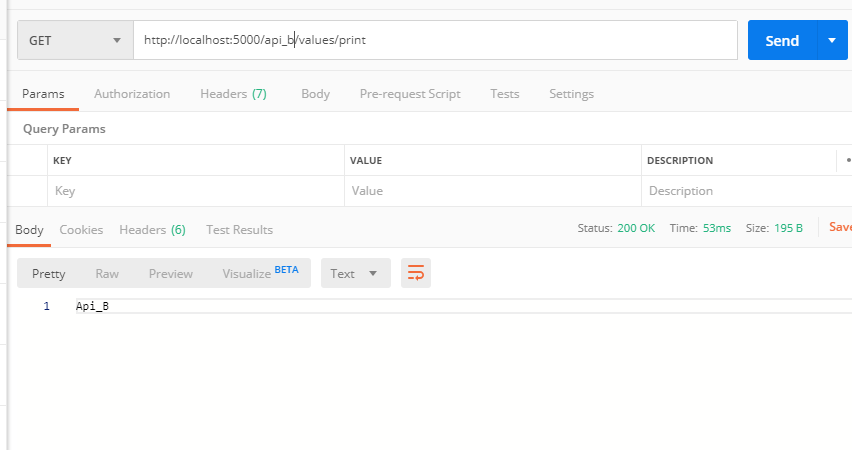
可以看到网关通过接受到的请求的Url后通过我们的配置自动转发到了我们想要访问的服务。
5.总结
自此就完成了Ocelot最简单的傻瓜式转发,当然它的功能远不止于此,之后我会继续更新详细介绍它的其他功能。