Nginx进程管理实例:
[root@nginx nginx-1.12.2]# cd /usr/local/nginx/
[root@nginx nginx]# ls
client_body_temp  fastcgi_temp  logs        sbin       uwsgi_temp
conf              html          proxy_temp  scgi_temp
[root@nginx nginx]# cd conf/
[root@nginx conf]# vim nginx.conf
//进行超时时间的设置
keepalive_timeout  65 180;
client_header_timeout 80;
client_body_timeout 80;
//修改完成后按Esc退出插入模式,输入:wq保存退出
[root@nginx conf]# service nginx stop
[root@nginx conf]# service nginx start
[root@nginx conf]# ps aux | grep nginx
root      53792  0.0  0.0  20548   620 ?        Ss   14:15   0:00 nginx: master process /usr/local/nginx/sbin/nginx
nginx     53794  0.0  0.0  23076  1396 ?        S    14:15   0:00 nginx: worker process
root      53818  0.0  0.0 112728   972 pts/0    R+   14:15   0:00 grep --color=auto nginx
//此时状态为一个master主进程,一个worker工作进程
[root@nginx conf]#init 0
在虚拟机设置中扩展CUP,操作如下:
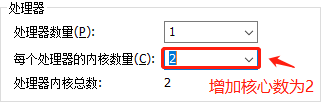
//查看cpu核心数:
[root@nginx ~]# cd /proc/
[root@nginx proc]# ls
1     1607  1881  2016  247   33   499  587  992          kcore         softirqs
10    1613  1892  2074  2476  364  5    589  997          keys          stat
100   1620  19    21    248   381  500  599  acpi         key-users     swaps
101   1621  1901  2119  25    391  501  6    buddyinfo    kmsg          sys
1010  1679  1907  2168  256   394  502  601  bus          kpagecount    sysrq-trigger
1011  1684  1914  22    257   396  503  604  cgroups      kpageflags    sysvipc
1012  17    1920  2244  258   4    504  605  cmdline      loadavg       timer_list
1044  1772  1934  2294  270   41   505  606  consoles     locks         timer_stats
11    1787  1946  23    283   42   506  608  cpuinfo      mdstat        tty
......此处省略多行,其中有我们需要查看的cpuinfo
[root@nginx proc]# cat cpuinfo
//第一核心:
processor   : 0
vendor_id   : GenuineIntel
cpu family  : 6
model       : 142
model name  : Intel(R) Core(TM) i5-8265U CPU @ 1.60GHz
stepping    : 11
microcode   : 0x9a
cpu MHz     : 1799.452
cache size  : 6144 KB
physical id : 0
siblings    : 2
core id     : 0
cpu cores   : 2
apicid      : 0
initial apicid  : 0
fpu     : yes
fpu_exception   : yes
cpuid level : 22
wp      : yes
//第二核心:
processor   : 1
vendor_id   : GenuineIntel
cpu family  : 6
model       : 142
model name  : Intel(R) Core(TM) i5-8265U CPU @ 1.60GHz
stepping    : 11
microcode   : 0x9a
cpu MHz     : 1799.452
cache size  : 6144 KB
physical id : 0
siblings    : 2
core id     : 1
cpu cores   : 2
apicid      : 1
initial apicid  : 1
fpu     : yes
fpu_exception   : yes
cpuid level : 22
wp      : yes
[root@nginx proc]# cd /usr/local/nginx/conf/
[root@nginx conf]# vim nginx.conf
worker_processes  2;        //把核心数1改成2
//接下来进行平均分配
worker_cpu_affinity 01 10;      //插入此行
//修改完成后按Esc退出插入模式,输入:wq保存退出
[root@nginx conf]# service nginx start
[root@nginx conf]# ps aux | grep nginx
avahi       573  0.0  0.0  30248  1788 ?        Ss   14:26   0:00 avahi-daemon: running [nginx.local]
root       2759  0.0  0.0  20548   624 ?        Ss   14:45   0:00 nginx: master process /usr/local/nginx/sbin/nginx
nginx      2760  0.0  0.0  23076  1400 ?        S    14:45   0:00 nginx: worker process
nginx      2761  0.0  0.0  23076  1400 ?        S    14:45   0:00 nginx: worker process
root       2782  0.0  0.0 112732   972 pts/0    S+   14:45   0:00 grep --color=auto nginx
//此时有两个worker工作进程
Nginx防盗链
win10中创建页面:
<html>
  <head>
    <title>快乐每一天</title>
  </head>
  <body>
    <h1>this is happy web</h1>
    <img src="http://www.kgc.com/lf.png"/>
  </body>
</html>
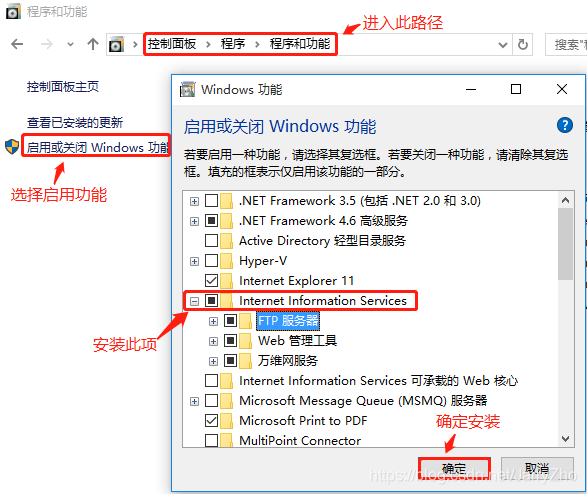
在win10虚拟机中安装IIS服务:
将写好的网页放入以下路径:C:\inetpub\wwwroot
同时关闭防火墙功能
安装DNS服务:
[root@nginx conf]# yum install bind -y
win10和win7的网络DNS地址改为192.168.18.136
[root@nginx conf]# vim /etc/named.conf
options {
        listen-on port 53 { any; };         //把括号中的127改为any
        listen-on-v6 port 53 { ::1; };
        directory       "/var/named";
        dump-file       "/var/named/data/cache_dump.db";
        statistics-file "/var/named/data/named_stats.txt";
        memstatistics-file "/var/named/data/named_mem_stats.txt";
        recursing-file  "/var/named/data/named.recursing";
        secroots-file   "/var/named/data/named.secroots";
        allow-query     { any; };           //把括号中的localhost改为any
//修改完成后按Esc退出插入模式,输入:wq保存退出
[root@nginx conf]# vim /etc/named.rfc1912.zones
zone "kgc.com" IN {
        type master;
        file "kgc.com.zone";
        allow-update { none; };
};
//添加以上的内容,修改完成后按Esc退出插入模式,输入:wq保存退出
[root@nginx conf]# cd /var/named/
[root@nginx named]# cp -p named.localhost kgc.com.zone
[root@nginx named]# vim kgc.com.zone
$TTL 1D
@       IN SOA  @ rname.invalid. (
                                        0       ; serial
                                        1D      ; refresh
                                        1H      ; retry
                                        1W      ; expire
                                        3H )    ; minimum
        NS      @
        A       127.0.0.1
www IN  A       192.168.18.136
//修改完成后按Esc退出插入模式,输入:wq保存退出
[root@nginx named]# systemctl start named
[root@nginx named]# systemctl stop firewalld.service
[root@nginx named]# setenforce 0
在win10和win7系统中使用cmd工具输入nslookup www.kgc.com进行域名解析,得到结果如下:
C:\Users\zhou>nslookup www.kgc.com
服务器:  UnKnown
Address:  192.168.18.136
名称:    www.kgc.com
Address:  192.168.18.136
我们使用win7访问win10的IP地址:192.168.18.139,得到盗链之后的页面:

我们使用win7访问:www.kgc.com,得到正常的Nginx的欢迎界面:

此时到盗链成功!接下来我们需要做的就是在Nginx中做防盗链!
[root@nginx named]# cd /usr/local/nginx/conf/
[root@nginx conf]# vim nginx.conf
     root   html;
 }
//在以上内容下行插入以下内容
location ~*\.(jpg|gif|swf)$ {
    valid_referers none blocked *.kgc.com kgc.com;
    if ( $invalid_referer ) {
       rewrite ^/ http://www.kgc.com/yy.png;
    }
}
//修改完成后按Esc退出插入模式,输入:wq保存退出
[root@nginx conf]# cp /aaa/yy.png /usr/local/nginx/html/
[root@nginx conf]# cd ../html/
[root@nginx html]# ls
50x.html  index.html  lf.jpg  yy.png
[root@nginx conf]# service nginx stop
[root@nginx conf]# service nginx start
我们使用win7访问win10的IP地址:192.168.18.139,此时会跳出防盗链的图片:

此时防盗链大成功!