Nginx 优化与防盗链
文章目录
一、隐藏版本号
(一)、查看nginx版本号
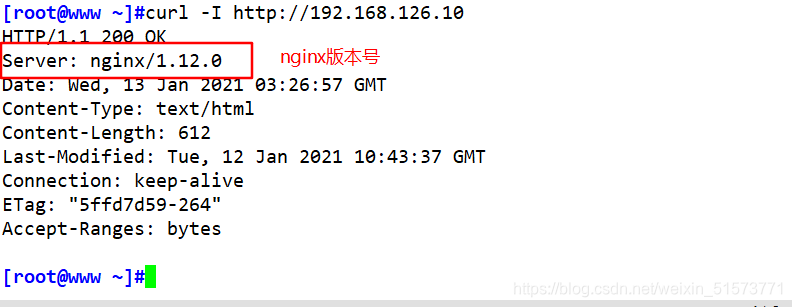
windows可以使用 Fiddler 工具抓取数据包,查看 Nginx版本,
也可以在 CentOS 中使用命令 curl -I http://192.168.126.10 显示响应报文首部信息。
curl -I http://192.168.126.10
(二)、隐藏版本号的修改方法
1、方法一:修改配置文件方式
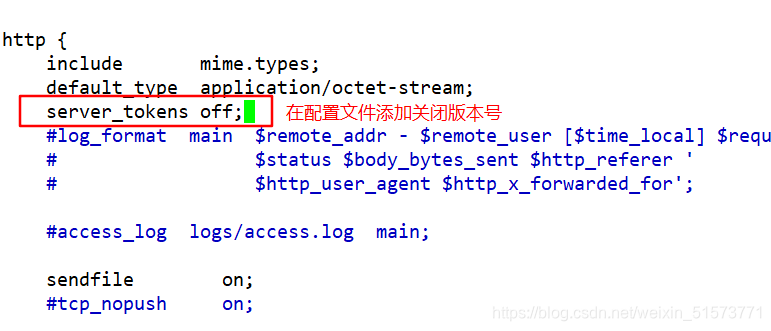
vim /usr/local/nginx/conf/nginx.conf
http {


    include       mime.types;
    default_type  application/octet-stream;
    server_tokens off;								#添加,关闭版本号
    ......
}
systemctl restart nginx
curl -I http://192.168.126.10

2、方法二:修改源码文件,重新编译安装
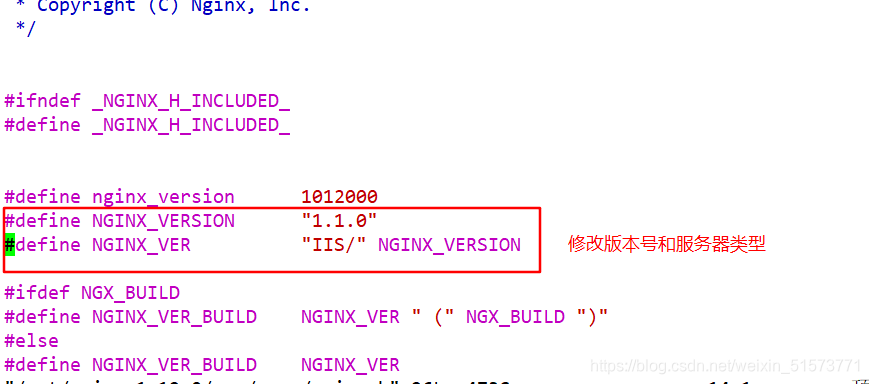
vim /opt/nginx-1.12.0/src/core/nginx.h
#define NGINX_VERSION "1.1.1" 					#修改版本号
#define NGINX_VER "IIS" NGINX_VERSION 			#修改服务器类型
cd /opt/nginx-1.12.0/
./configure --prefix=/usr/local/nginx --user=nginx --group=nginx --with-http_stub_status_module
make && make install
vim /usr/local/nginx/conf/nginx.conf
http {


    include       mime.types;
    default_type  application/octet-stream;
    server_tokens on;
	......
}
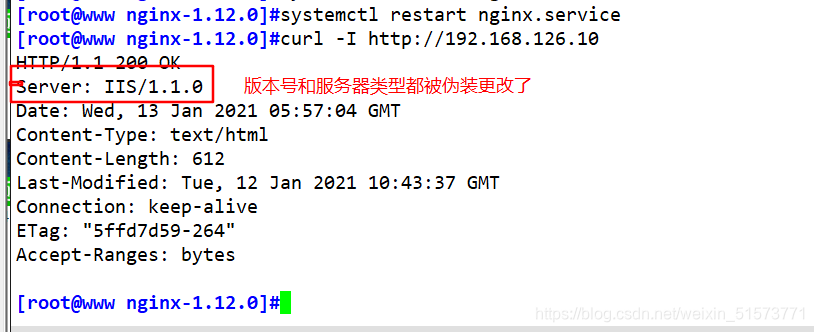
systemctl restart nginx
curl -I http://192.168.126.10
二、修改用户和组
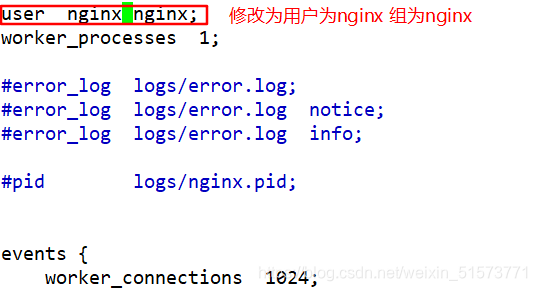
vim /usr/local/nginx/conf/nginx.conf
user nginx nginx; 								#取消注释,修改用户为 nginx ,组为 nginx
systemctl restart nginx
ps aux | grep nginx
主进程由root创建,子进程由nginx创建

三、缓存时间
vim /usr/local/nginx/conf/nginx.conf
http {
......
server {
......
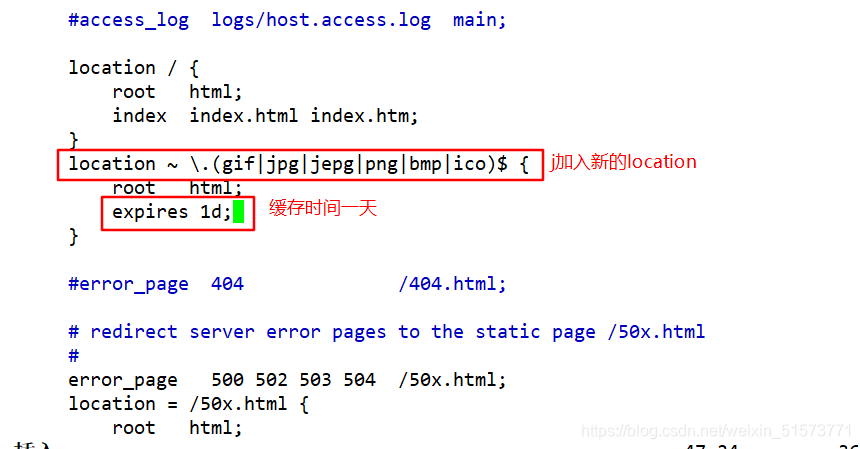
location / {
root html;
index index.html index.htm;
}
location ~ \.(gif|jpg|jepg|png|bmp|ico)$ {
#加入新的 location,以图片作为缓存对象
root html;
expires 1d; #指定缓存时间,1天
}
......
}
}
systemctl restart nginx
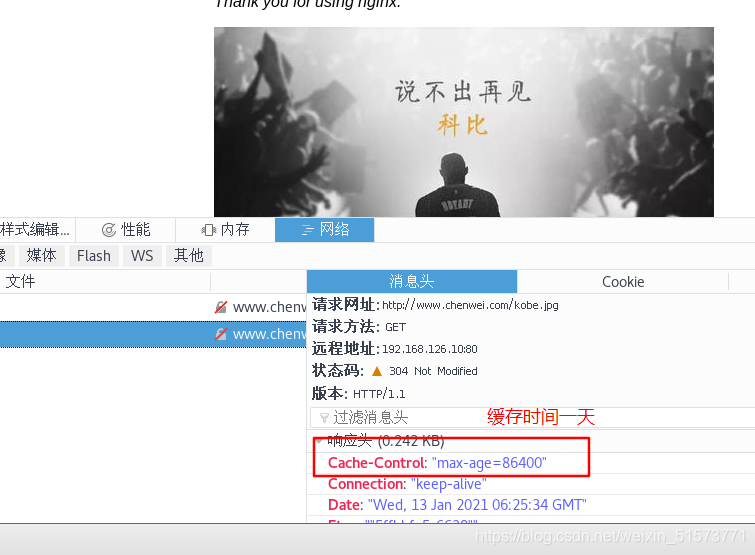
在Linux系统中,打开火狐浏览器,右击点查看元素
选择 网络 —> 选择 HTML、WS、其他
访问 http://192.168.80.10 ,双击200响应消息查看响应头中包含 Cahce-Control:max-age=86400 表示缓存时间是 86400 秒。也就是缓存一天的时间,一天之内浏览器访问这个页面,都是用缓存中的数据,而不需要向 Nginx 服务器重新发出请求,减少了服务器的使用带宽。
四、日志切割
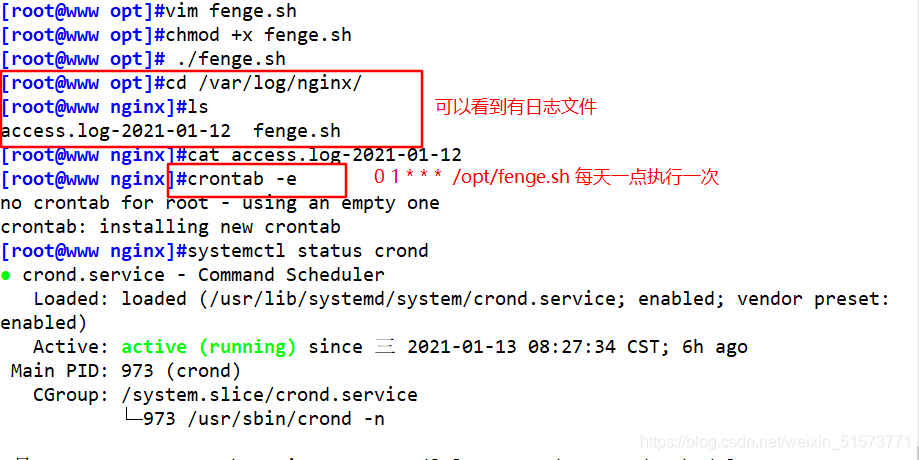
vim /opt/fenge.sh
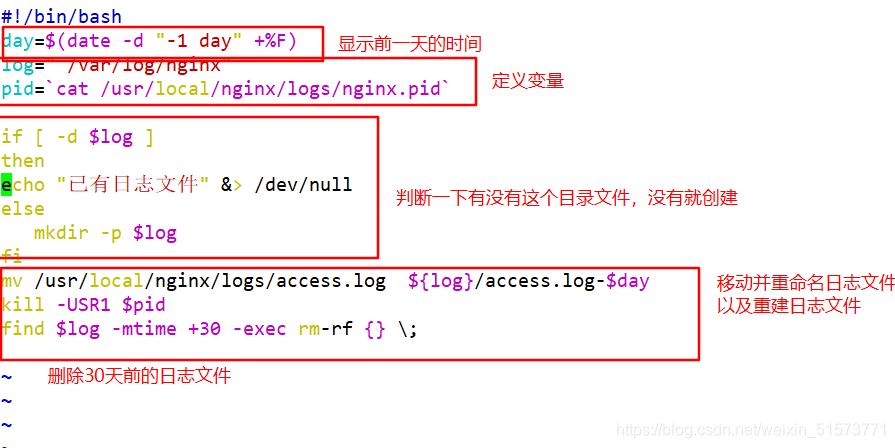
#!/bin/bash

#Filename: fenge.sh

d=$(date -d "-1 day" "+%Y%m%d")												#显示前一天的时间
logs_path="/var/log/nginx"
pid_path="/usr/local/nginx/logs/nginx.pid"
[ -d $logs_path ] || mkdir -p $logs_path 									#创建日志文件目录
mv /usr/local/nginx/logs/access.log ${logs_path}/kgc.com-access.log-$d		#移动并重命名日志文件
kill -USR1 $(cat $pid_path)													#重建新日志文件
find $logs_path -mtime +30 -exec rm -rf {

    } \;								#删除30天之前的日志文件
#find $logs_path -mtime +30 |xargs rm -rf
chmod +x /opt/fenge.sh
/opt/fenge.sh
ls /var/log/nginx
ls/usr/local/nginx/logs/access.log
crontab -e
0 1 * * * /opt/fenge.sh
--------------------------------------------------小知识--------------------------------------------------
在linux操作系统中,每个文件都有很多的时间参数,其中有三个比较主要,分别是ctime,atime,mtime
ctime(status time):
当修改文件的权限或者属性的时候,就会更新这个时间,ctime并不是create time,更像是change time,
只有当更新文件的属性或者权限的时候才会更新这个时间,但是更改内容的话是不会更新这个时间。
atime(accesstime):
当使用这个文件的时候就会更新这个时间。
mtime(modification time):
当修改文件的内容数据的时候,就会更新这个时间,而更改权限或者属性,mtime不会改变,这就是和ctime的区别。
五、连接超时
HTTP有一个KeepAlive模式,它告诉web服务器在处理完一个请求后保持这个TCP连接的打开状态。若接收到来自客户端的其它请求,服务端会利用这个未被关闭的连接,而不需要再建立一个连接。
KeepAlive 在一段时间内保持打开状态,它们会在这段时间内占用资源。占用过多就会影响性能。
vim /usr/local/nginx/conf/nginx.conf
http {


......
    keepalive_timeout 65 180;
    client_header_timeout 80;
    client_body_timeout 80;
......
}
systemctl restart nginx
keepalive_timeout
指定KeepAlive的超时时间(timeout)。指定每个TCP连接最多可以保持多长时间,服务器将会在这个时间后关闭连接。 Nginx的默认值是65秒,有些浏览器最多只保持 60 秒,所以可以设定为 60 秒。若将它设置为0,就禁止了keepalive 连接。
第二个参数(可选的)指定了在响应头Keep-Alive:timeout=time中的time值。这个头能够让一些浏览器主动关闭连接,这样服务器就不必去关闭连接了。没有这个参数,Nginx 不会发送 Keep-Alive 响应头。

client_header_timeout
客户端向服务端发送一个完整的 request header 的超时时间。如果客户端在指定时间内没有发送一个完整的 request header,Nginx 返回 HTTP 408(Request Timed Out)。

client_body_timeout
指定客户端与服务端建立连接后发送 request body 的超时时间。如果客户端在指定时间内没有发送任何内容,Nginx 返回 HTTP 408(Request Timed Out)。
六、更改进程数
cat /proc/cpuinfo | grep -c "physical id"	#查看cpu核数
ps aux | grep nginx
#查看nginx主进程中包含几个子进程
vim /usr/local/nginx/conf/nginx.conf
worker_processes  2;				#修改为核数相同或者2倍
worker_cpu_affinity 01 10;			#设置每个进程由不同cpu处理,进程数配为4时0001 0010 0100 1000
systemctl restart nginx


七、配置网页压缩
vim /usr/local/nginx/conf/nginx.conf
http {
......
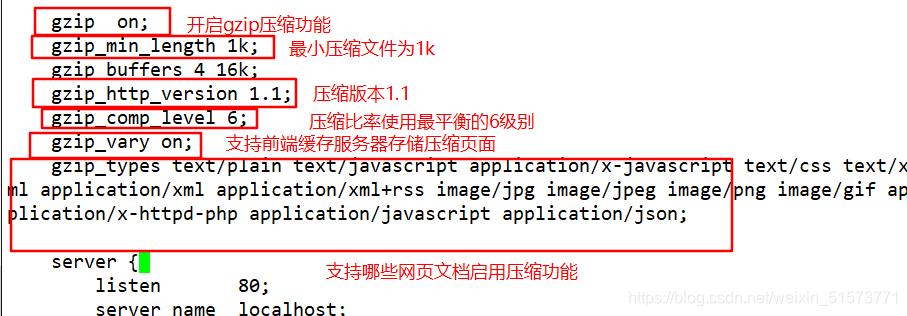
gzip on; #取消注释,开启gzip压缩功能
gzip_min_length 1k; #最小压缩文件大小
gzip_buffers 4 16k; #压缩缓冲区,大小为4个16k缓冲区
gzip_http_version 1.1; #压缩版本(默认1.1,前端如果是squid2.5请使用1.0)
gzip_comp_level 6; #压缩比率
gzip_vary on; #支持前端缓存服务器存储压缩页面
gzip_types text/plain text/javascript application/x-javascript text/css text/xml application/xml application/xml+rss image/jpg image/jpeg image/png image/gif application/x-httpd-php application/javascript application/json; #压缩类型,表示哪些网页文档启用压缩功能
......
}
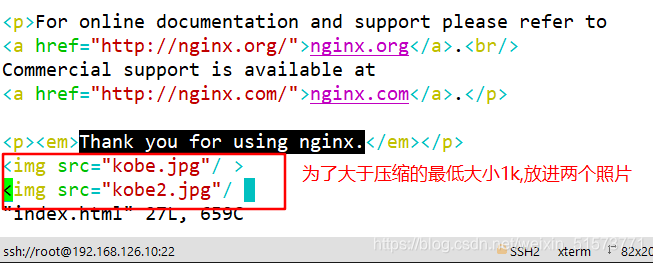
cd /usr/local/nginx/html
先将game.jpg文件传到/usr/local/nginx/html目录下
vim index.html
......
<img src="game.jpg"/>				#网页中插入图片
</body>
</html>
systemctl restart nginx
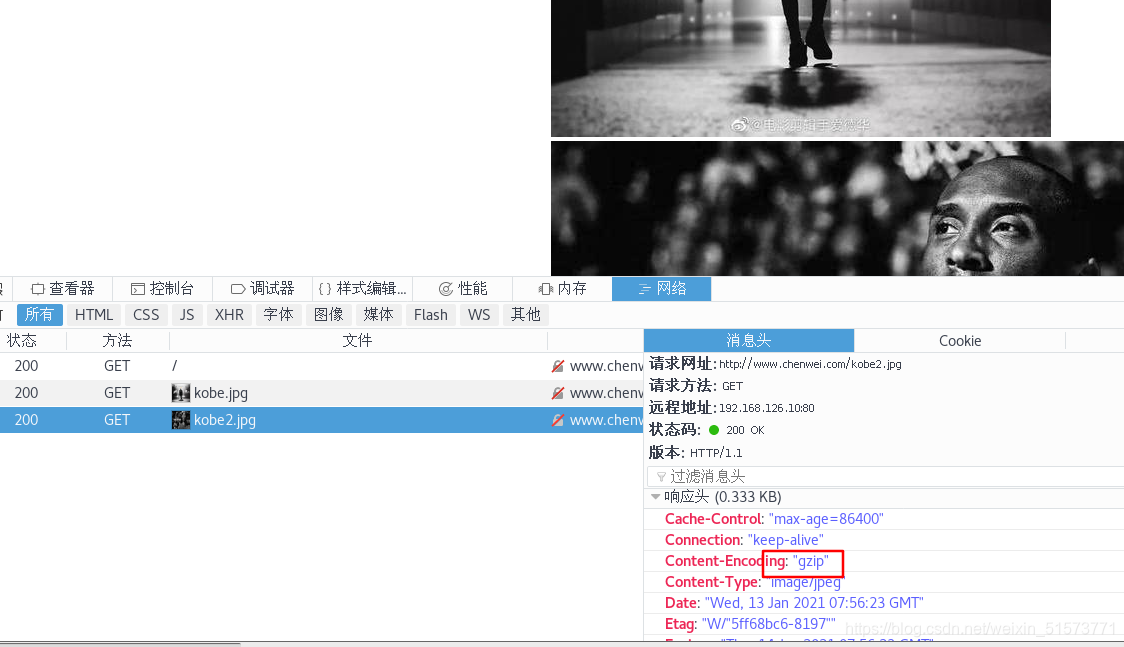
在Linux系统中,打开火狐浏览器,右击点查看元素
选择 网络 —> 选择 HTML、WS、其他
访问 http://192.168.126.10 ,双击200响应消息查看响应头中包含 Content-Encoding: gzip
八、配置防盗链
vim /usr/local/nginx/conf/nginx.conf
http {
......
server {
......
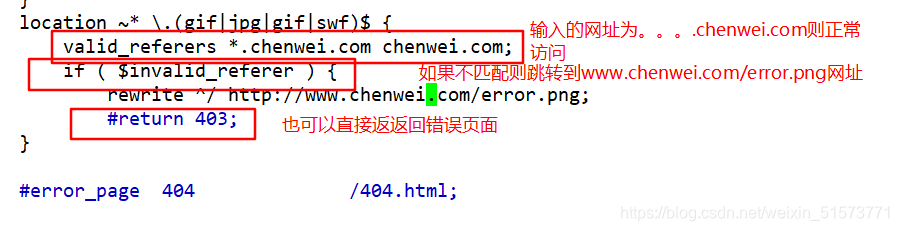
location ~*\.(jpg|gif|swf)$ {
valid_referers *.kgc.com kgc.com;
if ( $invalid_referer ) {
rewrite ^/ http://www.kgc.com/error.png;
#return 403;
}
}
......
}
}
~* \.(jpg|gif|swf)$ :这段正则表达式表示匹配不区分大小写,以.jpg 或.gif 或.swf 结尾的文件;
valid_referers :设置信任的网站,可以正常使用图片;
后面的网址或者域名 :referer 中包含相关字符串的网址;

if语句:如果链接的来源域名不在valid_referers所列出的列表中,$invalid_referer为1,则执行后面的操作,即进行重写或返回 403 页面。
网页准备:
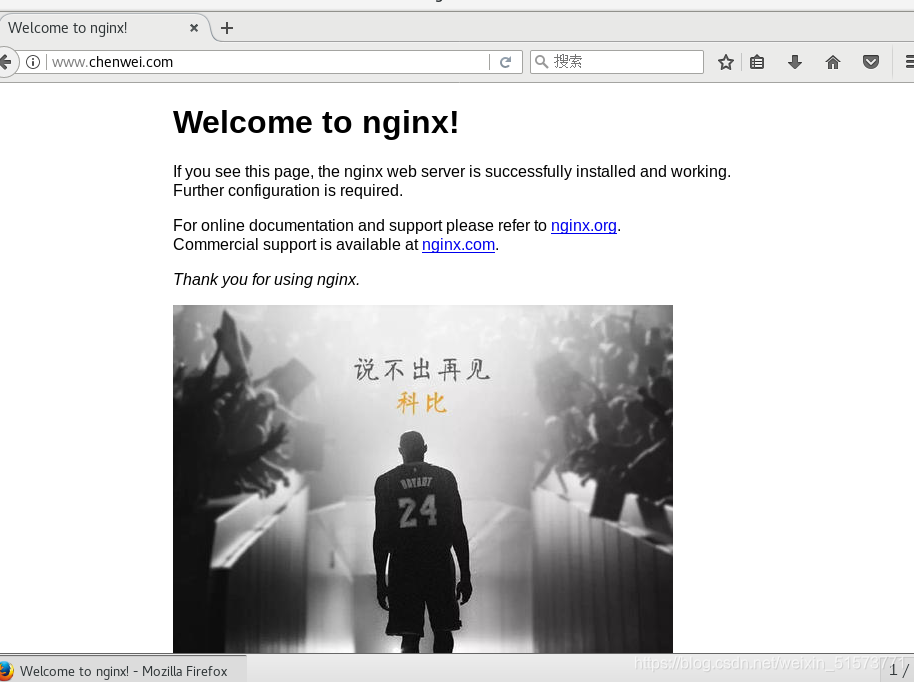
Web源主机(192.168.80.10)配置:
cd /usr/local/nginx/html
将game.jpg、error.png文件传到/usr/local/nginx/html目录下
vim index.html
......
<img src="kobe.jpg"/>
</body>
</html>
echo "192.168.126.10 www.chenwei.com" >> /etc/hosts
echo "192.168.126.20 www.mm.com" >> /etc/hosts
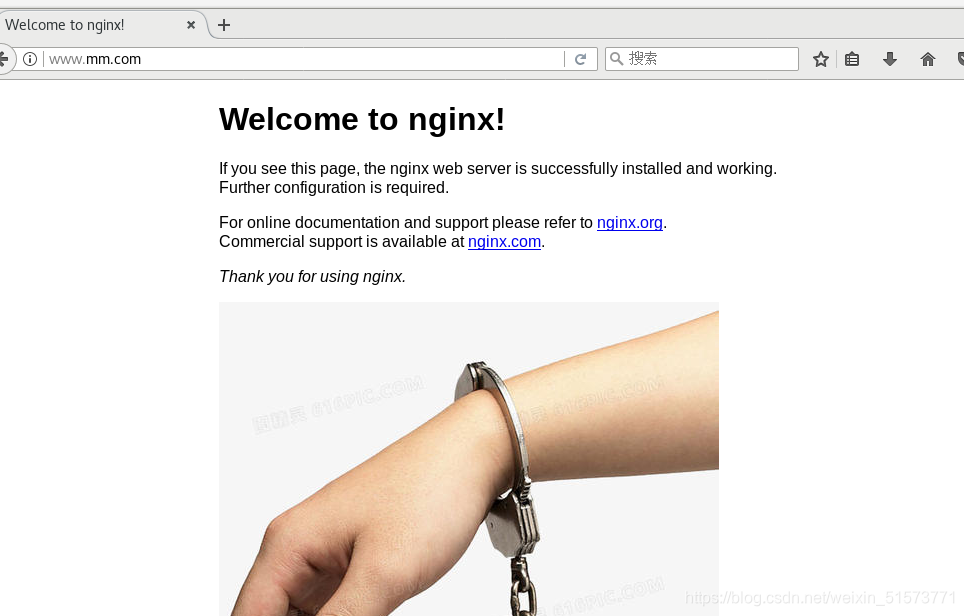
盗链网站主机(192.168.80.11):
cd /usr/local/nginx/html
vim index.html
......
<img src="http://www.chenwei.com/game.jpg"/>
</body>
</html>
echo "192.168.126.10 www.chenwei.com" >> /etc/hosts
echo "192.168.126.20 www.mm.com" >> /etc/hosts
在盗图网站主机上进行浏览器验证
http://www.mm.com
九、fpm参数优化
vim /usr/local/php/etc/php-fpm.conf
pid = run/php-fpm.pid
vim /usr/local/php/etc/php-fpm.d/www.conf
--96行--
pm = dynamic				#fpm进程启动方式,动态的
--107行--
pm.max_children=20			#fpm进程启动的最大进程数
--112行--
pm.start_servers = 5		#动态方式下启动时默认开启的进程数,在最小和最大之间
--117行--
pm.min_spare_servers = 2	#动态方式下最小空闲进程数
--122行--
pm.max_spare_servers = 8	#动态方式下最大空闲进程数
kill -USR2 `cat /usr/local/php/var/run/php-fpm.pid`			#重启php-fpm

netstat -anpt | grep 9000