Redis 是一个基于内存的日志型可持久化的缓存数据库,保存形式为 key-value 格式。本文章将通过使用 RedisTemplate 来完成 Spring Boot 与 Redis 的集成。
1 导入依赖
代码可以不写,但是依赖必须得导,Spring Boot 与 Redis 的集成需要导入以下依赖:
		<!-- 集成Redis -->
		<dependency>
            <groupId>org.springframework.boot</groupId>
            <artifactId>spring-boot-starter-data-redis</artifactId>
        </dependency>

        <!--spring2.0集成redis所需common-pool2-->
        <dependency>
            <groupId>org.apache.commons</groupId>
            <artifactId>commons-pool2</artifactId>
        </dependency>

        <dependency>
			<groupId>com.alibaba</groupId>
			<artifactId>fastjson</artifactId>
			<version>1.2.8</version>
		</dependency>
2 配置 application.properties
在我们项目的 application.properties 进行如下配置:
# Redis服务器地址
spring.redis.host=127.0.0.1
# Redis服务器连接端口
spring.redis.port=6379
# Redis数据库索引(默认为0)
spring.redis.database=0
# Redis服务器连接密码(默认为空)
spring.redis.password=
# 连接超时时间(毫秒)
spring.redis.timeout=10000
3 打开 redis

进入 Redis 的安装路径的根目录, 输入命令 redis-server.exe redis.windows.conf,出现如下图案,可见 Redis 已成功运行。
4 编写一个 controller
package edu.szu.test.controller;

import org.springframework.beans.factory.annotation.Autowired;
import org.springframework.data.redis.core.RedisTemplate;
import org.springframework.web.bind.annotation.RequestMapping;
import org.springframework.web.bind.annotation.RestController;

@RestController
@RequestMapping("/redistest")
public class HelloController {

	@Autowired
    private RedisTemplate redisTemplate;

	@RequestMapping("/hello")
    public String hello(){
        redisTemplate.opsForValue().set("sub","com");
        return (String) redisTemplate.opsForValue().get("sub");
	}
}
有的小伙伴可能会很惊讶,喂,配置呢?!为什么可以直接使用 Redis ?但实际上,在 Spring Boot 中,由于 Spring Boot 几乎帮我们干了所有的脏活累活,我们是可以直接使用 Redis 的。很神奇,不是吗?
redisTemplate.opsForValue().set("sub","com");
return (String) redisTemplate.opsForValue().get("sub");
这两行代码的意思为将一条数据存入 redis 中,然后再去 redis 中取出这条数据并返回前端。好的,现在我们运行启动类,看看前端是否会显示 com ?
在浏览器输入 http://localhost:8080/redistest/hello
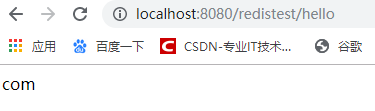
太好了!这代表我们已经将数据存入了 redis 并可以自由取出,那 Spring Boot 与 Redis 的集成是否就结束了呢?想得美!实际上,我们还忘了一个重要的步骤:序列化规则。如果我们不重新定义序列化规则,在 Redis 客户端输入 key 是查询不到 value 的。
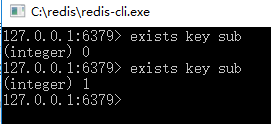
不信?我们可以试试,在 Redis 客户端输入 keys *,看看我们是否能在Redis 客户端查询到我们刚刚插入的 key ?

我们之前已经清空过 Redis 缓存,可以确定我们刚刚添加的键值对为 Redis 客户端唯一数据。可以看到,我们插入的 key 其实已经变成了一堆乱码。其实,这是默认序列化方式导致的,虽然我们的程序看起来正常,但 Redis 客户端无法正确存储我们插入的键值对。
5 修改序列化规则
自定义一个通用序列化方式的类:
package edu.szu.test.common;

import java.nio.charset.Charset;

import org.springframework.data.redis.serializer.RedisSerializer;
import org.springframework.data.redis.serializer.SerializationException;

import com.alibaba.fastjson.JSON;
import com.alibaba.fastjson.serializer.SerializerFeature;

public class FastJsonRedisSerializer<T> implements RedisSerializer<T> {

    public static final Charset DEFAULT_CHARSET = Charset.forName("UTF-8");

    private Class<T> clazz;

    public FastJsonRedisSerializer(Class<T> clazz) {
        super();
        this.clazz = clazz;
    }

    @Override
    public byte[] serialize(T t) throws SerializationException {
        if (null == t) {
            return new byte[0];
        }
        return JSON.toJSONString(t, SerializerFeature.WriteClassName).getBytes(DEFAULT_CHARSET);
    }

    @Override
    public T deserialize(byte[] bytes) throws SerializationException {
        if (null == bytes || bytes.length <= 0) {
            return null;
        }
        String str = new String(bytes, DEFAULT_CHARSET);
        return (T) JSON.parseObject(str, clazz);
    }

}
然后我们再实现一个 redis 的配置类:
package edu.szu.test.common;

import org.springframework.boot.autoconfigure.condition.ConditionalOnClass;
import org.springframework.boot.autoconfigure.condition.ConditionalOnMissingBean;
import org.springframework.boot.autoconfigure.data.redis.RedisProperties;
import org.springframework.boot.context.properties.EnableConfigurationProperties;
import org.springframework.context.annotation.Bean;
import org.springframework.context.annotation.Configuration;
import org.springframework.data.redis.connection.RedisConnectionFactory;
import org.springframework.data.redis.core.RedisOperations;
import org.springframework.data.redis.core.RedisTemplate;
import org.springframework.data.redis.core.StringRedisTemplate;
import org.springframework.data.redis.serializer.StringRedisSerializer;

@Configuration
@ConditionalOnClass(RedisOperations.class)
@EnableConfigurationProperties(RedisProperties.class)
public class RedisConfig {

    @Bean
    @ConditionalOnMissingBean(name = "redisTemplate")
    public RedisTemplate<Object, Object> redisTemplate(
            RedisConnectionFactory redisConnectionFactory) {
        RedisTemplate<Object, Object> template = new RedisTemplate<>();

        //使用fastjson序列化
        FastJsonRedisSerializer fastJsonRedisSerializer = new FastJsonRedisSerializer(Object.class);
        // value值的序列化采用fastJsonRedisSerializer
        template.setValueSerializer(fastJsonRedisSerializer);
        template.setHashValueSerializer(fastJsonRedisSerializer);
        // key的序列化采用StringRedisSerializer
        template.setKeySerializer(new StringRedisSerializer());
        template.setHashKeySerializer(new StringRedisSerializer());

        template.setConnectionFactory(redisConnectionFactory);
        return template;
    }

    @Bean
    @ConditionalOnMissingBean(StringRedisTemplate.class)
    public StringRedisTemplate stringRedisTemplate(
            RedisConnectionFactory redisConnectionFactory) {
        StringRedisTemplate template = new StringRedisTemplate();
        template.setConnectionFactory(redisConnectionFactory);
        return template;
    }

}
如代码所写,我们修改了 key 和 value 的序列化规则,key 用 Redis 本身提供的序列化方式,value 用我们自定义的fastjson 序列化方式。
再次打开启动类,在浏览器输入 http://localhost:8080/redistest/hello ,查看 Redis 客户端:
在程序中添加的 Redis 键值对正确被添加进了 Redis 客户端,代表 Spring Boot 与 Redis 已经集成完毕。
6 补充:value 为非字符串对象
我们上面举的例子为 value 为字符串对象的情况,若 value 为非字符串对象又该如何?其实基本上与之前是一模一样的,下面直接上代码。
我们先建立一个 pojo
public class Person{

	private int num;
	private String str;

	@Override
	public String toString() {
		return "Person [num=" + num + ", str=" + str + "]";
	}

	public Person() {

	}

	public Person(int num,String str) {
		this.num = num;
		this.str = str;
	}

	public int getNum() {
		return num;
	}

	public void setNum(int num) {
		this.num = num;
	}

	public String getStr() {
		return str;
	}

	public void setStr(String str) {
		this.str = str;
	}

}
注意,一定要加上空构造器,否则会报错!!
然后我们修改一下控制器
@RestController
@RequestMapping("/redistest")
public class HelloController {

	@Autowired
    private RedisTemplate redisTemplate;

	@RequestMapping("/hello")
    public String hello(){
        redisTemplate.opsForValue().set("per",new Person(1,"personsss"));
        Person person = (Person) redisTemplate.opsForValue().get("per");
        return person.toString() ;
	}
}
在浏览器输入 http://localhost:8080/redistest/hello,显示如下
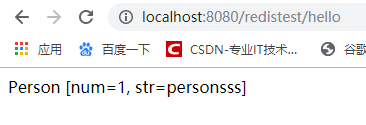
在 Redis 客户端进行查询,查得 key 为 per 时的 value 如下,与我们的程序相符。

本文章代码参考:SpringBoot2.0整合Redis