一、简介
spring boot框架中已经集成了redis,在1.x.x的版本时默认使用的jedis客户端,现在是2.x.x版本默认使用的lettuce客户端,两种客户端的区别如下
# Jedis和Lettuce都是Redis Client

# Jedis 是直连模式,在多个线程间共享一个 Jedis 实例时是线程不安全的,
# 如果想要在多线程环境下使用 Jedis,需要使用连接池,
# 每个线程都去拿自己的 Jedis 实例,当连接数量增多时,物理连接成本就较高了。
# Lettuce的连接是基于Netty的,连接实例可以在多个线程间共享,
# 所以,一个多线程的应用可以使用同一个连接实例,而不用担心并发线程的数量。
# 当然这个也是可伸缩的设计,一个连接实例不够的情况也可以按需增加连接实例。

# 通过异步的方式可以让我们更好的利用系统资源,而不用浪费线程等待网络或磁盘I/O。
# Lettuce 是基于 netty 的,netty 是一个多线程、事件驱动的 I/O 框架,
# 所以 Lettuce 可以帮助我们充分利用异步的优势。
由于我的项目是spring boot 2.0.4的,所以我是用lettuce来配置,在我的这个文章里面和其他文章不一样的地方是,其他文章直接把cache操作类放在跟spring boot同一个模块中
而实际开发时,这种缓存类都是独立放在common模块中的,所以Autowired就失效了,使用其他方式进行注入
以下是我的项目结构:
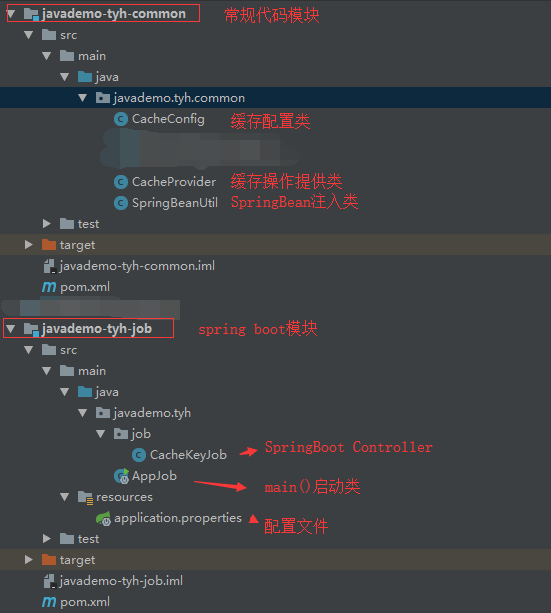
二、Common模块代码
1、先在pom中引入redis及其它jar包
<dependencies>
        <!-- spring bean 用于spring boot框架外的对象注入 -->
        <dependency>
            <groupId>org.springframework</groupId>
            <artifactId>spring-context</artifactId>
            <version>5.0.7.RELEASE</version>
        </dependency>
        <!-- spring boot redis 缓存引入 -->
        <dependency>
            <groupId>org.springframework.boot</groupId>
            <artifactId>spring-boot-starter-data-redis</artifactId>
            <version>2.0.4.RELEASE</version>
        </dependency>
        <!-- lettuce pool 缓存连接池 -->
        <dependency>
            <groupId>org.apache.commons</groupId>
            <artifactId>commons-pool2</artifactId>
            <version>2.5.0</version>
        </dependency>
        <!-- jackson json 优化缓存对象序列化 -->
        <dependency>
            <groupId>com.fasterxml.jackson.core</groupId>
            <artifactId>jackson-databind</artifactId>
            <version>2.9.6</version>
        </dependency>
    </dependencies>
2、编写缓存配置类CacheConfig用于调优缓存默认配置
import com.fasterxml.jackson.annotation.JsonAutoDetect;
import com.fasterxml.jackson.annotation.PropertyAccessor;
import com.fasterxml.jackson.databind.ObjectMapper;
import org.springframework.cache.CacheManager;
import org.springframework.cache.annotation.CachingConfigurerSupport;
import org.springframework.cache.annotation.EnableCaching;
import org.springframework.cache.interceptor.KeyGenerator;
import org.springframework.context.annotation.Bean;
import org.springframework.context.annotation.Configuration;
import org.springframework.data.redis.cache.RedisCacheConfiguration;
import org.springframework.data.redis.cache.RedisCacheManager;
import org.springframework.data.redis.cache.RedisCacheWriter;
import org.springframework.data.redis.connection.lettuce.LettuceConnectionFactory;
import org.springframework.data.redis.core.RedisTemplate;
import org.springframework.data.redis.core.StringRedisTemplate;
import org.springframework.data.redis.serializer.Jackson2JsonRedisSerializer;

import java.lang.reflect.Method;

/**
 * 缓存配置-使用Lettuce客户端,自动注入配置的方式
 */
@Configuration
@EnableCaching //启用缓存
public class CacheConfig extends CachingConfigurerSupport {

    /**
     * 自定义缓存key的生成策略。默认的生成策略是看不懂的(乱码内容) 通过Spring 的依赖注入特性进行自定义的配置注入并且此类是一个配置类可以更多程度的自定义配置
     *
     * @return
     */
    @Bean
    @Override
    public KeyGenerator keyGenerator() {
        return new KeyGenerator() {
            @Override
            public Object generate(Object target, Method method, Object... params) {
                StringBuilder sb = new StringBuilder();
                sb.append(target.getClass().getName());
                sb.append(method.getName());
                for (Object obj : params) {
                    sb.append(obj.toString());
                }
                return sb.toString();
            }
        };
    }

    /**
     * 缓存配置管理器
     */
    @Bean
    public CacheManager cacheManager(LettuceConnectionFactory factory) {
        //以锁写入的方式创建RedisCacheWriter对象
        RedisCacheWriter writer = RedisCacheWriter.lockingRedisCacheWriter(factory);
        /*
        设置CacheManager的Value序列化方式为JdkSerializationRedisSerializer,
        但其实RedisCacheConfiguration默认就是使用
        StringRedisSerializer序列化key,
        JdkSerializationRedisSerializer序列化value,
        所以以下注释代码就是默认实现,没必要写,直接注释掉
         */
        // RedisSerializationContext.SerializationPair pair = RedisSerializationContext.SerializationPair.fromSerializer(new JdkSerializationRedisSerializer(this.getClass().getClassLoader()));
        // RedisCacheConfiguration config = RedisCacheConfiguration.defaultCacheConfig().serializeValuesWith(pair);
        //创建默认缓存配置对象
        RedisCacheConfiguration config = RedisCacheConfiguration.defaultCacheConfig();
        RedisCacheManager cacheManager = new RedisCacheManager(writer, config);
        return cacheManager;
    }

    /**
     * 获取缓存操作助手对象
     *
     * @return
     */
    @Bean
    public RedisTemplate<String, String> redisTemplate(LettuceConnectionFactory factory) {
        //创建Redis缓存操作助手RedisTemplate对象
        StringRedisTemplate template = new StringRedisTemplate();
        template.setConnectionFactory(factory);
        //以下代码为将RedisTemplate的Value序列化方式由JdkSerializationRedisSerializer更换为Jackson2JsonRedisSerializer
        //此种序列化方式结果清晰、容易阅读、存储字节少、速度快,所以推荐更换
        Jackson2JsonRedisSerializer jackson2JsonRedisSerializer = new Jackson2JsonRedisSerializer(Object.class);
        ObjectMapper om = new ObjectMapper();
        om.setVisibility(PropertyAccessor.ALL, JsonAutoDetect.Visibility.ANY);
        om.enableDefaultTyping(ObjectMapper.DefaultTyping.NON_FINAL);
        jackson2JsonRedisSerializer.setObjectMapper(om);
        template.setValueSerializer(jackson2JsonRedisSerializer);
        template.afterPropertiesSet();
        return template;//StringRedisTemplate是RedisTempLate<String, String>的子类
    }
}
3、编写缓存操作提供类CacheProvider,用于给开发提供缓存操作
import com.google.gson.Gson;
import org.springframework.dao.DataAccessException;
import org.springframework.data.redis.connection.RedisConnection;
import org.springframework.data.redis.core.RedisCallback;
import org.springframework.data.redis.core.RedisTemplate;
import org.springframework.data.redis.serializer.RedisSerializer;

/**
 * 缓存提供类
 */
public class CacheProvider {

    //由于当前class不在spring boot框架内(不在web项目中)所以无法使用autowired,使用此种方法进行注入
    private static RedisTemplate<String, String> template = (RedisTemplate<String, String>) SpringBeanUtil.getBean("redisTemplate");

    public static <T> boolean set(String key, T value) {
        Gson gson = new Gson();
        return set(key, gson.toJson(value));
    }

    public static boolean set(String key, String value) {
        boolean result = template.execute(new RedisCallback<Boolean>() {
            @Override
            public Boolean doInRedis(RedisConnection connection) throws DataAccessException {
                RedisSerializer<String> serializer = template.getStringSerializer();
                connection.set(serializer.serialize(key), serializer.serialize(value));
                return true;
            }
        });
        return result;
    }

    public static <T> T get(String key, Class<T> clazz) {
        Gson gson = new Gson();
        return gson.fromJson(get(key), clazz);
    }

    public static String get(String key) {
        String result = template.execute(new RedisCallback<String>() {
            @Override
            public String doInRedis(RedisConnection connection) throws DataAccessException {
                RedisSerializer<String> serializer = template.getStringSerializer();
                byte[] value = connection.get(serializer.serialize(key));
                return serializer.deserialize(value);
            }
        });
        return result;
    }

    public static boolean del(String key) {
        return template.delete(key);
    }
}
4、此时你会发现我们并没有用Autowired做自动注入,而是用SpringBeanUtil.getBean("redisTemplate")自己写的类进行注入,
因为这个Common模块并不在Spring boot框架内,自动注入无效,所以改用这个
扫描二维码关注公众号,回复:
2672204 查看本文章

import org.springframework.beans.BeansException;
import org.springframework.context.ApplicationContext;
import org.springframework.context.ApplicationContextAware;
import org.springframework.stereotype.Component;

@Component
public class SpringBeanUtil implements ApplicationContextAware {

    private static ApplicationContext applicationContext = null;

    @Override
    public void setApplicationContext(ApplicationContext applicationContext) throws BeansException {
        if (SpringBeanUtil.applicationContext == null) {
            SpringBeanUtil.applicationContext = applicationContext;
        }
    }

    public static ApplicationContext getApplicationContext() {
        return applicationContext;
    }

    /**
     * 通过Bean名字获取Bean
     *
     * @param beanName
     * @return
     */
    public static Object getBean(String beanName) {
        return getApplicationContext().getBean(beanName);
    }

    /**
     * 通过Bean类型获取Bean
     *
     * @param beanClass
     * @param <T>
     * @return
     */
    public static <T> T getBean(Class<T> beanClass) {
        return getApplicationContext().getBean(beanClass);
    }

    /**
     * 通过Bean名字和Bean类型获取Bean
     *
     * @param beanName
     * @param beanClass
     * @param <T>
     * @return
     */
    public static <T> T getBean(String beanName, Class<T> beanClass) {
        return getApplicationContext().getBean(beanName, beanClass);
    }
}
5、现在Common模块就编写完成了,大家可以发现CacheConfig类中使用的自动读取配置文件的方式,以下再提供一种手动配置的方式


import com.fasterxml.jackson.annotation.JsonAutoDetect;
import com.fasterxml.jackson.annotation.PropertyAccessor;
import com.fasterxml.jackson.databind.ObjectMapper;
import org.apache.commons.pool2.impl.GenericObjectPoolConfig;
import org.springframework.beans.factory.annotation.Value;
import org.springframework.boot.context.properties.ConfigurationProperties;
import org.springframework.cache.CacheManager;
import org.springframework.cache.annotation.CachingConfigurerSupport;
import org.springframework.cache.annotation.EnableCaching;
import org.springframework.cache.interceptor.KeyGenerator;
import org.springframework.context.annotation.Bean;
import org.springframework.context.annotation.Configuration;
import org.springframework.data.redis.cache.RedisCacheConfiguration;
import org.springframework.data.redis.cache.RedisCacheManager;
import org.springframework.data.redis.cache.RedisCacheWriter;
import org.springframework.data.redis.connection.*;
import org.springframework.data.redis.connection.lettuce.LettuceConnectionFactory;
import org.springframework.data.redis.connection.lettuce.LettucePoolingClientConfiguration;
import org.springframework.data.redis.core.RedisTemplate;
import org.springframework.data.redis.core.StringRedisTemplate;
import org.springframework.data.redis.serializer.Jackson2JsonRedisSerializer;
import org.springframework.data.redis.serializer.JdkSerializationRedisSerializer;
import org.springframework.data.redis.serializer.RedisSerializationContext;
import org.springframework.data.redis.serializer.StringRedisSerializer;

import java.lang.reflect.Method;
import java.time.Duration;

/**
 * 缓存配置-使用Lettuce客户端,手动注入配置的方式
 */
@Configuration
@EnableCaching //启用缓存
@ConfigurationProperties(prefix = "spring.redis") //指明配置节点
public class CacheConfigLettuceManual extends CachingConfigurerSupport {

    // Redis服务器地址
    @Value("${spring.redis.host}")
    private String host;
    // Redis服务器连接端口
    @Value("${spring.redis.port}")
    private Integer port;
    // Redis数据库索引(默认为0)
    @Value("${spring.redis.database}")
    private Integer database;
    // Redis服务器连接密码(默认为空)
    @Value("${spring.redis.password}")
    private String password;
    // 连接超时时间(毫秒)
    @Value("${spring.redis.timeout}")
    private Integer timeout;

    // 连接池最大连接数(使用负值表示没有限制)
    @Value("${spring.redis.lettuce.pool.max-active}")
    private Integer maxTotal;
    // 连接池最大阻塞等待时间(使用负值表示没有限制)
    @Value("${spring.redis.lettuce.pool.max-wait}")
    private Integer maxWait;
    // 连接池中的最大空闲连接
    @Value("${spring.redis.lettuce.pool.max-idle}")
    private Integer maxIdle;
    // 连接池中的最小空闲连接
    @Value("${spring.redis.lettuce.pool.min-idle}")
    private Integer minIdle;
    // 关闭超时时间
    @Value("${spring.redis.lettuce.shutdown-timeout}")
    private Integer shutdown;

    /**
     * 自定义缓存key的生成策略。默认的生成策略是看不懂的(乱码内容) 通过Spring 的依赖注入特性进行自定义的配置注入并且此类是一个配置类可以更多程度的自定义配置
     *
     * @return
     */
    @Bean
    @Override
    public KeyGenerator keyGenerator() {
        return new KeyGenerator() {
            @Override
            public Object generate(Object target, Method method, Object... params) {
                StringBuilder sb = new StringBuilder();
                sb.append(target.getClass().getName());
                sb.append(method.getName());
                for (Object obj : params) {
                    sb.append(obj.toString());
                }
                return sb.toString();
            }
        };
    }

    /**
     * 缓存配置管理器
     */
    @Bean
    @Override
    public CacheManager cacheManager() {
        //以锁写入的方式创建RedisCacheWriter对象
        RedisCacheWriter writer = RedisCacheWriter.lockingRedisCacheWriter(getConnectionFactory());
        /*
        设置CacheManager的Value序列化方式为JdkSerializationRedisSerializer,
        但其实RedisCacheConfiguration默认就是使用
        StringRedisSerializer序列化key,
        JdkSerializationRedisSerializer序列化value,
        所以以下注释代码就是默认实现,没必要写,直接注释掉
         */
        // RedisSerializationContext.SerializationPair pair = RedisSerializationContext.SerializationPair.fromSerializer(new JdkSerializationRedisSerializer(this.getClass().getClassLoader()));
        // RedisCacheConfiguration config = RedisCacheConfiguration.defaultCacheConfig().serializeValuesWith(pair);
        //创建默认缓存配置对象
        RedisCacheConfiguration config = RedisCacheConfiguration.defaultCacheConfig();
        RedisCacheManager cacheManager = new RedisCacheManager(writer, config);
        return cacheManager;
    }

    /**
     * 获取缓存操作助手对象
     *
     * @return
     */
    @Bean
    public RedisTemplate<String, String> redisTemplate() {
        //创建Redis缓存操作助手RedisTemplate对象
        RedisTemplate<String, String> template = new RedisTemplate<>();
        template.setConnectionFactory(getConnectionFactory());
        //以下代码为将RedisTemplate的Value序列化方式由JdkSerializationRedisSerializer更换为Jackson2JsonRedisSerializer
        //此种序列化方式结果清晰、容易阅读、存储字节少、速度快,所以推荐更换
        Jackson2JsonRedisSerializer jackson2JsonRedisSerializer = new Jackson2JsonRedisSerializer(Object.class);
        ObjectMapper om = new ObjectMapper();
        om.setVisibility(PropertyAccessor.ALL, JsonAutoDetect.Visibility.ANY);
        om.enableDefaultTyping(ObjectMapper.DefaultTyping.NON_FINAL);
        jackson2JsonRedisSerializer.setObjectMapper(om);
        template.setValueSerializer(jackson2JsonRedisSerializer);
        template.setKeySerializer(new StringRedisSerializer());//RedisTemplate对象需要指明Key序列化方式,如果声明StringRedisTemplate对象则不需要
        //template.setEnableTransactionSupport(true);//是否启用事务
        template.afterPropertiesSet();
        return template;
    }

    /**
     * 获取缓存连接
     *
     * @return
     */
    @Bean
    public RedisConnectionFactory getConnectionFactory() {
        //单机模式
        RedisStandaloneConfiguration configuration = new RedisStandaloneConfiguration();
        configuration.setHostName(host);
        configuration.setPort(port);
        configuration.setDatabase(database);
        configuration.setPassword(RedisPassword.of(password));
        //哨兵模式
        //RedisSentinelConfiguration configuration1 = new RedisSentinelConfiguration();
        //集群模式
        //RedisClusterConfiguration configuration2 = new RedisClusterConfiguration();
        LettuceConnectionFactory factory = new LettuceConnectionFactory(configuration, getPoolConfig());
        //factory.setShareNativeConnection(false);//是否允许多个线程操作共用同一个缓存连接,默认true,false时每个操作都将开辟新的连接
        return factory;
    }

    /**
     * 获取缓存连接池
     *
     * @return
     */
    @Bean
    public LettucePoolingClientConfiguration getPoolConfig() {
        GenericObjectPoolConfig config = new GenericObjectPoolConfig();
        config.setMaxTotal(maxTotal);
        config.setMaxWaitMillis(maxWait);
        config.setMaxIdle(maxIdle);
        config.setMinIdle(minIdle);
        LettucePoolingClientConfiguration pool = LettucePoolingClientConfiguration.builder()
                .poolConfig(config)
                .commandTimeout(Duration.ofMillis(timeout))
                .shutdownTimeout(Duration.ofMillis(shutdown))
                .build();
        return pool;
    }

}
三、Web模块代码
这里只是一个调用方,使用spring boot先添加pom.xml信息
<dependencyManagement>
        <dependencies>
            <dependency>
                <groupId>org.springframework.boot</groupId>
                <artifactId>spring-boot-dependencies</artifactId>
                <version>2.0.3.RELEASE</version>
                <type>pom</type>
                <scope>import</scope>
            </dependency>
        </dependencies>
    </dependencyManagement>

    <dependencies>
        <dependency>
            <groupId>org.springframework.boot</groupId>
            <artifactId>spring-boot-starter-web</artifactId>
        </dependency>
        <dependency>
            <groupId>javademo.tyh</groupId>
            <artifactId>javademo-tyh-common</artifactId>
            <version>1.0-SNAPSHOT</version>
        </dependency>
    </dependencies>
添加配置文件及里面的配置
spring.application.name=javademo-tyh-job
server.port=15000

#redis
# Redis服务器地址
spring.redis.host=10.11.12.237
# Redis服务器连接端口
spring.redis.port=6379
# Redis数据库索引(默认为0)
spring.redis.database=0
# Redis服务器连接密码(默认为空)
spring.redis.password=
# 连接超时时间(毫秒)
spring.redis.timeout=10000

# 以下连接池已在SpringBoot2.0不推荐使用
#spring.redis.pool.max-active=8
#spring.redis.pool.max-wait=-1
#spring.redis.pool.max-idle=8
#spring.redis.pool.min-idle=0

# Jedis
#spring.redis.jredis.max-active=8
#spring.redis.jredis.max-wait=10000
#spring.redis.jredis.max-idle=8
#spring.redis.jredis.min-idle=0

# Lettuce
# 连接池最大连接数(使用负值表示没有限制)
spring.redis.lettuce.pool.max-active=8
# 连接池最大阻塞等待时间(使用负值表示没有限制)
spring.redis.lettuce.pool.max-wait=10000
# 连接池中的最大空闲连接
spring.redis.lettuce.pool.max-idle=8
# 连接池中的最小空闲连接
spring.redis.lettuce.pool.min-idle=0
# 关闭超时时间
spring.redis.lettuce.shutdown-timeout=100
调用Controller
@Controller
@RequestMapping("/cacheManage")
public class CacheKeyJob {

    @ResponseBody
    @RequestMapping("/test")
    public String test() {

        String str = "";
        str += CacheProvider.set("tyh", "aaaaaaaaaaaaaaaaaa");
        str += "|";
        str += CacheProvider.get("tyh");
        str += "|";
        str += CacheProvider.del("tyh");

        str += "|||";

        Cookie cookie = new Cookie("aaa", "bbb");
        str += CacheProvider.set("cookie", cookie);
        str += "|";
        str += CacheProvider.get("cookie", Cookie.class);
        str += "|";
        str += CacheProvider.del("cookie");

        return str.toString();
    }
}
启动main()方法
@SpringBootApplication
public class AppJob
{
    public static void main( String[] args )
    {
        SpringApplication.run(AppJob.class);
    }
}
好了,启动程序,打开http://localhost:15000/cacheManage/test 可以看到如下结果,就证明已经集成完成了
