最近在研究Spring Boot 的Validator以及国际化,在墙里墙外找了很多很久,可能是因为版本的更新迭代,找到的资料基本都用不了了。自己折腾了半天,终于琢磨出来了,特此记录。觉得过程啰嗦的可以直奔demo代码
本文代码地址:https://github.com/choimroc/SpringBoot_i18nDemo
本文实验的软件环境如下:
- Spring Boot 2.1.8.RELEASE
- JDK 1.8
- IDEA 2019.2.3
- Gradle 5.6.2
1 Validator的使用
Validator的具体用法不是本文的重点,网上也已经有大量的相关文章,所以就不展开说了。这里要提一下的是hibernate-validator包下的注解,在5.0版本之后就已经标记过时(@deprecated)了,hibernate-validator也是建议使用javax.validation 包下的注解来替换,用法都差不多。
2 Validator的配置
在很多文章中都出现过下面的这两种配置(来自hibernate-validator官方文档)
import org.hibernate.validator.HibernateValidator;
import org.hibernate.validator.cfg.ConstraintMapping;

import javax.validation.Validation;
import javax.validation.Validator;
import javax.validation.ValidatorFactory;

//这样
ValidatorFactory validatorFactory = Validation.byProvider(HibernateValidator.class)
            .configure()
            .failFast(true)
            .addMapping((ConstraintMapping) null)
            .buildValidatorFactory();
Validator validator = validatorFactory.getValidator();

//或者这样
ValidatorFactory validatorFactory = Validation.byProvider(HibernateValidator.class)
            .configure()
            .addProperty("hibernate.validator.fail_fast", "true")
            .buildValidatorFactory();
Validator validator = validatorFactory.getValidator();
这里说一下failFast的作用,在Validator进行校验时,会校验所有的参数,然后把错误一起返回,如下:
{
    "timestamp": 1570029617189,
    "status": 500,
    "error": "Internal Server Error",
    "message": "test.param1: 参数1不能为空, test.param2: 参数2不能为空",
    "path": "/test"
}
而设置了failFast之后,如果校验时发现了错误就会停止后续参数的校验。
我们可以看到上面的配置使用的javax.validation包下的Validator,但是在我所使用的Spring Boot版本中,实际使用的是org.springframework.validation包下的Validator,具体可以查看源码里org.springframework.web.servlet.config.annotation.WebMvcConfigurer这个接口的代码。所以上面所用的配置已经不适用了(PS:具体是什么时候替换的我也不清楚,了解情况的同学可以在留言区告知一声,感谢~)。
查看了org.springframework.boot.autoconfigure.validation.ValidationAutoConfiguration,发现defaultValidator用的是org.springframework.validation.beanvalidation.LocalValidatorFactoryBean,但是LocalValidatorFactoryBean下并没有configure和failFast。难道新版本之后就没办法设置了?对比了LocalValidatorFactoryBean和javax.validation后发现LocalValidatorFactoryBean有一个很可疑的属性validationPropertyMap,于是有了下面的配置
@Configuration
@EnableWebMvc
public class WebConfiguration implements WebMvcConfigurer {

	@Bean
	public LocalValidatorFactoryBean mvcValidator() {
	    LocalValidatorFactoryBean localValidatorFactoryBean = new LocalValidatorFactoryBean();
	    localValidatorFactoryBean.getValidationPropertyMap().put("hibernate.validator.fail_fast", "true");
	    return localValidatorFactoryBean;
	}
}
运行之后,发起请求,发现真的起作用了,nice!
注意,如果直接运行会抛出异常信息Consider renaming one of the beans or enabling overriding by setting spring.main.allow-bean-definition-overriding=true,还需要在application.yml或者application.properties中加入如下配置
# yml
spring:
  main:
    allow-bean-definition-overriding: true

# properties
spring.main.allow-bean-definition-overriding=true
3 Validator的全局异常捕获
上面的返回格式是Spring Boot自带的,而且HttpStatus是500,如果我们想要返回自定义的格式,就得做全局异常捕获。废话不多说,直接上代码:
@RestControllerAdvice
public class GlobalExceptionHandler {

    @ResponseStatus(HttpStatus.OK)
    @ExceptionHandler(BindException.class)
    public Result bindExceptionHandler(final BindException e) {
        String message = e.getBindingResult().getAllErrors().stream().map(DefaultMessageSourceResolvable::getDefaultMessage).collect(Collectors.joining());
        return new Result(500, message);
    }


    @ResponseStatus(HttpStatus.OK)
    @ExceptionHandler(MethodArgumentNotValidException.class)
    public Result handler(final MethodArgumentNotValidException e) {
        String message = e.getBindingResult().getAllErrors().stream().map(DefaultMessageSourceResolvable::getDefaultMessage).collect(Collectors.joining());
        return new Result(500, message);
    }

    @ResponseStatus(HttpStatus.OK)
    @ExceptionHandler(ConstraintViolationException.class)
    public Result handler(final ConstraintViolationException e) {
        String message = e.getConstraintViolations().stream().map(ConstraintViolation::getMessage).collect(Collectors.joining());
        return new Result(500, message);
    }

}
返回的数据如下:
{
    "code": 500,
    "msg": "参数1不能为空"
}
4 Validator和国际化
直奔主题,常规的配置如下:
@Configuration
@EnableWebMvc
public class WebConfiguration implements WebMvcConfigurer {
    public WebConfiguration() {
    }

    /*国际化 start*/
    @Bean
    public LocaleChangeInterceptor localeChangeInterceptor() {
        LocaleChangeInterceptor localeChangeInterceptor = new LocaleChangeInterceptor();
        //自定义参数
        localeChangeInterceptor.setParamName("language");
        return localeChangeInterceptor;
    }

    @Bean
    public LocaleResolver localeResolver() {
        SessionLocaleResolver localeResolver = new SessionLocaleResolver();
        //指定默认语言为中文
        localeResolver.setDefaultLocale(Locale.SIMPLIFIED_CHINESE);
        return localeResolver;
    }

    @Bean
    public LocalValidatorFactoryBean mvcValidator() {
        LocalValidatorFactoryBean localValidatorFactoryBean = new LocalValidatorFactoryBean();
        localValidatorFactoryBean.getValidationPropertyMap().put("hibernate.validator.fail_fast", "true");
        //为Validator配置国际化
        localValidatorFactoryBean.setValidationMessageSource(resourceBundleMessageSource());
        return localValidatorFactoryBean;
    }


    @Bean(name = "messageSource")
    public ResourceBundleMessageSource resourceBundleMessageSource() {
        ResourceBundleMessageSource resourceBundleMessageSource = new ResourceBundleMessageSource();
        //指定国际化的Resource Bundle地址
        resourceBundleMessageSource.setBasename("i18n/messages");
        //指定国际化的默认编码
        resourceBundleMessageSource.setDefaultEncoding("UTF-8");
        return resourceBundleMessageSource;
    }


    @Override
    public void addInterceptors(InterceptorRegistry registry) {
        registry.addInterceptor(localeChangeInterceptor());
    }

    /*国际化 end*/
}
这样就能完成国际化了,是不是 so easy?!但是这样写有一个问题,就是language参数必须是url参数,如http://localhost:8080/test?language=en_US,一般对于这种公共的参数,我们都希望放在Headers中的,那有没有办法呢?
我们首先来查看一下org.springframework.web.servlet.i18n.LocaleChangeInterceptor这个类的源码,这里面有一个关键的方法preHandle:
//这里只贴出关键代码,有兴趣的可以自己去研究
public class LocaleChangeInterceptor extends HandlerInterceptorAdapter {
	……

	@Override
	public boolean preHandle(HttpServletRequest request, HttpServletResponse response, Object handler)
			throws ServletException {
		//正是这一行代码,导致只能通过url参数传递language
		String newLocale = request.getParameter(getParamName());
		if (newLocale != null) {
			if (checkHttpMethod(request.getMethod())) {
				LocaleResolver localeResolver = RequestContextUtils.getLocaleResolver(request);
				if (localeResolver == null) {
					throw new IllegalStateException(
							"No LocaleResolver found: not in a DispatcherServlet request?");
				}
				try {
					localeResolver.setLocale(request, response, parseLocaleValue(newLocale));
				}
				catch (IllegalArgumentException ex) {
					if (isIgnoreInvalidLocale()) {
						if (logger.isDebugEnabled()) {
							logger.debug("Ignoring invalid locale value [" + newLocale + "]: " + ex.getMessage());
						}
					}
					else {
						throw ex;
					}
				}
			}
		}
		// Proceed in any case.
		return true;
	}
	……

}
既然找到了源头那就好办了,我们只需要继承源码中的这个类,依然画葫芦,重写关键方法就行了;在源码中,有个checkHttpMethod方法是用private标识的,所以我们同样要复制一份:
public class LocaleInterceptor extends LocaleChangeInterceptor {

    @Override
    public boolean preHandle(HttpServletRequest request, HttpServletResponse response, Object handler) throws ServletException {
    	//getParameter 改为 getHeader
        String newLocale = request.getHeader(getParamName());
        if (newLocale != null) {
            if (checkHttpMethod(request.getMethod())) {
                LocaleResolver localeResolver = RequestContextUtils.getLocaleResolver(request);
                if (localeResolver == null) {
                    throw new IllegalStateException(
                            "No LocaleResolver found: not in a DispatcherServlet request?");
                }
                try {
                    localeResolver.setLocale(request, response, parseLocaleValue(newLocale));
                } catch (IllegalArgumentException ex) {
                    if (isIgnoreInvalidLocale()) {
                        if (logger.isDebugEnabled()) {
                            logger.debug("Ignoring invalid locale value [" + newLocale + "]: " + ex.getMessage());
                        }
                    } else {
                        throw ex;
                    }
                }
            }
        }
        // Proceed in any case.
        return true;
    }

	//复制自源码中
    private boolean checkHttpMethod(String currentMethod) {
        String[] configuredMethods = getHttpMethods();
        if (ObjectUtils.isEmpty(configuredMethods)) {
            return true;
        }
        for (String configuredMethod : configuredMethods) {
            if (configuredMethod.equalsIgnoreCase(currentMethod)) {
                return true;
            }
        }
        return false;
    }
}

//修改WebConfiguration

@Configuration
@EnableWebMvc
public class WebConfiguration implements WebMvcConfigurer {

    @Bean
    public LocaleChangeInterceptor localeChangeInterceptor() {
        //改为我们自定义的LocaleInterceptor
        LocaleChangeInterceptor localeChangeInterceptor = new LocaleInterceptor();
        //指定参数
        localeChangeInterceptor.setParamName("language");
        return localeChangeInterceptor;
    }
}
这才是真正的so easy!同学们,这说明什么问题呀?这说明只要能够充分利用源码,我们就可以只做出些许修改就能达到目的,可谓是四两拨千斤呀!
然后我们再封装一个获取国际化资源的工具类:
import org.springframework.beans.factory.annotation.Autowired;
import org.springframework.context.MessageSource;
import org.springframework.context.i18n.LocaleContextHolder;
import org.springframework.stereotype.Component;

import java.util.Locale;

@Component
public class LocaleMessage {
    private final MessageSource messageSource;

    @Autowired
    public LocaleMessage(MessageSource messageSource) {
        this.messageSource = messageSource;
    }

    public String getMessage(String code) {
        return getMessage(code, new Object[]{});
    }

    public String getMessage(String code, String defaultMessage) {
        return getMessage(code,  new Object[]{}, defaultMessage);
    }

    public String getMessage(String code, String defaultMessage, Locale locale) {
        return getMessage(code,  new Object[]{}, defaultMessage, locale);
    }

    public String getMessage(String code, Locale locale) {
        return getMessage(code,  new Object[]{}, "", locale);
    }

    public String getMessage(String code, Object[] args) {
        return getMessage(code, args, "");
    }

    public String getMessage(String code, Object[] args, Locale locale) {
        return getMessage(code, args, "", locale);
    }

    public String getMessage(String code, Object[] args, String defaultMessage) {
        Locale locale = LocaleContextHolder.getLocale();
        return getMessage(code, args, defaultMessage, locale);
    }

    public String getMessage(String code, Object[] args, String defaultMessage, Locale locale) {
        return messageSource.getMessage(code, args, defaultMessage, locale);
    }

}
使用:
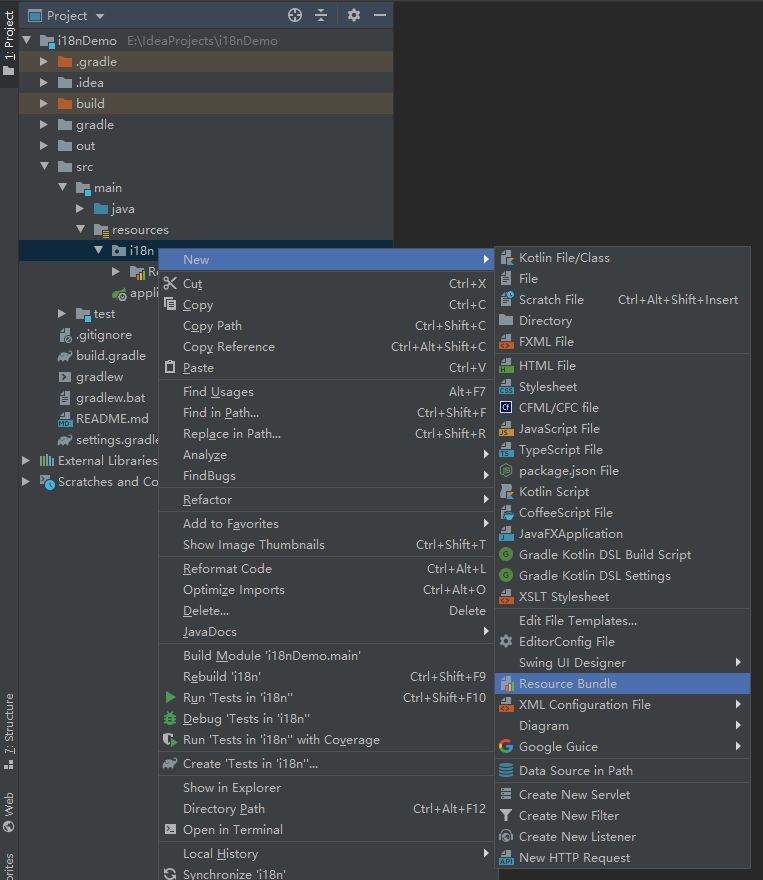
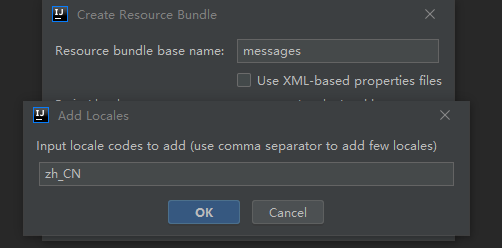
1.在src\main\resources下新建文件夹i18n,在i18n新建Resource Bundle,命名为messages
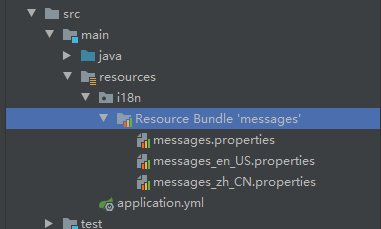
2.添加中文和英文


3.添加一些数据

4.在Controller中使用
@Validated
@RestController
@RequestMapping("test")
public class TestController {
    private final LocaleMessage localeMessage;

    @Autowired
    public TestController(LocaleMessage localeMessage) {
        this.localeMessage = localeMessage;
    }

    @PostMapping
    public Result test(
            @NotBlank(message = "{test.msg1}") String param1,
            @NotBlank(message = "{test.msg2}") String param2
    ) {
        return new Result(200, localeMessage.getMessage("test.msg3"));
    }
}
记录,分享,交流。