一、基本控件
在搭建Android界面中 有许多的控件给我们使用,有TextView,EditText,Button,ImageView等等,正是有了这些控件,我们才能搭建出好看的界面框架,本篇主要讲解一下基本控件的属性,以及在项目中常用的一些Android自带的控件。
所有控件必须要有的属性:设置控件的长和宽
android:layout_width
android:layout_height
1.TextView
这是一个文本控件,它主要是为了显示一些文本信息。
   <TextView
       android:id="@+id/textView"
       android:layout_width="match_parent"
       android:layout_height="wrap_content"
       android:gravity="center"
       android:textSize="25sp"
       android:textColor="#ff0000"
       android:text="这是helloworld"
       android:textStyle="blod"
       />
1.android:id 属性代表着TextView的Id,也就是TextView的唯一标示,在java代码中我们可以通过findViewById()方法来通过Id获取控件。上述控件的唯一id为textView。
2.android:layout_width 属性代表着控件的宽度,该属性的值是match_parent, 表示该控件的宽度与父视图的宽度相同。
3.android:layout_height 属性代表着控件的高度,该属性的值是wrap_content,表示控件的高度根据内容的高度进行改变。
4.android:gravity 属性代表着TextView中文字对齐方式,有多种方式,我们在此选的是center,居中显示。
5.android:textSize 属性代表着TextView中文字的型号,也就是文字的大小。
6.android:textColor 属性设置的是TextView中文字的颜色,属性值是16进制的色值。
7.android:text 属性就是用来设置TextView显示的值的。
8 androidtextStyle 字体样式:blod(粗体),italic(斜体),normal(常规)
当然,TextView还有很多其他的属性,这里就不一一介绍了,这就需要你们课后根据自己的时间学习兴趣去探索了。
2.EditText
EditText是程序用于和用户进行交互的一个重要控件,它允许用户在控件里输入和编辑内容。同样,它可配置的属性和TextView是差不多的,这里列举几个其它常用的属性:
●android:hint 这个属性指定了一段提示性的文本,当用户输入任何内容时,这段文本就会自动消失。
●android:maxLine 指定EditText的最大行数,这样当输入的内容超过最大行数时,文本就会向上滚动,而EditText则不会继续拉伸。
   <EditText
        android:id="@+id/name"
        android:layout_width="match_parent"
        android:layout_height="wrap_content"
        android:hint="请输入内容"
        android:maxLines="2"
        />
3.Button
Button就是一个按钮,是用户进行点击的,在Android开发中,Button是最常用的控件之一。
    <Button
    android:id="@+id/button"
    android:layout_width="match_parent"
    android:layout_height="wrap_content"
    android:text="我是button"
    android:textAllCaps="false"
    />
Button中所有英文字母会自动进行大写转换,我们需要android:textAllCaps属性设置为false来取消
▲
我们在界面中添加了这个按钮,此时点击它是完全没有反应的,因此我们需要为这个按钮注册一个监听器,并在里面写相应的点击逻辑。
public class MainActivity extends AppCompatActivity {

     Button button;
    @Override
    protected void onCreate(Bundle savedInstanceState) {
        super.onCreate(savedInstanceState);
        setContentView(R.layout.activity_main);
        button = findViewById(R.id.button);

        button.setOnClickListener(new View.OnClickListener() {
            @Override
            public void onClick(View v) {
                Toast.makeText(MainActivity.this,"你点击了button",Toast.LENGTH_SHORT).show();
            }
        });
    }
首先我们创建了一个Button的对象button,然后我们需要在onCreate方法(该方法是回在该活动创建的时候执行,故控件等需要初始化的东西在该方法中写)绑定是那一个按钮,利用findViewById()找到,名字就是布局文件中Button的id。button调用setOnClickListener,并在重写的onClick中写相应逻辑。这里是用Toast显示一段文字。
4.ImageView
这是一个显示图片的控件,它可以让我们的程序变得更加丰富多彩。学习这个空间钱需要提前准备一些图片,图片通常需要我们自己放在res目录下的drawable中。这里我把一张smile.jpg图片复制进drawable里面,再在布局中写:
<ImageView
        android:layout_width="wrap_content"
        android:layout_height="wrap_content"
        android:src="@drawable/smile"
   />
5.其他控件
这里我就不展开讲那么多了,课后同学自己去拓展
1.CheckBox复选框 : https://blog.csdn.net/kotlp1/article/details/78886736
2.ProgressBar进度条:https://www.jianshu.com/p/f613571addb5
太多了,以后根据需求同学们自行拓展
二、基本布局
1.LinearLayout(线性布局)
性布局,何为线性,线性、线性,有像线一样的性质,哈哈。
LinearLayout有两种模式来控制它里面的控件排列方式,一种是垂直模(android:orientation=“vertical”),一种是水平模式(android:orientation=“horizontal” ),当我们把模式设置为垂直模式时,在手机屏幕上,里面的控件会竖直排列下来,且每一排只能有一个控件,当我们设置为水平模式时,在手机屏幕上,这个布局只有一排,但是可以有多个控件排成一排。
android:orientation 属性指定了排列方向是 vertical,如果指定的是horizontal,控件就会在水平方向上排列了。
android:gravity 是用 于指定文字在控件中的对齐方式
android:layout_gravity 是用于指定控件在布局中的对齐方式
android:layout_weight=“1”(权重分布),这个weight在垂直布局时,代表行距;水平的时候代表列宽;
android:visibility=invisible控制布局是否显示 :1、显示 visible 2、不显示,但占空间 invisible 3、隐藏 gone
垂直按钮排列
效果图

<LinearLayout xmlns:android="http://schemas.android.com/apk/res/android"
    xmlns:app="http://schemas.android.com/apk/res-auto"
    xmlns:tools="http://schemas.android.com/tools"
    android:layout_width="match_parent"
    android:layout_height="match_parent"
    android:orientation="vertical"
    tools:context=".MainActivity">
    <Button
      android:layout_width="wrap_content"
      android:layout_height="wrap_content"
      android:text="button1"
      android:textAllCaps="false"/>
    <Button
        android:layout_width="wrap_content"
        android:layout_height="wrap_content"
        android:text="button2"
        android:textAllCaps="false"/>
    <Button
        android:layout_width="wrap_content"
        android:layout_height="wrap_content"
        android:text="button3"
        android:textAllCaps="false"/>
    <Button
        android:layout_width="wrap_content"
        android:layout_height="wrap_content"
        android:text="button4"
        android:textAllCaps="false"/>


</LinearLayout>
线性布局中,控件是一个挨着一个的,假如我们想在屏幕横排中,让两个按钮按照1:3的比例充满屏幕的宽,该怎么实现呢,这就需要用到android:layout_weight
<LinearLayout xmlns:android="http://schemas.android.com/apk/res/android"
    xmlns:app="http://schemas.android.com/apk/res-auto"
    xmlns:tools="http://schemas.android.com/tools"
    android:layout_width="match_parent"
    android:layout_height="match_parent"
    android:orientation="horizontal"
    tools:context=".MainActivity">
    <Button
      android:layout_width="0dp"
      android:layout_height="wrap_content"
        android:layout_weight="1"
      android:text="button1"
      android:textAllCaps="false"/>
    <Button
        android:layout_width="0dp"
        android:layout_height="wrap_content"
        android:layout_weight="3"
        android:text="button2"
        android:textAllCaps="false"/>


</LinearLayout>

2.RelativeLayout(相对布局)
是一种相对布局,控件的位置是按照相对位置来计算的,后一个控件在什么位置依赖于前一个控件的基本位置,是布局最常用,也是最灵活的一种布局。
1.实现效果图

<?xml version="1.0" encoding="utf-8"?>
<RelativeLayout xmlns:android="http://schemas.android.com/apk/res/android"
    xmlns:app="http://schemas.android.com/apk/res-auto"
    xmlns:tools="http://schemas.android.com/tools"
    android:layout_width="match_parent"
    android:layout_height="match_parent"

    tools:context=".MainActivity">
   <Button
       android:layout_width="wrap_content"
       android:layout_height="wrap_content"
       android:layout_alignParentLeft="true"
       android:layout_alignParentTop="true"
       android:text="button1"
       />
    <Button
        android:layout_alignParentTop="true"
        android:layout_width="wrap_content"
        android:layout_height="wrap_content"
        android:layout_alignParentRight="true"
        android:text="button1"
        />
    <Button
        android:layout_width="wrap_content"
        android:layout_height="wrap_content"
        android:layout_centerInParent="true"
        android:text="button1"
        />
    <Button
        android:layout_width="wrap_content"
        android:layout_height="wrap_content"
        android:layout_alignParentBottom="true"
        android:layout_alignParentLeft="true"
        android:text="button1"
        />
    <Button
        android:layout_width="wrap_content"
        android:layout_height="wrap_content"
        android:layout_alignParentBottom="true"
        android:layout_alignParentRight="true"
        android:text="button1"
        />


</RelativeLayout>
2.实现效果图:
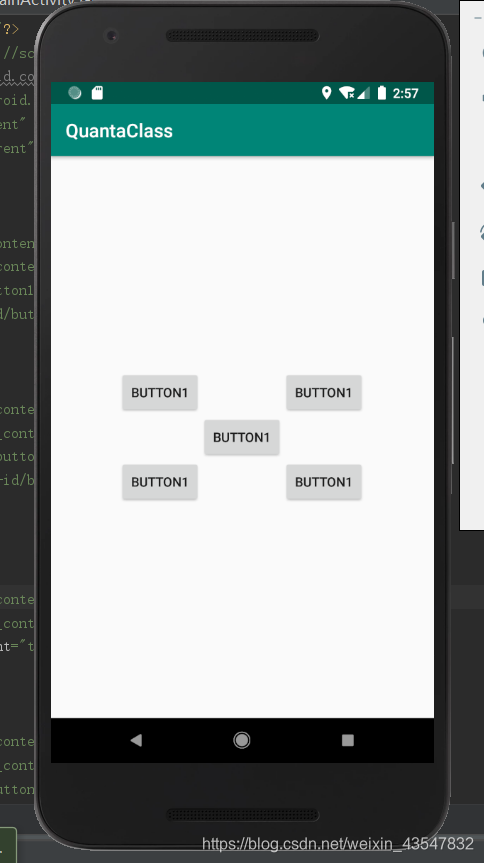
<?xml version="1.0" encoding="utf-8"?>
<RelativeLayout xmlns:android="http://schemas.android.com/apk/res/android"
    xmlns:app="http://schemas.android.com/apk/res-auto"
    xmlns:tools="http://schemas.android.com/tools"
    android:layout_width="match_parent"
    android:layout_height="match_parent"

    tools:context=".MainActivity">
   <Button
       android:layout_width="wrap_content"
       android:layout_height="wrap_content"
      android:layout_above="@+id/button1"
       android:layout_toLeftOf="@+id/button1"
       android:text="button1"
       />
    <Button
        android:layout_width="wrap_content"
        android:layout_height="wrap_content"
        android:layout_above="@+id/button1"
        android:layout_toRightOf="@+id/button1"
        android:text="button1"
        />
    <Button
        android:id="@+id/button1"
        android:layout_width="wrap_content"
        android:layout_height="wrap_content"
        android:layout_centerInParent="true"
        android:text="button1"
        />
    <Button
        android:layout_width="wrap_content"
        android:layout_height="wrap_content"
       android:layout_below="@+id/button1"
        android:layout_toLeftOf="@+id/button1"
        android:text="button1"
        />
    <Button
        android:layout_width="wrap_content"
        android:layout_height="wrap_content"
       android:layout_below="@+id/button1"
        android:layout_toRightOf="@+id/button1"
        android:text="button1"
        />


</RelativeLayout>
3.RelativeLayout中还有另一组相对控件进行定位的属性,android:layout_alignLeft表示让一个控件的左边缘和另一个控件的左边缘对齐,android:layout_alignRight表示让一个控件的右边缘和另一个控件的右边缘对齐,android:layout_alignBottom和android:layout_alignTop道理是一样的,你们就自己去探索吧!
3.FrameLayout(帧布局)
FrameLayout对象好比一块在屏幕上提前预定好的空白区域,可以将一些元素填充在里面,如图片。所有元素都被放置在FrameLayout区域的最左上区域,而且无法为这些元素制指定一个确切的位置,若有多个元素,那么后面的元素会重叠显示在前一个元素上。
效果图:
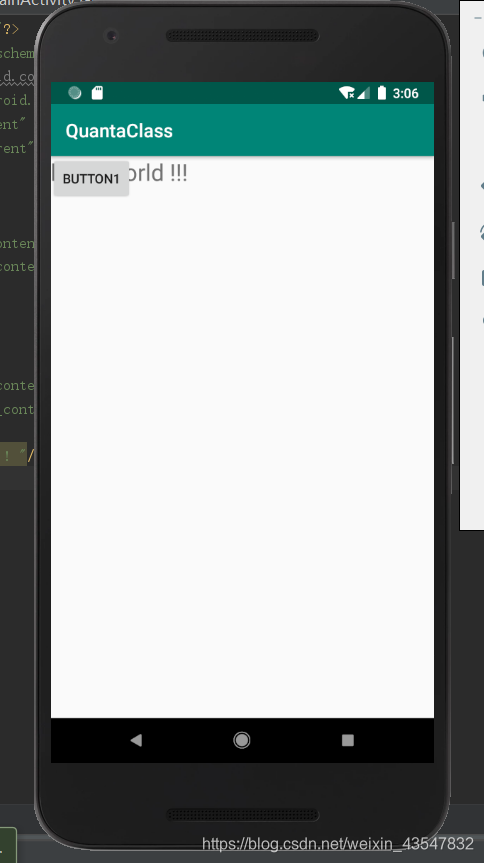
<?xml version="1.0" encoding="utf-8"?>
<FrameLayout xmlns:android="http://schemas.android.com/apk/res/android"
    xmlns:app="http://schemas.android.com/apk/res-auto"
    xmlns:tools="http://schemas.android.com/tools"
    android:layout_width="match_parent"
    android:layout_height="match_parent"

    tools:context=".MainActivity">
   <Button
       android:layout_width="wrap_content"
       android:layout_height="wrap_content"

       android:text="button1"
       />
    <TextView
        android:layout_width="wrap_content"
        android:layout_height="wrap_content"
        android:textSize="25sp"
        android:text="hello world !!! "/>


</FrameLayout>
4.其他一些布局
TableLayout(表格布局),AbsoluteLayout(绝对位置布局)等可以自己去查阅资料了解一下
三.作业
实现如下效果图:
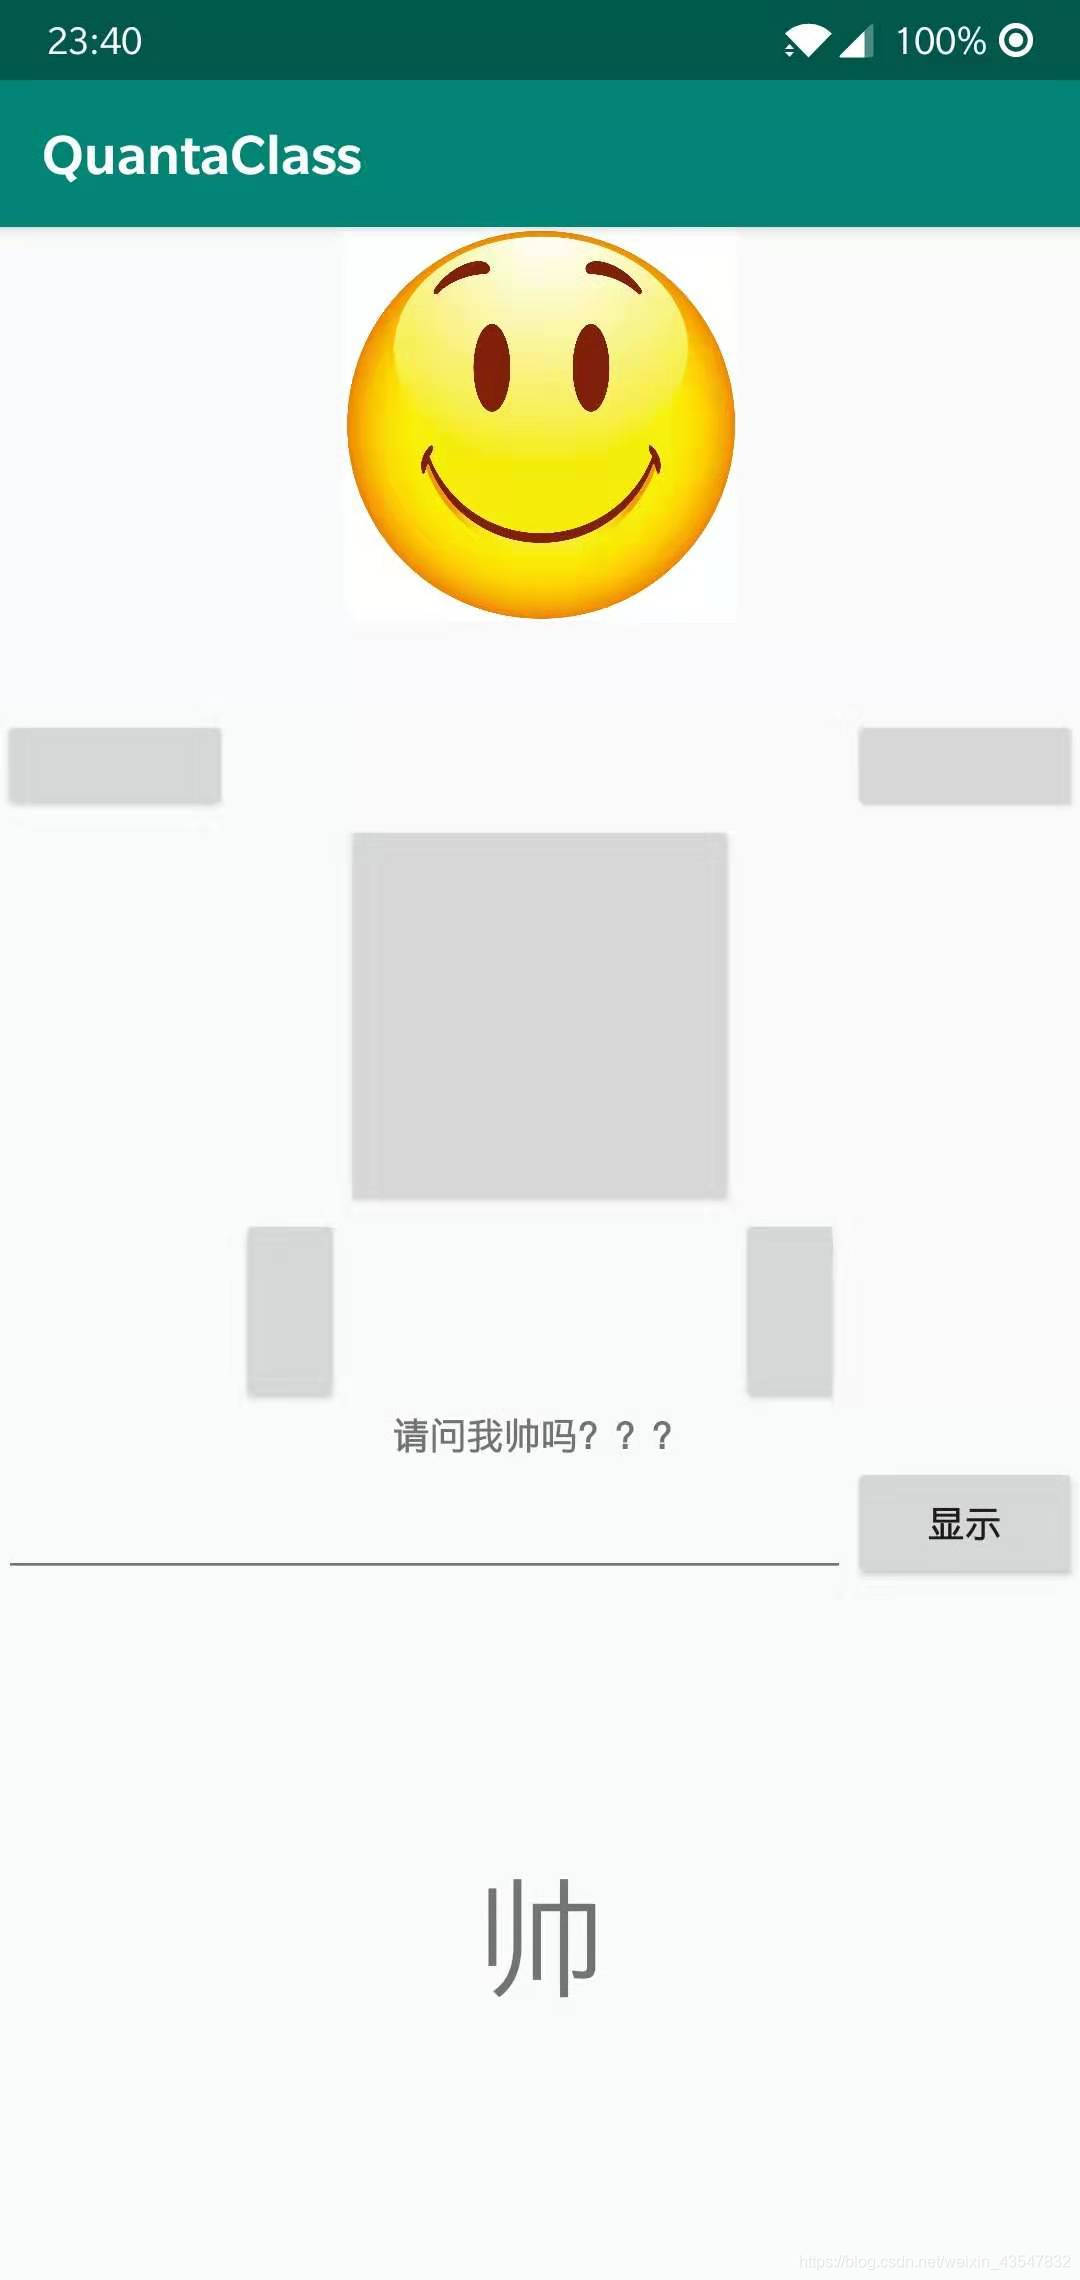
作业说明:图片可以不一样,但控件位置要一样。EditText输入回答后,点击显示按钮,会把答案显示在下面的TextView中