Android自定义Diaolog+日期选择器+Spinner四级联动
因为此次博文涵盖的东西比较多 ,我就把它细分一下 并且分享我在实现此功能中遇到的问题
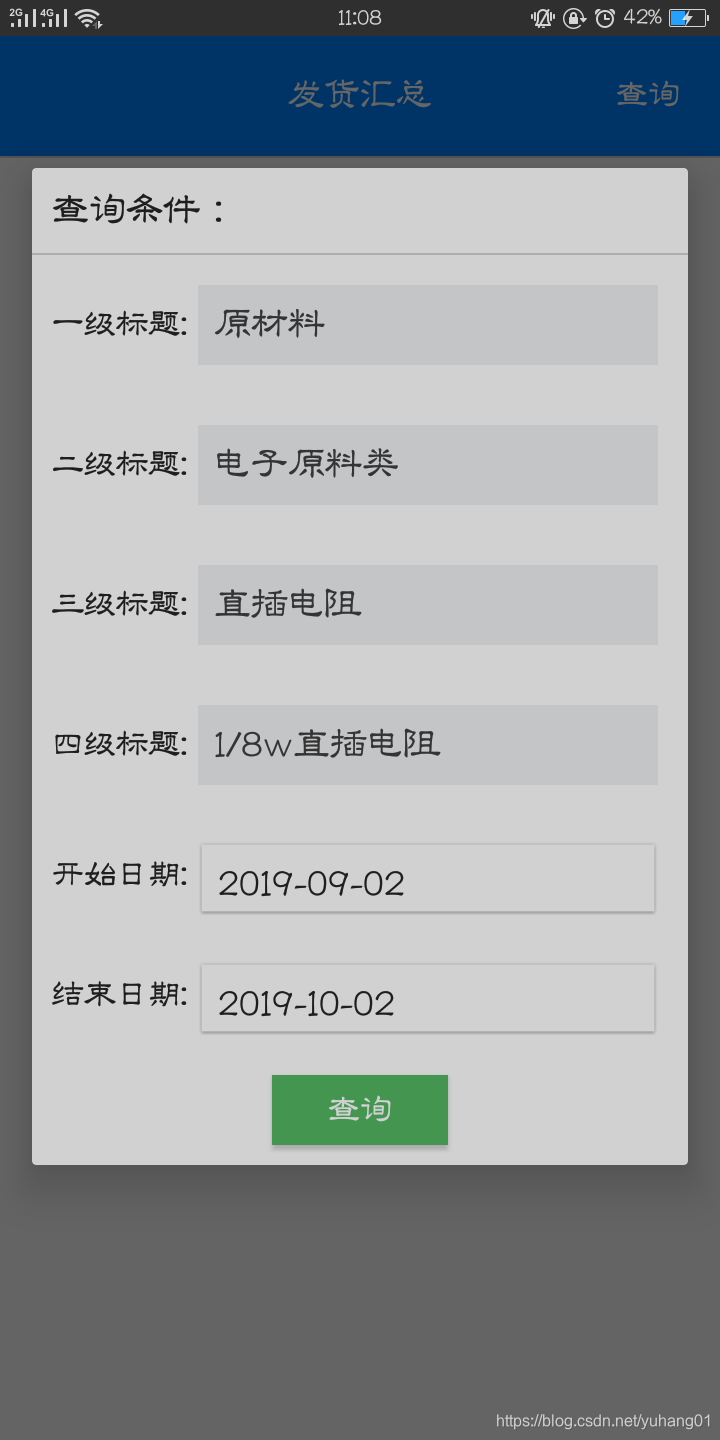
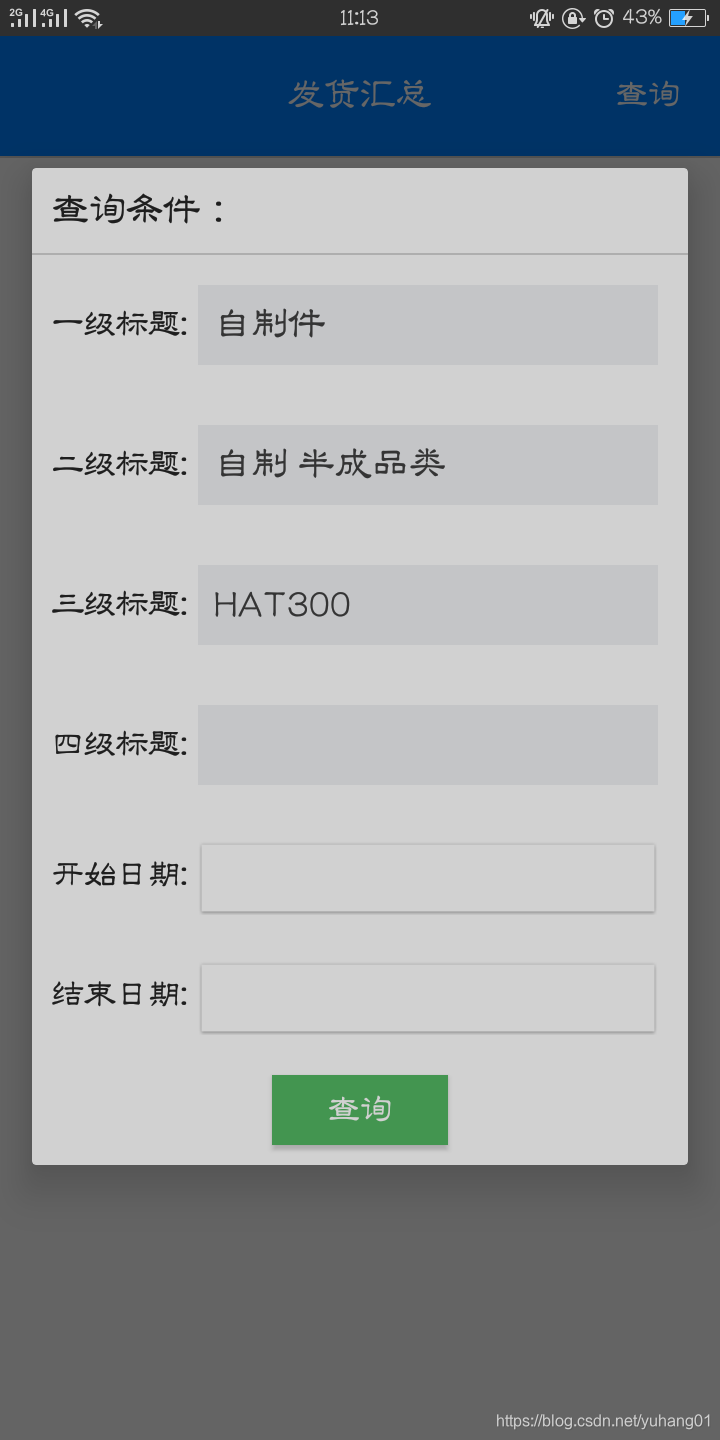
话不多说,先上效果图:
详细的实现步骤
1.自定义对话框的实现以及日期控件的设定
我是在一个模块中添加了一个按钮的点击事件,主要的代码如下:
 binding.deliveryTimeSummarySearch.setOnClickListener(new View.OnClickListener() {//按钮点击事件 这里用的数据绑定
            @Override
            public void onClick(View v) {
                showWow();//主要实现的功能
            }
        });

 private void showWow() {
        view = LayoutInflater.from(this).inflate(R.layout.delivery_time_dialog,null,false);
        final Dialog dialog = new Dialog(this);
        dialog.setContentView(view);
        Window dialogWindow = dialog.getWindow();
        WindowManager.LayoutParams lp = dialogWindow.getAttributes();
        dialogWindow.setGravity(Gravity.LEFT | Gravity.TOP);
        lp.x = 100; // 新位置X坐标
        lp.y = 100; // 新位置Y坐标
        lp.width = ScreenUtils.getScreenWidth(this); // 宽度
        lp.height = LinearLayout.LayoutParams.WRAP_CONTENT; // 高度
        lp.alpha = 0.7f; // 透明度

        final TextView stateStart = view.findViewById(R.id.time_summary_start);
        stateStart.setOnClickListener(new View.OnClickListener() {//开始日期选择
            @Override
            public void onClick(View v) {
                DatePickDialog dialog = new DatePickDialog(view.getContext());
                //设置上下年分限制
                dialog.setYearLimt(10);
                //设置标题
                dialog.setTitle("选择时间");
                //设置类型
                dialog.setType(DateType.TYPE_YMD);
                //设置消息体的显示格式,日期格式
                dialog.setMessageFormat("yyyy-MM");

                //设置选择回调
                dialog.setOnChangeLisener(null);
                //设置点击确定按钮回调
                dialog.setOnSureLisener(new OnSureLisener() {
                    @Override
                    public void onSure(Date date) {
                        //Date wow = new Date();
                        SimpleDateFormat simpleDateFormat = new SimpleDateFormat("yyyy-MM-dd");
                        String dt = simpleDateFormat.format(date);
                        stateStart.setText(dt);

                    }
                });
                dialog.show();
            }
        });

        final TextView stateEnd = view.findViewById(R.id.time_summary_end);
        stateEnd.setOnClickListener(new View.OnClickListener() {//开始日期选择
            @Override
            public void onClick(View v) {
                DatePickDialog dialog = new DatePickDialog(view.getContext());
                //设置上下年分限制
                dialog.setYearLimt(10);
                //设置标题
                dialog.setTitle("选择时间");
                //设置类型
                dialog.setType(DateType.TYPE_YMD);
                //设置消息体的显示格式,日期格式
                dialog.setMessageFormat("yyyy-MM");

                //设置选择回调
                dialog.setOnChangeLisener(null);
                //设置点击确定按钮回调
                dialog.setOnSureLisener(new OnSureLisener() {
                    @Override
                    public void onSure(Date date) {
                        //Date wow = new Date();
                        SimpleDateFormat simpleDateFormat = new SimpleDateFormat("yyyy-MM-dd");
                        String dt = simpleDateFormat.format(date);
                        stateEnd.setText(dt);
                    }
                });
                dialog.show();
            }
        });
        titleFir = view.findViewById(R.id.time_summary_first);
        titleSe = view.findViewById(R.id.time_summary_second);
        titleTh = view.findViewById(R.id.time_summary_third);
        titleFour = view.findViewById(R.id.time_summary_fourth);
        initData(code,titleFir);

        dialog.show();

    }
自定义的布局:(R.layout.delivery_time_dialog)
<?xml version="1.0" encoding="utf-8"?>
<LinearLayout xmlns:android="http://schemas.android.com/apk/res/android"
    android:orientation="vertical" android:layout_width="match_parent"
    android:layout_height="wrap_content">
<TextView
    android:padding="@dimen/dp_10"
    android:layout_width="wrap_content"
    android:layout_height="wrap_content"
    android:text="查询条件:"
    android:textColor="#000"
    android:textSize="@dimen/sp_16"
    />
    <View
        android:layout_width="match_parent"
        android:layout_height="1dp"
        android:background="#CDCDCD"></View>
    <LinearLayout
        android:padding="@dimen/dp_10"
        android:layout_width="match_parent"
        android:layout_height="wrap_content"
        android:gravity="center"
        android:orientation="horizontal"
        >

        <TextView
            android:layout_width="wrap_content"
            android:layout_height="wrap_content"
            android:text="一级标题:"
            android:textColor="#000"
            />
        <Spinner
            android:id="@+id/time_summary_first"
            android:layout_width="match_parent"
            android:layout_height="40dp"
            android:layout_margin="5dp"
            android:background="#EDEFF2"></Spinner>
    </LinearLayout>
    <LinearLayout
        android:padding="@dimen/dp_10"
        android:layout_width="match_parent"
        android:layout_height="wrap_content"
        android:gravity="center"
        android:orientation="horizontal"
        >

        <TextView
            android:layout_width="wrap_content"
            android:layout_height="wrap_content"
            android:text="二级标题:"
            android:textColor="#000"
            />
        <Spinner
            android:id="@+id/time_summary_second"
            android:layout_width="match_parent"
            android:layout_height="40dp"
            android:layout_margin="5dp"
            android:background="#EDEFF2"></Spinner>
    </LinearLayout>
    <LinearLayout
        android:padding="@dimen/dp_10"
        android:layout_width="match_parent"
        android:layout_height="wrap_content"
        android:gravity="center"
        android:orientation="horizontal"
        >

        <TextView
            android:layout_width="wrap_content"
            android:layout_height="wrap_content"
            android:text="三级标题:"
            android:textColor="#000"
            />
        <Spinner
            android:id="@+id/time_summary_third"
            android:layout_width="match_parent"
            android:layout_height="40dp"
            android:layout_margin="5dp"
            android:background="#EDEFF2"></Spinner>
    </LinearLayout>
    <LinearLayout
        android:padding="@dimen/dp_10"
        android:layout_width="match_parent"
        android:layout_height="wrap_content"
        android:gravity="center"
        android:orientation="horizontal"
        >

        <TextView
            android:layout_width="wrap_content"
            android:layout_height="wrap_content"
            android:text="四级标题:"
            android:textColor="#000"
            />
        <Spinner
            android:id="@+id/time_summary_fourth"
            android:layout_width="match_parent"
            android:layout_height="40dp"
            android:layout_margin="5dp"
            android:background="#EDEFF2"></Spinner>
    </LinearLayout>
    <LinearLayout
        android:padding="@dimen/dp_10"
        android:layout_width="match_parent"
        android:layout_height="wrap_content"
        android:gravity="center"
        android:orientation="horizontal"
        >

        <TextView
            android:layout_width="wrap_content"
            android:layout_height="wrap_content"
            android:text="开始日期:"
            android:textColor="#000"
            />
        <TextView
            android:layout_marginTop="2dp"
            android:id="@+id/time_summary_start"
            android:padding="@dimen/dp_10"
            android:textSize="@dimen/sp_16"
            android:textColor="#000"
            android:layout_width="match_parent"
            android:layout_height="38dp"
            android:background="@drawable/manager_white_search"
            android:layout_marginLeft="5dp"
            android:layout_marginRight="5dp" />
    </LinearLayout>
    <LinearLayout
        android:padding="@dimen/dp_10"
        android:layout_width="match_parent"
        android:layout_height="wrap_content"
        android:gravity="center"
        android:orientation="horizontal"
        >

        <TextView
            android:layout_width="wrap_content"
            android:layout_height="wrap_content"
            android:text="结束日期:"
            android:textColor="#000"
            />
        <TextView
            android:id="@+id/time_summary_end"
            android:layout_marginTop="2dp"
            android:padding="@dimen/dp_10"
            android:textSize="@dimen/sp_16"
            android:textColor="#000"
            android:layout_width="match_parent"
            android:layout_height="38dp"
            android:background="@drawable/manager_white_search"
            android:layout_marginLeft="5dp"
            android:layout_marginRight="5dp" />
    </LinearLayout>
    <Button
        android:layout_margin="@dimen/dp_10"

        android:id="@+id/time_summary_begin"
        android:layout_width="wrap_content"
        android:layout_height="35dp"
        android:text="查询"
        android:layout_gravity="center"
        android:background="#35AA47"
        android:textColor="@color/player_white" />
</LinearLayout>
主要的思路:
自定义的对话框网上都有详细的介绍,我就不多说了 ,主要说说日期选择器的设定
刚开始我用的AlertDialog()想要实现点击开始/结束日期展示日期选择器,但是不管我怎么设置TimePickerView的上下文参数,当我点击开始/结束日期时,弹出的日期控件却显示在了对话框的下面 具体的效果如下:
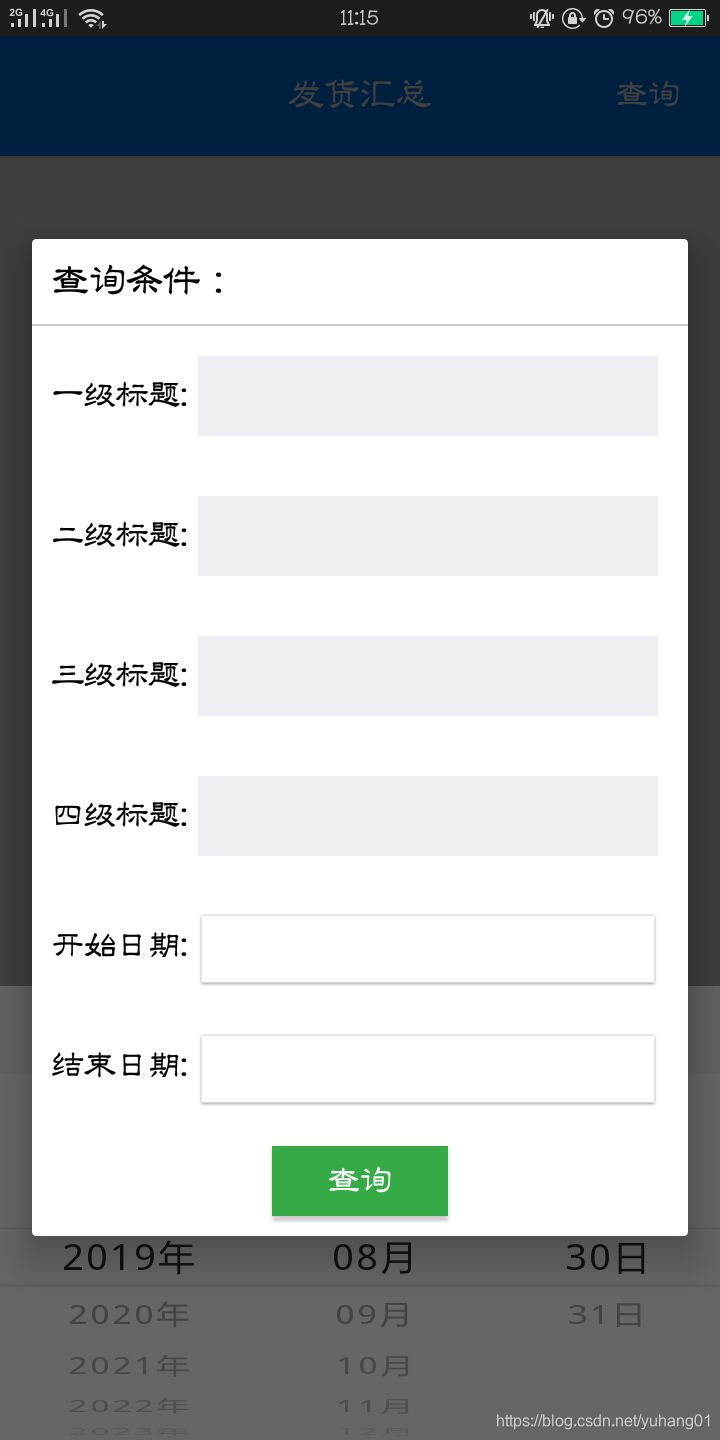
这个足足搞了我3小时,最后我也没想到好的解决办法,然后就百度自定义的对话框 我就将AlertDialog换成Dialog还是不行 然后最后我换了一个日期控件 解决了问题 现在在使用的时PickerTime( compile ‘com.github.codbking:PickTime:v1.0.1’)
Spinner四级联动的实现效果
设计思路
刚开始我以为很简单,然后也没有说一个一个的写,就想直接写一个公用的方法体,然后我直接将我的控件名以及接口的参数传到我的方法体里面 然后实现该功能
但是在我实际的操作中 一直没有达到我想要的效果 连简单的二级联动都没有实现 然后我内心话慌的一匹,就准备一步一步的写出来 ,我的下一级的数据时根据上一级的一个code参数所决定的 ,所以我将我下一级的网络请求放到了上一级的Spinner的点击事件中 根据点击事件我就可以获取到code 但是实际操作中 他却给我类似这样的错误 :
java.lang.ArrayIndexOutOfBoundsException: length=xx; index=-x
慢慢的发现我把我的Spinner的点击事件写到了我的网络请求中 这样当我下一级获取到数据后在发送一个网络请求 就相当于双层网络请求嵌套 。。。。。
主要的代码我就直接贴出来了
  private void initData(final String wawa, final Spinner title) {//第一级数据的获取
        cname = new ArrayList<>();
        dateBeans = new ArrayList<>();
        model.liandongEntityLiveData(wawa).observe(this, new Observer<LiandongEntity>() {//封装好的网络请求
            @Override
            public void onChanged(@Nullable LiandongEntity liandongEntity) {
              for(int i=0;i<liandongEntity.getDate().size();i++){
                  cname.add(liandongEntity.getDate().get(i).getCinvcname());
                  dateBeans.add(new LiandongEntity.DateBean(liandongEntity.getDate().get(i).getCinvccode(),liandongEntity.getDate().get(i).getCinvcname()));
              }
                    adapter = new ArrayAdapter<String>(DeliveryTimeManager.this, R.layout.spinneritem,cname);
                    title.setAdapter(adapter);
            }
        });
        initClick(title);//第一级的点击事件
    }

   private void initClick(Spinner title) {
        title.setOnItemSelectedListener(new AdapterView.OnItemSelectedListener() {
            @Override
            public void onItemSelected(AdapterView<?> parent, View view, int position, long id) {
                            dateBeanList = dateBeans.get(position);
                            diyige = dateBeanList.getCinvccode();
                             Log.i("wakakas",diyige);
                              initSe(diyige);//引出第二级数据
            }

            @Override
            public void onNothingSelected(AdapterView<?> parent) {

            };

        });

    }
   private void initSe(String codes) {
        aname = new ArrayList<>();
        abeans = new ArrayList<>();
        model.liandongEntityLiveData(codes).observe(this, new Observer<LiandongEntity>() {
            @Override
            public void onChanged(@Nullable LiandongEntity liandongEntity) {
                for(int i=0;i<liandongEntity.getDate().size();i++){
                    aname.add(liandongEntity.getDate().get(i).getCinvcname());
                    abeans.add(new LiandongEntity.DateBean(liandongEntity.getDate().get(i).getCinvccode(),liandongEntity.getDate().get(i).getCinvcname()));
                }
                adapter = new ArrayAdapter<String>(DeliveryTimeManager.this, R.layout.spinneritem,aname);
                titleSe.setAdapter(adapter);
            }
        });
            initSeClick(titleSe); //第二个spinner点击事件
         }

  private void initSeClick(Spinner titleSe) {
        titleSe.setOnItemSelectedListener(new AdapterView.OnItemSelectedListener() {
            @Override
            public void onItemSelected(AdapterView<?> parent, View view, int position, long id) {
                    dateBeanList = abeans.get(position);
                    dierge = dateBeanList.getCinvccode();
                Log.i("ttttt", dierge);
                initTh(dierge);
            }

            @Override
            public void onNothingSelected(AdapterView<?> parent) {
            }
        });
    }
以上是2级的数据请求了 俗话说第二级写出来以后 三级四级五级都是弟弟 以下的级别如法炮制 我就不贴了 当然你写可以根据以上代码将重复的代码抽离出来 这样方便下次的调用 舒服 ~
还没有结束 (出现的问题 )
这样写出来之后还有一个问题就是当我切换二级或者一级的时候 原已经获得数据的第三个第四个数据没有清空 这是就要用的一个小技巧 如下:
    private void initData(final String wawa, final Spinner title) {
        cname = new ArrayList<>();
        dateBeans = new ArrayList<>();
        model.liandongEntityLiveData(wawa).observe(this, new Observer<LiandongEntity>() {
            @Override
            public void onChanged(@Nullable LiandongEntity liandongEntity) {
                  cname.add("");//为Spinner的数组的第一条都默认显示为空的
              for(int i=0;i<liandongEntity.getDate().size();i++){
                  cname.add(liandongEntity.getDate().get(i).getCinvcname());

                  dateBeans.add(new LiandongEntity.DateBean(liandongEntity.getDate().get(i).getCinvccode(),liandongEntity.getDate().get(i).getCinvcname()));
              }
                    adapter = new ArrayAdapter<String>(DeliveryTimeManager.this, R.layout.spinneritem,cname);
                    title.setAdapter(adapter);
            }
        });
        initClick(title);//点击事件中的逻辑操作
    }
 private void initClick(Spinner title) {
        title.setOnItemSelectedListener(new AdapterView.OnItemSelectedListener() {
            @Override
            public void onItemSelected(AdapterView<?> parent, View view, int position, long id) {
                           if(position==0){//判断  设定默认的选中值
                               diyige ="0";
                           }else {
                               dateBeanList = dateBeans.get(position-1);
                               diyige = dateBeanList.getCinvccode();
                               Log.i("wakakas",diyige);
                               initSe(diyige);
                               initTh("0");//清空第三级数据
                               initFour("0");//清空第四级数据
                           }

            }
            @Override
            public void onNothingSelected(AdapterView<?> parent) {

            };
        });
    }
这样就是一个完整的spinner四级联动的项目了 完美!!!
就能实现完整的项目需求了