建立简单的Photon服务器(二)
上一篇博文(Photon教程——建立简单的Photon服务器(一))的地址:https://blog.csdn.net/ultramansail/article/details/102755901
生成库文件
一、生成解决方案
- 指定解决方案生成的输出目录
(1)右击解决方案,点击“属性”

(2)属性窗口打开后,点击“生成”,点击输出路径后的浏览按钮,选择输出路径,要记住这个路径,以后讲这个路径直接用“输出路径”表述

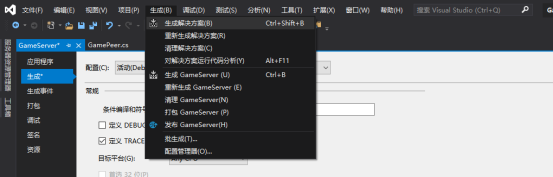
2.点击“生成->生成解决方案”
3.我们发现“输出路径/netstandard2.0”目录多了这些文件(有些版本可能直接在“输出路径”目录)

在Photon目录创建应用
一、新建应用目录
1.在Photon根目录下的“deploy”目录下新建一个文件夹,命名为“GameServer”,在“GameServer”目录下新建文件夹“bin”
2.把“输出路径/netstandard2.0”(或“输出路径”)目录下的文件全部拷贝到“Photon根目录/deploy/GameServer/bin”目录
二、配置PhotonServer.config文件
1.在“Photon根目录/deploy/bin_Win64”目录下找到“PhotonServer.config”文件,打开它
2.在最末尾的</Configuration>前追加一下内容
 <!-- Instance settings -->

  <GameServer

MaxMessageSize="512000"

MaxQueuedDataPerPeer="512000"

PerPeerMaxReliableDataInTransit="51200"

PerPeerTransmitRateLimitKBSec="256"

PerPeerTransmitRatePeriodMilliseconds="200"

MinimumTimeout="5000"

MaximumTimeout="30000"

DisplayName="Game Server"

>


    <!-- 0.0.0.0 opens listeners on all available IPs. Machines with multiple IPs should define the correct one here. -->

    <!-- Port 5055 is Photon's default for UDP connections. -->

    <UDPListeners>

      <UDPListener

IPAddress="0.0.0.0"

Port="5055"

OverrideApplication="GameServer">

      </UDPListener>

    </UDPListeners>


    <!-- 0.0.0.0 opens listeners on all available IPs. Machines with multiple IPs should define the correct one here. -->

    <!-- Port 4530 is Photon's default for TCP connecttions. -->

    <!-- A Policy application is defined in case that policy requests are sent to this listener (known bug of some some flash clients) -->

    <TCPListeners>

      <TCPListener

IPAddress="0.0.0.0"

Port="4530"

PolicyFile="Policy\assets\socket-policy.xml"

InactivityTimeout="10000"

OverrideApplication="GameServer"

>

      </TCPListener>

    </TCPListeners>


    <!-- Policy request listener for Unity and Flash (port 843) and Silverlight (port 943)  -->

    <PolicyFileListeners>

      <!-- multiple Listeners allowed for different ports -->

      <PolicyFileListener

IPAddress="0.0.0.0"

Port="843"

PolicyFile="Policy\assets\socket-policy.xml"

InactivityTimeout="10000">

      </PolicyFileListener>

      <PolicyFileListener

IPAddress="0.0.0.0"

Port="943"

PolicyFile="Policy\assets\socket-policy-silverlight.xml"

InactivityTimeout="10000">

      </PolicyFileListener>

    </PolicyFileListeners>


    <!-- WebSocket (and Flash-Fallback) compatible listener -->

    <WebSocketListeners>

      <WebSocketListener

IPAddress="0.0.0.0"

Port="9090"

DisableNagle="true"

InactivityTimeout="10000"

OverrideApplication="GameServer">

      </WebSocketListener>

    </WebSocketListeners>


    <!-- Defines the Photon Runtime Assembly to use. -->

    <Runtime

Assembly="PhotonHostRuntime, Culture=neutral"

Type="PhotonHostRuntime.PhotonDomainManager"

UnhandledExceptionPolicy="Ignore">

    </Runtime>


    <!-- Defines which applications are loaded on start and which of them is used by default. Make sure the default application is defined. -->

    <!-- Application-folders must be located in the same folder as the bin_win32 folders. The BaseDirectory must include a "bin" folder. -->

    <Applications Default="GameServer">


      <!-- Game Server Application -->

      <Application

Name="GameServer"

BaseDirectory="GameServer"

Assembly="GameServer"

Type="GameServer.GameServer"

ForceAutoRestart="true"

WatchFiles="dll;config"

ExcludeFiles="log4net.config">

      </Application>


      <!-- CounterPublisher Application -->

      <Application

Name="CounterPublisher"

BaseDirectory="CounterPublisher"

Assembly="CounterPublisher"

Type="Photon.CounterPublisher.Application"

ForceAutoRestart="true"

WatchFiles="dll;config"

ExcludeFiles="log4net.config">

      </Application>


    </Applications>

  </GameServer>
注Application代码块中,Name是服务的名称(应用的名称),BaseDirectory是应用相对于“Photon根目录/deploy”的路径,Assembly是程序集,是主类(继承自ApplicationBase的类)的名称,Type是类的类型,一般为“命名空间.类名”
三、开启服务器
1.打开主程序“Phton根目录/deploy/bin_Win64/PhotonControl.exe”
2.右击PhotonControl的后台图标,点击“Game Instance->Start as application”,启动服务(如果服务启动不了,请检查配置文件),退出应用则点击“Stop application”

下一篇博文(Photon教程——使用log4net插件在Photon中打印log)的地址:https://blog.csdn.net/ultramansail/article/details/102756662