版权声明:本文为博主原创文章,遵循 CC 4.0 BY-SA 版权协议,转载请附上原文出处链接和本声明。
Spring Boot 2.x With Spring Data JPA
这篇博文我们来学习下Spring Boot 与Spring Data JPA 技术的整合。
关于Spring Data JPA 的基础知识可以参考我的另一篇博文
星云的 Spring Data JPA学习手册
0x01 Spring Boot With Spring Data JPA
接下来的教程将会演示在Spring Boot 中如何使用Spring Data JPA 来存储和读取数据。
1.1 创建项目基本信息
第一步,我们需要使用Intellij Idea 中快速创建一个项目
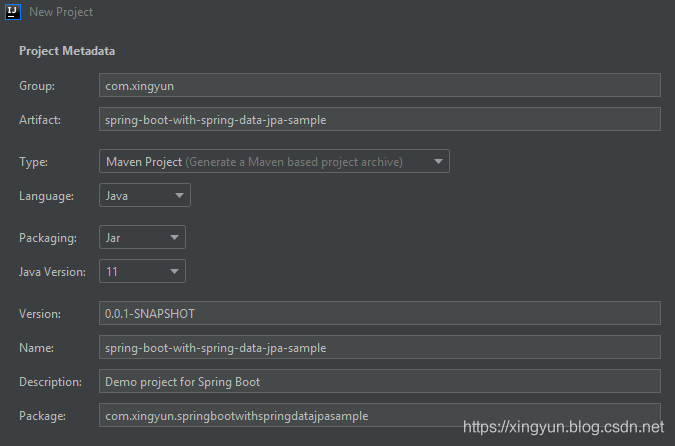
当然,你也可以使用STS IDE或 start.spring.io
1.2 添加依赖
如果当前项目是一个Spring Boot 项目,那么我们只需要在pom.xml中添加如下依赖即可:
        <!-- Spring Data JPA -->
        <dependency>
            <groupId>org.springframework.boot</groupId>
            <artifactId>spring-boot-starter-data-jpa</artifactId>
        </dependency>
- 添加如上依赖后会自动传递依赖如下
    <dependency>
      <groupId>org.springframework.boot</groupId>
      <artifactId>spring-boot-starter-aop</artifactId>
      <version>2.1.8.RELEASE</version>
      <scope>compile</scope>
    </dependency>
    <dependency>
      <groupId>org.springframework.boot</groupId>
      <artifactId>spring-boot-starter-jdbc</artifactId>
      <version>2.1.8.RELEASE</version>
      <scope>compile</scope>
    </dependency>
    <dependency>
      <groupId>javax.transaction</groupId>
      <artifactId>javax.transaction-api</artifactId>
      <version>1.3</version>
      <scope>compile</scope>
    </dependency>
    <dependency>
      <groupId>javax.xml.bind</groupId>
      <artifactId>jaxb-api</artifactId>
      <version>2.3.1</version>
      <scope>compile</scope>
    </dependency>
    <dependency>
      <groupId>org.hibernate</groupId>
      <artifactId>hibernate-core</artifactId>
      <version>5.3.11.Final</version>
      <scope>compile</scope>
      <exclusions>
        <exclusion>
          <artifactId>jboss-transaction-api_1.2_spec</artifactId>
          <groupId>org.jboss.spec.javax.transaction</groupId>
        </exclusion>
      </exclusions>
    </dependency>
    <dependency>
      <groupId>org.springframework.data</groupId>
      <artifactId>spring-data-jpa</artifactId>
      <version>2.1.10.RELEASE</version>
      <scope>compile</scope>
      <exclusions>
        <exclusion>
          <artifactId>aspectjrt</artifactId>
          <groupId>org.aspectj</groupId>
        </exclusion>
        <exclusion>
          <artifactId>jcl-over-slf4j</artifactId>
          <groupId>org.slf4j</groupId>
        </exclusion>
      </exclusions>
    </dependency>
    <dependency>
      <groupId>org.springframework</groupId>
      <artifactId>spring-aspects</artifactId>
      <version>5.1.9.RELEASE</version>
      <scope>compile</scope>
    </dependency>
- 里面主要包括Spring Framework,Spring Data JPA,Hibernate等核心依赖。
- Hibernate 是最受欢迎的JPA实现之一
- Spring Data JPA: 使实现基于JPA的存储库变得容易
- Spring框架对ORM的核心支持
完整的pom.xml内容如下:
<?xml version="1.0" encoding="UTF-8"?>
<project xmlns="http://maven.apache.org/POM/4.0.0" xmlns:xsi="http://www.w3.org/2001/XMLSchema-instance"
         xsi:schemaLocation="http://maven.apache.org/POM/4.0.0 https://maven.apache.org/xsd/maven-4.0.0.xsd">
    <modelVersion>4.0.0</modelVersion>
    <!-- 设置当前项目的父项目为Spring Boot -->
    <parent>
        <groupId>org.springframework.boot</groupId>
        <artifactId>spring-boot-starter-parent</artifactId>
        <version>2.1.8.RELEASE</version>
        <relativePath/> <!-- lookup parent from repository -->
    </parent>

    <!-- 设置当前项目的基本信息 -->
    <groupId>com.xingyun</groupId>
    <artifactId>spring-boot-with-spring-data-jpa-sample</artifactId>
    <version>0.0.1-SNAPSHOT</version>
    <name>spring-boot-with-spring-data-jpa-sample</name>
    <description>Demo project for Spring Boot</description>

    <properties>
        <!-- 设置当前项目源码使用字符编码为UTF-8 -->
        <project.build.sourceEncoding>UTF-8</project.build.sourceEncoding>
        <!-- 设置当前项目所需要的JDK版本 Open JDK下载地址:https://jdk.java.net/ -->
        <java.version>11</java.version>
        <!-- 设置当前项目编译所需要的JDK版本 Open JDK下载地址:https://jdk.java.net/ -->
        <maven.compiler.source>${java.version}</maven.compiler.source>
        <maven.compiler.target>${java.version}</maven.compiler.target>
        <!-- 设置maven编译插件版本,可通过下面网址查看最新的版本-->
        <!-- https://mvnrepository.com/artifact/org.apache.maven.plugins/maven-compiler-plugin -->
        <maven.compiler.plugin.version>3.5.1</maven.compiler.plugin.version>
        <!-- 项目所使用第三方依赖jar包的版本,建议以后都使用这种方式,方便今后维护和升级 -->
    </properties>


    <dependencies>
        <!-- Spring Data JPA -->
        <dependency>
            <groupId>org.springframework.boot</groupId>
            <artifactId>spring-boot-starter-data-jpa</artifactId>
        </dependency>
        <!-- H2 Database -->
        <dependency>
            <groupId>com.h2database</groupId>
            <artifactId>h2</artifactId>
            <scope>runtime</scope>
        </dependency>
        <!-- Spring Web -->
        <dependency>
            <groupId>org.springframework.boot</groupId>
            <artifactId>spring-boot-starter-web</artifactId>
        </dependency>
        <!-- lombok -->
        <dependency>
            <groupId>org.projectlombok</groupId>
            <artifactId>lombok</artifactId>
            <optional>true</optional>
        </dependency>
        <!-- Spring Boot Test -->
        <dependency>
            <groupId>org.springframework.boot</groupId>
            <artifactId>spring-boot-starter-test</artifactId>
            <scope>test</scope>
        </dependency>
    </dependencies>

    <build>
        <plugins>
            <!--该插件可以让我们通过maven命令将项目打包成一个可执行的Jar-->
            <plugin>
                <groupId>org.springframework.boot</groupId>
                <artifactId>spring-boot-maven-plugin</artifactId>
            </plugin>
            <!--该插件限定Maven打包时所使用的版本,避免出现版本不匹配问题-->
            <plugin>
                <groupId>org.apache.maven.plugins</groupId>
                <artifactId>maven-compiler-plugin</artifactId>
                <version>${maven.compiler.plugin.version}</version>
                <configuration>
                    <source>${java.version}</source>
                    <target>${java.version}</target>
                </configuration>
            </plugin>
        </plugins>
    </build>
</project>
1.3 properties 配置
application.properties
spring.profiles.active=dev
application-dev.properties
# 配置应用名称
spring.application.name=spring-boot-with-jpa-sample

# 配置内嵌容器
# 配置内嵌容器IP地址
server.address=127.0.0.1
# 配置内嵌容器端口
server.port=8080
# 配置内嵌容器上下文
server.servlet.context-path=/

# 配置Datasource
# 配置使用数据库驱动
spring.datasource.driver-class-name=org.h2.Driver
# 配置存储数据到内存
#spring.datasource.url=jdbc\:h2:\:mem\:testdb;DB_CLOSE_DELAY=-1;
# 配置存储数据到文件
spring.datasource.url=jdbc:h2:~/jpa_sample_db
# 配置数据库连接账号
spring.datasource.username=sa
# 配置数据库连接密码
spring.datasource.password=sa
# 配置数据源初始化类型 embedded|always|never
# 注意:spring.datasource.initialize=true已经过时,使用spring.datasource.initialization-mode替代
spring.datasource.initialization-mode=embedded

# 配置 Spring Data JPA
# 配置使用数据库类型
spring.jpa.database=h2
# 创建表的方式
# 方式一:通过表注解映射方式
# 自动建表规则
# create:Create the schema and destroy previous data
# create-drop:Create and then destroy the schema at the end of the session.
# update:Update the schema if necessary.
# none:Disable DDL handling
spring.jpa.hibernate.ddl-auto=create-drop
# 自动建表和列映射规则
# 第一种规则:org.hibernate.boot.model.naming.PhysicalNamingStrategyStandardImpl:会把nickName映射为nickName
# 第二种规则:org.springframework.boot.orm.jpa.hibernate.SpringPhysicalNamingStrategy:会把nickName映射为nick_name
# 第三种自定义规则:com.xingyun.springbootwithjpasample.customize.UpperTableColumnStrategy:会把nickName映射为NIKE_NAME
spring.jpa.hibernate.naming.physical-strategy=com.xingyun.springbootwithspringdatajpasample.customize.UpperTableColumnStrategy
# 方式二:通过脚本初始化建立数据库表
# 初始化数据库表
#spring.datasource.schema=classpath*:/script/easy-shop-db-schema.sql
# 初始化数据库数据
spring.datasource.data=classpath*:/script/jpa_sample_db_data.sql
# 是否显示SQL
spring.jpa.show-sql=true
# 是否显示Web 控制台
spring.jpa.open-in-view=true

# 配置H2 Database
# H2 web管理控制台需要devtools,如果没有添加该依赖仍然想要使用web 控制台,那么需要配置如下属性为true
spring.h2.console.enabled=true
# 配置H2 web 管理控制台的上下文
spring.h2.console.path=/h2-console
1.4 定义JPA 配置类
SpringDataJpaConfig.java内容如下:
import org.springframework.context.annotation.Configuration;
import org.springframework.data.jpa.repository.config.EnableJpaRepositories;

/**
 * @author 星云
 * @功能
 * @date 10/1/2019 5:45 PM
 */
@EnableJpaRepositories(basePackages = "com.xingyun.springbootwithspringdatajpasample.dao.jpa")
@Configuration
public class SpringDataJpaConfig {}
1.5 自定义表和字段映射规则类
| 规则实现类 | 映射规则说明 |
|---|---|
org.hibernate.boot.model.naming.PhysicalNamingStrategyStandardImpl |
把nickName映射为nickName |
org.springframework.boot.orm.jpa.hibernate.SpringPhysicalNamingStrategy |
把nickName映射为nick_name |
com.xingyun.springbootwithjpasample.customize.UpperTableColumnStrategy |
把nickName映射为NIKE_NAME |
为了将字段和表全部转换成大写,我们需要自定义一个规则类
编写代码如下:
import org.hibernate.boot.model.naming.Identifier;
import org.hibernate.engine.jdbc.env.spi.JdbcEnvironment;
import org.springframework.boot.orm.jpa.hibernate.SpringPhysicalNamingStrategy;

import java.util.Locale;

/**
 * @author 星云
 * @功能 将数据库表和字段全部大写
 * @date 9/22/2019 10:25 AM
 */
public class UpperTableColumnStrategy extends SpringPhysicalNamingStrategy {

    /**
     * 父类中映射规则是nikeName映射为nick_name
     * 自雷重写父类方法将nikeName映射为NIKE_NAME
     * @param name
     * @param quoted
     * @param jdbcEnvironment
     * @return
     */
    @Override
    protected Identifier getIdentifier(String name, boolean quoted, JdbcEnvironment jdbcEnvironment) {
        if (this.isCaseInsensitive(jdbcEnvironment)) {
            name = name.toUpperCase(Locale.ROOT);
        }
        return new Identifier(name, quoted);
    }

    /**
     * 大小写是否敏感
     * @param jdbcEnvironment
     * @return 默认是true
     */
    @Override
    protected boolean isCaseInsensitive(JdbcEnvironment jdbcEnvironment) {
        return super.isCaseInsensitive(jdbcEnvironment);
    }
}
1.6 定义一个实体类
Customer 类有三个属性id, firstName, 和 lastName,以及两个构造方法。
其中默认的构造方法只给Spring Data JPA使用,另外一个带参数的构造方法给我们自己用,我们用它来保存一个对象实例到数据库。
Customer.java源码如下:
import lombok.Getter;
import lombok.Setter;
import lombok.ToString;

import javax.persistence.*;


/**
 * @功能 用户实体类
 * @author 星云
 * @date 9/28/2019 8:01 PM
 */
@Getter
@Setter
@ToString
@Table(name = "T_CUSTOMER")
@Entity
public class Customer {

    /**
     * -GenerationType.AUTO主键由程序控制, 是默认选项 ,不设置就是这个
     * -GenerationType.IDENTITY 主键由数据库生成, 采用数据库自增长, Oracle不支持这种方式
     * -GenerationType.SEQUENCE 通过数据库的序列产生主键,Oracle支持,MYSQL不支持
     * -GenerationType.TABLE 提供特定的数据库产生主键, 该方式更有利于数据库的移植
     * 主键Id
     */
    @Id
    @GeneratedValue(strategy= GenerationType.IDENTITY)
    private Long id;

    /**
     * 姓
     */
    @Column(nullable = false)
    private String firstName;
    /**
     * 名
     */
    @Column(nullable = false)
    private String lastName;

    protected Customer() {}
    public Customer(String firstName, String lastName) {
        this.firstName = firstName;
        this.lastName = lastName;
    }
}
- Customer类使用了
@Entity注解,标识它是一个JPA 实体类@Table(name = "T_CUSTOMER")
- 我们这里显示指定一个映射表的名称
- 如果没有使用该注解默认映射表名称为
Customer@Id注解标识为映射表的主键@GeneratedValue这个注解标识该表主键的序列为自动递增- 我们使用lombok 的
@Getter和@Setter以及@ToString省略对应的方法- 关于
lombok的用法详细可参考我的另一篇博文 Spring Boot 2.x With lombok
为了统一返回结果格式,定义一个类
import lombok.Getter;
import lombok.Setter;
import lombok.ToString;
import org.springframework.stereotype.Component;

/**
 * @author 星云
 * @功能
 * @date 9/28/2019 10:27 PM
 */
@Getter
@Setter
@ToString
@Component
public class AppResponse {
    private Integer responseCode;
    private String responseMessage;
    private Object responseData;
}
1.7 定义一个Repository 接口类
CustomerRepository.java内容如下:
import com.xingyun.springbootwithspringdatajpasample.model.Customer;
import org.springframework.data.jpa.repository.JpaRepository;
import org.springframework.data.jpa.repository.Query;

import java.util.List;

/**
 * @author 星云
 * @功能
 * @date 9/28/2019 8:22 PM
 */
public interface CustomerRepository extends JpaRepository<Customer, Long> {
    /**
     * 根据lastName 查找多个对象
     * @param lastName
     * @return
     */
    List<Customer> findByLastName(String lastName);

    /**
     * 使用原生的SQL进行查询 ?1是占位符
     * @param lastName 查询的名字
     * @return 返回用户
     */
    @Query(value = "select * from T_CUSTOMER u where u.LAST_NAME = ?1",nativeQuery = true)
    List<Customer> findByLastNameBySQL(String lastName);
}
1.8 服务接口类
CustomerService.java内容如下:
import com.xingyun.springbootwithjpasample.model.Customer;

import java.util.List;
import java.util.Optional;

/**
 * @author 星云
 * @功能
 * @date 9/28/2019 10:16 PM
 */
public interface CustomerService {
    /**
     * 根据lastName 查找多个对象
     * @param lastName
     * @return
     */
    List<Customer> findByLastName(String lastName);

    /**
     * 根据Id查找一个对象
     * 该接口方法原型是 Optional<T> findById(ID var1); 位于CrudRepository 里的
     * @param id
     * @return
     */
     Optional<Customer> findCustomerById(Long id);

    /**
     * 保存一个对象
     * @param customer
     */
    void saveCustomer(Customer customer);

    /**
     * 查找所有对象
     * @return
     */
    List<Customer> showAllCustomer();

    /**
     * 根据名字查找对象
     * @param lastName
     * @return
     */
    List<Customer> findAllCustomerBySQL(String lastName);
}
1.9 服务接口实现类
import com.xingyun.springbootwithspringdatajpasample.dao.jpa.CustomerRepository;
import com.xingyun.springbootwithspringdatajpasample.model.Customer;
import lombok.extern.slf4j.Slf4j;
import org.springframework.beans.factory.annotation.Autowired;
import org.springframework.stereotype.Service;

import java.util.List;
import java.util.Optional;

/**
 * @author 星云
 * @功能
 * @date 9/28/2019 10:19 PM
 */
@Service
@Slf4j
public class CustomerServiceImpl implements CustomerService{

    @Autowired
    CustomerRepository customerRepository;

    @Override
    public List<Customer> findByLastName(String lastName) {
        return customerRepository.findByLastName(lastName);
    }

    @Override
    public Optional<Customer> findCustomerById(Long id) {
       return customerRepository.findById(id);
    }

    @Override
    public void saveCustomer(Customer customer) {
        customerRepository.save(customer);
    }

    @Override
    public List<Customer> showAllCustomer() {
        return customerRepository.findAll();
    }

    @Override
    public List<Customer> findAllCustomerBySQL(String lastName) {
        return customerRepository.findByLastNameBySQL(lastName);
    }
}
1.10 Controller 调用类
import com.xingyun.springbootwithspringdatajpasample.model.AppResponse;
import com.xingyun.springbootwithspringdatajpasample.model.Customer;
import com.xingyun.springbootwithspringdatajpasample.service.CustomerService;
import lombok.extern.slf4j.Slf4j;
import org.springframework.beans.factory.annotation.Autowired;
import org.springframework.web.bind.annotation.*;

import java.util.List;
import java.util.Optional;

/**
 * @author 星云
 * @功能
 * @date 9/28/2019 8:25 PM
 */
@Slf4j
@RequestMapping(value = "/customers")
@RestController
public class CustomerController {

    @Autowired
    AppResponse appResponse;

    @Autowired
    CustomerService customerService;

    /**
     * curl -d '' http://127.0.0.1:8080/customers/saveCustomer
     * 保存一个对象
     * @return
     */
    @PostMapping(value = "/saveCustomer")
    public AppResponse saveCustomer(){
        // save a few customers
        customerService.saveCustomer(new Customer("Jack", "Bauer"));
        customerService.saveCustomer(new Customer("Chloe", "O'Brian"));
        customerService.saveCustomer(new Customer("Kim", "Bauer"));
        customerService.saveCustomer(new Customer("David", "Palmer"));
        customerService.saveCustomer(new Customer("Michelle", "Dessert"));

        appResponse.setResponseCode(200);
        appResponse.setResponseMessage("save user finished");
        appResponse.setResponseData(null);
        return appResponse;
    }

    /**
     * 根据Id 查找某个对象
     * curl http://127.0.0.1:8080/customers/1
     * @param id
     */
    @GetMapping(value = "/{id}")
    public AppResponse findCustomerById(@PathVariable(value = "id")Long id){

        // fetch an individual customer by ID
        Optional<Customer> customer=customerService.findCustomerById(id);

        //如果有值不为空
        if(customer.isPresent()){
            log.info("Customer found with findById(1L):");
            log.info("------------start--------------------");
            log.info(customer.toString());
            log.info("------------end--------------------");
            appResponse.setResponseCode(200);
            appResponse.setResponseMessage("根据Id 查找某个对象成功");
            appResponse.setResponseData(customer);
        }else{
            appResponse.setResponseCode(401);
            appResponse.setResponseMessage("未找到该对象");
            appResponse.setResponseData(null);
        }
        return appResponse;
    }


    /**
     * 查找所有的对象
     * curl http://127.0.0.1:8080/customers/showCustomerList
     */
    @GetMapping(value = "/showCustomerList")
    public AppResponse showAllCustomer(){

        List<Customer> customerList=customerService.showAllCustomer();
        // fetch all customers
        log.info("Customers found with findAll():");
        log.info("-------------------------------");
        for (Customer customer : customerList) {
            log.info(customer.toString());
        }

        appResponse.setResponseCode(200);
        appResponse.setResponseMessage("查找所有的对象 finished");
        appResponse.setResponseData(customerList);
        return appResponse;
    }

    /**
     * 根据lastName 查找一个对象
     * curl http://127.0.0.1:8080/customers/findCustomerByLastName?lastName=Bauer
     */
    @GetMapping(value = "/findCustomerByLastName")
    public AppResponse showAllCustomerByLastName(@RequestParam(value = "lastName")String lastName){

        List<Customer> customerList=customerService.findByLastName(lastName);
        // fetch customers by last name
        log.info("Customer found with findByLastName('Bauer'):");
        log.info("--------------------------------------------");

        if(null!=customerList){
            //使用lambda表达式
            customerList.forEach(bauer -> {
                log.info(bauer.toString());
            });

            //使用传统的方式遍历
            for (Customer bauer : customerList) {
                log.info(bauer.toString());
            }
            appResponse.setResponseCode(200);
            appResponse.setResponseMessage("根据lastName 查找一个对象 finished");
            appResponse.setResponseData(customerList);
        }else{
            appResponse.setResponseCode(401);
            appResponse.setResponseMessage("未找到相关数据");
            appResponse.setResponseData(null);
        }
        return appResponse;
    }

    /**
     * 根据lastName 查找一个对象
     * curl http://127.0.0.1:8080/customers/findCustomerByLastNameWithSQL?lastName=Bauer
     */
    @GetMapping(value = "/findCustomerByLastNameWithSQL")
    public AppResponse findCustomerByLastNameWithSQL(@RequestParam(value = "lastName")String lastName){

        List<Customer> customerList=customerService.findAllCustomerBySQL(lastName);
        // fetch customers by last name
        if(null!=customerList){
            //使用lambda表达式
            customerList.forEach(bauer -> {
                log.info(bauer.toString());
            });
            appResponse.setResponseCode(200);
            appResponse.setResponseMessage("根据lastName 查找一个对象 finished");
            appResponse.setResponseData(customerList);
        }else{
            appResponse.setResponseCode(401);
            appResponse.setResponseMessage("未找到相关数据");
            appResponse.setResponseData(null);
        }
        return appResponse;
    }
}
1.11 Curl 测试API
关于Curl 用法不太了解的可以参考我的另外一篇博文 Curl的下载安装和配置
- 保存对象
curl -d '' http://127.0.0.1:8080/customers/saveCustomer
- 根据Id 查找某个对象
curl http://127.0.0.1:8080/customers/1
- 查找所有的对象
curl http://127.0.0.1:8080/customers/showCustomerList
- 根据lastName 查找一个对象
curl http://127.0.0.1:8080/customers/findCustomerByLastName?lastName=Bauer
根据lastName 查找一个对象(原生SQL)
curl http://127.0.0.1:8080/customers/findCustomerByLastNameWithSQL?lastName=Bauer
0x02 源码下载
0x03 参考资料
本节完~
喜欢我的博文欢迎点赞,关注,或打赏。