最近研究spring cloud 用的是开发工具创建的项目,自动根配置使用最新版的spring cloud 2.0.3版本,整合spring data jpa过程中发生了好多坑,一步一步踩过去,现在将采坑过程写出来,留作记录。
一、首先创建一个父工程,然后使用开发工具创建一个简单的 Eureka server 服务注册中心,如下:
1、application.properties文件的配置:
##=====Eureka注册中心配置=====##
# 服务端口号
server.port=8761
# 服务地址
eureka.instance.hostname=localhost
# 配置是否将自己注册(默认为true)
eureka.client.register-with-eureka=false
# 关闭检索服务(默认为true)
eureka.client.fetch-registry=false
# 访问路径
eureka.client.service-url.defaultZone=http://${eureka.instance.hostname}:${server.port}/eureka/

##=====设置服务名=====##
spring.application.name=eureka-server
2、在启动类上加入@EnableEurekaServer的注解,开启Eureka server的一些默认配置;
import org.springframework.boot.SpringApplication;
import org.springframework.boot.autoconfigure.SpringBootApplication;
import org.springframework.cloud.netflix.eureka.server.EnableEurekaServer;

@SpringBootApplication
@EnableEurekaServer
public class EurekaApplication {

    public static void main(String[] args) {
        SpringApplication.run(EurekaApplication.class, args);
    }
}
至此,一个简单的Eureka server 服务注册中心就配置好了,启动EurekaApplication类中的main()方法,然后看到下图所示的一些信息,就表示启动成功了:

二、创建消费者,即项目的业务模块,spring cloud 的消费者有两个可以选择,Ribbon 和 Feign,选哪个都可以,具体有什么区别,这里不讨论,需要注意的是Ribbon需要注入restTemplate 。嫌麻烦可以使用Feign,本demo 使用的是Feign。
注:此工程的application.properties配置文件:
##=====加载Eureka注册中心=====##
# 注册路径
eureka.client.service-url.defaultZone=http://localhost:8761/eureka/
# 注册服务名称
spring.application.name: polymerize-basic

##=====数据库配置=====##
# MySQL数据库驱动
spring.datasource.driver-class-name=com.mysql.jdbc.Driver
# MySQL数据库地址
spring.datasource.url=jdbc:mysql://localhost:3306/polymerize
# MySQL数据库用户名
spring.datasource.username=root
# MySQL数据库密码
spring.datasource.password=root

##=====Jpa配置=====##
# 指定jpa连接类型
spring.jpa.database=MYSQL
# 显示后台处理的SQL语句
spring.jpa.show-sql=true
# 项目启动对数据库的操作
spring.jpa.properties.hibernate.hbm2ddl.auto=update
1、使用开发工具创建一个Feign的工程,然后加入spring data jpa 以及 mysql 驱动的依赖包:
<!--jpa-->
<dependency>
    <groupId>org.springframework.boot</groupId>
    <artifactId>spring-boot-starter-data-jpa</artifactId>
</dependency>

<!-- mysql-connector-java -->
<dependency>
    <groupId>mysql</groupId>
    <artifactId>mysql-connector-java</artifactId>
</dependency>
2、加入依赖之后,创建相应的service、dao、controller、model 包,然后写一个简单的UserInfoModel.java 实体类:
import javax.persistence.*;
import java.util.Date;

/**
 * Model class for UserInfo
 */
@Entity
@Table(name = "user_info")
public class UserInfoModel {

	//用户ID
	private Integer userId;
	//角色ID
	private Integer roleId;
	//···省略···

	/**
	 * Get 用户ID
	 */
	@Column(name = "USER_ID")
	@Id @GeneratedValue(strategy=GenerationType.AUTO)
	public Integer getUserId() {
		return userId;
	}

	/**
	 * Set 用户ID
	 */
	public void setUserId(Integer userId) {
		this.userId = userId;
	}

	//···后面的getXxx()、setXxx()方法省略···
}
然后在dao 包里创建IUserInfoDao.java 的接口,并继承JpaRepository<T,ID>接口:
import com.polymerize.basic.basicData.model.UserInfoModel;
import org.springframework.data.jpa.repository.JpaRepository;

/**
 * 用户信息(userInfo)dao接口
 *
 * @author: liwenqiang 2018/7/27 17:50
 **/
public interface IUserInfoDao extends JpaRepository<UserInfoModel,Integer> {
    }
3、此时已经可以启动项目进行测试,然而...启动报错了
Error starting ApplicationContext. To display the auto-configuration report re-run your application with 'debug' enabled.
2018-07-30 15:51:40.428 ERROR 5652 --- [           main] o.s.b.d.LoggingFailureAnalysisReporter   :

***************************
APPLICATION FAILED TO START
***************************

Description:

Cannot determine embedded database url for database type NONE

Action:

If you want an embedded database please put a supported one on the classpath. If you have database settings to be loaded from a particular profile you may need to active it (no profiles are currently active).
然后Google了好多资料,得知是因为数据源的配置问题,spring data jpa引入之后,会加入hibernate 的数据源配置,但是spring boot 项目如果配置的datasource 的相关信息,会去配置文件里读取,所以连个产生了问题,解决这个问题的办法有两个:
方法一:使用注解——在启动类的@SpringApplication注解上配置 exclude = DataSourceAutoConfiguration.class
@SpringBootApplication(exclude = DataSourceAutoConfiguration.class)
@EnableFeignClients
public class BasicApplication {

    public static void main(String[] args) {
        SpringApplication.run(BasicApplication.class, args);
    }
}
但是方法一试了之后,问题并没有解决···,然后此方法放弃,试试方法二。
方法二:自定义数据源配置:
3.1、创建DataSource的配置类,由于测试项目,只设置了一个数据源,具体内容如下:
import org.springframework.beans.factory.annotation.Qualifier;
import org.springframework.boot.context.properties.ConfigurationProperties;
import org.springframework.boot.jdbc.DataSourceBuilder;
import org.springframework.context.annotation.Bean;
import org.springframework.context.annotation.Configuration;
import org.springframework.context.annotation.Primary;

import javax.sql.DataSource;

/**
 * 数据源配置
 *
 * @author: liwenqiang 2018/7/30 11:01
 **/
@Configuration
public class DataSourceConfig {

    @Bean(name = "baseDataSource")
    @Primary
    @Qualifier("baseDataSource")
    @ConfigurationProperties(prefix = "spring.datasource")
    public DataSource primaryDatasource() {
        return DataSourceBuilder.create().build();
    }


}
3.2、在创建一个jpa的配置类
/**
 * 这两个方法不适用 spring boot 2.x
 */

@Bean(name = "entityManagerFactoryPrimary")
    @Primary
    public LocalContainerEntityManagerFactoryBean entityManagerFactoryPrimary(EntityManagerFactoryBuilder builder) {

        return builder
                //设置数据源
                .dataSource(primaryDataSource)
                //设置数据源属性
                .properties(getVendorProperties(primaryDataSource))
                //设置实体类所在位置.扫描所有带有 @Entity 注解的类
                .packages("com.itguang.springbootmultidatasource.domain")
                // Spring会将EntityManagerFactory注入到Repository之中.有了 EntityManagerFactory之后,
                // Repository就能用它来创建 EntityManager 了,然后 EntityManager 就可以针对数据库执行操作
                .persistenceUnit("primaryPersistenceUnit")
                .build();

    }

    private Map<String, String> getVendorProperties(DataSource dataSource) {
        return jpaProperties.getHibernateProperties(dataSource);
    }
这里要注意,由于spring boot 2.x 的变化,网上差的资料有用带参的getVendorProperties(DataSource dataSource)方法的,但是2.x 不支持,所以要用不带参的方法:
import org.springframework.beans.factory.annotation.Autowired;
import org.springframework.beans.factory.annotation.Qualifier;
import org.springframework.boot.autoconfigure.orm.jpa.HibernateSettings;
import org.springframework.boot.autoconfigure.orm.jpa.JpaProperties;
import org.springframework.boot.orm.jpa.EntityManagerFactoryBuilder;
import org.springframework.context.annotation.Bean;
import org.springframework.context.annotation.Configuration;
import org.springframework.context.annotation.Primary;
import org.springframework.data.jpa.repository.config.EnableJpaRepositories;
import org.springframework.orm.jpa.JpaTransactionManager;
import org.springframework.orm.jpa.LocalContainerEntityManagerFactoryBean;
import org.springframework.transaction.PlatformTransactionManager;
import org.springframework.transaction.annotation.EnableTransactionManagement;
import javax.persistence.EntityManager;
import javax.sql.DataSource;
import java.util.Map;
/**
* jpa配置
*
* @author: liwenqiang 2018/7/30 10:27
**/
@Configuration
@EnableTransactionManagement
@EnableJpaRepositories(
entityManagerFactoryRef = "entityManagerFactoryPrimary",//配置连接工厂 entityManagerFactory
transactionManagerRef = "transactionManagerPrimary", //配置 事物管理器 transactionManager
basePackages = {"com.polymerize.basic.*.dao"}//设置dao(repo)所在位置
)
public class JpaConfig {
@Autowired
private JpaProperties jpaProperties;
@Autowired
@Qualifier("baseDataSource")
private DataSource primaryDataSource;
/**
* @param builder
* @return
*/
@Primary
@Bean(name = "entityManagerFactoryPrimary")
public LocalContainerEntityManagerFactoryBean entityManagerFactoryPrimary(EntityManagerFactoryBuilder builder) {
return builder
.dataSource(primaryDataSource)
.packages("com.polymerize.basic.*.model")
.persistenceUnit("primaryPersistenceUnit")
.properties(getVendorProperties())
.build();
}
private Map<String, Object> getVendorProperties() {
return jpaProperties.getHibernateProperties(new HibernateSettings());
}
@Primary
@Bean(name = "entityManagerPrimary")
public EntityManager entityManager(EntityManagerFactoryBuilder builder) {
return entityManagerFactoryPrimary(builder).getObject().createEntityManager();
}
/**
* 配置事物管理器
*
* @param builder
* @return
*/
@Bean(name = "transactionManagerPrimary")
@Primary
PlatformTransactionManager transactionManagerPrimary(EntityManagerFactoryBuilder builder) {
return new JpaTransactionManager(entityManagerFactoryPrimary(builder).getObject());
}
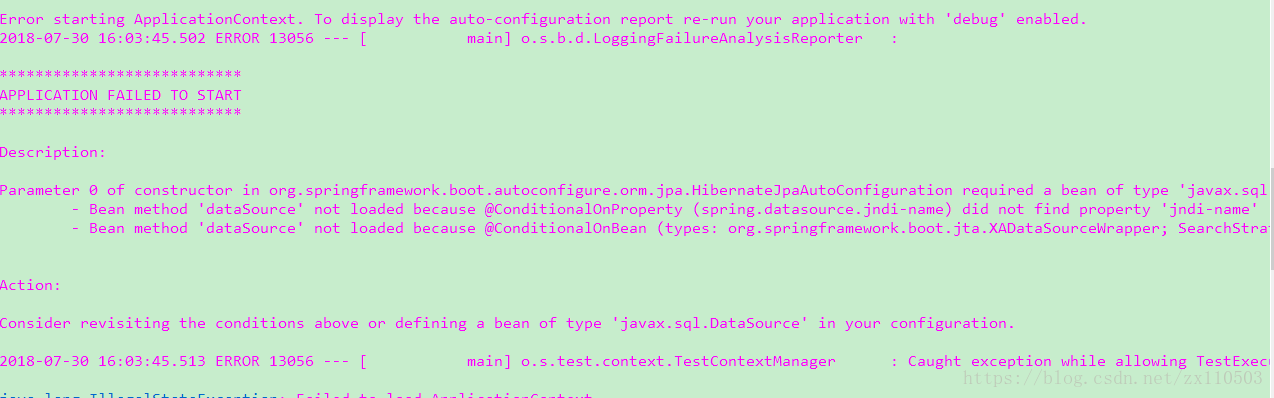
}配置完成之后启动一下,又出现了一个问题

然后试着改了下application.properties配置文件中的配置为:spring.datasource.url 改为 spring.datasource.jdbcUrl
# MySQL数据库地址,springboot2.x需使用.jdbcUrl否则会报错
spring.datasource.jdbcUrl=jdbc:mysql://localhost:3306/polymerize
然后再启动,终于成功了!!!
github项目地址:https://github.com/little3201/polymerize