/ 前言 /
这是一个带弧形的进度条,其实这个控件很久之前已经实现了,但是我想用Kotlin去重写优化一遍,并且对此铺开来讲解。项目的Github地址:
https://github.com/TanJiaJunBeyond/CircularArcProgressView
效果图

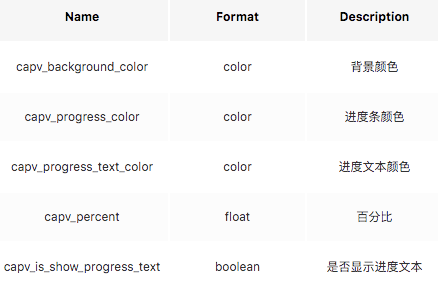
属性
使用
导入你的项目中
dependencies {
    implementation 'com.tanjiajun.widget:CircularArcProgressView:1.0.2'
}
布局文件
<com.tanjiajun.widget.CircularArcProgressView
    android:id="@+id/capv_first"
    android:layout_width="0dp"
    android:layout_height="30dp"
    android:layout_marginStart="16dp"
    android:layout_marginTop="16dp"
    android:layout_marginEnd="16dp"
    app:capv_background_color="@color/circular_arc_progress_view_first_background_color"
    app:capv_is_show_progress_text="true"
    app:capv_percent="0.8"
    app:capv_progress_color="@color/circular_arc_progress_view_first_progress_color"
    app:layout_constraintEnd_toEndOf="parent"
    app:layout_constraintStart_toStartOf="parent"
    app:layout_constraintTop_toTopOf="parent" />
Kotlin
findViewById<CircularArcProgressView>(R.id.capv_first).startAnimator(duration = 2000)
Java
((CircularArcProgressView) findViewById(R.id.capv_first)).startAnimator(2000);
/ 源码分析 /
定义自定义属性,据此写出对应的获取自定义属性的代码,并且暴露一些需要用户设置的方法,代码如下:
/**
 * Set percent to show the progress.
 */
var percent: Float = 0f
    set(value) {
        var percent = value

        if (percent < 0f) {
            percent = 0f
        } else if (percent > 1f) {
            percent = 1f
        }

        if (percent != field) {
            field = percent
            invalidate()
        }
    }

init {
    attrs?.let { set ->
        context.obtainStyledAttributes(set, R.styleable.CircularArcProgressView).apply {
            bgColor =
                getColor(R.styleable.CircularArcProgressView_capv_background_color, Color.BLACK)
            progressColor =
                getColor(R.styleable.CircularArcProgressView_capv_progress_color, Color.RED)
            progressTextColor =
                getColor(
                    R.styleable.CircularArcProgressView_capv_progress_text_color,
                    Color.WHITE
                )
            getFloat(R.styleable.CircularArcProgressView_capv_percent, 0f).let {
                percent = it
            }
            isShowProgressText =
                getBoolean(
                    R.styleable.CircularArcProgressView_capv_is_show_progress_text,
                    false
                )
            recycle()
        }
    }
}
根据用户设置的宽高去绘制一个半径为高度一半的圆角矩形,注意要对padding属性进行处理,这部分就是背景,代码如下:
val halfHeight = height / 2f
val saveCount = canvas.saveLayer(0f, 0f, width.toFloat(), height.toFloat(), null)

// Draw background.
backgroundRectF.left = paddingStart.toFloat()
backgroundRectF.top = paddingTop.toFloat()
backgroundRectF.right = width - paddingEnd.toFloat()
backgroundRectF.bottom = height - paddingBottom.toFloat()
canvas.drawRoundRect(backgroundRectF, halfHeight, halfHeight, backgroundPaint)
在背景圆角矩形的左边绘制另外一个半径为高度一半的圆角矩形,宽高和背景圆角矩形一样,但是左右坐标会随着percent的增加而增加,绘制完毕后的表现就是往右移动,然后利用PorterDuffXfermode处理重叠部分,这部分就是进度,代码如下:
private val progressTextPaint by lazy {
    TextPaint().apply {
        isAntiAlias = true
        isDither = true
        style = Paint.Style.FILL
        color = progressTextColor
    }
}
// Draw progress.
progressRectF.left = -backgroundRectF.width() + percent * width
progressRectF.top = backgroundRectF.top
progressRectF.right = progressRectF.left + backgroundRectF.width()
progressRectF.bottom = backgroundRectF.bottom
canvas.drawRoundRect(progressRectF, halfHeight, halfHeight, progressPaint)
canvas.restoreToCount(saveCount)
根据用户需要绘制一个百分比文本,左右坐标也是随着percent增加而增加,绘制完毕后的表现也是向右移动,不过是位于进度条弧形的左边,注意要准确测量文字的宽高,代码如下:
if (isShowProgressText && percent >= 0.1f) {
    progressTextPaint.run {
        textSize = halfHeight
        fontMetrics.let {
            val progressText = (percent * 100).toInt().toString() + "%"
            canvas.drawText(
                progressText,
                percent * width - progressTextPaint.measureText(progressText) - height / 5f,
                halfHeight - it.descent + (it.descent - it.ascent) / 2f,
                progressTextPaint
            )
        }
    }
}
暴露一个设置动画的方法。
/**
 * Start animator.
 *
 * @param timeInterpolator the interpolator to be used by this animation. The default value is
 * android.view.animation.AccelerateInterpolator.
 *
 * @param duration the length of the animation.
 */
@JvmOverloads
fun startAnimator(
    timeInterpolator: TimeInterpolator? = AccelerateInterpolator(),
    duration: Long
) =
    with(ObjectAnimator.ofFloat(this, "percent", 0f, percent)) {
        interpolator = timeInterpolator
        this.duration = duration
        start()
    }
/ PorterDuff.Mode /
来源
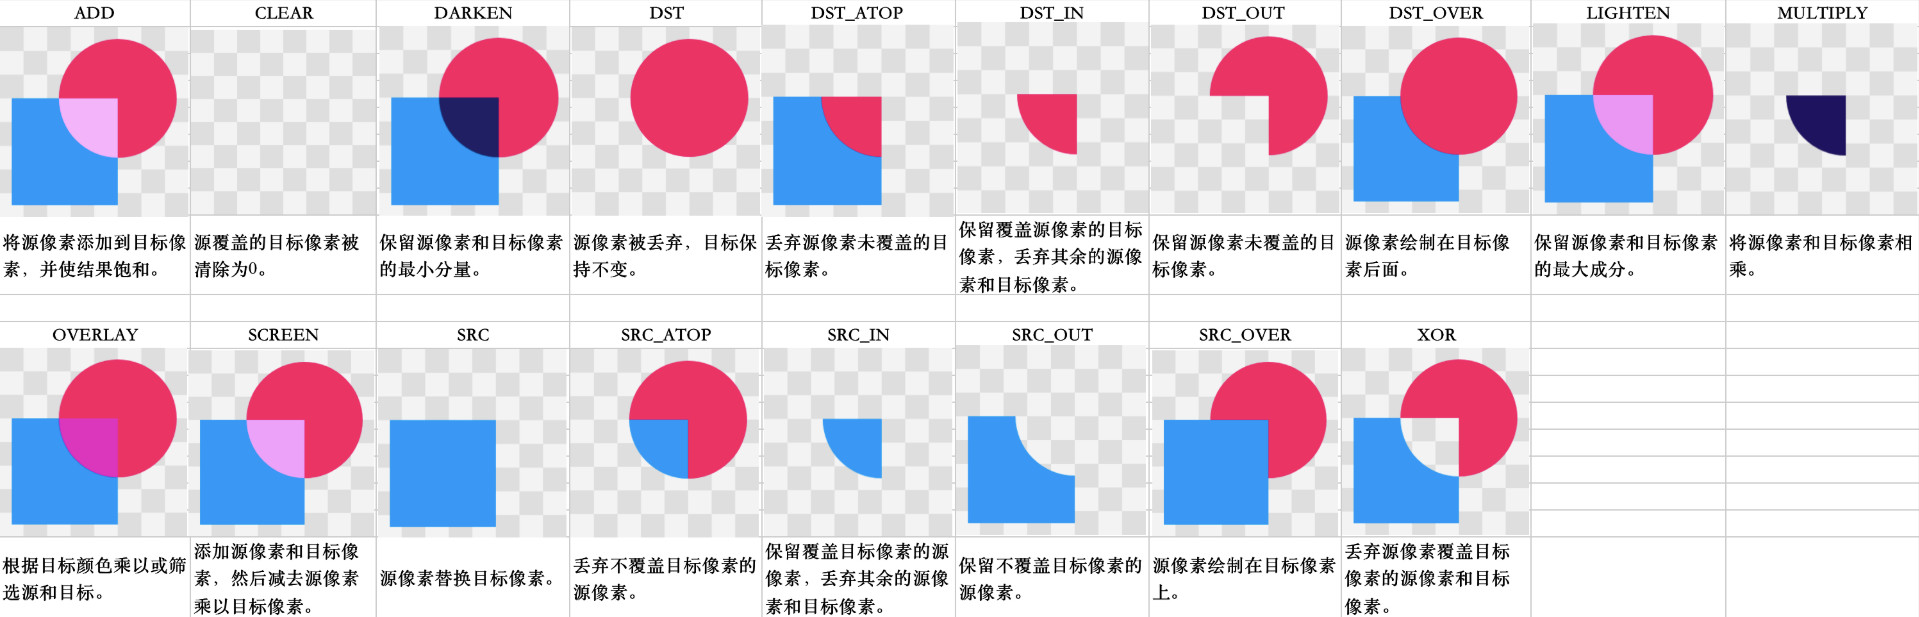
为什么叫PorterDuff呢?其实是两个人名来的,一个叫Thomas Porter,另一个叫Tom Duff,他们在1984年7月发表了Compositing Digital Images,描述了12个合成运算符。它们控制着要渲染的图像和渲染目标的内容组成的颜色,然后这个类还提供了除了那12种的其他几种混合模式,但是这些不是由这两人定义的,只是为了方便才在此类中,所以总共有18种。
源码
我们可以看下PorterDuff这个类,里面有个枚举Mode,代码如下:
public enum Mode {
    CLEAR       (0),
    SRC         (1),
    DST         (2),
    SRC_OVER    (3),
    DST_OVER    (4),
    SRC_IN      (5),
    DST_IN      (6),
    SRC_OUT     (7),
    DST_OUT     (8),
    SRC_ATOP    (9),
    DST_ATOP    (10),
    XOR         (11),
    DARKEN      (16),
    LIGHTEN     (17),
    MULTIPLY    (13),
    SCREEN      (14),
    ADD         (12),
    OVERLAY     (15);

    Mode(int nativeInt) {
        this.nativeInt = nativeInt;
    }

    /**
     * @hide
     */
    @UnsupportedAppUsage
    public final int nativeInt;
}
PorterDuff总共有18种模式,以下展示了这些模式对应的名字、图片和描述,可以点开图片查看,图片如下:
/ 延迟属性Lazy /
这个控件的代码也用上了延迟属性Lazy,代码如下:
private val progressTextPaint by lazy {
    TextPaint().apply {
        isAntiAlias = true
        isDither = true
        style = Paint.Style.FILL
        color = progressTextColor
    }
}
我们可以看到,lazy函数是接受一个Lambda表达式,如果函数最后一个参数是Lambda表达式的话,可以提到小括号外边,并且小括号也可以省略;调用延迟属性有这样的特征,第一次拿到属性的值(调用get方法)会执行已传递给函数的Lambda表达式并且记录结果,后续调用get()只是返回记录的结果。我们可以看下源码,提供了三个函数。
lazy(initializer: () -> T)
public actual fun <T> lazy(initializer: () -> T): Lazy<T> = SynchronizedLazyImpl(initializer)
这个函数接受一个Lambda表达式,并且返回Lazy,并且调用SynchronizedLazyImpl函数,而且我们可以得知多个线程去调用这个lazy函数是安全的,代码如下:
, Serializable {
    private var initializer: (() -> T)? = initializer
    @Volatile private var _value: Any? = UNINITIALIZED_VALUE
    // final field is required to enable safe publication of constructed instance
    private val lock = lock ?: this

    override val value: T
        get() {
            val _v1 = _value
            if (_v1 !== UNINITIALIZED_VALUE) {
                @Suppress("UNCHECKED_CAST")
                return _v1 as T
            }

            return synchronized(lock) {
                val _v2 = _value
                if (_v2 !== UNINITIALIZED_VALUE) {
                    @Suppress("UNCHECKED_CAST") (_v2 as T)
                } else {
                    val typedValue = initializer!!()
                    _value = typedValue
                    initializer = null
                    typedValue
                }
            }
        }

    override fun isInitialized(): Boolean = _value !== UNINITIALIZED_VALUE

    override fun toString(): String = if (isInitialized()) value.toString() else "Lazy value not initialized yet."

    private fun writeReplace(): Any = InitializedLazyImpl(value)
}
我们可以看到用的是**双重检查锁(Double Checked Locking)**来保证线程安全。
lazy(mode: LazyThreadSafetyMode, initializer: () -> T)
public actual fun <T> lazy(mode: LazyThreadSafetyMode, initializer: () -> T): Lazy<T> =
    when (mode) {
        LazyThreadSafetyMode.SYNCHRONIZED -> SynchronizedLazyImpl(initializer)
        LazyThreadSafetyMode.PUBLICATION -> SafePublicationLazyImpl(initializer)
        LazyThreadSafetyMode.NONE -> UnsafeLazyImpl(initializer)
    }
这个函数接受两个参数,一个是LazyThreadSafetyMode,另外一个是Lambda表达式,并且返回Lazy,LazyThreadSafetyMode是个枚举类,代码如下:
public enum class LazyThreadSafetyMode {
    SYNCHRONIZED,
    PUBLICATION,
    NONE,
}
使用SYNCHRONIZED可以保证只有一个线程初始化实例,实现细节在上面也说过了;使用PUBLICATION允许多个线程并发初始化值,但是只有第一个返回值用作实例的值;使用NONE不会有任何线程安全的保证以及的相关的开销,所以你如果你确认初始化总是发生在同一个线程的话可以用此模式,减少一些性能上的开销。
lazy(lock: Any?, initializer: () -> T)
public actual fun <T> lazy(lock: Any?, initializer: () -> T): Lazy<T> = SynchronizedLazyImpl(initializer, lock)
这个函数接受两个参数,一个是你使用指定的对象(lock)进行同步,另外一个是Lambda表达式,返回的是Lazy,调用的是SynchronizedLazyImpl函数,上面也说过了,这里不再赘述。
/ @JvmOverloads /
如果写一个有默认参数值的Kotlin函数,在Java中只会有个一个所有参数都存在的方法可以调用,如果希望向Java调用者暴露多个重载,可以使用**@JvmOverloads**注解。拿这个控件的代码举例,代码如下:
class CircularArcProgressView @JvmOverloads constructor(
    context: Context,
    attrs: AttributeSet? = null,
    defStyleAttr: Int = 0
) : View(context, attrs, defStyleAttr) {
    // 省略实现代码
}
反编译成Java代码,代码如下:
public final class CircularArcProgressView extends View {

   @JvmOverloads
   public CircularArcProgressView(@NotNull Context context, @Nullable AttributeSet attrs, int defStyleAttr) {
      // 省略实现代码
   }

  @JvmOverloads
   public CircularArcProgressView(@NotNull Context context, @Nullable AttributeSet attrs) {
      // 省略实现代码
   }

  @JvmOverloads
   public CircularArcProgressView(@NotNull Context context) {
      // 省略实现代码
   }
}