上一篇文章 记录了 webpack 初次安装与基础使用,本篇则是记录一下如何使用webpack构建一个比较完整,基础的项目
1. webpack 的4个核心概念
- 入口(entry):选择项目构建的入口模块,他会根据这个文件起点构建整个项目。
- 输出(output):构建编译后文件储存的目录,可将构建后的项目输出到指定文件夹。
- loader:可以使 webpack 处理非 js 类型的文件,并进行打包构建。
- 插件(plugins):比 loader 功能更加强大,可以执行更复杂的操作。
2. 本篇目标
使用 webpack 构建一个完整的前端项目,项目内容包括 js,html/css,图片文件。使项目能够正常构建,并在内置 dev 服务器上运行起来。
需要做的事情:
- 配置入口,输入。
- 相关配置:例如上一篇说到的以生产 or 开发模式打包,配置后不需要每次在命令后加入参数。
- 配置 loader,使 webpack 能够打包 css,图片等文件。
- 配置插件,打包 html,提取 css。
- 运行项目。
注意:所有命令的执行均在项目根目录下去执行。
3. 开始搭建项目

3.1 基础构建
根据第一篇文章中的方法,我们首先创建好一个基本的项目 blog2 :
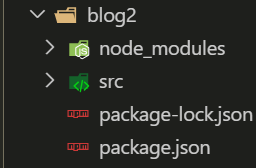
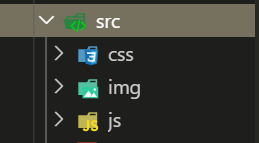
src为自定义文件夹,按照个人习惯建立以下结构:
3.2 配置前的准备
在根目录下新建 webpack.config.js 配置文件(与 package.json 同级),配置文件基础内容结构如下(官网有大量配置实例可供参考):
const path = require('path');

module.exports = {

};
注意:后续步骤中所有配置会在前一步骤配置基础上去增加,当前步骤配置会加粗,确保能够看到配置文件的整体结构,方便理解。
4. 开始配置 webpack 管理项目
4.1 入口与出口配置
const path = require('path');

module.exports = {

  entry: './src/js/index.js',

  output: {
    path: path.resolve(__dirname, 'dist'),
    filename: 'js/first-[hash].bundle.js'
  }

};
entry:用来配置入口文件路径,
output:
path:保存的路径及生成的文件夹的名字,我们这里使用dist,
filename:打包后的文件的名字(可带路径,例如例子中的是打包到 dist/js 文件夹中 ),使用 [hash] 可以生成带 hash 值的名字。
4.2 配置打包模式
上一篇文章我们说到,webpack 有开发模式与生产环境,如果不进行配置,会产生警告,我们之前使用的是在命令中去携带执行参数,现在我们在配置文件中加上它,这样更加方便,配置方式如下:
const path = require('path');

module.exports = {
  entry: './src/js/index.js',
  output: {
    path: path.resolve(__dirname, 'dist'),
    filename: 'js/first-[hash].bundle.js'
  },

  mode: 'production'

};
mode:有两个参数,开发模式 development,生产模式 production
4.3 配置 dev 服务器
我们入口,出口配置好之后,实际上就能打包运行了。但是在上一篇中,我们测试打包完成的 js 是自己建 html 并引入进行测试的,这样肯定是不适用于开发过程中的。我们可以借助于 webpack-dev-server 来启动本地服务,并进行代码的调试。
4.3.1 下载安装
npm install webpack-dev-server -s
4.3.2 配置
const path = require('path');

module.exports = {
  entry: './src/js/index.js',
  output: {
    path: path.resolve(__dirname, 'dist'),
    filename: 'js/first-[hash].bundle.js'
  },
  mode: 'production',

  devServer: {
    contentBase: './dist',
    inline: true
  }

};
devServer:
contentBase:需要运行的目录
inline:是否实时更新
port:可以设置端口号
4.3.3 简化配置
正常来说我们启动的命令是:
webpack-dev-server
比较麻烦,我们可以在 package.json 中去配置一下:
在 scripts 这一项中,可以配置自定义的 npm 要执行的命令,我们在这里面加上:
"scripts": {

  "dev": "webpack-dev-server --open --inline"

}
--open 代表自动打开浏览器页面 --inline 代表实时刷新
配置好后,我们在控制台输入:
npm run dev
便可以启动项目,启动后,我们实际在浏览器打开的是文件目录,并不是一个 html 页面,因为我们目前并没有打包 html 文件。
4.4 配置 loader
我们如果需要 webpack 打包非 js 文件, 我们需要进行安装配置,包括有 css,图片等文件的打包。loader 的种类非常多,可以在 官网 loaders 模块 查找到适合自己项目的 loader。我们接下来安装项目中需要的 loader:
4.4.1 下载安装:
安装 style-loader css-loader 用来打包 css 样式
npm install style-loader css-loader -s
安装 file-loader 用来打包文件
npm install file-loader -s
安装 html-withimg-loader 用来打包 html 内的图片
npm install html-withimg-loader -s
4.4.2 配置:
const path = require('path');

module.exports = {
  entry: './src/js/index.js',
  output: {
    path: path.resolve(__dirname, 'dist'),
    filename: 'js/first-[hash].bundle.js'
  },
  mode: 'production',
  devServer: {
    contentBase: './dist',
    inline: true
  },

  module: {
    rules: [
      { test: /\.css$/, use: ['style-loader', 'css-loader'] },
      { test: /\.(jpg|png|jpeg)$/, use: 'file-loader?limit=1024&name=./img/[name].[ext]' },
      { test: /\.html$/, use: 'html-withimg-loader' }
    ]
  }

};
注意:配置时,style-loader 需要放在前面,不然会报错。
module:
rules:
test:代表匹配的文件,支持正则表达式。
use:执行相应的 loader;值后面可带参数,与 url 类似,limit 指文件大小,name 则是设置文件的路径,名字,[name] 原文件名 [ext] 原文件后缀。
4.5 配置插件 plugins
前面我们配置了 loader 使 webpack 能够打包 css,图片,我们现在配置打包 html 所需要的内容。
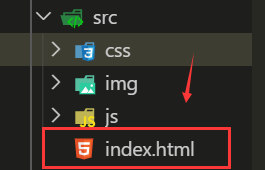
我们还需要在 src 目录下新建一个 index.html 文件,当作入口页面。
4.5.1 下载与安装
下载安装 html-webpack-plugin 用来打包 html 文件
npm install html-webpack-plugin -s
下载安装 extract-text-webpack-plugin 用来拆分打包 css,注意:需要安装 @next 最新版的
npm install extract-text-webpack-plugin@next -s
4.5.2 配置
const path = require('path');
const HtmlWebpackPlugin = require('html-webpack-plugin');
const ExtractTextPlugin = require('extract-text-webpack-plugin');

module.exports = {
  entry: './src/js/index.js',
  output: {
    path: path.resolve(__dirname, 'dist'),
    filename: 'js/first-[hash].bundle.js'
  },
  mode: 'production',
  devServer: {
    contentBase: './dist',
    inline: true
  },

  module: {
    rules: [
      {
        test: /\.css$/,
        use: ExtractTextPlugin.extract({
          fallback: 'style-loader',
          use: [{
            loader: 'css-loader'
          }],
          publicPath: '../'
        })
      },
      {
        test: /\.(jpg|png|jpeg)$/,
        use: 'file-loader?limit=1024&name=./img/[name].[ext]'
      },
      {
        test: /\.html$/,
        use: 'html-withimg-loader'
      }
    ]
  },

  plugins: [
    new ExtractTextPlugin('./css/[name].css'),
    new HtmlWebpackPlugin({
      template: './src/index.html',
      filename: 'index.html',
      minify:{
        // 去除引号
        removeAttributeQuotes: true,
        // 去除注释
        removeComments: true,
        // 去除空属性
        removeEmptyAttributes: true,
        // 去除空格回车
        collapseWhitespace: true
      }
    })
  ]

};
首先需要 require 引入插件,
分离 css 插件需要在 loader 设置中配合一起使用
如 ExtractTextPlugin.extract 的语法
publicPath 设置加载的路径,根据项目的路径进行调整
plugins:插件数组
new 创建 extract-text-webpack-plugin 对象
设置提取出的 css 位置与名字
new 创建 html-webpack-plugin 对象
template:使用主文件 html 的内容
import '../css/index.css'

console.log('hello word');
src/css/index.css:
body{
  background-color: aquamarine;
}
#div1{
  width: 200px;
  height: 100px;
  background-image: url('../img/1.jpg');
}
src/img/1.jpg
src/index.html
<!DOCTYPE html>
<html lang="zh-CN">
<head>
    <meta charset="UTF-8">
    <title>blog2</title>
    <meta http-equiv="X-UA-Compatible" content="IE=edge">
    <meta name="viewport" content="initial-scale=1.0, user-scalable=no, width=device-width">
</head>
<body>
  <div id="div1"></div>
  <div id="div2">
    第二个 div
    <img src="../src/img/1.jpg" alt="t1" width="300px">
  </div>
</body>
</html>
启动后,效果如下:
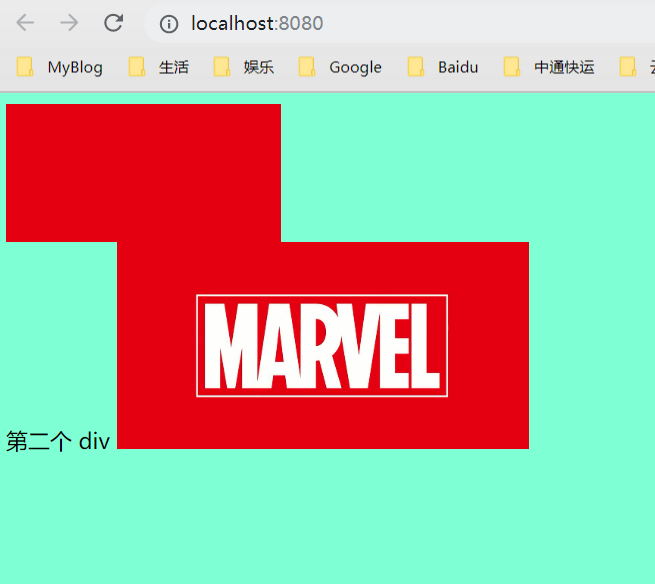

js,css,img 都能够正常加载,说明项目已经搭建起来了,有需要的小伙伴可以下载。
6. 总结
webpack 的功能是非常非常多的,我们学习它最好的方法,就是去看文档了。当然对于我这样的小白,可能看文档根本看不懂,但是在不断的尝试过程中,慢慢的开始对 webpack 的认识变的清晰起来。我建议新学的同学也可以先在网上看看例子,有一个大致了解,知道它是什么,能够做什么,以及基本的套路之后,再去看文档,会更加得心应手。
那么本篇基于 webpack 核心概念搭建的小项目已经全部完成了,后面可能会去学一些集成其它框架或者 js 的实践了。