事先表述一下:在做过一次嵌入式实验之后,发现安卓有一个轻量级异步类AsyncTask线程。AsyncTask每产生一个线程需要使用execute()或者executeOnExecuter()方法。其中execute()方式是产生串行线程,executeOnExecuter()方法产生并行线程。由于是轻量级类线程,封装了线程池,AsyncTask并不能无限的产生子线程,它所产生的线程并行最大数取决于设备的CPU核心数(核心数x2+1)。
通常我们写在子线程里面的操作,可以称为耗时任务(顾名思义就是耗时间的任务)。(先记住这个)
“ANR”是指程序在响应不灵敏的情况下,系统会弹出Dialog提示用户是否“继续等待”或者“强行关闭”。(这个也记住)
主线程在程序运行的时候被创建。
Android中主线程一般不宜写入太多任务,也是为了避免出现“ANR”情况,所以我们可以把耗时任务都写进子线程。那么主线程主要是干嘛呢?我认为主要是让其负责前台用户界面更新和及时响应用户的操作(控件交互),所以主线程也称为UI线程。
AsyncTask
在Android中创建子线程较为常用的方法就是继承AsyncTask这个类,然后调用execute()方法或者executeOnExecutor()方法创建,前者是串行子线程,后者是并行子线程。
线程中需要调用这几个方法:doInBackground()、publicProgress()、onProgressUpdate()。
doInBackground()是必须存在的,就相当于Thread的run()方法必须重写。
publicProgress()是帮onProgressUpdate()传递参数的。
onProgressUpdate()是更新数据的。
下面尝试使用AsyncTask来创建子线程:
public class MainActivity extends Activity {

	private TextView task_1;
	private TextView task_2;
	private TextView task_3;
	private TextView task_4;
	private TextView task_5;

	private Button t_one;
	private Button t_two;
	private Button t_three;
	private Button t_four;
	private Button t_five;

	@Override
	protected void onCreate(Bundle savedInstanceState) {
		super.onCreate(savedInstanceState);
		setContentView(R.layout.activity_main);

		task_1 = (TextView)findViewById(R.id.task_1);
		task_2 = (TextView)findViewById(R.id.task_2);
		task_3 = (TextView)findViewById(R.id.task_3);
		task_4 = (TextView)findViewById(R.id.task_4);
		task_5 = (TextView)findViewById(R.id.task_5);

		t_one = (Button)findViewById(R.id.t_one);
		t_two = (Button)findViewById(R.id.t_two);
		t_three = (Button)findViewById(R.id.t_three);
		t_four = (Button)findViewById(R.id.t_four);
		t_five = (Button)findViewById(R.id.t_five);

		t_one.setOnClickListener(new OnClickListener() {
			public void onClick(View v) {
				create(1);
			}
		});
		t_two.setOnClickListener(new OnClickListener() {
			public void onClick(View v) {
				create(2);
			}
		});
		t_three.setOnClickListener(new OnClickListener() {
			public void onClick(View v) {
				create(3);
			}
		});
		t_four.setOnClickListener(new OnClickListener() {
			public void onClick(View v) {
				create(4);
			}
		});
		t_five.setOnClickListener(new OnClickListener() {
			public void onClick(View v) {
				create(5);
			}
		});


	}

	public void create(int i) {
		CreateTask createTask = new CreateTask(this,i);
        /////注意这里,execute是串行的////////////////////////////
		createTask.execute();
	}

	//CreateTask继承AsyncTask
	class CreateTask extends AsyncTask<Void, Integer, Integer>{

		private Context context;
		private int i;

		//获取上下文
		CreateTask(Context context, int i){
			this.context = context;//this.context为此类下的context
			this.i = i;
		}

		//在doinbackground()之前运行的一个函数
		protected void onPreExecute() {
			Toast.makeText(
					context,
					"进入子线程",
					Toast.LENGTH_SHORT).show();
		}

		//这是后台运行方法,但不可以更新UI
		@Override
		protected Integer doInBackground(Void... params) {

			for(int i = 0; i < 10; i++) {
				publishProgress(i);
				try {
					Thread.sleep(200);
				} catch (InterruptedException e) {
					e.printStackTrace();
				}
			}

			return null;
		}

		//跳出doinbackground()之后执行onpostExecute
		public void onPostExecute(Integer integer) {
			Toast.makeText(
					context,
					"子线程"+i+"执行完!",
					Toast.LENGTH_SHORT).show();
		}


		protected void onProgressUpdate(Integer... values) {//这里的Integer... values适用于接收数组

			switch (i) {
			case 1:
				task_1.setText(""+values[0]);
				break;
			case 2:
				task_2.setText(""+values[0]);
				break;
			case 3:
				task_3.setText(""+values[0]);
				break;
			case 4:
				task_4.setText(""+values[0]);
				break;
			case 5:
				task_5.setText(""+values[0]);
				break;

			default:
				break;
			}
		}

	}


}
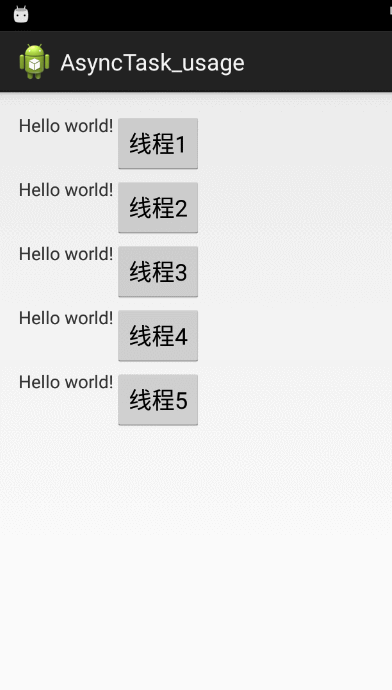
运行结果(这里可以看出,这里的子线程是串行的):
那么我们使用executeOnExecutor()来创建并行线程:直接把代码里的 execute()改为executeOnExecutor(AsyncTask.THREAD_POOL_EXECUTOR)即可,运行结果如下:
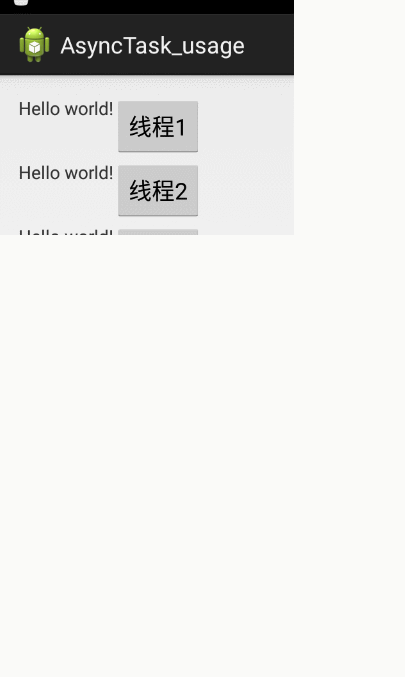
问:这里就是并行的子线程。心细的童鞋应该发现,到第4个子线程的时候,怎么不并行了呢?
答:因为线程并行的个数 取决于 设备的处理器的核心数(核心数x2+1)。
问:还有一点,大家都知道安卓UI更新需要在主线程(UI线程)进行对吧?为什么在这里可以在子线程中更新呢?
答:因为AsyncTask封装了Handler和线程池。Handler就是“帮助”子线程传递消息给主线程(UI线程)而进行更新UI的。
顺便说一下线程池:线程池是用于控制线程开销的,也就是阻止不必要的线程被创建,就比如有50个任务,每个任务内只需要执行0.01ms就可以执行完毕,如果创建50个线程进行执行,这无疑是一笔大开销,影响设备性能(这里能理解,得益于钟院所说的温室万一有几千个传感器的问题,线程能少创建尽量少创建)。简单点说,线程池是有固定数量的线程的,遏制线程过多被创建导致设备性能降低。据了解,AsyncTask的线程池只有5个子线程。
其实AsyncTask还有很多可深入的,下次再深入。
Runnable
在Java项目中,我们创建线程常用的就是Runnable接口,它不像AsyncTask的线程池那样限制线程数量的创建。
先给个错误代码给你们看看,看看找的出哪里有错。
protected void onCreate(Bundle savedInstanceState) {
super.onCreate(savedInstanceState);
setContentView(R.layout.activity_main);
task_1 = (TextView)findViewById(R.id.task_1);
task_2 = (TextView)findViewById(R.id.task_2);
task_3 = (TextView)findViewById(R.id.task_3);
task_4 = (TextView)findViewById(R.id.task_4);
task_5 = (TextView)findViewById(R.id.task_5);
t_one = (Button)findViewById(R.id.t_one);
t_two = (Button)findViewById(R.id.t_two);
t_three = (Button)findViewById(R.id.t_three);
t_four = (Button)findViewById(R.id.t_four);
t_five = (Button)findViewById(R.id.t_five);
//创建子线程
t_one.setOnClickListener(new OnClickListener() {
public void onClick(View v) {
Task_one task_one = new Task_one(1);
new Thread(task_one).start();
}
});
t_two.setOnClickListener(new OnClickListener() {
public void onClick(View v) {
Task_one task_two = new Task_one(2);
new Thread(task_two).start();
}
});
t_three.setOnClickListener(new OnClickListener() {
public void onClick(View v) {
Task_one task_three = new Task_one(3);
new Thread(task_three).start();
}
});
t_four.setOnClickListener(new OnClickListener() {
public void onClick(View v) {
Task_one task_four = new Task_one(4);
new Thread(task_four).start();
}
});
t_five.setOnClickListener(new OnClickListener() {
public void onClick(View v) {
Task_one task_five = new Task_one(5);
new Thread(task_five).start();
}
});
}
class Task_one implements Runnable{
private int i = 0;
public Task_one(int i) {
this.i = i;
}
public void run() {
// TODO 自动生成的方法存根
for(int j = 0; j <= 10; j++) {
switch (i) {
case 1:
task_1.setText(""+j);
break;
case 2:
task_2.setText(""+j);
break;
case 3:
task_3.setText(""+j);
break;
case 4:
task_4.setText(""+j);
break;
case 5:
task_5.setText(""+j);
break;
default:
break;
}
}
}
}
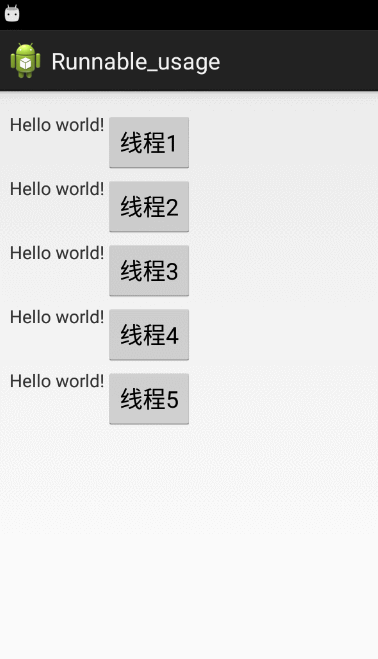
}看起来好像没什么毛病。
但是“意外停止”了:
我们来看看logcat: Only the original thread that created a view hierarchy can touch its views.这里的大概意思是只有在主线程下才可以操控控件的界面。我们回到代码看一下,有没有发现更新TextView是在run()方法里面:

这是不可取的,因为更新TextView就是更新UI,更新UI必须要在主线程(UI线程)中,不可在子线程中更新,而run()方法则是Runnable接口创建的子线程的重写方法,所以违反Android机制导致程序意外停止。
那我们怎么做?
写在主线程的runOnUiThread()方法中更新:
public class MainActivity extends Activity {
private TextView task_1;
private TextView task_2;
private TextView task_3;
private TextView task_4;
private TextView task_5;
private Button t_one;
private Button t_two;
private Button t_three;
private Button t_four;
private Button t_five;
public int Const1 = 0;
public int Const2 = 0;
public int Const3 = 0;
public int Const4 = 0;
public int Const5 = 0;
@Override
protected void onCreate(Bundle savedInstanceState) {
super.onCreate(savedInstanceState);
setContentView(R.layout.activity_main);
task_1 = (TextView)findViewById(R.id.task_1);
task_2 = (TextView)findViewById(R.id.task_2);
task_3 = (TextView)findViewById(R.id.task_3);
task_4 = (TextView)findViewById(R.id.task_4);
task_5 = (TextView)findViewById(R.id.task_5);
t_one = (Button)findViewById(R.id.t_one);
t_two = (Button)findViewById(R.id.t_two);
t_three = (Button)findViewById(R.id.t_three);
t_four = (Button)findViewById(R.id.t_four);
t_five = (Button)findViewById(R.id.t_five);
//刷新UI
new Thread(new Runnable() {
@Override
public void run() {
// TODO 自动生成的方法存根
try {
while(true) {
Thread.sleep(200);
runOnUiThread(new Runnable() {
@Override
public void run() {
task_1.setText(""+Const1);
task_2.setText(""+Const2);
task_3.setText(""+Const3);
task_4.setText(""+Const4);
task_5.setText(""+Const5);
}
});
}
} catch (InterruptedException e) {
}
}
}).start();
t_one.setOnClickListener(new OnClickListener() {
public void onClick(View v) {
Task_one task_one = new Task_one(1);
new Thread(task_one).start();
}
});
t_two.setOnClickListener(new OnClickListener() {
public void onClick(View v) {
Task_one task_two = new Task_one(2);
new Thread(task_two).start();
}
});
t_three.setOnClickListener(new OnClickListener() {
public void onClick(View v) {
Task_one task_three = new Task_one(3);
new Thread(task_three).start();
}
});
t_four.setOnClickListener(new OnClickListener() {
public void onClick(View v) {
Task_one task_four = new Task_one(4);
new Thread(task_four).start();
}
});
t_five.setOnClickListener(new OnClickListener() {
public void onClick(View v) {
Task_one task_five = new Task_one(5);
new Thread(task_five).start();
}
});
}
class Task_one implements Runnable{
private int i = 0;
public Task_one(int i) {
this.i = i;
}
public void run() {
// TODO 自动生成的方法存根
for(int j = 0; j <= 10; j++) {
try {Thread.sleep(500);} catch (InterruptedException e) {}
switch (i) {
case 1:
Const1 = j;
break;
case 2:
Const2 = j;
break;
case 3:
Const3 = j;
break;
case 4:
Const4 = j;
break;
case 5:
Const5 = j;
break;
default:
break;
}
}
}
}
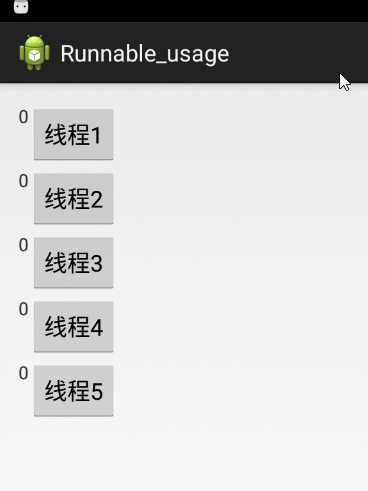
}运行结果(5个子线程并行):
综上,AsyncTask与Runnable各有好处,巧用哪个取决于项目需要。
本文两个demo,稍后给出。http://t.cn/AiCwwXLp
本文可能有些地方难以理解,下方文章可能会对你有帮助: