自定义属性与自定义Style
在使用一个自定义控件式我们常常在它的xml文件中看到如下的代码:
<com.example.administrator.tine.view.CustomCalendar
            android:id="@+id/cal"
            android:layout_width="match_parent"
            android:layout_height="wrap_content"
            android:layout_margin="10dp"
            android:background="@drawable/shape_circle"

            wxx:mCurrentBg="#6E6E6E"
            wxx:mCurrentBgDashPath="@array/customCalendar_currentDay_bg_DashPath"
            wxx:mCurrentBgStrokeWidth="1.5dip"/>
最后的三个属性很明显不是系统自带的,而是人为通过Xml中的declare-styleable标签来实现的。
declare-styleable标签的使用方法
自定义一个类如下:
public class MyStyleView extends AppCompatTextView {
    public MyStyleView(Context context) {
        super(context);
    }

    public MyStyleView(Context context, AttributeSet attrs) {
        super(context, attrs);
    }

    public MyStyleView(Context context, AttributeSet attrs, int defStyleAttr) {
        super(context, attrs, defStyleAttr);
    }
}
在res/values目录下新建attrs.xml文件
代码如下:
<resources>
    <!--name属性 取值对应所定义的类名,此处表示为MyStyleView类添加XML属性-->
    <declare-styleable name="MyStyleView">
        <attr name="header" format="reference"/>
        <attr name="headerHeight" format="dimension"/>
        <attr name="headerVisiableHeight" format="dimension"/>
        <attr name="age">
            <flag name="child" value="10"/>
            <flag name="young" value="18"/>
            <flag name="old" value="60"/>
        </attr>
    </declare-styleable>
</resources>
decare-styleable中的标签的用法
reference指的是从String.xml,drawable.xml,color.xml等文件中引用过来的值
flag是自定义的,类似于android:gravity=“top”
demension指的是从dimension.xml文件中引用过来的值。注意如果该处使用的是dp,就会进行像素转换。
使用如下:
<LinearLayout xmlns:android="http://schemas.android.com/apk/res/android"
    xmlns:app="http://schemas.android.com/apk/res-auto"
    android:orientation="vertical"
    android:layout_width="match_parent"
    android:layout_height="match_parent">

<wx.swpu.edu.pathmeasure.MyStyleView
        android:layout_width="match_parent"
        android:layout_height="match_parent"
        app:header="@drawable/dog"
        app:headerHeight="300dp"
        app:headerVisiableHeight="100dp"
        app:age="young"/>
header的取值是直接从其他的XML文件引用过来的,dimension表示尺寸,直接输入数字,flag相当于代码中的常量,比如这里的young就代表数字18.
在上面我们的自定义属性都是通过app:来指定的,这是因为我们上面的一行代码:
xmlns:app="http://schemas.android.com/apk/res-auto"
这个地方的xmlns:后面设置标签,想设置为什么就是什么。就是这个标签决定了我们访问自定义控件的方式app:XXX=“XXXX”.
在代码中获取自定义属性的值
使用代码获取用户锁定的某个属性的值,主要使用TypeArray类。这个类提供了获取某个属性值的所有方法。
例:
typeArray.getInt(int index,float defValue);
typeArray.getDimension(int index,float defValue);
typeArray.getBoolean(int index,float defValue);
typeArray.getColor(int index,float defValue);
typeArray.getString(int index);
typeArray.getDrawable(int index);
typeArray.getResources();
接下来在MyStyleView中获取我们在XML中定义的那些属性的值,然后将他们设置为显示的文字
TypedArray typedArray=context.obtainStyledAttributes(attrs,R.styleable.MyStyleView);
float headerHeight=typedArray.getDimension(R.styleable.MyStyleView_headerHeight,-1);
int age=typedArray.getInt(R.styleable.MyStyleView_age,-1);
typedArray.recycle();
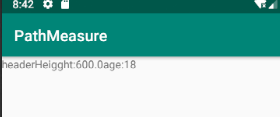
this.setText("headerHeigght:"+headerHeight+"age:"+age);
运行截图:
declare-styleable属性的用法:
<declare-styleable name="Name">
<!--reference:参考某一资源ID-->
	<attr name="background" format="reference"/>
	<!--color:颜色值-->
	<attr name="textColor" format="color"/>
	<!--Boolean:布尔值-->
	<attr name="focusable" format="boolean"/>
	<!--diemnsion:尺寸值-->
	<attr name="headerHeight" format="dimension"/>
	<!--float:浮点值-->
	<attr name="fromAlpha" format="float"/>
	<!--integer:整形值-->
	<attr name="frameDuration" format="integer"/>
	<!--字符串-->
	<attr name="apikey" format="string"/>
	<!--百分数-->
	<attr name="toDegrees" format="fraction"/>
	<!--枚举值-->
	<attr name="orientation">
		<enum name="horizontal" value="0"/>
		<enum name="vertical" value="1"/>
	</attr>
	<!--flag:位或运算-->
	<attr name="windowSoftInputMode">
		<flag name="stateUnspecified" value="0"/>
		<flag name="stateUnchanged" value="1" />
		<flag name="stateHidden" value="2"/>
		...
	</attr>
</declare-syuleable>
使用如下:
<ImageView

	<!--reference的使用-->
	android:background="@drawable/图片ID"
	<!--Color的使用-->
	android:textColor="#000ff0"
	<!--boolean的使用-->
	android:focusable="true"
	<!--diemndion的使用-->
	android:headerHeight="42dip"
	<!--float的使用-->
	android:fromAlpha="1.0"
	<!--integer的使用-->
	android:frameDuration="50"
	<!--string的使用-->
	android:apikey="ew98217e91ehquahwdiuka"
	<!--百分数的使用-->
	android:toDegrees="90%"
	<!--枚举类型的使用-->
	android:orientation="vertical"
	<!--flag位或运算的使用-->
	android:windowSoftInputMode="stateUnspecified|stateUnchanged|stateHidden"
/>
测量和布局
ViewGroup的绘制流程
绘制流程分为三步;测量、布局、绘制、分别对应onMeasure()、onLayout()、onDraw()函数;三个函数对应的作用:
- onMeasure:测量当前控件的大小,为正式布局提供建议
- onLayout:使用Layout函数对所有的子控件进行布局
- onDraw:根据布局的位置绘图
onMeasure函数于MeasureSpec
布局绘画涉及两个过程:测量过程和布局过程。测量过程通过measure函数来实现,是View树自顶向下的遍历,每个View在循环过程中将尺寸细节往下传递,当测量过程完成之后,所有的View都存储了自己的尺寸。布局过程则通过layout函数来实现,也是自顶向下的,在这个过程中,每个父View负责通过计算好的尺寸放置它的子View。
onMeasure函数
protected void onMeasure(int widthMeasureSpec,int heightMeasureSpec)
这个函数中的两个参数是父类传递过来的给当前View的一个建议值,即想把当前View的尺寸设置为宽widthMeasureSpec,高heightMeasureSpec
MeasureSpec的组成
由mode+size两部分组成。
widthMeasureSpec和heightMeasureSpec转换位二进制数字表示,他们都是32
位的,前2位代表的是模式,后30位代表数值
模式分类
- UNSPECIFIED(未指定):父元素不对子元素施加任何束缚,子元素可以得到任意想要的大小
- EXACTLY(完全):父元素决定子元素的确切大小,子元素将被限定在给定的边界里而忽略本身的大小
- AT_MOST(至多):子元素至多达到指定大小的值
对应的二进制:
UNSPECIFIED:00000000000000000000000000000000
EXACTLY: 01000000000000000000000000000000
AT_MOST:10000000000000000000000000000000
模式与数值的提取方法:
MeasureSpec.getMode(int spec)//提取模式
MeasureSpec.getSize(int spec)//提取数值
模式的用处
XML布局与模式的对应的关系
wrap_content->MeasureSpec.AT_MOST
match_parent->MeasureSpec.EXACTLY
具体值->MeasureSpec.EXACTLY
一般来说,当模式是Measure.EXACTLY时,就不必设定我么计算的数值了,因为这个大小是用户指定的,我们不应更改,但当模式是MeasureSpec.AT_MOST时,也就是说用户将布局设置成了wrap_content,就需要将大小设定位我们计算的值,因为用户根本没有设置具体值是什么,需要我们自己计算。
onLayout函数
onLayout是实现所有子控件布局的函数。
这是ViewGroup中的源码
@Override
protected abstract void onLayout(boolean changed,int l,int l,int t,int b);
这个函数位抽象函数,所有继承ViewGroup的View都需要重写这个函数。
onLayout和onMeasure的使用示例
XML布局:
<wx.swpu.edu.pathmeasure.MyLinearLayout xmlns:android="http://schemas.android.com/apk/res/android"
    xmlns:app="http://schemas.android.com/apk/res-auto"
    android:orientation="vertical"
    android:layout_width="match_parent"
    android:background="#ff00ff"
    android:layout_height="wrap_content">

	<TextView
	        android:text="第一个View"
	        android:layout_width="wrap_content"
	        android:layout_height="wrap_content"
	        android:background="#ff0000"/>

    <TextView
        android:text="第二个View"
        android:layout_width="wrap_content"
        android:layout_height="wrap_content"
        android:background="#0ff"/>

    <TextView
        android:text="第三个View"
        android:layout_width="wrap_content"
        android:layout_height="wrap_content"
        android:background="#fff0"/>

</wx.swpu.edu.pathmeasure.MyLinearLayout>
接下来看MyLinearLayout的代码实现:
public class MyLinearLayout extends ViewGroup {
    public MyLinearLayout(Context context) {
        super(context);
    }

    public MyLinearLayout(Context context, AttributeSet attrs) {
        super(context, attrs);
    }

    public MyLinearLayout(Context context, AttributeSet attrs, int defStyleAttr) {
        super(context, attrs, defStyleAttr);
    }

    /**
     * @param widthMeasureSpec
     * @param heightMeasureSpec
     * 总的来说onMeasure函数中计算出来的width和height就是当XML布局设置为layout_width="wrap_content"
     * layout_height="wrap_content"时所占的宽和高,即整个container所占的最小的矩形
     */
    @Override
    protected void onMeasure(int widthMeasureSpec, int heightMeasureSpec) {
        super.onMeasure(widthMeasureSpec, heightMeasureSpec);

        /**
         * 利用MeasureSpec来提取宽高和对应的模式
         */
        int measureWidth= MeasureSpec.getSize(widthMeasureSpec);
        int measureHeight=MeasureSpec.getSize(heightMeasureSpec);
        int measureWidthMode=MeasureSpec.getMode(widthMeasureSpec);
        int measureHeightMode=MeasureSpec.getMode(heightMeasureSpec);

        /**
         * 通过测量子控件来决定它所占位置的大小
         */
        int height=0;
        int width=0;
        int count=getChildCount();
        for(int i=0;i<count;i++){
            //测量子控件
            View child=getChildAt(i);
            measureChild(child,widthMeasureSpec,heightMeasureSpec);
            //获得子控件的高度和宽度
            int childWidth=child.getMeasuredWidth();
            int childHeight=child.getMeasuredHeight();
            //得到最大宽度,并且累加高度
            height+=childHeight;
            width=Math.max(childWidth,width);
        }
        setMeasuredDimension((measureWidthMode==MeasureSpec.EXACTLY)?measureWidth:width,(measureHeightMode== MeasureSpec.EXACTLY)?measureHeight:height);
    }

//根据自己的意愿把container内部的各个控件排列起来,在这里要实现的是将所有控件垂直排列
    @Override
    protected void onLayout(boolean changed, int l, int t, int r, int b) {
        int top=0;
        int count=getChildCount();
        for(int i=0;i<count;i++){
            View child=getChildAt(i);

			//调用layout函数设置子控件所在的位置
            int childHeight=child.getMeasuredHeight();
            int childWidth=child.getMeasuredWidth();

            //top代表控件的顶,top+childHeight代表Bottom
            child.layout(0,top,childWidth,top+childHeight);
            top+=childHeight;
        }
    }
}
运行截图:
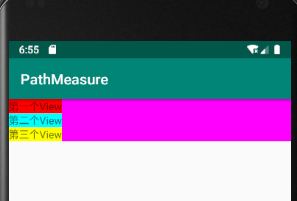
oMmeasure:首先是从父类传过来的建议宽和高,widthMeasureSpec和heightMeasureSpec,利用MeasureSpec从中提取宽高值和对应的模式。然后测量它所有的子控件来决定它所占的大小。
onLayout:根据自己的意愿把container内部的各个控件排列起来。
getMeasureWidth和getWidth的区别
- getMeasureWidth函数在measure过程结束后就可以获取到宽度值;而getWidth函数要在layout过程结束后才能获取到宽度值。
- getMeasureWidth函数中的值是通过setMeasureDimension函数来进行设置的;而getWidth函数中的值则是通过layout函数来进行设置的。
这两个函数的值在大多数的情况下值是相同的
在使用setMeasureDimension函数提供的测量结果只是位布局提供建议的,最终的取用与否要看layout函数,所以看这里重写的MyLinearLayout,是不是我们自己使用child.layout()函数来定义了各个子控件的所在位置?
在上面的示例中我们使用的是如下代码:
			int childHeight=child.getMeasuredHeight();
            int childWidth=child.getMeasuredWidth();

            //top代表控件的顶,top+childHeight代表Bottom
            child.layout(0,top,childWidth,top+childHeight)
从代码中我们可以看到我们是使用的child.layout()函数来定义各个子控件的位置的,由于layout函数中的参数是通过child.getMeasureHeight方法实现的,所以当我们使用getMeasureWidth和getWidth函数获得的返回值是一样的。若我们在使用child.layout()函数的时候传入与getMeasureWidth函数的返回值不一样的参数,那么我们使用getMeasureWidth和getWidth得到的返回值就是不一样的了。
container自己什么时候被布局
前面讲了container中子空间的布局,现在来看一下container的布局,对于container它当然也有父控件,它的布局是由它的父控件来完成的,就这样一层一层的向上由各自的父控件完成对自己的布局,自导所有的父控件的顶层结点。在所有控件的顶层有一个ViewRoot,他才是所有控件的祖先结点。
在ViewRoot的布局里,会调用自己的一个layout函数(不能被重载,在View.java中)
public final void layout(int l,int t,intg r,int b){
	boolean changed=setFrame(l,t,r,b);//设置每个视图位于父视图的坐标轴
	if(changhed||(mParivateFlags&LAYOUT_REQUIRED)==LAYOUT_REQUIRED){
		if(ViewDebug.TRACE_HIERARCHY){
			ViewDebug.trace(this,ViewDebug.HierarchyTraceType.ON_LAYOUT);
		}
		onLayout(changed,l,t,r,b);//回调onLayout函数,设置每个子视图的布局
		mPrivateFlags&=~LAYOUT_REQUIRED;
	}
	mPrivateFlags&=~FORCE_LAYOUT;
}
在setFrame中设置自己的位置,才会调用onlayout函数来设置内部的所有子控件。onMeasure和onLayout的了解就到这里了。
获取子控件margin值的方法
我们在设置margin的时候,必须要在onlayout函数中实现,如果仅仅在XML文件中添加margin属性的话是没有效果的,同时当我们在onlayout函数根据margin来布局,那么在onMeasure函数中计算container的大小的时候,也要加上Layout_margin参数,否则的话会导致container太小而控件显示不全的问题。
重写generateKayoutParams()和generateDefaultLayoutParams()函数
  @Override
    public LayoutParams generateLayoutParams(AttributeSet attrs) {
        return new MarginLayoutParams(getContext(),attrs);
    }

    @Override
    protected LayoutParams generateLayoutParams(LayoutParams p) {
        return new MarginLayoutParams(p);
    }

    @Override
    protected LayoutParams generateDefaultLayoutParams() {
        return new MarginLayoutParams(LayoutParams.MATCH_PARENT,LayoutParams.MATCH_PARENT);
    }
onMeasure的修改部分
 			MarginLayoutParams lp=(MarginLayoutParams) child.getLayoutParams();
            //宽度加上左右的margin,高度加上上下的margin
            int childWidth=child.getMeasuredWidth()+lp.leftMargin+lp.rightMargin;
            int childHeight=child.getMeasuredHeight()+lp.topMargin+lp.bottomMargin;
onLayout的修改部分
   			MarginLayoutParams lp=(MarginLayoutParams) child.getLayoutParams();
            int childHeight=child.getMeasuredHeight()+lp.topMargin+lp.bottomMargin;
            int childWidth=child.getMeasuredWidth()+lp.leftMargin+lp.rightMargin;
xml文件中添加margin属性
 <TextView
        android:text="第一个View"
        android:layout_marginTop="30dp"
        android:layout_width="wrap_content"
        android:layout_height="wrap_content"
        android:background="#ff0000"/>

    <TextView
        android:text="第二个View"
        android:layout_marginTop="30dp"
        android:layout_marginLeft="50dp"
        android:layout_width="wrap_content"
        android:layout_height="wrap_content"
        android:background="#0ff"/>

    <TextView
        android:text="第三个View"
        android:layout_marginTop="30dp"
        android:layout_width="wrap_content"
        android:layout_height="wrap_content"
        android:background="#fff0"/>
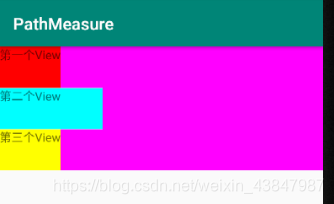
运行截图:
margin的实现原理
只有重写generateDefaultLayoutParams函数才能获取到控件的margin值。在container中初始化子控件时,会调用LayoutParams generateLayoutParams(LayoutParams p)函数来为子控件生成对应的布局属性,但默认指只生成layout_width和layout_height所对应的布局参数,所以在正常情况在调用generateLayoutParams()函数生成的LayoutParams示例是不可以获取到margin属性值的。
所以当我们要使用Margin相关的参数的时候,就只能重写generateLayoutParams函数
@Override
    public LayoutParams generateLayoutParams(AttributeSet attrs) {
        return new MarginLayoutParams(getContext(),attrs);
    }
由于generateLayoutParams函数的返回值LayoutParams实例,而MarginlayoutParams是派生自LayoutParams的,所以,根据类的多态性,需要将此时的LayourParams参数实例强转为MarginLayoutparams实例
所以会出现这样的一句代码:
MarginLayoutParams lp=(MarginLayoutParams) child.getLayoutParams();
generateLayoutParams与MarginLayoutParams函数的实现
在这两个函数源码中都是通过TypeArray解析自定义属性来获得用户的定义值的。在generlayoutParams函数所生成的LayoutParams属性只有layout_width和layout_height属性值,为MarginLayoutParams函数中还有Layout_margin属性值。所以我们必须写MarginLayoutParams()函数才可以是实现设置Margin属性。