本章主要实现注册登陆功能和游戏的主界面。有了游戏的界面,大家能有更直观的认识。
本章我们主要开发的是idlewow-game模块,其实就是游戏的客户端展示层。因为是放置游戏,为了方便,主要使用spring-mvc来开发,整个游戏形式是类似web端的文字mud游戏,会稍带一些图形图片。当然,游戏的客户端可以是多种多样的,也可以使用U3D开发成移动端或者C++/flash/silver light,开发成PC端、网页端、微端等等形式,但需要更多的美术资源。
一、注册登陆和角色创建
首先,我们把idlewow-game的框架搭建好,因为也是spring-mvc项目,可以基本参照前面的rms模块。各种配置,这里就不再赘述了。可以先把源代码下载下来,对照着看。
一)添加jsp页面
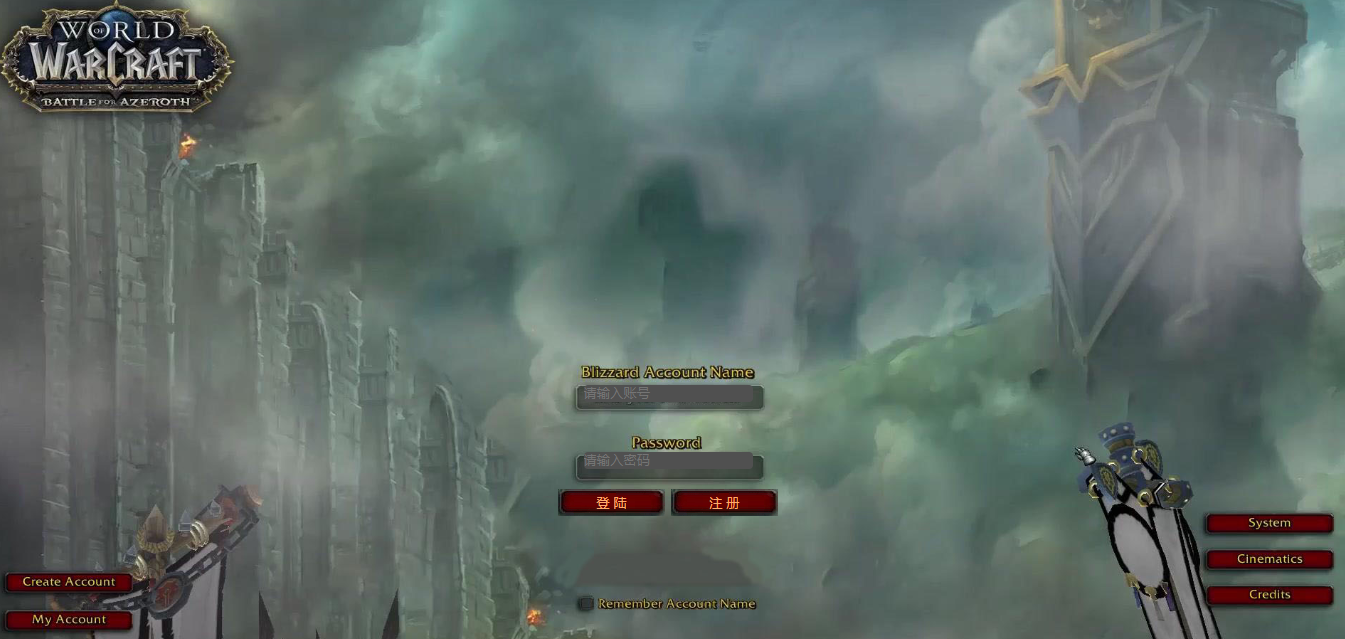
为了便于理解,这里我们先添加个首页,即登陆页面。其实就是一个背景图,带上登陆输入框和注册、登陆按钮。如下图,是我从网上随便找的一个背景图。这里,注册和登陆页面的展示,不需要经过controller做什么处理,直接在"/webapp/"目录下添加jsp页面即可。代码如下,比较简单,注意里面引用的css和js就不粘贴了。


<%@ page contentType="text/html;charset=UTF-8" language="java" %>
<% String path = request.getContextPath();%>
<html>
<head>
    <title>挂机魔兽</title>
    <link rel="stylesheet" href="<%=path%>/css/wow/base.css?v=0714">
    <script type="text/javascript" src="/js/jquery.min.js"></script>
    <style>
        .input-wow {
            background: rgb(80, 80, 80);
            border: gray;
            border-radius: 4px;
            color: white;
        }
    </style>
</head>
<body>
<div class="bg bg-index"></div>
<div style="text-align:center; width:100%;position:relative;top:58%;">
    <form id="form-login" method="post">
        <div style="margin: 10px;">
            <input type="text" name="username" placeholder="请输入账号" class="input-wow"/>
        </div>
        <div style="margin-top: 50px;">
            <input type="password" name="password" placeholder="请输入密码" class="input-wow"/>
        </div>
        <div style="margin: 20px;">
            <button type="button" class="btn-wow" onclick="login();">登 陆</button>
            <button type="button" class="btn-wow" onclick="location.href='/register.jsp';">注 册</button>
        </div>
    </form>
</div>
<script type="text/javascript" src="<%=path%>/js/wow/index.js?v=0714"></script>
</body>
</html>
<%@ page contentType="text/html;charset=UTF-8" language="java" %>
<html>
<head>
    <title>注册账号</title>
    <script type="text/javascript" src="/js/jquery.min.js"></script>
</head>
<body>
<form id="form-register" method="post">
    <div>
        <label>账号:</label>
        <input type="text" name="username" id="username"/>
    </div>
    <div>
        <label>密码:</label>
        <input type="password" name="password" id="password"/>
    </div>
    <div>
        <label>确认密码:</label>
        <input type="password" name="password2" id="password2"/>
    </div>
    <div>
        <button type="button" onclick="register();">注册</button>
        <button type="button" onclick="history.go(-1);">返回</button>
    </div>
</form>
<script type="text/javascript" src="/js/wow/register.js"></script>
</body>
</html>
好了,现在页面有了,接下来,在注册页面点击“注册”和登陆页面点击“登陆”按钮时,就需要controller来做后台逻辑处理了。
二)hessian客户端配置
在添加controller前,我们先把hessian客户端配置好。注意,在调用hessian接口的客户端,同样需要在pom中引用hessian的包。
因为game模块作为游戏的客户端展示层,本身不访问底层数据库,这里就需要调用上一章提供的hessian服务,来完成注册和登陆功能。hessian的服务端配置上一章已经讲过了,在调用时,上一章我们直接使用代码生成代理类进行测试。实际使用时,一般只需要配置一个xml文件,就可以在项目中引用对应的对象。
在game模块的"/resources/properties"目录下,添加 hessian.properties 文件,用来存放 hessian 服务的url地址,内容如下:
server.url=http://localhost:20000
再在"/resources/spring"目录下,添加 hessian-client.xml 文件,用来配置需要引用的接口地址(即hessian服务端暴露出的接口),内容如下:
<beans xmlns="http://www.springframework.org/schema/beans"
       xmlns:xsi="http://www.w3.org/2001/XMLSchema-instance"
       xmlns:util="http://www.springframework.org/schema/util"
       xsi:schemaLocation="
        http://www.springframework.org/schema/beans
        http://www.springframework.org/schema/beans/spring-beans.xsd
        http://www.springframework.org/schema/util
        http://www.springframework.org/schema/util/spring-util.xsd">

    <util:properties location="classpath:/properties/hessian.properties" id="hessian"/>

    <bean id="userService" class="org.springframework.remoting.caucho.HessianProxyFactoryBean">
        <property name="serviceUrl" value="#{hessian['server.url']}/remoting/UserService"/>
        <property name="serviceInterface" value="com.idlewow.user.service.UserService"/>
    </bean>
    <bean id="characterService" class="org.springframework.remoting.caucho.HessianProxyFactoryBean">
        <property name="serviceUrl" value="#{hessian['server.url']}/remoting/CharacterService"/>
        <property name="serviceInterface" value="com.idlewow.character.service.CharacterService"/>
    </bean>
</beans>
然后,在spring的上下文配置文件 applicationContext.xml 中,将这段配置引入即可,即:
<beans>
        ........
        <import resource="hessian-client.xml"/>
        ........
</beans>
全部配置完成,就可以在项目中引用并调用hessian服务了。注意,以后服务端每次添加新的接口,都需要在服务端和客户端的配置文件添加配置。
三)添加controller
页面完成后,点击“注册“和”登陆“按钮时,需要后台进行相应的逻辑处理,在spring-mvc框架下,就需要新建一个controller。
在com.idlewow.game.controller包下,新建一个类GameController,内容如下:
package com.idlewow.game.controller;

import com.idlewow.character.model.Character;
import com.idlewow.character.service.CharacterService;
import com.idlewow.common.model.CommonResult;
import com.idlewow.game.GameWorld;
import com.idlewow.user.model.UserAccount;
import com.idlewow.user.service.UserService;
import com.idlewow.util.cipher.MD5Util;
import org.apache.commons.lang3.StringUtils;
import org.apache.logging.log4j.LogManager;
import org.apache.logging.log4j.Logger;
import org.springframework.beans.factory.annotation.Autowired;
import org.springframework.stereotype.Controller;
import org.springframework.web.bind.annotation.RequestMapping;
import org.springframework.web.bind.annotation.RequestMethod;
import org.springframework.web.bind.annotation.ResponseBody;
import org.springframework.web.servlet.mvc.support.RedirectAttributes;

import javax.servlet.http.HttpServletRequest;
import javax.servlet.http.HttpSession;
import java.util.List;
import java.util.regex.Pattern;

@Controller
@RequestMapping("/game")
public class GameController {
    private static final Logger logger = LogManager.getLogger(GameController.class);

    @Autowired
    UserService userService;
    @Autowired
    CharacterService characterService;
    @Autowired
    private HttpSession httpSession;
    @Autowired
    private HttpServletRequest request;

    @ResponseBody
    @RequestMapping("/register")
    public Object register(String username, String password) {
        String ip = request.getRemoteAddr();
        String regex = "[a-zA-Z0-9]{6,20}";
        if (!Pattern.matches(regex, username)) {
            return CommonResult.fail("用户名应为6-20位英文字母、数字");
        }

        if (!Pattern.matches(regex, password)) {
            return CommonResult.fail("密码应为6-20位英文字母、数字");
        }

        String cipher = MD5Util.md5(password);
        CommonResult commonResult = userService.register(username, cipher, ip);
        return commonResult;
    }

    @ResponseBody
    @RequestMapping(value = "/login", method = RequestMethod.POST)
    public Object login(String username, String password) {
        String cipher = MD5Util.md5(password);
        CommonResult commonResult = userService.login(username, cipher);
        if (commonResult.isSuccess()) {
            UserAccount userAccount = (UserAccount) commonResult.getData();
            httpSession.setAttribute(GameWorld.SK_User, userAccount);
        }

        return commonResult;
    }

    @RequestMapping("/characters")
    public Object characterList(RedirectAttributes redirectAttributes) {
        try {
            UserAccount userAccount = (UserAccount) httpSession.getAttribute(GameWorld.SK_User);
            String userId = userAccount.getId();
            CommonResult commonResult = characterService.getUserCharacters(userId);
            if (!commonResult.isSuccess()) {
                throw new Exception("获取角色列表失败!" + commonResult.getMessage());
            }

            List<Character> list = (List<Character>) commonResult.getData();
            request.setAttribute("characters", list);
            return "/game/characters";
        } catch (Exception ex) {
            redirectAttributes.addFlashAttribute("error", ex.getMessage());
            return "redirect:/game/error";
        }
    }

    @RequestMapping("/createChar")
    public Object createChar() {
        return "/game/createChar";
    }

    @ResponseBody
    @RequestMapping(value = "/createChar", method = RequestMethod.POST)
    public Object createChar(String name, Integer faction, Integer race, Integer job) {
        UserAccount userAccount = (UserAccount) httpSession.getAttribute(GameWorld.SK_User);
        String userId = userAccount.getId();
        if (StringUtils.isBlank(name)) {
            return CommonResult.fail("角色昵称不能为空!");
        }

        if (name.length() < 2 || name.length() > 10) {
            return CommonResult.fail("角色昵称应为 2-10 个字符!");
        }

        String pattern = "^[\\u4e00-\\u9fa5_a-zA-Z0-9]+$";
        if (!Pattern.matches(pattern, name)) {
            return CommonResult.fail("角色名称只能包含汉字、英文字母、数字、下划线!");
        }

        if (faction == null) {
            return CommonResult.fail("请选择阵营!");
        }

        if (race == null) {
            return CommonResult.fail("请选择种族!");
        }

        if (job == null) {
            return CommonResult.fail("请选择职业!");
        }


        CommonResult commonResult = characterService.createCharacter(userId, name, faction, race, job);
        return commonResult;
    }

    @RequestMapping("/main")
    public Object main(String characterId, RedirectAttributes redirectAttributes) {
        if (characterId == null) {
            characterId = httpSession.getAttribute(GameWorld.SK_CharId).toString();
        }

        CommonResult commonResult = characterService.find(characterId);
        if (commonResult.isSuccess()) {
            Character character = (Character) commonResult.getData();
            httpSession.setAttribute(GameWorld.SK_CharId, characterId);
            request.setAttribute("character", character);
            return "/game/main";
        } else {
            redirectAttributes.addFlashAttribute("error", commonResult.getMessage());
            return "redirect:/game/error";
        }
    }

    @RequestMapping("/error")
    public Object error() {
        return "/game/error";
    }
}
其中,userService和characterService就是对hessian接口的引用。这里注解使用@Autowired或者@Resource均可。具体区别可以百度一下。
    @Autowired
    UserService userService;
    @Autowired
    CharacterService characterService;
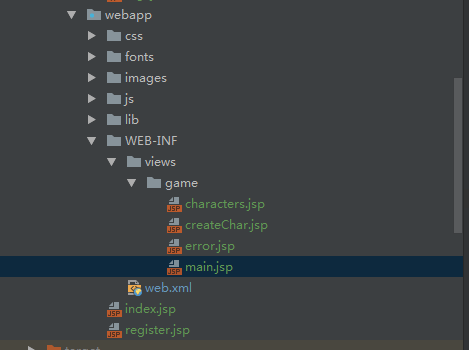
controller中的方法,对应提供了“注册”、“登陆”、“获取角色列表”、“创建角色”、“进入游戏主界面”、“错误页面”几个功能。其中,还需要对应的创建几个页面,目录结构如下图。页面代码就不粘贴了,可以下载源码查看。这里需要注意的是,由controller路由的页面,根目录是"/WEB-INF/views/”,这是我们在spring-mvc.xml中的视图解析节点配置的,属于mvc的路由机制。而前面的index.jsp和register.jsp,是直接从文件目录结构访问的,未参与mvc路由。
四)数据库设计
项目中用到的sql建表语句等,都在idlewow-doc目录下。这里账号表和角色表比较简单,sql里也有相应的注释。这里需要注意的是,角色表 user_character 中,有一个字段 extra_info。这个字段主要以json文本的形式存储一些缓存数据。比如角色身上的装备信息,角色所在的地图,等等等等。
试想一下,在游戏世界中,一个角色可能会频繁的进行更换装备、切换地图等操作,这些信息都需要记录。如果游戏中每个角色有此类动作时,都进行更新写库,对数据库会造成巨大的压力。因此这部分数据,会在游戏一开始时,读取到缓存中(比如redis)。在游戏进行时,只需要更新缓存数据。在游戏退出时,再将缓存中的数据写回数据库。
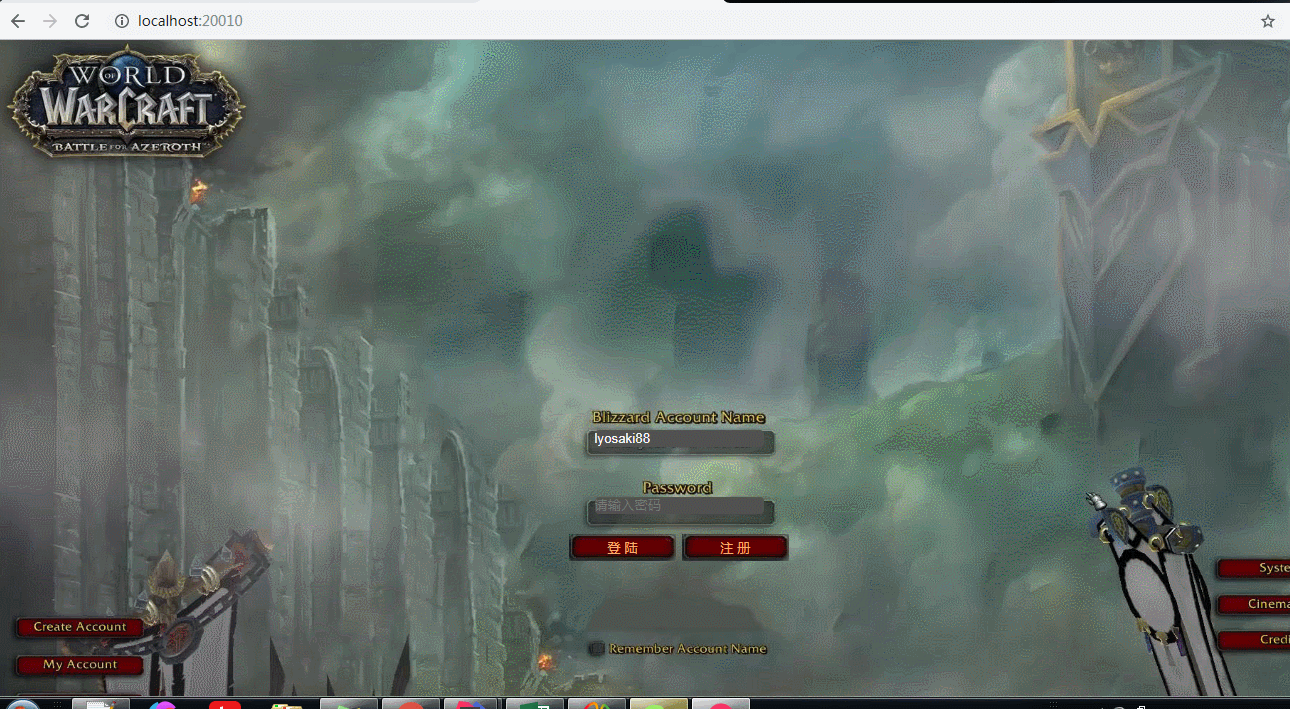
二、效果演示
小结
本章主要实现了游戏的主界面,但界面上的角色信息、战斗记录、地图信息及怪物信息等,目前都是静态文本,接下来只要一点点往上添加就行了。
本章的代码可能会有部分冗余,因为是从我已经开发好的分支上,直接拷贝过来的。有些代码可能目前还用不到,或者后期会有改进,有些地方是我还没想好最终会怎么做还在思考。看代码的时候,重点关注本章需要实现的内容就可以了,有些不合理的地方也可以自己发挥。
源码下载地址:https://545c.com/file/14960372-403554557
本文原文地址:https://www.cnblogs.com/lyosaki88/p/idlewow_11.html
项目交流群:329989095