本章主要来探讨一下,RN 的启动过程都做了什么?同时简单的介绍下在 Android 中是如何实现 ReactNative 的。进而引出解决一个重要的问题,ReactNative 的预加载。
ReactNative 系统框架概述
ReactNative 源码结构图如下:
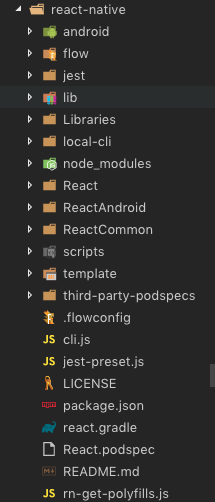
其中几个主要内容:
- Libraries:JS层的实现,实现了JS组件的封装与JS队列的封装
- ReactAndroid:Android 源码实现
- ReactCommon:C++ 层实现,实现了对脚本引擎JSC的封装与通信桥ReactBridge,Android与iOS调用
- React:ReactNative源码的主要内容
ReactNative 主要工作就两部分:
第一部分实现:ReactNative 应用启动流程;ReactNative应用UI的绘制与渲染;ReactNative应用通信机制;ReactNative应用线程模型
第二部分:ReactNative运行时的异常以及异常的捕获与处理;SOLoader加载动态链接库;ReactNative触摸事件处理机制。
我们先从一个 Demo 工程来看 ReactNative 启动流程
启动流程
应用初始化
首先,我们打开这个普通工程的 android 目录,这里就是一个完整的 android 项目。
- 首先我们看
MainApplication.java 里面的 RN 的初始化操作
       1


       2


       3


       4


       5


       6


       7


       8


       9


       10


       11


       12


       13


       14


       15


       16


       17


       18


       19


       20


       21


       22


       23


       24


       25


       26


       27


       28


       29


       30


       31


       32
|
public
class extends Application implements ReactApplication {
private
final ReactNativeHost mReactNativeHost =
new ReactNativeHost(
this) {
public boolean getUseDeveloperSupport() {
return BuildConfig.DEBUG;
}
protected List<ReactPackage> getPackages() {
return Arrays.<ReactPackage>asList(
new MainReactPackage()
);
}
protected String getJSMainModuleName() {
return
"index";
}
};
public ReactNativeHost getReactNativeHost() {
return mReactNativeHost;
}
public void onCreate() {
super.onCreate();
SoLoader.init(
this,
false);
}
}
|
ReactApplication 可以看到我们在Application里实现了 ReactApplication接口,该接口要求创建一个ReactNativeHost对象。ReactNativeHost 对象,本身持有 ReactInstanceManager 对象。其对外暴露两个需要实现的方法:
       1


       2


       3


       4


       5


       6


       7
|
public abstract boolean getUseDeveloperSupport();
protected abstract List<ReactPackage> getPackages();
|
ReactNativeHost主要的工作就是创建 ReactInstanceManager,创建部分代码如下:
       1


       2


       3


       4


       5


       6


       7


       8


       9


       10


       11


       12


       13


       14


       15


       16


       17


       18


       19


       20


       21


       22


       23


       24


       25


       26


       27


       28


       29


       30


       31


       32


       33


       34


       35


       36


       37
|
public
abstract
class ReactNativeHost {
protected ReactInstanceManager createReactInstanceManager() {
ReactInstanceManagerBuilder builder = ReactInstanceManager.builder()
.setApplication(mApplication)
.setJSMainModulePath(getJSMainModuleName())
.setUseDeveloperSupport(getUseDeveloperSupport())
.setRedBoxHandler(getRedBoxHandler())
.setJavaScriptExecutorFactory(getJavaScriptExecutorFactory())
.setUIImplementationProvider(getUIImplementationProvider())
.setJSIModulesPackage(getJSIModulePackage())
.setInitialLifecycleState(LifecycleState.BEFORE_CREATE);
for (ReactPackage reactPackage : getPackages()) {
builder.addPackage(reactPackage);
}
String jsBundleFile = getJSBundleFile();
if (jsBundleFile !=
null) {
builder.setJSBundleFile(jsBundleFile);
}
else {
builder.setBundleAssetName(Assertions.assertNotNull(getBundleAssetName()));
}
ReactInstanceManager reactInstanceManager = builder.build();
ReactMarker.logMarker(ReactMarkerConstants.BUILD_REACT_INSTANCE_MANAGER_END);
return reactInstanceManager;
}
}
|
- 接下来看 MainActivity.java
       1


       2


       3


       4


       5


       6


       7
|
public
class MainActivity extends ReactActivity {
@Override
protected
String getMainComponentName() {
return
"TestDemo";
}
}
|
这里我们的 MainActivity 继承自 ReactActivity,ReactActivity作为JS页面的容器。最后我们的前端界面的内容,就是渲染到了这个容器上面。(ReactActivity 后面介绍)
应用启动流程
我们开始分析 ReactActivity。ReactAcivity 本身继承自 Activity,并实现了其生命周期。本质上其什么也没有做,都是委托给了 ReactActivityDelegate。代码如下:
       1


       2


       3


       4


       5


       6


       7


       8


       9


       10


       11


       12


       13


       14


       15


       16


       17


       18


       19


       20


       21
|
public
abstract
class ReactActivity extends Activity
implements DefaultHardwareBackBtnHandler, PermissionAwareActivity {
private
final ReactActivityDelegate mDelegate;
protected ReactActivity() {
mDelegate = createReactActivityDelegate();
}
protected
@Nullable
String getMainComponentName() {
return
null;
}
protected ReactActivityDelegate createReactActivityDelegate() {
return
new ReactActivityDelegate(
this, getMainComponentName());
}
@Override
protected void onCreate(Bundle savedInstanceState) {
super.onCreate(savedInstanceState);
mDelegate.onCreate(savedInstanceState);
}
}
|
其本身所有行为都交给了 ReactActivityDelegate 来处理,我们只需要关心 ReactActivityDelegate 即可。
ReactActivityDelegate
我们先来看,ReactActivity 的 onCreate 方法,本质上映射到了 ReactActivityDelegate 的 onCreate。
ReactActivityDelegate.onCreate(Bundle savedInstanceState)
       1


       2


       3


       4


       5


       6


       7


       8


       9


       10


       11


       12


       13


       14


       15


       16


       17


       18


       19


       20


       21


       22


       23


       24


       25


       26


       27


       28


       29
|
public
class ReactActivityDelegate {
public ReactActivityDelegate(Activity activity, @Nullable String mainComponentName) {
mActivity = activity;
mMainComponentName = mainComponentName;
mFragmentActivity =
null;
}
protected void onCreate(Bundle savedInstanceState) {
if (mMainComponentName !=
null) {
loadApp(mMainComponentName);
}
}
protected void loadApp(String appKey) {
if (mReactRootView !=
null) {
throw
new IllegalStateException(
"Cannot loadApp while app is already running.");
}
mReactRootView = createRootView();
mReactRootView.startReactApplication(
getReactNativeHost().getReactInstanceManager(),
appKey,
getLaunchOptions());
getPlainActivity().setContentView(mReactRootView);
}
}
|
创建阶段主要了做了如下几个事情:
- 创建ReactRootView作为应用的容器,它本质上是一个FrameLayout。
- 调用ReactRootView.startReactApplication()进一步执行应用启动流程。
- 调用Activity.setContentView() 将创建的 ReactRootView 作为 ReactActivity的content view。
所以呢,RN 其实被渲染到了一个 ReactRootView 上面,他可以被用在 Android 任何地方(比如 RN 视图和 原生视图组合)。接下来我们看启动过程 startReactApplication。
ReactRootView.startReactApplication(ReactInstanceManager reactInstanceManager, String moduleName, @Nullable Bundle launchOptions)
简要代码如下:
       1


       2


       3


       4


       5


       6


       7


       8


       9


       10


       11


       12


       13


       14


       15


       16


       17


       18


       19


       20


       21


       22


       23


       24


       25


       26


       27
|
public
class ReactRootView extends SizeMonitoringFrameLayout
implements RootView, MeasureSpecProvide {
public void startReactApplication(
ReactInstanceManager reactInstanceManager,
String moduleName,
@Nullable Bundle initialProperties,
@Nullable String initialUITemplate) {
try {
UiThreadUtil.assertOnUiThread();
mReactInstanceManager = reactInstanceManager;
mJSModuleName = moduleName;
mAppProperties = initialProperties;
mInitialUITemplate = initialUITemplate;
if (!mReactInstanceManager.hasStartedCreatingInitialContext()) {
mReactInstanceManager.createReactContextInBackground();
}
attachToReactInstanceManager();
}
finally {
Systrace.endSection(TRACE_TAG_REACT_JAVA_BRIDGE);
}
}
}
|
参数信息:
- ReactInstanceManager reactInstanceManager:ReactInstanceManager 实例
- String moduleName:模块的名字,对应ReactActivity.getMainComponentName()与AppRegistry.registerComponent()
- Bundle launchOptions:Bundle 类型,可以在 startActivity 时候传递参数到 JS 层
(UiThreadUtil 主要包装了两个方法:UiThreadUtil.isOnUiThread(),UiThreadUtil.runOnUiThread(Runnable runnable))
主要还是调用了 ReactInstanceManager 上的 createReactContextInBackground 方法。
ReactInstanceManager.createReactContextInBackground()
       1


       2


       3


       4


       5


       6


       7


       8


       9


       10


       11


       12


       13


       14


       15


       16


       17


       18


       19


       20


       21


       22


       23


       24


       25


       26


       27


       28


       29


       30


       31


       32


       33


       34


       35


       36


       37


       38


       39


       40


       41


       42


       43


       44


       45


       46


       47


       48


       49


       50


       51


       52


       53


       54


       55


       56


       57


       58


       59


       60


       61


       62
|
public
class ReactInstanceManager {
@ThreadConfined(UI)
public void createReactContextInBackground() {
Log.d(ReactConstants.TAG,
"ReactInstanceManager.createReactContextInBackground()");
Assertions.assertCondition(
!mHasStartedCreatingInitialContext,
"createReactContextInBackground should only be called when creating the react " +
"application for the first time. When reloading JS, e.g. from a new file, explicitly" +
"use recreateReactContextInBackground");
mHasStartedCreatingInitialContext =
true;
recreateReactContextInBackgroundInner();
}
@ThreadConfined(UI)
private void recreateReactContextInBackgroundInner() {
UiThreadUtil.assertOnUiThread();
if (mUseDeveloperSupport && mJSMainModulePath !=
null) {
}
recreateReactContextInBackgroundFromBundleLoader();
}
@ThreadConfined(UI)
private void recreateReactContextInBackgroundFromBundleLoader() {
recreateReactContextInBackground(mJavaScriptExecutorFactory, mBundleLoader);
}
@ThreadConfined(UI)
private void recreateReactContextInBackground(
JavaScriptExecutorFactory jsExecutorFactory,
JSBundleLoader jsBundleLoader) {
UiThreadUtil.assertOnUiThread();
final ReactContextInitParams initParams =
new ReactContextInitParams(
jsExecutorFactory,
jsBundleLoader);
if (mCreateReactContextThread ==
null) {
runCreateReactContextOnNewThread(initParams);
}
else {
mPendingReactContextInitParams = initParams;
}
}
public ReactContextInitParams(
JavaScriptExecutorFactory jsExecutorFactory,
JSBundleLoader jsBundleLoader) {
mJsExecutorFactory = Assertions.assertNotNull(jsExecutorFactory);
mJsBundleLoader = Assertions.assertNotNull(jsBundleLoader);
}
}
|
这里创建过程从上到下执行,最后调用到 runCreateReactContextOnNewThread。该方法实际上就是新启了一个线程,来执行如下内容:
       1


       2


       3


       4


       5


       6


       7


       8


       9


       10


       11


       12


       13


       14


       15


       16


       17


       18


       19


       20


       21


       22


       23


       24


       25


       26


       27


       28


       29


       30


       31


       32


       33


       34


       35


       36


       37


       38


       39


       40


       41


       42


       43


       44


       45


       46


       47


       48


       49


       50


       51


       52


       53


       54


       55


       56


       57


       58


       59


       60


       61


       62


       63


       64


       65


       66


       67


       68


       69


       70


       71


       72


       73


       74


       75


       76


       77


       78


       79


       80


       81
|
final ReactApplicationContext reactApplicationContext =
createReactContext(
initParams.getJsExecutorFactory().create(),
initParams.getJsBundleLoader());
Runnable setupReactContextRunnable =
new Runnable() {
@Override
public void run() {
try {
setupReactContext(reactApplicationContext);
}
catch (Exception e) {
mDevSupportManager.handleException(e);
}
}
};
reactApplicationContext.runOnNativeModulesQueueThread(setupReactContextRunnable);
```
完成 ReactApplicationContext 的创建。我们看传入的两个参数:
* JsExecutorFactory jsExecutor:当该类被加载时,它会自动去加载
"reactnativejnifb.so"库,并会调用 Native 方
法 initHybrid() 初始化 C++层 RN 与 JSC通信的框架。
* JSBundleLoader jsBundleLoader:缓存了JSBundle的信息,封装了上层加载JSBundle的相关接口,CatalystInstance通过其间接调用ReactBridge 去加载J S文件,不同的场景会创建不同的加载器,具体可以查看类JSBundleLoader。
##### ReactInstanceManager.createReactContext( JavaScriptExecutor jsExecutor, JSBundleLoader jsBundleLoader)
简要代码如下
```java
public
class ReactInstanceManager {
private ReactApplicationContext createReactContext(
JavaScriptExecutor jsExecutor,
JSBundleLoader jsBundleLoader) {
final ReactApplicationContext reactContext =
new ReactApplicationContext(mApplicationContext);
NativeModuleCallExceptionHandler exceptionHandler = mNativeModuleCallExceptionHandler !=
null
? mNativeModuleCallExceptionHandler
: mDevSupportManager;
reactContext.setNativeModuleCallExceptionHandler(exceptionHandler);
NativeModuleRegistry nativeModuleRegistry = processPackages(reactContext, mPackages,
false);
CatalystInstanceImpl.Builder catalystInstanceBuilder =
new CatalystInstanceImpl.Builder()
.setReactQueueConfigurationSpec(ReactQueueConfigurationSpec.createDefault())
.setJSExecutor(jsExecutor)
.setRegistry(nativeModuleRegistry)
.setJSBundleLoader(jsBundleLoader)
.setNativeModuleCallExceptionHandler(exceptionHandler);
final CatalystInstance catalystInstance;
try {
catalystInstance = catalystInstanceBuilder.build();
}
finally {
Systrace.endSection(TRACE_TAG_REACT_JAVA_BRIDGE);
ReactMarker.logMarker(CREATE_CATALYST_INSTANCE_END);
}
if (mJSIModulePackage !=
null) {
catalystInstance.addJSIModules(mJSIModulePackage
.getJSIModules(reactContext, catalystInstance.getJavaScriptContextHolder()));
}
if (mBridgeIdleDebugListener !=
null) {
catalystInstance.addBridgeIdleDebugListener(mBridgeIdleDebugListener);
}
catalystInstance.runJSBundle();
reactContext.initializeWithInstance(catalystInstance);
return reactContext;
}
}
|
- 主要创建 JavaModule 表,交给 CatalystInstance 管理
- 处理ReactPackage,将JavaModule与JavaScriptModule放进各自对应的注册表里。
- 通过上面jsExecutor、nativeModuleRegistry、jsModulesRegistry、jsBundleLoader、exceptionHandler等参数创建CatalystInstance实例。
- 关联 ReactContext 与 CatalystInstance,并将JS Bundle加载进来,等待ReactContextInitAsyncTask结束以后调用JS入口渲染页面。
- 最后调用 CatalystInstance.runJSBundle()去加载 JS Bundle
最终由 C++ 中的JSCExecutor.cpp 完成了 JS Bundle 的加载。
这里起到作用的就是 CatalystInstance 他由 CatalystInstanceImpl 构造而成。查看代码:
CatalystInstanceImpl
       1


       2


       3


       4


       5


       6


       7


       8


       9


       10


       11


       12


       13


       14


       15


       16


       17


       18


       19


       20


       21


       22


       23


       24


       25


       26


       27


       28


       29


       30


       31


       32


       33


       34


       35


       36


       37


       38


       39


       40


       41


       42


       43


       44
|
public
class CatalystInstanceImpl implements CatalystInstance {
private
final HybridData mHybridData;
private native static HybridData initHybrid();
private native void initializeBridge(
ReactCallback callback,
JavaScriptExecutor jsExecutor,
MessageQueueThread jsQueue,
MessageQueueThread moduleQueue,
Collection<JavaModuleWrapper> javaModules,
Collection<ModuleHolder> cxxModules);
private CatalystInstanceImpl(
final ReactQueueConfigurationSpec reactQueueConfigurationSpec,
final JavaScriptExecutor jsExecutor,
final NativeModuleRegistry nativeModuleRegistry,
final JSBundleLoader jsBundleLoader,
NativeModuleCallExceptionHandler nativeModuleCallExceptionHandler) {
mHybridData = initHybrid();
mReactQueueConfiguration = ReactQueueConfigurationImpl.create(
reactQueueConfigurationSpec,
new NativeExceptionHandler());
mBridgeIdleListeners =
new CopyOnWriteArrayList<>();
mNativeModuleRegistry = nativeModuleRegistry;
mJSModuleRegistry =
new JavaScriptModuleRegistry();
mJSBundleLoader = jsBundleLoader;
mNativeModuleCallExceptionHandler = nativeModuleCallExceptionHandler;
mNativeModulesQueueThread = mReactQueueConfiguration.getNativeModulesQueueThread();
mTraceListener =
new JSProfilerTraceListener(
this);
initializeBridge(
new BridgeCallback(
this),
jsExecutor,
mReactQueueConfiguration.getJSQueueThread(),
mNativeModulesQueueThread,
mNativeModuleRegistry.getJavaModules(
this),
mNativeModuleRegistry.getCxxModules());
mJavaScriptContextHolder =
new JavaScriptContextHolder(getJavaScriptContext());
}
}
|
- ReactCallback callback:CatalystInstanceImpl的静态内部类ReactCallback,负责接口回调。
- JavaScriptExecutor jsExecutor:JS执行器,将JS的调用传递给C++层。
- MessageQueueThread jsQueue.getJSQueueThread():JS线程,通过mReactQueueConfiguration.getJSQueueThread()获得,
- Collection
javaModules:java modules,来源于mJavaRegistry.getJavaModules(this)。
- Collection
cxxModules):c++ modules,来源于mJavaRegistry.getCxxModules()。
CatalystInstanceImpl 创建好,调用 runJSBundle 来加载js
CatalystInstanceImpl.runJSBundle()
这个代码最后会调用,初始化创建 ReactInstanceManager -> createReactContext 传入的 JSBundleLoader bundleLoader 上的
       1


       2
|
mJSBundleLoader.loadScript(CatalystInstanceImpl.
this);
|
bundleLoader 由 ReactInstanceManagerBuilder.setJSBundleFile(String jsBundleFile) 创建而来
       1


       2


       3


       4


       5


       6


       7


       8


       9


       10


       11


       12


       13
|
       public ReactInstanceManagerBuilder setJSBundleFile(

       String jsBundleFile) {


       if (jsBundleFile.startsWith(

       "assets://")) {


               mJSBundleAssetUrl = jsBundleFile;


               mJSBundleLoader =

       null;


       return

       this;


           }


       return setJSBundleLoader(JSBundleLoader.createFileLoader(jsBundleFile));


       }


       public ReactInstanceManagerBuilder setJSBundleLoader(JSBundleLoader jsBundleLoader) {


           mJSBundleLoader = jsBundleLoader;


           mJSBundleAssetUrl =

       null;


       return

       this;


       }
|
JSBundleLoader 提供了多种加载方案,通过 ReactInstanceManagerBuilder.setJSBundleFile(String jsBundleFile) 调用的加载器如下:
       1


       2


       3


       4


       5


       6


       7


       8


       9


       10


       11


       12


       13


       14


       15


       16


       17


       18


       19
|
public
abstract
class JSBundleLoader {
public static JSBundleLoader createFileLoader(final String fileName) {
return createFileLoader(fileName, fileName,
false);
}
public static JSBundleLoader createFileLoader(
final String fileName,
final String assetUrl,
final boolean loadSynchronously) {
return
new JSBundleLoader() {
@Override
public String loadScript(CatalystInstanceImpl instance) {
instance.loadScriptFromFile(fileName, assetUrl, loadSynchronously);
return fileName;
}
};
}
public abstract String loadScript(CatalystInstanceImpl instance);
}
|
可以看到,在这种加载器下,最后调用的是 CatalystInstanceImpl 上的 loadScriptFromFile
       1


       2


       3


       4


       5


       6


       7


       8
|
public
class CatalystInstanceImpl implements CatalystInstance {
private native void jniLoadScriptFromFile(String fileName, String sourceURL, boolean loadSynchronously);
void loadScriptFromFile(String fileName, String sourceURL, boolean loadSynchronously) {
mSourceURL = sourceURL;
jniLoadScriptFromFile(fileName, sourceURL, loadSynchronously);
}
}
|
CatalystInstanceImpl.java 最终还是调用C++层的 CatalystInstanceImpl.cpp去加载JS Bundle。
接下来就是 C++ 部分了,不太会了呢。
ReactInstanceManager.setupReactContext(final ReactApplicationContext reactContext)
当 createContext 调用完毕后,C++ 会回调了 setupReactContextRunnable 线程,该线程调用的就是 setupReactContext 方法。代码如下
       1


       2


       3


       4


       5


       6


       7


       8


       9


       10


       11


       12


       13


       14


       15


       16


       17


       18


       19


       20


       21


       22


       23


       24


       25


       26


       27


       28


       29


       30


       31


       32


       33


       34


       35


       36


       37


       38


       39


       40


       41


       42


       43


       44


       45


       46


       47


       48


       49


       50


       51


       52


       53


       54


       55


       56


       57


       58


       59


       60


       61


       62
|
public
class ReactInstanceManager {
private void setupReactContext(final ReactApplicationContext reactContext) {
Log.d(ReactConstants.TAG,
"ReactInstanceManager.setupReactContext()");
ReactMarker.logMarker(PRE_SETUP_REACT_CONTEXT_END);
ReactMarker.logMarker(SETUP_REACT_CONTEXT_START);
Systrace.beginSection(TRACE_TAG_REACT_JAVA_BRIDGE,
"setupReactContext");
synchronized (mAttachedRootViews) {
synchronized (mReactContextLock) {
mCurrentReactContext = Assertions.assertNotNull(reactContext);
}
CatalystInstance catalystInstance =
Assertions.assertNotNull(reactContext.getCatalystInstance());
catalystInstance.initialize();
mDevSupportManager.onNewReactContextCreated(reactContext);
mMemoryPressureRouter.addMemoryPressureListener(catalystInstance);
moveReactContextToCurrentLifecycleState();
ReactMarker.logMarker(ATTACH_MEASURED_ROOT_VIEWS_START);
for (ReactRootView rootView : mAttachedRootViews) {
attachRootViewToInstance(rootView);
}
ReactMarker.logMarker(ATTACH_MEASURED_ROOT_VIEWS_END);
}
ReactInstanceEventListener[] listeners =
new ReactInstanceEventListener[mReactInstanceEventListeners.size()];
final ReactInstanceEventListener[] finalListeners =
mReactInstanceEventListeners.toArray(listeners);
UiThreadUtil.runOnUiThread(
new Runnable() {
@Override
public void run() {
for (ReactInstanceEventListener listener : finalListeners) {
listener.onReactContextInitialized(reactContext);
}
}
});
Systrace.endSection(TRACE_TAG_REACT_JAVA_BRIDGE);
ReactMarker.logMarker(SETUP_REACT_CONTEXT_END);
reactContext.runOnJSQueueThread(
new Runnable() {
@Override
public void run() {
Process.setThreadPriority(Process.THREAD_PRIORITY_DEFAULT);
ReactMarker.logMarker(CHANGE_THREAD_PRIORITY,
"js_default");
}
});
reactContext.runOnNativeModulesQueueThread(
new Runnable() {
@Override
public void run() {
Process.setThreadPriority(Process.THREAD_PRIORITY_DEFAULT);
}
});
}
}
|
ReactInstanceManager.attachRootViewToInstance 方法,重置 ReactRootView 内容,然后将ReactRootView作为根布局,作为根布局进行绘制。随后调用 rootView.setRootViewTag(rootTag); 设置内相关内容,调用 rootView.runApplication() 启动 js。
rootView.runApplication 里面就是包装了一些启动参数 launchOptions 与 模块名 jsAppModuleName。然后最终调用了
catalystInstance.getJSModule(AppRegistry.class).runApplication(jsAppModuleName, appParams) 方法:
检查下这个代码:
       1


       2


       3


       4


       5


       6


       7


       8


       9
|
public
interface AppRegistry extends JavaScriptModule {
void runApplication(String appKey, WritableMap appParameters);
void unmountApplicationComponentAtRootTag(int rootNodeTag);
void startHeadlessTask(int taskId, String taskKey, WritableMap data);
}
|
根据注释我们知道这有可能就是js层暴露给java的接口方法。?? (AppRegister.js)
原文:大专栏 ReactNative 详解(四) 源码之RN启动过程