之前我们了解了 Sentinel 集成 SpringBoot实现限流,也探讨了Sentinel的限流基本原理,那么接下去我们来学习一下Sentinel整合Dubbo及 Nacos 实现动态数据源的限流以及分布式限流。
先来看一下我的工程目录:
单服务的限流:
Provider :
首先从 api 模块开始:

其中只是定义了一个接口:
public interface SentinelService {
    String sayHello(String txt);
}
接下去来编写服务端的代码。
1.首先需要添加我们需要的依赖:
<dependency>
    <groupId>com.wuzz.demo</groupId>
    <artifactId>sentinel-dubbo-api</artifactId>
    <version>1.0-SNAPSHOT</version>
</dependency>
<dependency>
    <groupId>org.apache.dubbo</groupId>
    <artifactId>dubbo</artifactId>
    <version>2.7.2</version>
</dependency>
<dependency>
    <groupId>org.apache.curator</groupId>
    <artifactId>curator-recipes</artifactId>
    <version>4.0.1</version>
</dependency>
<dependency>
    <groupId>com.alibaba.csp</groupId>
    <artifactId>sentinel-dubbo-adapter</artifactId>
    <version>1.6.3</version>
</dependency>
<dependency>
    <groupId>com.alibaba.csp</groupId>
    <artifactId>sentinel-transport-simple-http</artifactId>
    <version>1.6.3</version>
</dependency>
2.我们需要编写接口的实现类并且发布成Dubbo服务:
@Service//把当前服务发布成dubbo服务
public class SentinelServiceImpl implements SentinelService {

    @Override
    public String sayHello(String txt) {
        return "hello world :" + LocalDateTime.now();
    }
}
3.添加 Dubbo相关配置,这里采用注解的方式:
@Configuration
@DubboComponentScan("com.wuzz.demo")
public class DubboConfig {

    @Bean
    public ApplicationConfig applicationConfig(){
        ApplicationConfig applicationConfig=new ApplicationConfig();
        applicationConfig.setName("sentinel-dubbo");
        applicationConfig.setOwner("wuzz");
        return applicationConfig;
    }
    @Bean
    public RegistryConfig registryConfig(){
        RegistryConfig registryConfig=new RegistryConfig();
        registryConfig.setAddress("zookeeper://192.168.1.101:2181");
        return registryConfig;
    }
    @Bean
    public ProtocolConfig protocolConfig(){
        ProtocolConfig protocolConfig=new ProtocolConfig();
        protocolConfig.setName("dubbo");
        protocolConfig.setPort(20880);
        return protocolConfig;
    }
}
4.配置文件 application.properties:
server.port = 8881
5.编写主启动类:
@SpringBootApplication
public class SentinelProviderApplication {
    public static void main(String[] args) throws IOException {
        initFlowRules();
        SpringApplication.run(SentinelProviderApplication.class, args);
        System.in.read();
    }

    //初始化规则
    private static void initFlowRules() {
        List<FlowRule> rules = new ArrayList<>(); //限流规则的集合
        FlowRule flowRule = new FlowRule();
        flowRule.setResource("com.wuzz.demo.SentinelService:sayHello(java.lang.String)");//资源(方法名称、接口)
        flowRule.setCount(10);//限流阈值 qps=10
        flowRule.setGrade(RuleConstant.FLOW_GRADE_QPS);//限流阈值类型(QPS 或并发线程数)
        //流量控制手段(直接拒绝、Warm Up、匀速排队)
        flowRule.setControlBehavior(RuleConstant.CONTROL_BEHAVIOR_DEFAULT);
        flowRule.setLimitApp("sentinel-web");//流控针对的调用来源,若为 default 则不区分调用来源
        rules.add(flowRule);
        FlowRuleManager.loadRules(rules);
    }
}
设置限流的基准:
Service Provider 用于向外界提供服务,处理各个消费者的调用请求。为了保护 Provider 不被激增的流量拖垮影响稳定性,可以给 Provider 配置 QPS 模式的限流,这样当每秒的请求量超过设定的阈值时会自动拒绝多的请求。限流粒度可以是服务接口和服务方法两种粒度。若希望整个服务接口的 QPS 不超过一定数值,则可以为对应服务接口资源(resourceName 为接口全限定名)配置 QPS 阈值;若希望服务的某个方法的 QPS 不超过一定数值,则可以为对应服务方法资源(resourceName 为接口全限定名:方法签名)配置 QPS 阈值.
LimitApp:
很多场景下,根据调用方来限流也是非常重要的。比如有两个服务 A 和 B 都向 Service Provider 发起调用请求,我们希望只对来自服务 B 的请求进行限流,则可以设置限流规则的 limitApp 为服务 B 的名称。Sentinel Dubbo Adapter 会自动解析 Dubbo 消费者(调用方)的 application name 作为调用方名称(origin),在进行资源保护的时候都会带上调用方名称。若限流规则未配置调用方(default),则该限流规则对所有调用方生效。若限流规则配置了调用方则限流规则将仅对指定调用方生效。
注:Dubbo 默认通信不携带对端 application name 信息,因此需要开发者在调用端手动将 applicationname 置入 attachment 中,provider 端进行相应的解析。Sentinel Dubbo Adapter 实现了一个 Filter 用于自动从 consumer 端向 provider 端透传 application name。若调用端未引入 Sentinel DubboAdapter,又希望根据调用端限流,可以在调用端手动将 application name 置入 attachment 中,key 为dubboApplication.
ControlBehavior:
当 QPS 超过某个阈值的时候,则采取措施进行流量控制。流量控制的手段包括以下几种:直接拒绝、Warm Up、匀速排队。对应 FlowRule 中的 controlBehavior 字段
- 直接拒绝(RuleConstant.CONTROL_BEHAVIOR_DEFAULT)方式是默认的流量控制方式,当QPS超过任意规则的阈值后,新的请求就会被立即拒绝,拒绝方式为抛出FlowException。这种方式适用于对系统处理能力确切已知的情况下,比如通过压测确定了系统的准确水位时
- Warm Up(RuleConstant.CONTROL_BEHAVIOR_WARM_UP)方式,即预热/冷启动方式,当系统长期处于低并发的情况下,流量突然增加到qps的最高峰值,可能会造成系统的瞬间流量过大把系统压垮。所以warmup,相当于处理请求的数量是缓慢增加,经过一段时间以后,到达系统处理请求个数的最大值
- 匀速排队(RuleConstant.CONTROL_BEHAVIOR_RATE_LIMITER)方式会严格控制请求通过的间隔时间,也即是让请求以均匀的速度通过,对应的是漏桶算法它的原理是,以固定的间隔时间让请求通过。当请求过来的时候,如果当前请求距离上个通过的请求通过的时间间隔不小于预设值,则让当前请求通过;否则,计算当前请求的预期通过时间,如果该请求的预期通过时间小于规则预设的 timeout 时间,则该请求会等待直到预设时间到来通过;反之,则马上抛出阻塞异常。可以设置一个最长排队等待时间: flowRule.setMaxQueueingTimeMs(5 * 1000); // 最长排队等待时间:5s这种方式主要用于处理间隔性突发的流量,例如消息队列。想象一下这样的场景,在某一秒有大量的请求到来,而接下来的几秒则处于空闲状态,我们希望系统能够在接下来的空闲期间逐渐处理这些请求,而不是在第一秒直接拒绝多余的请求。
Consumer :
1.添加依赖:
<dependency>
  <groupId>com.wuzz.demo</groupId>
  <artifactId>sentinel-dubbo-api</artifactId>
  <version>1.0-SNAPSHOT</version>
</dependency>
<dependency>
  <groupId>org.apache.dubbo</groupId>
  <artifactId>dubbo</artifactId>
  <version>2.7.2</version>
</dependency>
<dependency>
  <groupId>org.apache.curator</groupId>
  <artifactId>curator-recipes</artifactId>
  <version>4.0.1</version>
</dependency>
<dependency>
  <groupId>org.apache.dubbo</groupId>
  <artifactId>dubbo-spring-boot-starter</artifactId>
  <version>2.7.1</version>
</dependency>
2.consumer主要是对外提供服务的,我们需要一个controller:
@RestController
public class SentinelController {

    @Reference(timeout = 3000,check = false)
    SentinelService sentinelService;//proxy$0

    @GetMapping("/say")
    public String sayHello(){
        RpcContext.getContext().setAttachment("dubboApplication","sentinel-web");
        return sentinelService.sayHello("test");
    }

    @GetMapping("/say2")
    public String sayHello2(){
        return sentinelService.sayHello("test2");
    }
}
3.主启动类:
@SpringBootApplication
public class SentinelConsumerApplication {

    public static void main(String[] args) {
        SpringApplication.run(SentinelConsumerApplication.class, args);
    }

}
4.配置文件 application.properties :
server.port = 8882
dubbo.registry.address=zookeeper://192.168.1.101:2181
dubbo.scan.base-packages=com.wuzz.demo
dubbo.application.name=sentinel-web
服务端及客户端代码编写完毕,这个时候我们需要先启动Sentinel-Dashboard 以便直观的去看到限流的效果。然后启动服务端,并且在启动时加入 JVM 参数 -Dcsp.sentinel.dashboard.server=localhost:8080 指定控制台地址和端口。其他具体的参数如下:
-server
-XX:MaxHeapSize=128m
-Xms256m
-Xmx256m
-XX:PermSize=128M
-XX:MaxPermSize=256m
-Dproject.name=app-demo
-Dcsp.sentinel.dashboard.server=localhost:8080
-Dcsp.sentinel.log.use.pid=true
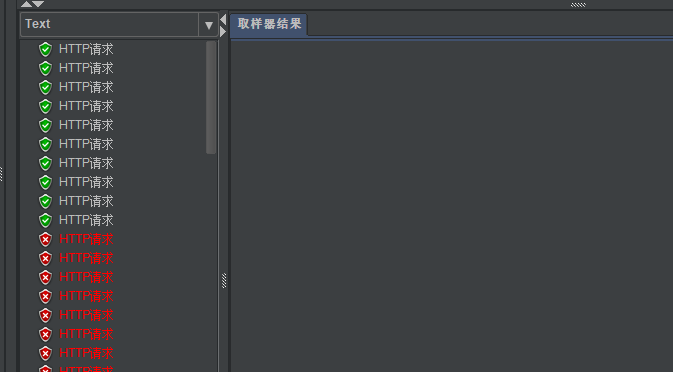
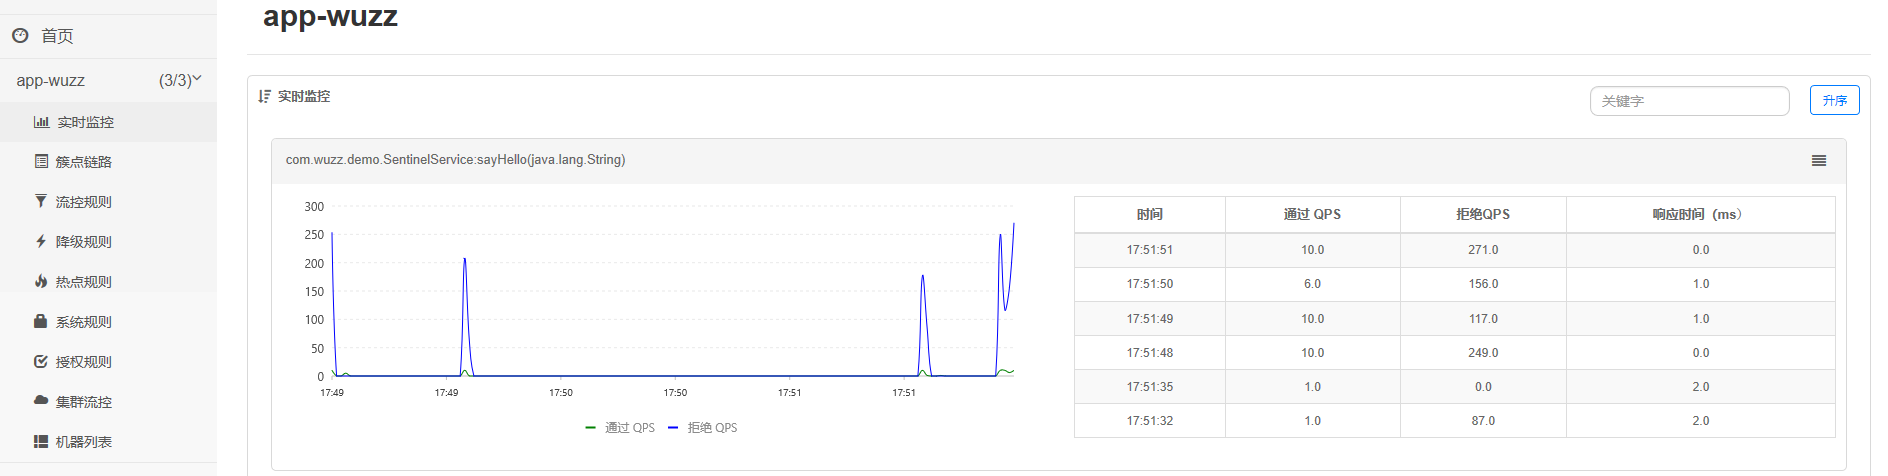
然后启动客户端,通过 JMeter 进行压测,结果如下:
另一方面我们启动了 Sentinel-Dashboard 所以我们可以通过控制台查看:

如何实现分布式限流:
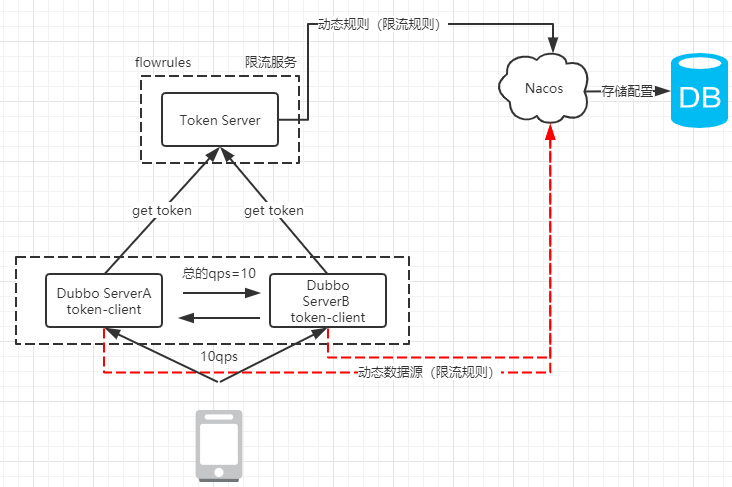
为什么要使用集群流控呢?假设我们希望给某个用户限制调用某个 API 的总 QPS 为 50,但机器数可能很多(比如有 100 台)。这时候我们很自然地就想到,找一个 server 来专门来统计总的调用量,其它的实例都与这台 server 通信来判断是否可以调用。这就是最基础的集群流控的方式。
另外集群流控还可以解决流量不均匀导致总体限流效果不佳的问题。假设集群中有 10 台机器,我们给每台机器设置单机限流阈值为 10 QPS,理想情况下整个集群的限流阈值就为 100 QPS。不过实际情况下流量到每台机器可能会不均匀,会导致总量没有到的情况下某些机器就开始限流。因此仅靠单机维度去限制的话会无法精确地限制总体流量。而集群流控可以精确地控制整个集群的调用总量,结合单机限流兜底,可以更好地发挥流量控制的效果。
集群流控中共有两种身份:
- Token Client:集群流控客户端,用于向所属 Token Server 通信请求 token。集群限流服务端会返回给客户端结果,决定是否限流。
- Token Server:即集群流控服务端,处理来自 Token Client 的请求,根据配置的集群规则判断是否应该发放 token(是否允许通过)。
要想使用集群流控功能,我们需要在应用端配置动态规则源,并通过 Sentinel 控制台实时进行推送。如下图所示:
搭建 Token-Server:
1.添加pom依赖:
<dependency>
  <groupId>com.alibaba.csp</groupId>
  <artifactId>sentinel-cluster-server-default</artifactId>
  <version>1.6.3</version>
</dependency>
<dependency>
  <groupId>com.alibaba.csp</groupId>
  <artifactId>sentinel-datasource-nacos</artifactId>
  <version>1.6.3</version>
</dependency>
<dependency>
  <groupId>com.alibaba.csp</groupId>
  <artifactId>sentinel-transport-simple-http</artifactId>
  <version>1.6.3</version>
</dependency>
2.dubbo中利用Nacos实现动态数据源要求实现 InitFunc 接口:
public class NacosDataSourceInitFunc implements InitFunc {

    private final String remoteAddress="localhost"; //nacos 配置中心的服务host
    private final String groupId="SENTINEL_GROUP";
    private final String FLOW_POSTFIX="-flow-rules"; //dataid(names+postfix)

    //意味着当前的token-server会从nacos上获得限流的规则
    @Override
    public void init() throws Exception {
        ClusterFlowRuleManager.setPropertySupplier(namespace ->{
            ReadableDataSource<String, List<FlowRule>> rds=
                    new NacosDataSource<List<FlowRule>>(remoteAddress,groupId,namespace+FLOW_POSTFIX,
                            source -> JSON.parseObject(source,new TypeReference<List<FlowRule>>(){}));
            return rds.getProperty();
        });
    }
}
然后需要在META-INF/services 下添加拓展点文件 com.alibaba.csp.sentinel.init.InitFunc 。其内容就是我们的实现:
com.wuzz.demo.NacosDataSourceInitFunc
3.主启动类:
public class ClusterServer {

    public static void main(String[] args) throws Exception {
        ClusterTokenServer tokenServer=new SentinelDefaultTokenServer();
        ClusterServerConfigManager.loadGlobalTransportConfig(
                new ServerTransportConfig().setIdleSeconds(600).setPort(9999));
        ClusterServerConfigManager.loadServerNamespaceSet(Collections.singleton("app-wuzz")); //设置成动态
        tokenServer.start();
    }
}
启动Sentinel-dashboard:
java -Dserver.port=8080 -Dcsp.sentinel.dashboard.server=localhost:8080 -Dproject.name=sentinel-dashboard -XX:MaxHeapSize=128m -Xms256m -Xmx256m -XX:PermSize=128M -XX:MaxPermSize=256m -jar sentinel-dashboard-1.6.3.jar
启动nacos以及增加配置:Data Id=app-wuzz-flow-rules,Group=SENTINEL_GROUP
[
    {
        "resource":"com.wuzz.demo.SentinelService:sayHello(java.lang.String)",
        "grade":1, //限流模式 qps
        "count":10, // 限流总阈值
        "clusterMode":true, //集群模式 true
        "clusterConfig":{
            "flowId":100001,//全局唯一ID
            "thresholdType":1,//阈值模式,全局阈值
            "fallbackToLocalWhenFail":true //client连接失败使用本地限流模式
        }
    }
]
启动 Token-Server 并且添加以下JVM参数,将其加入到 Sentinel-Dashboard中进行管理:
-server -Dproject.name=app-wuzz -Dcsp.sentinel.dashboard.server=localhost:8080 -Dcsp.sentinel.log.use.pid=true
电脑内存不足加入 -XX:MaxHeapSize=128m -Xms256m -Xmx256m -XX:PermSize=128M -XX:MaxPermSize=256m。服务启动之后,在$user.home$/logs/csp/ 可以找到sentinel-record.log.pid*.date文件,如果看到日志文件中获取到了远程服务的信息,说明token-server启动成功了,也可以通过Sentinel-Dashboard看到注册的列表:

Provider :
1.添加pom依赖:
<dependency>
  <groupId>com.alibaba.csp</groupId>
  <artifactId>sentinel-cluster-client-default</artifactId>
  <version>1.6.3</version>
</dependency>
<dependency>
  <groupId>com.alibaba.csp</groupId>
  <artifactId>sentinel-datasource-nacos</artifactId>
  <version>1.6.3</version>
</dependency>
2.在META-INF/services 下添加拓展点文件 com.alibaba.csp.sentinel.init.InitFunc 。其内容就是我们的实现,刚刚哎token-server中配置的是直接从Nacos中获取。在服务端配置如下:
public class NacosDataSourceInitFunc implements InitFunc {


    private final String CLUSTER_SERVER_HOST="localhost"; //token-server的地址
    private final int CLUSTER_SERVER_PORT=9999;
    private final int REQUEST_TIME_OUT=200000; //请求超时时间

    private final String APP_NAME="app-wuzz"; //namespace

    //nacos的配置()
    private final String remoteAddress="localhost"; //nacos 配置中心的服务host
    private final String groupId="SENTINEL_GROUP";
    private final String FLOW_POSTFIX="-flow-rules"; //dataid(names+postfix)

    //意味着当前的token-server会从nacos上获得限流的规则
    @Override
    public void init() throws Exception {
        //加载集群-信息
        loadClusterClientConfig();

        registryClusterFlowRuleProperty();
    }

    private void loadClusterClientConfig(){
        ClusterClientAssignConfig assignConfig=new ClusterClientAssignConfig();
        assignConfig.setServerHost(CLUSTER_SERVER_HOST);
        assignConfig.setServerPort(CLUSTER_SERVER_PORT);
        ClusterClientConfigManager.applyNewAssignConfig(assignConfig);

        ClusterClientConfig clientConfig=new ClusterClientConfig();
        clientConfig.setRequestTimeout(REQUEST_TIME_OUT);
        ClusterClientConfigManager.applyNewConfig(clientConfig);
    }

    //注册动态数据源
    private void registryClusterFlowRuleProperty(){
        ReadableDataSource<String, List<FlowRule>> rds=
                new NacosDataSource<List<FlowRule>>(remoteAddress,groupId,APP_NAME+FLOW_POSTFIX,
                        source -> JSON.parseObject(source,new TypeReference<List<FlowRule>>(){}));
        FlowRuleManager.register2Property(rds.getProperty());
    }

}
3.修改主启动类:
@SpringBootApplication
public class SentinelProviderApplication {
    public static void main(String[] args) throws IOException {//表示当前的节点是集群客户端
        ClusterStateManager.applyState(ClusterStateManager.CLUSTER_CLIENT);
        SpringApplication.run(SentinelProviderApplication.class, args);
        System.in.read();
    }
}
启动服务端并且将其加入到Sentinel-Dashboard中,另外这里再添加JVM参数的时候需要注意,这里的project-name要包含在token-server中配置的namespace中,token server 会根据客户端对应的 namespace(默认为 project.name 定义的应用名)下的连接数来计算总的阈值,我这里设置成app-wuzz.:
-server
-XX:MaxHeapSize=128m
-Xms256m
-Xmx256m
-XX:PermSize=128M
-XX:MaxPermSize=256m
-Dproject.name=app-wuzz
-Dcsp.sentinel.dashboard.server=localhost:8080
-Dcsp.sentinel.log.use.pid=true
服务启动之后,在$user.home$/logs/csp/ 可以找到sentinel-record.log.pid*.date文件,如果看到日志文件中获取到了token-server的信息,说明连接成功了。
由于我们要实现分布式限流,也就是需要部署我们的局群服务,我们可以利用IDEA来实现:添加一个 SentinelProviderApplication。同时运行两个程序:
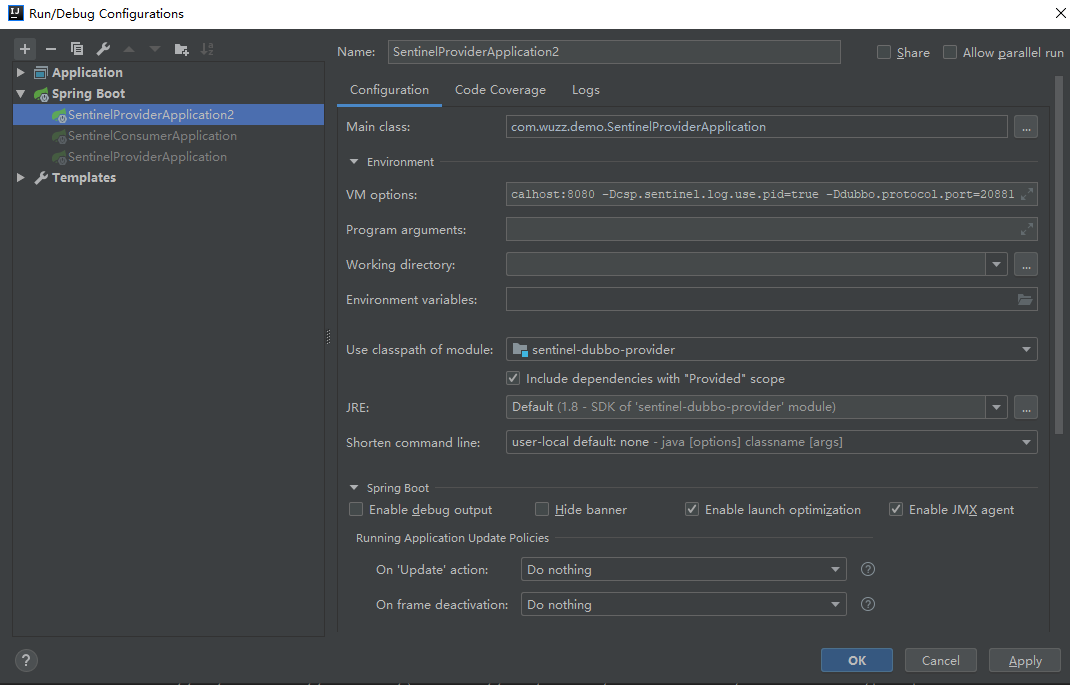
这里 JVM 参数需要多增加一个 -Ddubbo.protocol.port=20881 才可以。然后我们启动两个服务及客户端。通过JMeter 压测就可以看到结果(多发几次请求),我们也可以直接看Sentinel-Dashboard:
就这样实现了分布式限流。