博主声明:
转载请在开头附加本文链接及作者信息,并标记为转载。本文由博主 威威喵 原创,请多支持与指教。
本文首发于此 博主:威威喵 | 博客主页:https://blog.csdn.net/smile_running
感受 Material Design UI 魅力,你不能错过的 Material Design 全系列文章:
Material Design 之一 BottomNavigationView + ViewPager + Fragment 仿微信底部导航效果
Material Design 之二 Toolbar + DrawerLayout + NavigationView 实现QQ侧拉抽屉效果
Material Design 之三 TabLayout + ViewPager + Fragment 今日头条标题切换效果
Material Design 之四 SwipeRefreshLayout + CardView + RecyclerView 精美瀑布流效果
Material Design 之五 CoordinatorLayout + AppBarLayout 提供最佳浏览体验
Material Design 之六 CollapsingToolbarLayout + FloatingActionButton 打造精美详情界面
Material Design 之七 TextInputLayout+TextInputEditText 打造精美的登录界面
Material Design 提供的 View 都是非常精美的,为了使我们 Android ui 开发时更简单的绘制出效果更佳、且更好看、美观的 View,所以 Google 出了一个 design lib,里面包含了丰富的 View,并且都非常 nice,运用上 Material Design 设计,可以让我们的 app 显得更加美观,我个人是这样认为的,至少在我的角度上看,是真的很有风范。
这一篇文章作为 Material Design View 系列的开头篇,之后我会把 Material Design 库中所有的 View 的基本使用写一个系列的教程,数了一下好像还挺多的,但是咱们学习的热情是阻止不了的。
这个系列头一篇,我就想把这几个最最常用的,也是最容易使用的给先介绍和使用一下,Material Design 中还有一些 View 特效是比较难理解的,我们循循渐进,一步一步的搞定它们。
开头扯了一点个人想法以及内容的介绍,现在我们要请出本篇主角 BottomNavigationView。一看这个名字,又是 bottom 又是 navigation,一猜不久猜出来了嘛。没错,几乎是我们每一个 app 都有的底部导航几个按钮,这个哥们单独使用起来真没意义,但是配合我们的 ViewPager + Fragment 那就是另一番天地,看下我们要实现的效果:

好了,我们今天就要做这样的效果,总体来说难度不大,ViewPager + Fragment 应该大部分都使用过了吧,或者听过就行了,只要你大概了解它有什么功能就好了,不了解的自己去补一补,那开始吧。
一开始,要加入库依赖,然后 sync 一下:
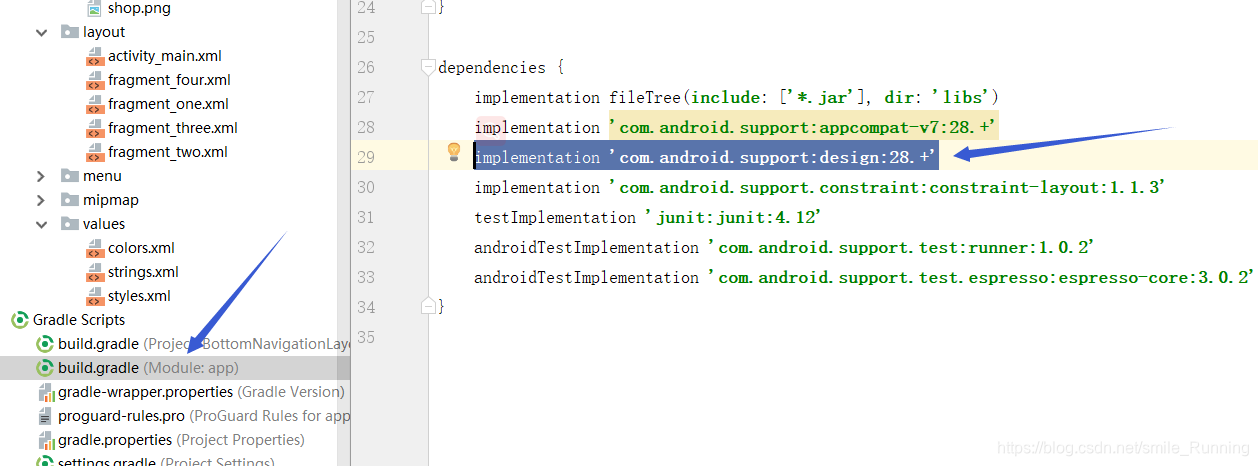
首先,在布局中添加 BottomNavigationView 的引用,没什么疑问,然后它有一个这样的 view 属性:app:menu="@menu/tab_menu" 非常重要,看下面的演示代码:
<FrameLayout xmlns:android="http://schemas.android.com/apk/res/android"
    xmlns:app="http://schemas.android.com/apk/res-auto"
    xmlns:tools="http://schemas.android.com/tools"
    android:layout_width="match_parent"
    android:layout_height="match_parent"
    tools:context=".MainActivity">

    <android.support.design.widget.BottomNavigationView
        android:id="@+id/bottom_nav_view"
        android:layout_width="match_parent"
        android:layout_height="wrap_content"
        app:menu="@menu/tab_menu"
        android:layout_gravity="bottom" />

</FrameLayout>app:menu="@menu/tab_menu",表示引入可以点击的一组按钮集合,可以有多个组合起来使用。注意:tab_menu 需要创建一个 xml 文件,具体在 res 下新建一个 menu 文件夹:

然后新建如上图名字的 xml 文件,里面写入的代码如下:
<?xml version="1.0" encoding="utf-8"?>
<menu xmlns:android="http://schemas.android.com/apk/res/android">
    <item
        android:id="@+id/tab_one"
        android:icon="@drawable/home"
        android:title="首页" />

    <item
        android:id="@+id/tab_two"
        android:icon="@drawable/shop"
        android:title="商城" />

    <item
        android:id="@+id/tab_three"
        android:icon="@drawable/bill"
        android:title="订单" />

    <item
        android:id="@+id/tab_four"
        android:icon="@drawable/personal"
        android:title="我的" />
</menu>
代码很简单, 一个 id 用于点击事件的,一个是图标,一个是按钮名称,然后就可以运行了,显示效果会是这样的:

好了,这就完成了底部按钮的基本操作,你可能觉得不好看啊,那能换个颜色吗?当然,不能换颜色还拿来干嘛用呢,所以我们在 drawable 文件下新建了一个 xml 文件:

选中和未选中的颜色更改,代码如下:
<?xml version="1.0" encoding="utf-8"?>
<selector xmlns:android="http://schemas.android.com/apk/res/android">
    <item android:color="#9966cc" android:state_checked="true" />
    <item android:color="#a2c699" android:state_checked="false" />
</selector>
然后再设置到 BottomNavigationView 中,代码如下:
<?xml version="1.0" encoding="utf-8"?>
<FrameLayout xmlns:android="http://schemas.android.com/apk/res/android"
    xmlns:app="http://schemas.android.com/apk/res-auto"
    xmlns:tools="http://schemas.android.com/tools"
    android:layout_width="match_parent"
    android:layout_height="match_parent"
    tools:context=".MainActivity">

    <android.support.design.widget.BottomNavigationView
        android:id="@+id/bottom_nav_view"
        android:layout_width="match_parent"
        android:layout_height="wrap_content"
        android:background="#fcfcfc"
        app:menu="@menu/tab_menu"
        app:itemIconTint="@drawable/seleced_menu_color"
        app:itemTextColor="@drawable/seleced_menu_color"
        android:layout_gravity="bottom" />

</FrameLayout>
我们的 icon 和 text 都设置统一的颜色,这样比较好看,还有背景设置了白色,更改后效果如下:
还可以吧,总体上美观了那么一点点。
布局还可以,然后就是加入我们的 ViewPager 与 Fragment 了,不然就孤零零的 BottomNavigationView 也没有任何作用。修改代码,加入 ViewPager:
<?xml version="1.0" encoding="utf-8"?>
<RelativeLayout xmlns:android="http://schemas.android.com/apk/res/android"
    xmlns:app="http://schemas.android.com/apk/res-auto"
    xmlns:tools="http://schemas.android.com/tools"
    android:layout_width="match_parent"
    android:layout_height="match_parent"
    tools:context=".MainActivity">

    <android.support.v4.view.ViewPager
        android:id="@+id/view_pager"
        android:layout_width="match_parent"
        android:layout_height="match_parent"
        android:layout_above="@+id/bottom_nav_view" />

    <android.support.design.widget.BottomNavigationView
        android:id="@+id/bottom_nav_view"
        android:layout_width="match_parent"
        android:layout_height="wrap_content"
        android:layout_alignParentBottom="true"
        android:background="#fcfcfc"
        app:itemIconTint="@drawable/seleced_menu_color"
        app:itemTextColor="@drawable/seleced_menu_color"
        app:menu="@menu/tab_menu" />

</RelativeLayout>
再写一个 ViewPager 的适配器(之前写的,直接拷贝过来用了),代码如下:
package nd.no.xww.bottomnavigationlayout;

import android.support.v4.app.Fragment;
import android.support.v4.app.FragmentManager;
import android.support.v4.app.FragmentPagerAdapter;

import java.util.List;

/**
 * 功能:viewpager 添加 fragments 的适配器
 *
 * @author : xww
 * @created at : 19-3-9
 * @time : 下午7:14
 */
public final class FragmentAdapter extends FragmentPagerAdapter {
    private List<Fragment> mFragments;

    public FragmentAdapter(List<Fragment> fragments, FragmentManager fm) {
        super(fm);
        this.mFragments = fragments;
    }

    @Override
    public Fragment getItem(int i) {
        return mFragments.get(i);
    }

    @Override
    public int getCount() {
        return mFragments.size();
    }
}
然后,为每一个按钮都新建一个 Fragment 用于切换使用,Fragment 代码很简单,啥都不干,就加载一下布局:
package nd.no.xww.bottomnavigationlayout;

import android.os.Bundle;
import android.support.annotation.NonNull;
import android.support.annotation.Nullable;
import android.support.v4.app.Fragment;
import android.view.LayoutInflater;
import android.view.View;
import android.view.ViewGroup;

/**
 * @author xww
 * @desciption :
 * @date 2019/7/22
 * @time 23:40
 */
public class OneFragment extends Fragment {

    @Nullable
    @Override
    public View onCreateView(@NonNull LayoutInflater inflater, @Nullable ViewGroup container, @Nullable Bundle savedInstanceState) {
        View view = inflater.inflate(R.layout.fragment_one, container, false);
        return view;
    }
}
它布局文件如下:
<?xml version="1.0" encoding="utf-8"?>
<RelativeLayout xmlns:android="http://schemas.android.com/apk/res/android"
    android:layout_width="match_parent"
    android:layout_height="match_parent">

    <TextView
        android:layout_width="wrap_content"
        android:layout_height="wrap_content"
        android:layout_centerInParent="true"
        android:text="首页"
        android:textSize="22sp" />
</RelativeLayout>
这里有 4 个 Fragment 都需要自己创建,代码都几乎一样,我就不再贴出来了,具体文件创建如下:

最后是我们的 MainActivity 的代码,一个是对 ViewPager 滑动事件的监听,滑动一下,BottomNavigationView 也要跟随着切换,还有就是 BottomNavigationView 点击事件的监听,每点击一下按钮,需要跳转到指定的 Fragment 中,代码如下:
package nd.no.xww.bottomnavigationlayout;

import android.support.annotation.NonNull;
import android.support.design.widget.BottomNavigationView;
import android.support.v4.app.Fragment;
import android.support.v4.view.ViewPager;
import android.support.v7.app.AppCompatActivity;
import android.os.Bundle;
import android.view.MenuItem;

import java.util.ArrayList;
import java.util.List;

public class MainActivity extends AppCompatActivity {

    BottomNavigationView bnView;
    ViewPager viewPager;


    @Override
    protected void onCreate(Bundle savedInstanceState) {
        super.onCreate(savedInstanceState);
        setContentView(R.layout.activity_main);

        bnView = findViewById(R.id.bottom_nav_view);
        viewPager = findViewById(R.id.view_pager);


        List<Fragment> fragments = new ArrayList<>();
        fragments.add(new OneFragment());
        fragments.add(new TwoFragment());
        fragments.add(new ThreeFragment());
        fragments.add(new FourFragment());

        FragmentAdapter adapter = new FragmentAdapter(fragments, getSupportFragmentManager());
        viewPager.setAdapter(adapter);

        //BottomNavigationView 点击事件监听
        bnView.setOnNavigationItemSelectedListener(new BottomNavigationView.OnNavigationItemSelectedListener() {
            @Override
            public boolean onNavigationItemSelected(@NonNull MenuItem menuItem) {
                int menuId = menuItem.getItemId();
                // 跳转指定页面:Fragment
                switch (menuId) {
                    case R.id.tab_one:
                        viewPager.setCurrentItem(0);
                        break;
                    case R.id.tab_two:
                        viewPager.setCurrentItem(1);
                        break;
                    case R.id.tab_three:
                        viewPager.setCurrentItem(2);
                        break;
                    case R.id.tab_four:
                        viewPager.setCurrentItem(3);
                        break;
                }
                return false;
            }
        });

        // ViewPager 滑动事件监听
        viewPager.addOnPageChangeListener(new ViewPager.OnPageChangeListener() {
            @Override
            public void onPageScrolled(int i, float v, int i1) {

            }

            @Override
            public void onPageSelected(int i) {
                //将滑动到的页面对应的 menu 设置为选中状态
                bnView.getMenu().getItem(i).setChecked(true);
            }

            @Override
            public void onPageScrollStateChanged(int i) {

            }
        });

    }
}
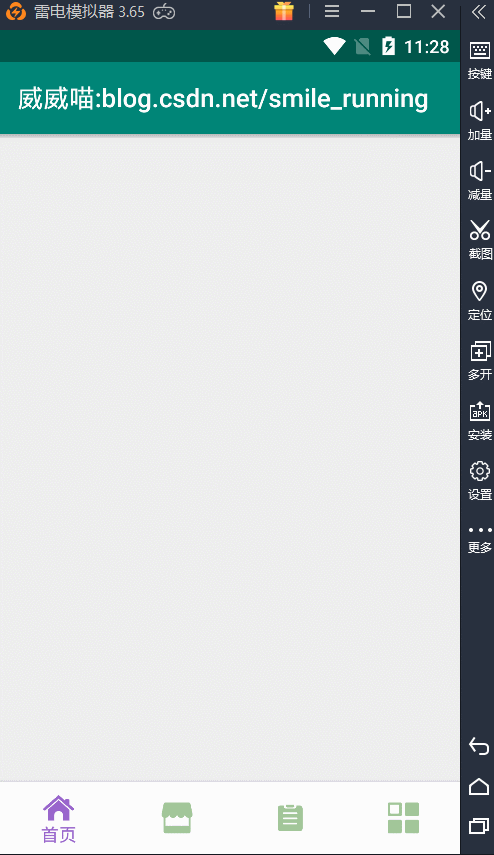
好吧,重新跑一下 app 后发现效果以及实现好了,效果如下: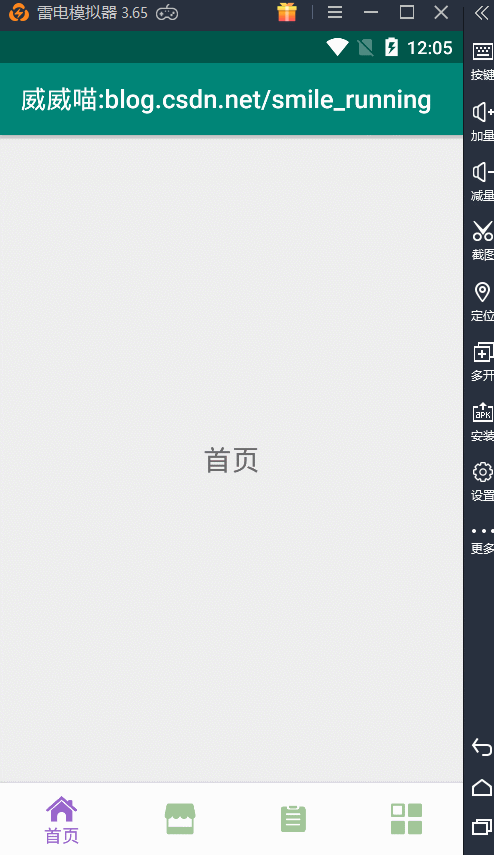
最后呢,我们实现了这样的一个效果, 现在看起来虽然有一点点简陋、单调,没什么内容,不过我们下一篇文章中,我将会加入一个新的 View,这也是 Material Design 包中提供的一个新的控件,它可以实现类似 QQ 的侧拉抽屉效果。好吧,这篇我们实现的效果到这里就完成了,如果觉得我配色不好看的话,自己再去搞吧,哈哈!