一、安装服务:
1、下载nacos包:https://github.com/alibaba/nacos/releases;
2、下载完成之后,解压。根据不同平台,执行不同命令,启动单机版Nacos服务:
(1) Linux/Unix/Mac:sh startup.sh -m standalone
(2) Windows:cmd startup.cmd -m standalone
3、浏览器打开:http://localhost:8848/nacos;登陆用户名和密码都是:nacos;
二、实现provider:
1、新建Spring boot工程项目provider;
2、在POM文件中引入包:
1 <dependency>
2     <groupId>org.springframework.boot</groupId>
3     <artifactId>spring-boot-starter-web</artifactId>
4 </dependency>
5 <dependency>
6     <groupId>org.springframework.cloud</groupId>
7     <artifactId>spring-cloud-starter-alibaba-nacos-discovery</artifactId>
8     <version>0.9.0.RELEASE</version>
9 </dependency>
3、配置文件application.yml中填写内容:
1 server:
2   port: 5005
3 spring:
4   application:
5     name: provider
6   cloud:
7     nacos:
8       discovery:
9         server-addr: 127.0.0.1:8848
4、入口类添加注解@EnableDiscoveryClient:
 1 @EnableDiscoveryClient
 2 @SpringBootApplication
 3 public class NoApplication {
 4     public static void main(String[] args) {
 5         SpringApplication.run(NoApplication.class,args);
 6     }
 7 }
 8
 9 @RestController
10 public class NacosProducerController {
11     @RequestMapping("/hello")
12     public String hello(@RequestParam("name")String name)
13     {
14         return "hello::"+name;
15     }
16 }
5、启动应用程序,可以在http://localhost:8848/nacos上的服务列表中看到服务provider;
三、实现consumer:
1、新建Spring boot工程项目;
2、在POM中引入包:
1 <dependency>
2     <groupId>org.springframework.boot</groupId>
3     <artifactId>spring-boot-starter-web</artifactId>
4 </dependency>
5 <dependency>
6     <groupId>org.springframework.cloud</groupId>
7     <artifactId>spring-cloud-starter-alibaba-nacos-discovery</artifactId>
8     <version>0.9.0.RELEASE</version>
9 </dependency>
3、配置文件application.yml中填写内容:
1 server:
2   port: 6060
3 spring:
4   application:
5     name: consumer
6   cloud:
7     nacos:
8       discovery:
9         server-addr: 127.0.0.1:8848
4、入口类实现:
 1 @RestController
 2 public class ConController {
 3     @Autowired
 4     RestTemplate restTemplate;
 5
 6     @RequestMapping("/callSayHello")
 7     public String services(@RequestParam("name") String name) {
 8
 9         String callServiceResult = restTemplate.getForEntity("http://provider/hello?name="+name,String.class).getBody();
10         System.out.println(callServiceResult);
11         return callServiceResult;
12     }
13 }
5、启动应用程序,可以在nacos的服务列表发现新增了一项consumer服务;然后在浏览器中输入http://localhost:6060/callSayHello?name=123456即可看到返回了数据;
四、坑点:
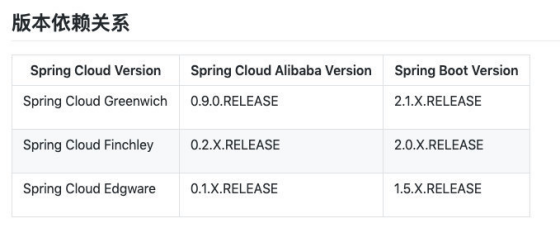
Spring cloud配合nacos实现比较坑,照着网上的步骤敲的代码,运行起来发现不是报错就是服务没有注册到nacos上,最后发现是版本搭配的问题;
nacos版本 0.2.x.RELEASE 对应的是 Spring Boot 2.x 版本,nacos版本 0.1.x.RELEASE 对应的是 Spring Boot 1.x 版本。
我最终调试通过的代码用的版本对应是:nacos:0.9.0.RELEASE,spring-boot-starter-parent:2.1.7.RELEASE;nacos Server版本:1.1.3;
五、参考资料:
https://blog.51cto.com/9332743/2423285
https://www.cnblogs.com/zgwjava/p/10562775.html