1, 什么是LNMP
LNMP 是一套技术的组合, L=Linux、 N=Nginx、 M=MySQL、 P=PHP
2,LNMP工作流程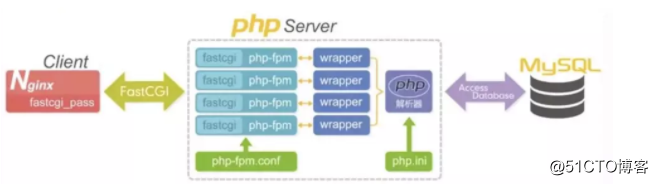
原理:
1.用户通过 http 协议发起请求,请求会先抵达 LNMP 架构中的 Nginx
2.Nginx 会根据用户的请求进行判断,这个判断是有 Location 进行完成
3.判断用户请求的是静态页面, Nginx 直接进行处理
4.判断用户请求的是动态页面, Nginx 会将该请求交给 fastcgi 协议下发
5.fastgi 会将请求交给 php-fpm 管理进程, php-fpm 管理进程接收到后会调用具体的工作进程 warrapr
6.warrap 进程会调用 php 程序进行解析,如果只是解析代码 php 直接返回
7.如果有查询数据库操作,则由 php 连接数据库(用户 密码 IP)发起查询的操作
8.最终数据由 mysql->php->php-fpm->fastcgi->nginx->http->user
3,安装LNMP
1,创建统一的用户和组
groupadd www -g 666
useradd www -s /sbin/nologin -M -u 666 -g 666
2,下载nginxREPO源
wget http://nginx.org/packages/centos/$releasever/$basearch/
wget http://nginx.org/packages/mainline/centos/$releasever/$basearch/
yum -y install nginx
3,启动并设置开机启动nginx
systemctl start nginx
systemctl enable nginx
4,下载php7.1第三方源
rpm -Uvh https://dl.fedoraproject.org/pub/epel/epel-release-latest-7.noarch.rpm
rpm -Uvh https://mirror.webtatic.com/yum/el7/webtatic-release.rpm
yum -y install php71w php71w-cli php71w-common php71w-devel php71w-embedded php71w-gd php71w-mcrypt php71w-mbstring php71w-pdo php71w-xml php71w-fpm php71w-mysqlnd php71w-opcache php71w-pecl-memcached php71w-pecl-redis php71w-pecl-mongodb5,启动并设置开机启动PHP
systemctl start php-fpm
systemctl enable php-fpm
6,在Nginx和PHP配置文件的用户修改为www
sed -i '/^user/c user = www' /etc/php-fpm.d/www.conf
sed -i '/^group/c group = www' /etc/php-fpm.d/www.conf
7,安装Mysql即Mariadb
yum install mariadb-server mariadb -y
8,启动并设置开机启动Mariadb
systemctl start mariadb
systemctl enable mariadb
9,数据库配置账号密码
mysqladmin password 'oldboy123'(默认root密码)
mysql -uroot -poldboy123 (登录mysql)
使用指定IP登录
mysql -uroot -poldboy123 -h127.0.0.1
show databases;
show tables from mysql;
select user,host from mysql.user;查看当前mysql有哪些用户
desc user;查看表字段
4,接通nginx和php即fastcgi
cat /etc/nginx/conf.d/php.conf
server {
    server_name www.oldboy.com;
    listen 80;
    root /code;
    index index.php index.html;

    location ~ \.php$ {
        root /code;
        fastcgi_pass 127.0.0.1:9000;
        fastcgi_index index.php;
        fastcgi_param SCRIPT_FILENAME $document_root$fastcgi_script_name;
        include fastcgi_params;
    }
}
1,创建code目录并做一个php测试网页
mkdir /code
chown -R www:www /code/
cat /code/info.php
<?php
    phpinfo();
?>
2,nginx -t
systemctl restart nginx
3,网页测试 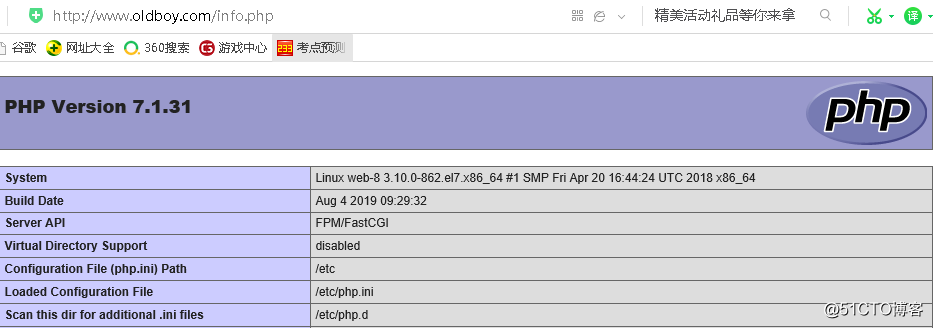
4,测试PHP和数据库之间的连通性
cat /code/mysql.php
<?php
    $servername = "localhost";
    $username = "root";
    $password = "oldboy123";

    // 创建连接
    $conn = mysqli_connect($servername, $username, $password);
    // // 检测连接
    if (!$conn) {
        die("Connection failed: " . mysqli_connect_error());
    }
    echo "php 连接 MySQL 数据库成功";
?>
浏览器上输入:http://www.oldboy.com/mysql.php
至此,Nginx与PHP接通,PHP与数据库接通
5,部署Wordpress博客
1,配置wordpress虚拟主机server {
server_name blog.oldboy.com;
listen 80;
root /code/wordpress/;
index index.php index.html;
location ~ \.php$ {
root /code/wordpress/;
fastcgi_pass 127.0.0.1:9000;
fastcgi_index index.php;
fastcgi_param SCRIPT_FILENAME $document_root$fastcgi_script_name;
include fastcgi_params;
}
}
2,重启nginx
nginx -t
systemctl restart nginx
3,下载wordpress代码压缩包
cd /code
wget https://cn.wordpress.org/wordpress-4.9.4-zh_CN.tar.gz
tar -zxvf wordpress-4.9.4-zh_CN.tar.gz
chown -R www:www /code/wordpress
4,创建任意一个数据库就叫wordpress
mysql -uroot -poldboy123
create database wordpress;
exit
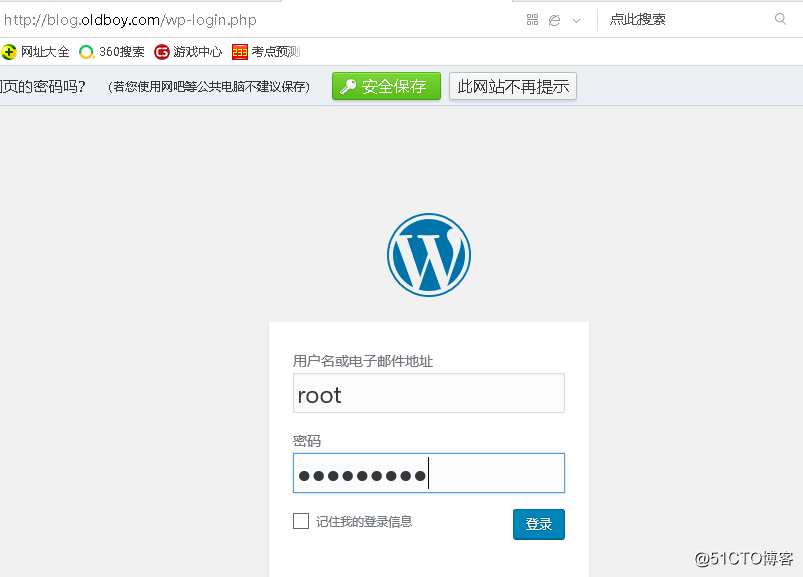
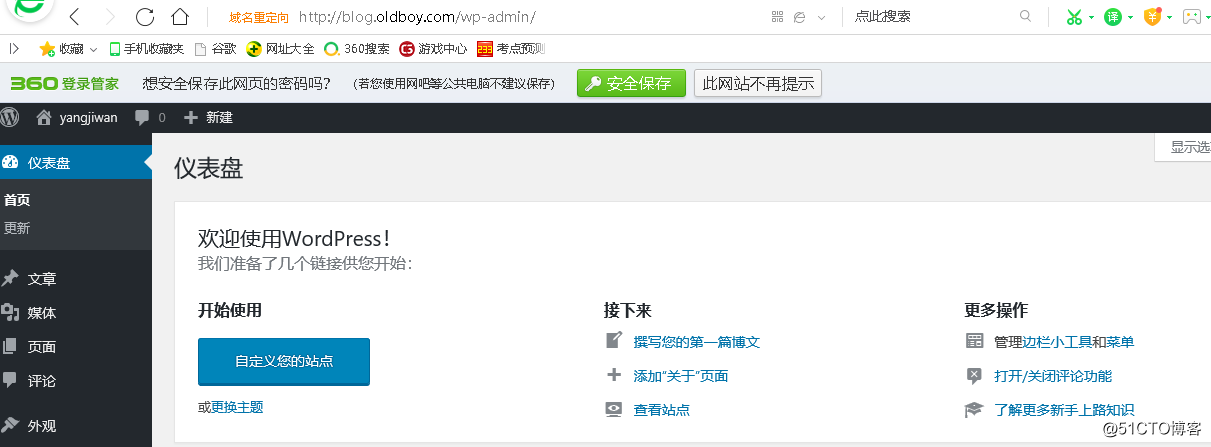
5,浏览器访问wordpress并部署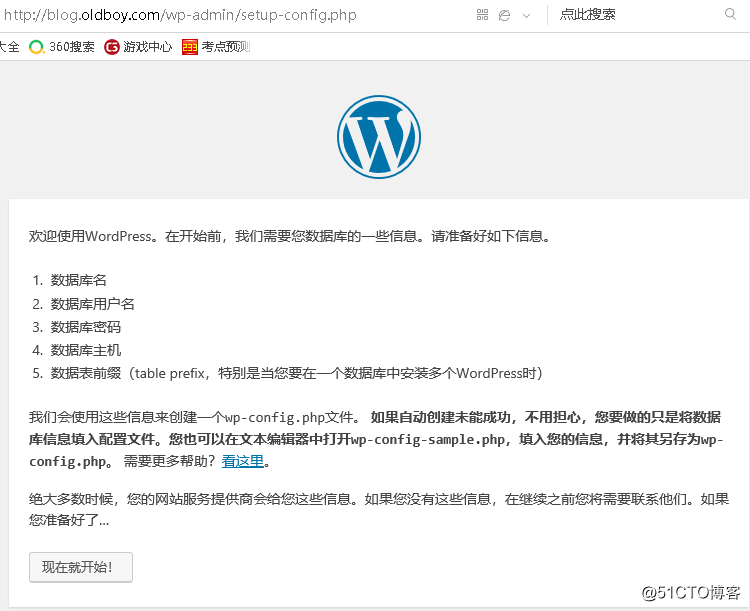
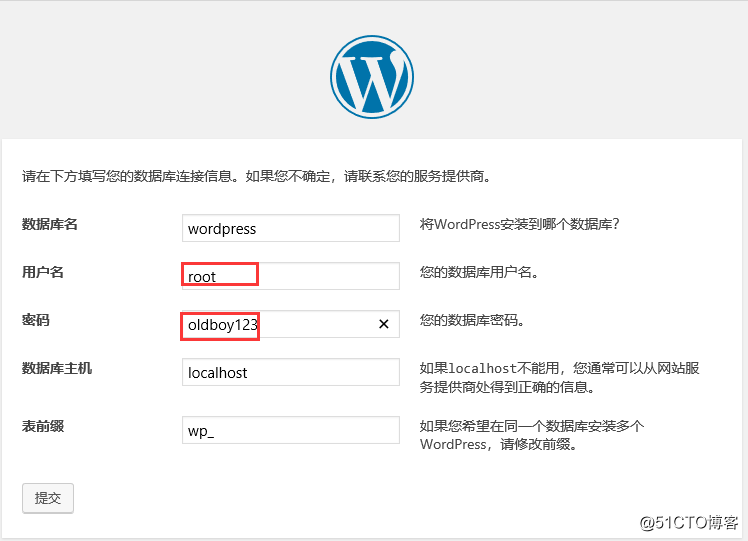

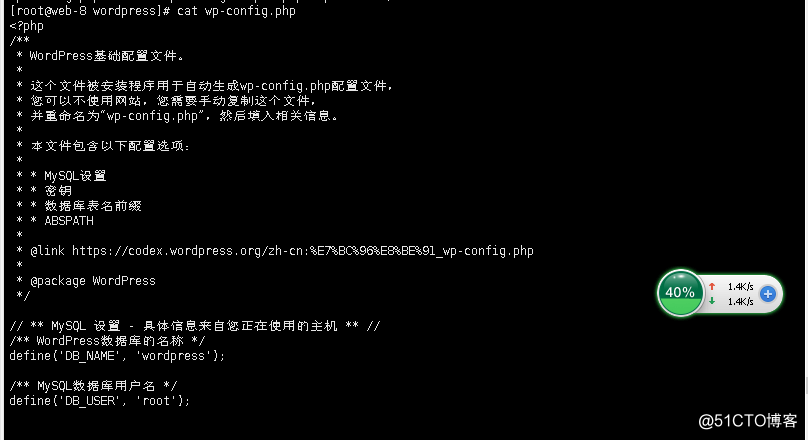
以上编辑步骤后在PHP上生成/code/wopress/wp-config.php生成配置文件。用来接通数据库