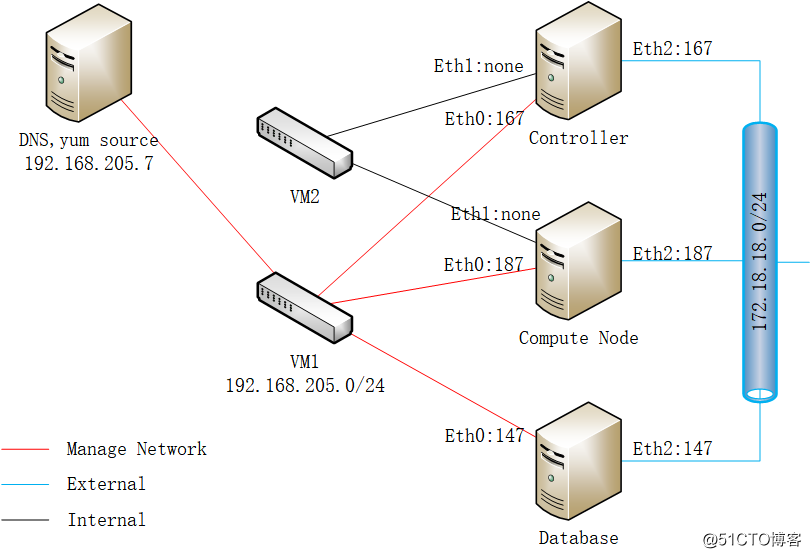
环境:
• 192.168.205.7: as Chrony, DNS and YUM Source server(为了安装更快,自建yum源)
• 192.168.205.147: as DataBase, install MariaDB, RabbitMQ, Memcached
• 192.168.205.167: as controller, install keystone, placement, nova, neutron, dashboard
• 192.168.205.187: as compute node, install neutron agent and nova agent
注:所有操作系统默认停用firewalld,iptable为空,关闭selinux
版本:
• OS: centos 7 1810 with mini install for controller and SQL server
• OS: CentOS 7  1511 with mini install for compute node
• Openstack Minimal deployment for Stein
• mariadb-10.3.10
注:其它未注明均为yum 安装
目地:
• 最小化安装openstack stein最新版本
• 安装完成后各组件正常运行
• 测试成功建立实列并运行
• 通过运行实列测试基本的网络功能
步骤:
1. 安装前的环境准备
2. 安装keystone
3. 安装glance镜像服务
4. 安装placement
5. 安装Nova on controller
6. 安装Nova on compute node
7. 安装Neutron on controller node
8. 安装Neutron on compute node
9. 安装dashboard
10. 验证测试
安装前的环境准备
安装的准备工作很重要,因为openstack服务非常多,服务之间的依赖关系紧密,合理的规划不会导至安装出现问题,否则会出现各种的问题。
准备环境
- 所有的服务器时间必须一致,我们设置时间服务同步,这里可以是外部的源,也可以是自已的时间源服务器,我用一台chrony服务器做为时间服务器, 同进也兼做dns解析和yum源
#yum install chrony #systemctl start chronyd #cat /etc/chrony.conf server 192.168.205.7 iburst #systemctl status chronyd #chronyc sources -v #检查chrony时间是否同步,看到^*为同步,否则没有同步 - 修改hosts文件,并将hosts文件复制到三台服务器,如果用了dns,这步不是必须,但不要配主机名。
#cat /etc/hosts 192.168.205.167 controller1 192.168.205.147 master 192.168.205.187 node1 - 使用DNS域名解析的规划
域名:flex.net name server 192.168.205.7 A stack.flex.net 192.168.205.167 controller1 A dbs.flex.net 192.168.205.147 database, memcached, rabbitMQ 同进DNS也做为转发服务器为yum提像安装软件 - 编辑网卡每台有三个网卡, 分为管理网络,租户网络和外网,管理网络的dns指向192.168.205.7
eth0为管理和API的网络 #cat ifcfg-eth0 NAME="eth0" DEVICE="eth0" ONBOOT=yes BOOTPROTO=static IPADDR=192.168.205.x NETMASK=255.255.255.0 TYPE=Ethernet eth1为租户tenant网络使用,不配IP,设置成none #cat ifcfg-eth1 NAME="eth1" DEVICE="eth1" ONBOOT=yes BOOTPROTO=none eth2为外网安装yum源使用,使用nat方式,同时将dns设置为内网的dns: 192.168.205.7 #cat ifcfg-eth2 NAME="eth2" DEVICE="eth2" ONBOOT=yes BOOTPROTO=static IPADDR=172.18.18.x NETMASK=255.255.255.0 GATEWAY=172.18.18.2 DNS1=192.168.205.7 注:不要修改HWADDR和UUID -
安装源,首先启用extras packges,我使用原cenos安装时自带的源, 也可以启用aliyun或tinghua的extras源
#ls backup CentOS-Base.repo CentOS-Debuginfo.repo CentOS-Media.repo CentOS-Vault.repo backup1 CentOS-CR.repo CentOS-fasttrack.repo CentOS-Sources.repo #yum list Centos-release-OpenStack* … Available Packages centos-release-openstack-stein.noarch 1-1.el7.centos extras centos-release-openstack-ocata.noarch 1-2.el7 extras centos-release-openstack-pike.x86_64 1-1.el7 extras centos-release-openstack-queens.noarch 1-2.el7.centos extras 注:安装时我们要禁用epel源 - 我们通过yum 方式去直接下载安装最新的stein源
#yum install centos-release-openstack-stein -
安装完成后我们看到目录中多了一些源
#ls backup CentOS-Debuginfo.repo CentOS-QEMU-EV.repo backup1 CentOS-fasttrack.repo CentOS-Sources.repo CentOS-Base.repo CentOS-Media.repo CentOS-Storage-common.repo CentOS-Ceph-Nautilus.repo CentOS-NFS-Ganesha-28.repo CentOS-Vault.repo #cat CentOS-OpenStack-stein.repo CentOS-OpenStack-stein.repo … - 更新包在所有的节点
# yum upgrade - 所有的节点上安装openstack客户端
# yum install python-openstackclient安装数据库
- 安装数据库及python组件
# yum install mariadb mariadb-server python2-PyMySQL - 建立数据库的配置文件并写入下列配置
# vi /etc/my.cnf.d/openstack.cnf [mysqld] bind-address = 192.168.205.147 default-storage-engine = innodb innodb_file_per_table = on max_connections = 4096 collation-server = utf8_general_ci character-set-server = utf8 - 允许系统引导时自动启动服务并启动服务
# systemctl enable mariadb.service # systemctl start mariadb.service - 运行mysql_secure_installation脚本,特别是root的口令,为root配一个合适的口令,为了演示,我们设为root, 密码root123
# mysql_secure_installation安装消息队列在mysql上
Openstack的服务之间使用消息队列协调操作和状态信息,消息队列通常地运行在controller上, openstack支持几种消息队列如:rabbitMQ, Qpid, ZeroMQ. 大多的发行版都支持这些特定的消息队列,本实验我们用RabbitMQ因为大多发行版都支持它,本列中,我们的消息队列运行在dababase中
- 安装包
# yum install rabbitmq-server - 允许系统引导时自动启动服务并启动服务
# systemctl enable rabbitmq-server.service # systemctl start rabbitmq-server.service - 添加一个openstack用户
# rabbitmqctl add_user openstack openstack123 - 充许openstack用户具有write, and read访问权限
# rabbitmqctl set_permissions openstack ".*" ".*" ".*"
注:在vhost "/" ...中给用户 "openstack" 授权
安装和配置Memcached
身份识别服务验证机制使用Memcached缓存令牌,Memcached通常运行在controller上,对于生产部署,我们建议启用防火墙、身份验证和加密的组合来保护它。
- 安装包
# yum install memcached python-memcached - 编辑文件/etc/sysconfig/memcached并修改配置文件服务使用管理IP,充许其它节点通过管理IP访问到Memcached
#vi /etc/sysconfi/memcached OPTIONS="-l 127.0.0.1,::1,master" #如果你装在数据库服务器上,那么就改数据库服务器的名字, 因为hosts中已经做解析 - 允许系统引导时自动启动服务并启动服务
# systemctl enable memcached.service
# systemctl start memcached.service