这篇博客就用来记录在使用pytorch时遇到的BUG,虽然年纪大了,但是调出BUG还是令人兴奋^_^!
BUG1:
在使用NLLLoss()激活函数时,NLLLoss用来做n类分类的,一般最后一层网络为LogSoftmax,如果其他的则需要使用CrossEntropyLoss。其使用格式为:loss(m(input), target),其中input为2DTensor大小为(minibatch,n),target为真实分类的标签。
如果输入的input类型为torch.cuda.FloatTensor,target类型为torch.cuda.IntTensor,则会出现如下错误:
TypeError: CudaClassNLLCriterion_updateOutput received an invalid combination of arguments - got (int, torch.cuda.FloatTensor, !torch.cuda.IntTensor!, torch.cuda.FloatTensor, bool, NoneType, torch.cuda.FloatTensor), but expected (int state, torch.cuda.FloatTensor input, torch.cuda.LongTensor target, torch.cuda.FloatTensor output, bool sizeAverage, [torch.cuda.FloatTensor weights or None], torch.cuda.FloatTensor total_weight)
因此需要保证target类型为torch.cuda.LongTensor,需要在数据读取的迭代其中把target的类型转换为int64位的:target = target.astype(np.int64),这样,输出的target类型为torch.cuda.LongTensor。(或者在使用前使用Tensor.type(torch.LongTensor)进行转换)。
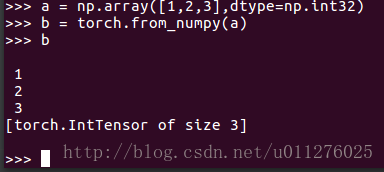
为了说明pytorch中numpy和toch的转换关系,测试如下:
首先输入int32的numpy数组转换为torch,得到的IntTensor类型
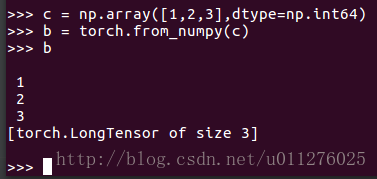
如果输入的为int64的numpy,得到LongTensor类型:
如果把int32的数组转换为LongTensor,则会出错:

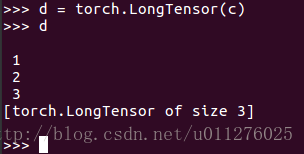
如果把int64的数组转换为LongTensor,正常:
PS: 2017/8/8(奇怪,在使用binary_cross_entropy进行分类时又要求类型为FloatTensor类型,简直够了)
BUG2:
同样是NLLLoss()使用时的问题。网络传播都正常,但是在计算loss时出现如下错误:
RuntimeError: cuda runtime error (59) : device-side assert triggered at /home/loop/pytorch-master/torch/lib/THC/generic/THCTensorMath.cu:15
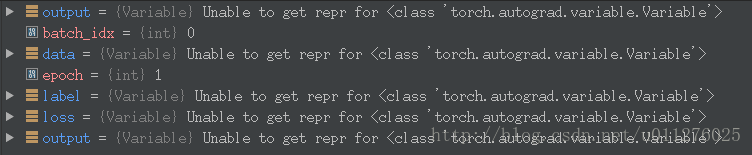
断点调试发现数据类型出现如下变化:
我以为显卡除了问题,最后在pytoch#1204中发现一个人的标签中出现-1,发生了类似的错误:

而我的标签为1~10,最后把标签定义为1~9,解决这个问题。^_^!
BUG3:
当使用torch.view()时出现 RuntimeError: input is not contiguous at /home/loop/pytorch-master/torch/lib/TH/generic/THTensor.c:231
这个是由于浅拷贝出现的问题。
如下:定义初始化一个Tensor值,并且对其进行维度交换,在进行Tensor.view()操作时出现以上错误。
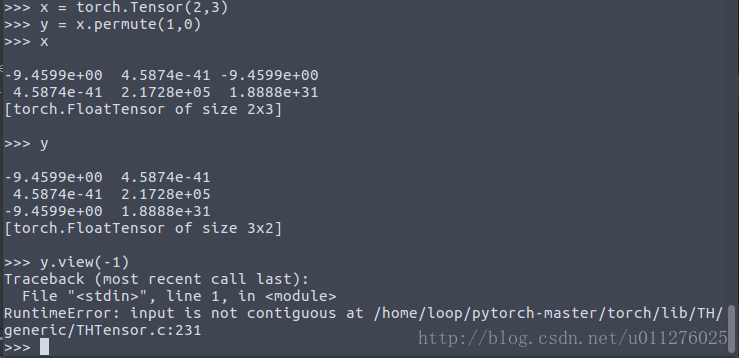
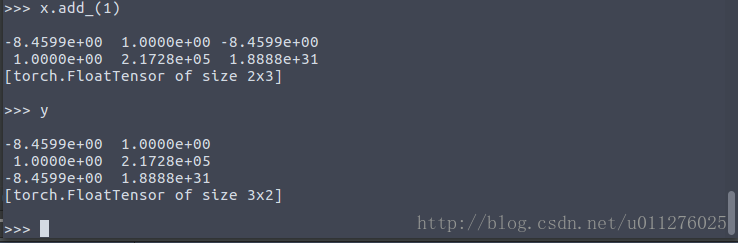
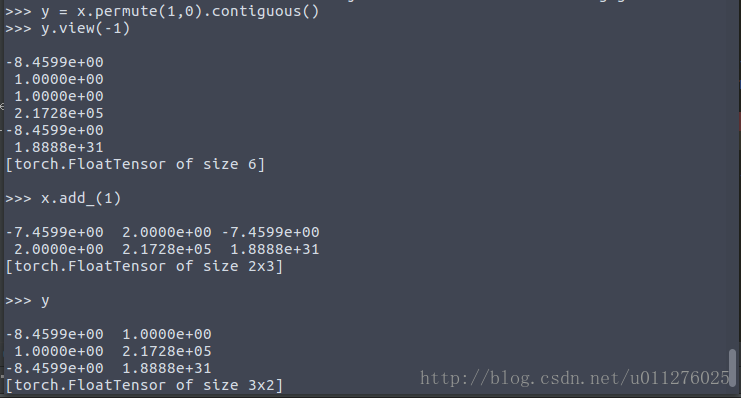
这是由于浅拷贝的原因,y只是复制了x的指针,x改变,y也要随之改变,如下:
可以使用tensor.contiguous()解决:
BUG4:
使用Cross_entropy损失函数时出现 RuntimeError: multi-target not supported at …
仔细看其参数说明:
input has to be a 2D Tensor of size batch x n.

This criterion expects a class index (0 to nClasses-1) as the target for each value of a 1D tensor of size n
其标签必须为0~n-1,而且必须为1维的,如果设置标签为[nx1]的,则也会出现以上错误。
BUG4:
按照官网的方式编译PyTorch源码时出现:undefined reference to ... @GLIBCXX_3.4.21 (未定义的引用问题) 我的是出现在编译90%左右的broadcast_test附近出现的。问题估计是GCC的版本造成的,虽然GCC -v显示的5.0,但是调用的库不是,需要执行:
conda install libgcc然后python setup.py clean重新生成即可解决问题
BUG5:
出现如下错误:
ValueError: Expected more than 1 value per channel when training, got input size [1, 5,1,1]这个是在使用BatchNorm时不能把batchsize设置为1,一个样本的话y = (x - mean(x)) / (std(x) + eps)的计算中,x==mean(x)导致输出为0。
NOTE1: 共享参数问题
在tensorflow中有variable_scope方法实现参数共享,也就是说对于2张图片,第二张训练时的权重参数与第一张图片所使用的相同,详见tf.variable_scope. 同样,在PyTorch则不存在这样的问题,因为PyTorch中使用的卷积(或者其他)层首先需要初始化,也就是需要建立一个实例,然后使用实例搭建网络,因此在多次使用这个实例时权重都是共享的。
NOTE2: torch.nn.Module.cuda作用
之前看教程中在定义完网络后会进行:
if gpu:
    net.cuda()
现在才发现这个的作用,官方文档上写的是:Moves all model parameters and buffers to the GPU.
也就是在定义时并没有把weight参数传入gpu中,在调用网络进行计算时,如果传入的数据为GPU数据,则会出现:tensors are on different GPUs 错误,因此使用torch.nn.Module.cuda可以把定义的网络参数传入gpu中。
NOTE3: 对同一个网络连续进行两次梯度求解(backward)
如果使用一个Variable数据传入到网络,通过backward求解其梯度值,然后在使用另一个Variable传入网络,再次求解梯度值,其最终结果会怎么样呢?正如你所想得样,是两次梯度之和。测试代码如下:
import torch.nn as nn
from torch.autograd import Variable
import torch.optim as optim
def init_weigts(m):
    classname = m.__class__.__name__
    if classname.find('Linear') != -1:
        m.weight.data.fill_(0)
        m.bias.data.fill_(0)

net = nn.Sequential(nn.Linear(2, 2))
net.apply(init_weigts)

input = Variable(torch.FloatTensor(1, 2).fill_(1))
label = Variable(torch.FloatTensor(1, 2).fill_(1))
criterion = nn.MSELoss()
# compute first time network
net.zero_grad()
print('before backward')
print(net[0].bias.grad)
output = net(input)
loss = criterion(output, label)
loss.backward()
print('after backward1')
print(net[0].bias.grad)
# compute second time network
input2 = Variable(torch.FloatTensor(1, 2).fill_(1))
label2 = Variable(torch.FloatTensor(1, 2).fill_(1))
output2 = net(input2)
loss2 = criterion(output2, label2)
loss2.backward()
print('after2 backward1')
print(net[0].bias.grad)
定义一个一层的线性网络,并且其权重(weight)和偏置(bias)都初始化为0,在每次求解梯度后输出梯度值,其结果如下:
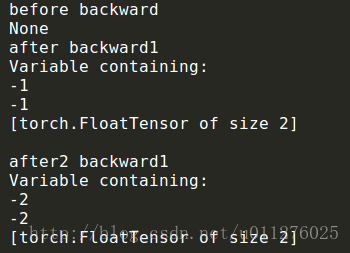
可以发现,在进行梯度求解前,没有梯度,在第一次计算后梯度为-1,第二次计算后为-2,如果在第一次求解后初始化梯度net.zero_grad(),则来嗯次都是-1,则连续多次求解梯度为多次梯度之和。
NOTE4: PyTorch自定义权重初始化
在上面的NOTE3中使用自定意的权重参数初始化,使用toch.nn.Module.apply()对定义的网络参数进行初始化,首先定义一个权重初始化的函数,如果传入的类是所定义的网络,则对其权重进行in_place赋值。
如果对weight_init(m)中的classname输出,可以发现有多个类:(因此需要判断是否为所定义的网络)
Linear
Sequential
NOTE5: PyTorch权重的更新
关于网络传递中网络的定义、loss计算、backpropogate的计算,update weight在Neural Networks有简单介绍,这里测试下。只要定义一个优化器(optimizer),实现了常见的优化算法(optimization algorithms),然后使用优化器和计算的梯度进行权重的更新。
在NOTE3中的代码后面增加如下(更新权重参数):
print('before update parameters')
print(net[0].bias)
optimizer = optim.Adam(net.parameters(), 1)
optimizer.step()
print('after update parameters')
print(net[0].bias)
其运行结果为:
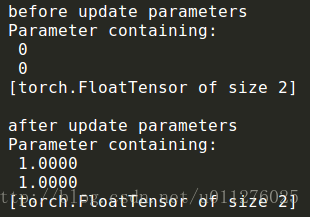
可见使用optimizer.step()实现了网络权重的更新。(而且可以选择不同的更新方式,如:Adam、SGD等)
NOTE6: torch.autograd.backward()使用技巧
当计算多个梯度相加(相减)时,使用backward(torch.FloatTensor([-1]))可以简单实现。
NOTE6: 监控内存使用, 防止内存泄露(memory leak)
代码如下:
import gc
import resource

gc.collect()
max_mem_used = resource.getrusage(resource.RUSAGE_SELF).ru_maxrss
print("{:.2f} MB".format(max_mem_used / 1024))