第1章 struts2基本概念
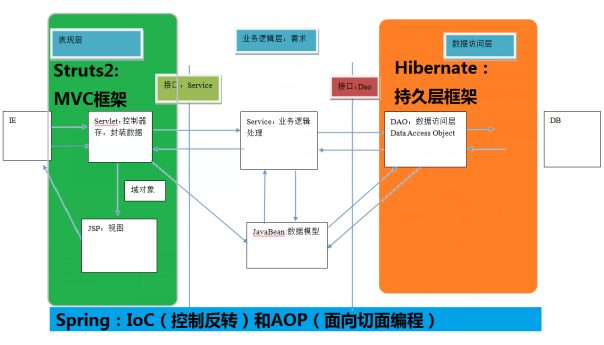
1.1 三层架构和三大框架各自的位置
1.1.1 三层架构:
我们的开发架构一般都是基于两种形式,一种是C/S架构,也就是客户端/服务器,另一种是B/S架构,也就是浏览器服务器。在JavaEE开发中,几乎全都是基于B/S架构的开发。那么在B/S架构中,系统标准的三层架构包括:表现层、业务层、持久层。三层架构在我们的实际开发中使用的非常多,所以我们课程中的案例也都是基于三层架构设计的。
三层架构中,每一层各司其职,接下来我们就说说每层都负责哪些方面:
表现层:
也就是我们常说的web层。它负责接收客户端请求,向客户端响应结果,通常客户端使用http协议请求web层,web需要接收http请求,完成http响应。
表现层包括展示层和控制层:控制层负责接收请求,展示层负责结果的展示。
表现层依赖业务层,接收到客户端请求一般会调用业务层进行业务处理,并将处理结果响应给客户端。
表现层的设计一般都使用MVC模型。(MVC是表现层的设计模型,和其他层没有关系)
业务层:
也就是我们常说的service层。它负责业务逻辑处理,和我们开发项目的需求息息相关。web层依赖业务层,但是业务层不依赖web层。
业务层在业务处理时可能会依赖持久层,如果要对数据持久化需要保证事务一致性。(也就是我们说的,事务应该放到业务层来控制)
持久层:
也就是我们是常说的dao层。负责数据持久化,包括数据层即数据库和数据访问层,数据库是对数据进行持久化的载体,数据访问层是业务层和持久层交互的接口,业务层需要通过数据访问层将数据持久化到数据库中。
通俗的讲,持久层就是和数据库交互,对数据库表进行曾删改查的。
1.1.2 三大框架和三层架构的关系
三大框架包含了我们已经讲过的Hibernate,即将要学习的struts2和后面我们要学习的Spring。
它们在三层架构中所处的位置,如下图所示:
1.1 struts2概述

Struts2是一种基于MVC模式的轻量级Web框架,它自问世以来,就受到了广大Web开发者的关注,并广泛应用于各种企业系统的开发中。目前掌握Struts2框架几乎成为Web开发者的必备技能之一。接下来将针对Struts2的特点、安装以及执行流程等内容进行详细的讲解。
在介绍Struts2之前,先来认识一下Struts1。Struts1是最早的基于MVC模式的轻量级Web框架,它能够合理的划分代码结构,并包含验证框架、国际化框架等多种实用工具框架。但是随着技术的进步,Struts1的局限性也越来越多的暴露出来。为了符合更加灵活、高效的开发需求,Struts2框架应运而生。
Struts2是Struts1的下一代产品,是在 Struts1和WebWork技术的基础上进行合并后的全新框架(WebWork是由OpenSymphony组织开发的,致力于组件化和代码重用的J2EE Web框架,它也是一个MVC框架)。虽然Struts2的名字与Struts1相似,但其设计思想却有很大不同。实质上,Struts2是以WebWork为核心的,它采用拦截器的机制来处理用户的请求。这样的设计也使得业务逻辑控制器能够与ServletAPI完全脱离开,所以Struts2可以理解为WebWork的更新产品。
Struts2拥有优良的设计和功能,其优势具体如下:
- l 项目开源,使用及拓展方便,天生优势。
- l 提供Exception处理机制。
- l Result方式的页面导航,通过Result标签很方便的实现重定向和页面跳转。
- l 通过简单、集中的配置来调度业务类,使得配置和修改都非常容易。
- l 提供简单、统一的表达式语言来访问所有可供访问的数据。
- l 提供标准、强大的验证框架和国际化框架。
- l 提供强大的、可以有效减少页面代码的标签。
- l 提供良好的Ajax支持。
- l 拥有简单的插件,只需放入相应的JAR包,任何人都可以扩展Struts2框架,比如自定义拦截器、自定义结果类型、自定义标签等,为Struts2定制需要的功能,不需要什么特殊配置,并且可以发布给其他人使用。
- l 拥有智能的默认设置,不需要另外进行繁琐的设置。使用默认设置就可以完成大多数项目程序开发所需要的功能。
上面列举的就是Struts2的一系列技术优势,只需对它们简单了解即可,在学习了后面的知识后,会慢慢对这些技术优势有更好的理解和体会。
第2章 struts2的入门
2.1 Struts2环境搭建
2.1.1 下载struts2开发包
Struts2的官网: https://struts.apache.org/
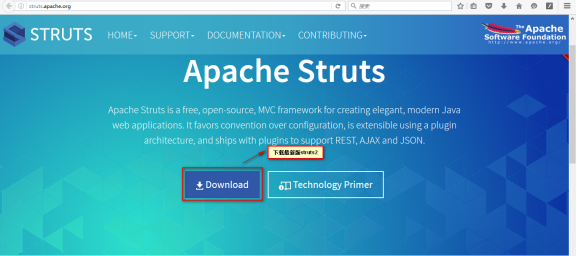
我们这里使用struts-2.3.24版本的Struts2为大家讲解,这个版本可以在当日授课资料中找到。下载好了以后需要进行解压。
2.1.2 struts2开发包目录介绍
解压后的目录结构如下:

Struts2的文件夹结构
从图中可以看出,展示的是解压后的Struts2.3.24的目录结构,为了让大家对每个目录的内容和作用有一定的了解,接下来针对这些目录进行简单介绍,具体如下:
- l apps:该文件夹存用于存放官方提供的Struts2示例程序,这些程序可以作为学习者的学习资料,可为学习者提供很好的参照。各示例均为war文件,可以通过zip方式进行解压。
- l docs:该文件夹用于存放官方提供的Struts2文档,包括Struts2的快速入门、Struts2的文档,以及API文档等内容。
- l lib:该文件夹用于存放Struts2的核心类库,以及Struts2的第三方插件类库。
- l src:该文件夹用于存放该版本Struts2框架对应的源代码。
有了Struts2的开发环境,接下来我们可以进行Struts2的开发了。
2.1.3 搭建步骤
2.1.3.1 第一步:拷贝struts2必备jar包到web工程的lib目录
首先,需要我们创建一个WEB工程,引入相关的jar包文件。引入哪些jar包呢?将struts-2.3.24框架目录中的lib文件夹打开,得到Struts2 开发中可能用到的所有JAR包(此版本有107个JAR包)。实际的开发中,我们根本不用引入这么多的jar包。
要进行struts2的基本的开发,可以参考struts-2.3.24中的apps下的一些示例代码,其中struts2-blank.war是一个struts2的空的工程。我们只需要将struts2-blank.war解压后进入到WEB-INF下的lib中查看。

Struts2 项目依赖的基础JAR包说明
| 文件名 |
说明 |
| asm-3.3.jar |
操作java字节码的类库 |
| asm-commons-3.3.jar |
提供了基于事件的表现形式 |
| asm-tree-3.3.jar |
提供了基于对象的表现形式 |
| struts2-core-2.3.24.jar |
Struts2框架的核心类库 |
| xwork-core-2.3.24.jar |
WebWork核心库,Struts2的构建基础 |
| ognl-3.0.6.jar |
对象图导航语言(Object Graph Navigation Language),struts2框架通过其读写对象的属性 |
| freemarker-2.3.22.jar |
Struts2标签模板使用的类库 |
| javassist-3.11.0.GA.jar |
javaScript字节码解释器 |
| commons-fileupload-1.3.1.jar |
Struts2文件上传组件依赖包 |
| commons-io-2.2.jar |
Struts2的输入输出,传文件依赖的jar |
| commons-lang-2.4.jar |
包含一些数据类型工具,是对java.lang包的增强 |
| log4j-api-2.2.jar |
Struts2的日志管理组件依赖包的api |
| log4j-core-2.2.jar |
Struts2的日志管理组件依赖包 |
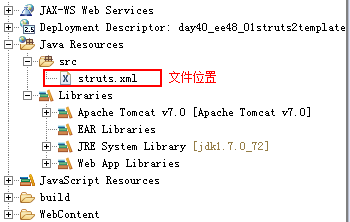
2.1.3.2 第二步:在类的根路径下创建一个名称为struts.xml的文件,并导入约束
这个时候,我们还需要观察apps中的示例代码,在WEB-INF的classes中,有一个名称为struts.xml的文件,这个文件就是struts2的配置文件。
我们在开发中需要将struts.xml文件引入到工程的src下,因为src下内容发布到web服务器中就是WEB-INF下的classes中。
<?xml version="1.0" encoding="UTF-8"?>
<!-- 导入约束:
	约束的位置:在struts2的核心jar包中
			struts2-core-2.3.24.jar中包含一个名称为:
				struts-2.3.dtd的约束文件
-->
<!DOCTYPE struts PUBLIC
	"-//Apache Software Foundation//DTD Struts Configuration 2.3//EN"
	"http://struts.apache.org/dtds/struts-2.3.dtd">
<struts></struts>
2.1.3.3 第三步:在web.xml配置struts2的核心控制器(一个过滤器)
Struts2框架要想执行,所有的请求都需要经过这个前端控制器(核心过滤器),所以需要配置这个核心过滤器。因为这个过滤器完成了框架的部分的功能。那么我们接下来对过滤器进行配置。我们打开web.xml,在web.xml中进行如下配置。
<?xml version="1.0" encoding="UTF-8"?>
<web-app xmlns:xsi="http://www.w3.org/2001/XMLSchema-instance"
	xmlns="http://java.sun.com/xml/ns/javaee"
	xsi:schemaLocation="http://java.sun.com/xml/ns/javaee http://java.sun.com/xml/ns/javaee/web-app_2_5.xsd"
	id="WebApp_ID" version="2.5">
	<display-name>day01struts2template</display-name>

	<!-- 配置struts2的核心控制器:一个过滤器 -->
	<filter>
        	<filter-name>struts2</filter-name>
		<filter-class>
		org.apache.struts2.dispatcher.ng.filter.StrutsPrepareAndExecuteFilter
		</filter-class>
    </filter>
    <filter-mapping>
        <filter-name>struts2</filter-name>
        <url-pattern>/*</url-pattern>
    </filter-mapping>

	<welcome-file-list>
		<welcome-file>index.html</welcome-file>
		<welcome-file>index.htm</welcome-file>
		<welcome-file>index.jsp</welcome-file>
		<welcome-file>default.html</welcome-file>
		<welcome-file>default.htm</welcome-file>
		<welcome-file>default.jsp</welcome-file>
	</welcome-file-list>
</web-app>
2.1.3.4 验证搭建成功与否:
把应用部署到tomcat中,启动tomcat,不报异常则表示搭建成功。
2.2 Struts2入门案例
2.2.1 案例需求
此章节我们使用的案例需求是,通过点击超链接发送请求,由Struts2中类来负责接收,并且在控制台输出接收到了的语句。
2.2.2 案例实现
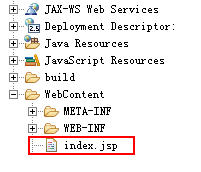
2.2.2.1 第一步:在Web应用中编写一个index.jsp页面,放到WebContent目录下。如下图:
里面的内容如下所示:
<%@ page language="java" contentType="text/html; charset=UTF-8"
		pageEncoding="UTF-8"%>
<!DOCTYPE html PUBLIC "-//W3C//DTD HTML 4.01 Transitional//EN"
				"http://www.w3.org/TR/html4/loose.dtd">
<html>
	<head>
		<meta http-equiv="Content-Type" content="text/html; charset=UTF-8">
		<title>Struts2的入门案例</title>
	</head>
	<body>
		<%--struts2的核心控制器(过滤器)默认会拦截以.action为后缀或者没有后缀的请求。
			例如:hello.action或者hello --%>
		<a href="${pageContext.request.contextPath}/hello.action">
			访问struts2的第一个动作类中的方法.action
		</a>
		<a href="${pageContext.request.contextPath}/hello">
			访问struts2的第一个动作类中的方法
		</a>
	</body>
</html>
点击该链接,需要提交请求到服务器的Action。那么接下来需要编写Action去处理请求。
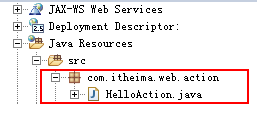
2.2.2.2 第二步:编写一个Class,放到你想指定的包下:
类中提供一个方法,代码如下:
/**
 * 我们的第一个动作类
 * 	动作类:
 * 		Struts2中用于处理请求的类,叫做动作类。
 * 		其实就是一个普通的java类。
*/
public class HelloAction {

	/**
	 * 我们把动作类中的具有特定编写规则的方法叫做动作方法。
	 * 规则是:
	 * 	 1、访问修饰符必须是public
	 * 	 2、方法的返回值必须是String
	 * 	 3、方法的参数列表必须是空的
	 * @return
	 */
	public String sayHello(){
		System.out.println(this);
		System.out.println("HelloAction中的sayHello方法执行了。。。。");
		return "success";
	}
}
2.2.2.3 第三步:在配置文件中配置我们的动作类
<?xml version="1.0" encoding="UTF-8"?>
<!DOCTYPE struts PUBLIC
	"-//Apache Software Foundation//DTD Struts Configuration 2.3//EN"
	"http://struts.apache.org/dtds/struts-2.3.dtd">
<struts>
	<!-- 目前照抄 -->
	<package name="p1" extends="struts-default">
		<action name="hello" class="com.itheima.web.action.HelloAction" method="sayHello">
			<result name="success" type="dispatcher">/success.jsp</result>
		</action>
	</package>
</struts>
2.2.2.4 第四步:在WebContent中编写一个success.jsp
<%@ page language="java" contentType="text/html; charset=UTF-8"  pageEncoding="UTF-8"%>
<!DOCTYPE html PUBLIC "-//W3C//DTD HTML 4.01 Transitional//EN" "http://www.w3.org/TR/html4/loose.dtd">
<html>
<head>
<meta http-equiv="Content-Type" content="text/html; charset=UTF-8">
<title>Insert title here</title>
</head>
<body>
执行成功!
</body>
</html>
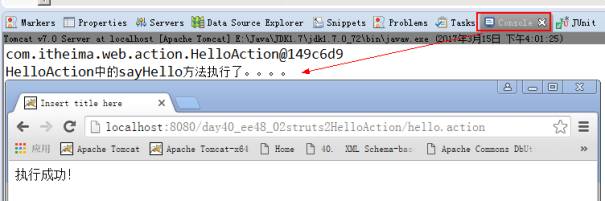
2.2.2.5 第六步:启动tomcat测试访问结果
2.3 Struts2的执行过程
2.3.1 执行时序:
首先是,启动tomcat服务器,这时候会加载web.xml,当读到filter标签时,会创建过滤器对象。
struts2的核心过滤器(StrutsPrepareAndExecuteFilter)会负责加载类路径下的struts.xml配置文件。
接下来,从客户端发送请求过来 先经过前端控制器(核心过滤器StrutsPrepareAndExecuteFilter),前端控制器会根据请求的名称在struts.xml中找到对应的配置,创建我们的动作类对象(每次访问时都会创建新的Action对象),然后执行指定的方法,根据方法的返回值找到Result的配置进行页面的跳转.最后响应浏览器。
如下图所示:

2.3.2 内部执行流程:
struts2框架在默认情况下核心控制器(StrutsPrepareAndExecuteFilter)默认会拦截以.action为后缀的请求,或者是没有任何后缀的请求。当拦截下来后,送入struts2的核心内部。如下图所示:

我们通过上面的图解,应该明确在实际开发中我们用struts2要做哪些:
a、写动作类
b、写jsp
c、写配置文件
其中,又以配置文件为重。
第3章 struts2的配置文件详解
3.1 Struts2中的配置文件
3.1.1 配置文件说明
通过上图,我们知道了学习struts2框架,配置文件的重要性。那么在struts2中给我们提供了6个配置文件。他们的加载时机是tomcat启动服务一加载我们的应用时,就加载struts2的配置文件。
他们的加载顺序入下图:
| 顺序 |
配置文件名 |
所在位置 |
说明 |
| 1 |
default.properties |
struts2-core-2.3.15.3.jar\org\apache\struts2 |
不能修改 |
| 2 |
struts-default.xml |
struts2-core-2.3.15.3.jar |
不能修改 |
| 3 |
strtuts-plugin.xml |
在struts2提供的插件jar包中 |
不能修改 |
| 4 |
struts.xml |
我们的应用中 |
我们修改的:推荐 |
| 5 |
struts.properties |
我们的应用中 |
我们修改的 |
| 6 |
web.xml |
我们的应用中 |
我们修改的,可以给过滤器配置参数 |
这些加载顺序,都是在Struts2的核心控制器中体现的,源码如下:
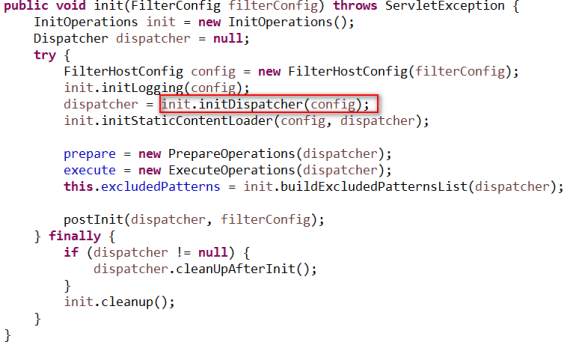
在init方法中,调用了init的initDispatcher的方法来加载配置文件,进入到该代码中:

我们会发现这个方法又调用了dispatcher的init方法。进入init方法内部:
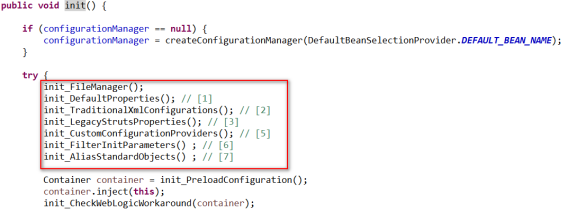
这一系列的代码就是用来加载Struts2的配置文件的。
3.1.2 配置文件的注意事项
1、Struts2提供了两种配置的方式。一种是key=value的方式,即使用.properties文件。另一种是xml文件配置。我们推荐使用xml文件(它能描述层级关系)。
2、当多个配置文件中,有相同的参数,后加载的会把前面的值给覆盖了。

3.1.3 struts2中的常用常量
常量定义在了default.properties配置文件中,体现形式都是key=value。所有的struts2应用都会用到这些常量。
常用的:
| 常量名 |
常量值 |
说明 |
| struts.i18n.encoding |
UTF-8 |
应用中使用的编码 |
| struts.objectFactory.spring.autoWire |
name |
和spring框架整合有关 |
| struts.multipart.parser |
jakarta |
指定文件上传用的组件 |
| struts.multipart.maxSize |
2097152 |
文件上传总文件大小限制:2M |
| struts.action.extension |
action,, |
能进入Struts2框架内部的url地址后缀名。多个值用逗号分隔 |
| struts.enable.DynamicMethodInvocation |
false |
是否允许动态方法调用 |
| struts.devMode |
false |
是否是开发模式。开发模式:改了配置文件,不需要重启。输出更多的错误信息。开发阶段建议为true。 |
| struts.ui.theme |
xhtml |
页面展示用的主题 |
3.2 struts.xml中的标签详解
3.2.1 constant标签
作用:
用于修改struts2中的常量
属性:
name:指定常量的key
value:指定常量的值
用法:
<!-- 开启开发者模式 -->
<constant name="struts.devMode" value="true"></constant>
3.2.2 package标签
作用:
在struts2的配置文件中引入了面向对象思想,使用了分包管理。易于管理动作类。便于模块化开发动作类。
属性:
name:
包的名称。必须写。且必须唯一。
extends:
一般情况下需要继承struts-default包,但不是必须的。不过如果不继承的话,将无法使用struts2提供的核心功能。struts-default.xml中定义着struts-default这个包。而struts-default.xml是在我们的struts.xml加载之前加载。
abstract:
把包声明为抽象包,抽象包就是用来被继承的。只要是没有<action>元素的包,就可以声明为抽象包。
namespace:
名称空间。它的作用是把访问的URL按照模块化来管理。
名称空间的写法:
必须以/开头
后面可以是字母和数组的组合,也可只有字母。
如果有数字的话,数字不能作为/后面的第一个字符。
当我们指定了名称空间之后,访问的URL就变成了:
名称空间+action标签的name属性取值
例如:
/n1/hello.action
/customer/addCustomer.action
/customer/editCustomer.action
/linkman/findAllLinkMan.action
/linkman/removeLinkMan.action
名称空间的默认值是:""(struts2官方文档中提供的)
用法:
<package name="myDefault" extends="struts-default" abstract="true">
<!-- 此处就可以定义公共配置,该公共配置应该是当前应用中的公共配置 -->
</package>
<package name="p1" extends="myDefault" namespace="/n1">
<action name="hello" class="com.itheima.web.action.HelloAction" method="sayHello">
<result name="success" type="dispatcher">/success.jsp</result>
</action>
</package>
3.2.3 action标签
作用:
建立动作名称和动作类以及动作方法的对应关系。
属性:
name:指定的动作名称。和页面中url后面保持一种。注意此处不能后缀。动作名称必须唯一。
class:指定的是动作类的全限定类名。
method:指定的是动作方法名称
3.3 动作类的三种创建方式:
3.3.1 第一种:无侵入式创建(实际开发中基本不用)
/**
 * 我们的第一个动作类
 * 动作类的第一种创建方式:
 * 	无侵入式的创建。
*/
public class HelloAction {
	/**
	 * @return
	 */
	public String sayHello(){
		System.out.println(this);
		System.out.println("HelloAction中的sayHello方法执行了。。。。");
		return "success";
	}
}
<action name="hello" class="com.itheima.web.action.HelloAction" method="sayHello">
		<result name="success" type="dispatcher">/success.jsp</result>
</action>
3.3.2 第二种:实现Action接口的定义方式(实际开发中用的也不多)
/**
 * 动作类的第二种创建方式:
 *  实现Action接口
 */
public class Hello2Action implements Action{

	@Override
	public String execute() throws Exception {
		System.out.println("Hello2Action的execute方法执行了............");
		return ERROR;
	}
}
默认的动作方法是:execute(),所以可以不指定method属性
<action name="hello2" class="com.itheima.web.action.Hello2Action">
		<result name="success" type="dispatcher">/success.jsp</result>
</action>
Action接口中的常量
	SUCCESS:一般多用于成功
	ERROR:一般多用于动作方法执行失败
	LOGIN:一般多用于返回登录页面
	NONE:一般用于不返回任何结果视图,和return null作用是一样的
	INPUT:一般多用于数据回显,也是struts2中数据回显时的默认返回值。
3.3.3 第三种:继承ActionSupport (们实际开发中采用的方式)
/**
 * 动作类的第三种创建方式:
 *  继承ActionSupport
*/
public class Hello3Action extends ActionSupport{
}
<action name="hello3" class="com.itheima.web.action.Hello3Action">
	<result name="success" type="dispatcher">/success.jsp</result>
</action>
3.3.4 默认动作类:ActionSupport类
通过struts-default.xml中我们知道默认的动作类是ActionSupport,所以如果实现该类的execute方法,则可以不用指定class和method属性
<action name="defaultAction">
	<result name="success" type="dispatcher">/success.jsp</result>
</action>
3.4 配置action时使用通配符
3.4.1 原始全匹配配置方式:
<package name="user" extends="struts-default" namespace="/user" >
	<action name="addUser" class="com.itheima.web.action.UserAction" method="addUser">
			<result name="success">/success.jsp</result>
	</action>
	<action name="updateUser" class="com.itheima.web.action.UserAction" method="updateUser">
		<result name="success">/success.jsp</result>
	</action>
	<action name="deleteUser" class="com.itheima.web.action.UserAction" method="deleteUser">
		<result name="success">/success.jsp</result>
	</action>
	<action name="findUser" class="com.itheima.web.action.UserAction" method="findUser">
		<result name="success">/success.jsp</result>
	</action>
</package>
页面访问方式:
<a href="${pageContext.request.contextPath}/addUser.action">添加用户</a>
<a href="${pageContext.request.contextPath}/updateUser.action">修改用户</a>
<a href="${pageContext.request.contextPath}/deleteUser.action">删除用户</a>
<a href="${pageContext.request.contextPath}/findUser.action">查询用户</a>

Action类中的方法:
/**
 * 用户管理的动作类
*/
public class UserAction extends ActionSupport {

	public String addUser(){
		System.out.println("添加了用户");
		return SUCCESS;
	}
	public String updateUser(){
		System.out.println("更新了用户");
		return SUCCESS;
	}
	public String deleteUser(){
		System.out.println("删除了用户");
		return SUCCESS;
	}
	public String findUser(){
		System.out.println("查询了用户");
		return SUCCESS;
	}
}
3.4.2 使用通配符访问方式
3.4.3 第一种:单一通配符
<package name="user" extends="struts-default">
	<action name="*" class="com.itheima.web.action.UserAction" method="{1}">
		<result name="success">/success.jsp</result>
	</action>
</package>
页面访问方式和Action类中的方法不变
3.4.4 第二种:多个通配符组合使用
<package name="user" extends="struts-default">											 <action name="*_*" class="com.itheima.web.action.{2}Action" method="{1}{2}">
		<result name="success">/success.jsp</result>
	</action>
</package>

页面访问方式:
<a href="${pageContext.request.contextPath}/add_User.action">添加用户</a>
<a href="${pageContext.request.contextPath}/update_User.action">修改用户</a>
<a href="${pageContext.request.contextPath}/delete_User.action">删除用户</a>
<a href="${pageContext.request.contextPath}/find_User.action">查询用户</a>
Action类中的方法不变。
3.4.5 第三种:动态方法调用
<!-- 开启动态方法调用 -->
<constant name="struts.enable.DynamicMethodInvocation" value="true"></constant>
<package name="user" extends="struts-default">
	<action name="user" class="com.itheima.web.action.UserAction" >
		<result name="success">/success.jsp</result>
	</action>
</package>

页面访问方式:
<a href="${pageContext.request.contextPath}/user!addUser.action">添加用户</a>
<a href="${pageContext.request.contextPath}/user!updateUser.action">修改用户</a>
<a href="${pageContext.request.contextPath}/user!deleteUser.action">删除用户</a>
<a href="${pageContext.request.contextPath}/user!findUser.action">查询用户</a>
Action类中的方法不变。
第4章 案例:Strut2+Hibernate查询客户列表
4.1 使用struts2+hibernate实现客户列表查询
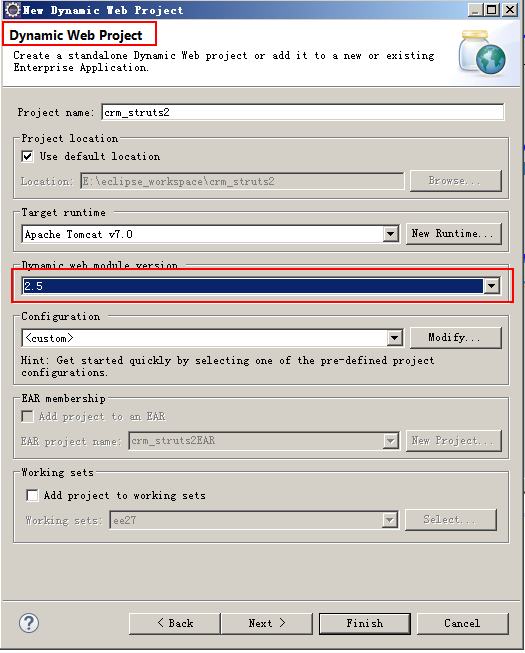
请先创建一个java web工程,选择Servlet2.5规范。
4.1.1 第一步:搭建hibernate开发环境并准备实体类和映射文件
搭建hibernate开发环境:略
实体类:
/**
 * 客户的实体类
*/
public class Customer implements Serializable {

	private Long custId;
	private String custName;
	private String custSource;
	private String custIndustry;
	private String custLevel;
	private String custAddress;
	private String custPhone;

	public Long getCustId() {
		return custId;
	}
	public void setCustId(Long custId) {
		this.custId = custId;
	}
	public String getCustName() {
		return custName;
	}
	public void setCustName(String custName) {
		this.custName = custName;
	}
	public String getCustSource() {
		return custSource;
	}
	public void setCustSource(String custSource) {
		this.custSource = custSource;
	}
	public String getCustIndustry() {
		return custIndustry;
	}
	public void setCustIndustry(String custIndustry) {
		this.custIndustry = custIndustry;
	}
	public String getCustLevel() {
		return custLevel;
	}
	public void setCustLevel(String custLevel) {
		this.custLevel = custLevel;
	}
	public String getCustAddress() {
		return custAddress;
	}
	public void setCustAddress(String custAddress) {
		this.custAddress = custAddress;
	}
	public String getCustPhone() {
		return custPhone;
	}
	public void setCustPhone(String custPhone) {
		this.custPhone = custPhone;
	}
	@Override
	public String toString() {
		return "Customer [custId=" + custId + ", custName=" + custName + ", custSource=" + custSource
				+ ", custIndustry=" + custIndustry + ", custLevel=" + custLevel + ", custAddress=" + custAddress
				+ ", custPhone=" + custPhone + "]";
	}
}
映射文件:
<?xml version="1.0" encoding="UTF-8"?>
<!DOCTYPE hibernate-mapping PUBLIC
    "-//Hibernate/Hibernate Mapping DTD 3.0//EN"
    "http://www.hibernate.org/dtd/hibernate-mapping-3.0.dtd">
<hibernate-mapping package="com.itheima.domain">
	<class name="Customer" table="cst_customer">
		<id name="custId" column="cust_id">
			<generator class="native"></generator>
		</id>
		<property name="custName" column="cust_name"></property>
		<property name="custSource" column="cust_source"></property>
		<property name="custIndustry" column="cust_industry"></property>
		<property name="custLevel" column="cust_level"></property>
		<property name="custAddress" column="cust_address"></property>
		<property name="custPhone" column="cust_phone"></property>
	</class>
</hibernate-mapping>
4.1.2 第二步:按照2.1.3章节搭建struts2环境
按照2.1.3章节的步骤去做。略。
4.1.3 第三步:导入crm的jsp页面
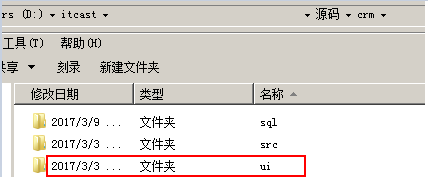
把下图中红框内文件夹下所有内容都拷贝到WebContent目录中

4.1.4 第四步:修改menu.jsp
<TR>
	<TD class=mainMenu onClick="MenuDisplay('table_1');">
		<SPAN class=span id=table_1Span>+</SPAN> 客户管理
	</TD>
</TR>
	<TR>
	<TD>
		<TABLE id=table_1 style="DISPLAY: none" cellSpacing=0 cellPadding=2 width=155 align=center border=0>
			<TBODY>
				<TR>
					<TD class=menuSmall>
						<A class=style2 href="${pageContext.request.contextPath}/welcome.html"  target=main>- 新增客户</A>
					</TD>
				</TR>
		<TR>
			<TD class=menuSmall>
				<A class=style2 href="${pageContext.request.contextPath}/customer/findAllCustomer.action" target=main>- 客户列表</A>
			</TD>
		</TR>
	</TBODY>
	</TABLE>
</TD>
</TR>
4.1.5 第五步:在配置文件中配置findAllCustomer.action
<?xml version="1.0" encoding="UTF-8"?>
<!DOCTYPE struts PUBLIC
	"-//Apache Software Foundation//DTD Struts Configuration 2.3//EN"
	"http://struts.apache.org/dtds/struts-2.3.dtd">
<struts>
	<!-- 开启开发者模式 -->
	<constant name="struts.devMode" value="true"></constant>

	<!-- 配置动作 -->
	<package name="customer" extends="myDefault" namespace="/customer">
		<!-- 查询所有客户 -->
		<action name="findAllCustomer" class="com.itheima.web.action.CustomerAction" method="findAllCustomer">
			<result name="findAllCustomer">/jsp/customer/list.jsp</result>
		</action>
	</package>
</struts>
4.1.6 第六步:创建动作类并提供动作方法
/**
 * 客户的动作类
 */
public class CustomerAction extends ActionSupport implements ModelDriven<Customer>{

	private ICustomerService customerService = new CustomerServiceImpl();


	/**
	 * 查询所有客户
	 * @return
	 */
	public String findAllCustomer(){
		//1.使用service对象查询所有客户
		List<Customer> customers = customerService.findAllCustomer();
		//2.获取request对象
		HttpServletRequest request = ServletActionContext.getRequest();
		//3.存入request域中
		request.setAttribute("customers", customers);
		return "findAllCustomer";
	}
}
4.1.7 第七步:编写service接口和实现类
/**
 * 客户的业务层接口
 */
public interface ICustomerService {

	/**
	 * 查询所有客户
	 * @return
	 */
	List<Customer> findAllCustomer();
}

/**
 * 客户的业务层实现类
 */
public class CustomerServiceImpl implements ICustomerService {

	private ICustomerDao customerDao = new CustomerDaoImpl();

	@Override
	public List<Customer> findAllCustomer() {
		Session s = null;
		Transaction tx = null;
		try{
			s = HibernateUtil.getCurrentSession();
			tx = s.beginTransaction();
			List<Customer> customers = customerDao.findAllCustomer();
			tx.commit();
			return customers;
		}catch(Exception e){
			tx.rollback();
			throw new RuntimeException(e);
		}
	}
}
4.1.8 编写dao接口和实现类
/**
 * 客户的持久层接口
*/
public interface ICustomerDao {

	/**
	 * 查询所有客户
	 * @return
	 */
	List<Customer> findAllCustomer();
}

	/**
 * 客户的持久层实现类
 */
public class CustomerDaoImpl implements ICustomerDao {
	@Override
	public List<Customer> findAllCustomer() {
	return HibernateUtil.getCurrentSession().createQuery("from Customer").list();
	}
}
4.1.9 修改jsp/customer/list.jsp
list.jsp中的代码节选,只涉及forEach标签遍历的部分。

<c:forEach items="${customers}" var="customer">
<TR style="FONT-WEIGHT: normal; FONT-STYLE: normal; BACKGROUND-COLOR: white; TEXT-DECORATION: none">
	<TD>${customer.custName }</TD>
	<TD>${customer.custLevel }</TD>
	<TD>${customer.custSource }</TD>
	<TD>${customer.custIndustry }</TD>
	<TD>${customer.custAddress }</TD>
	<TD>${customer.custPhone }</TD>
	<TD>
		<a href="${pageContext.request.contextPath}/customer/CustomerServlet?method=editCustomerUI&custId=${customer.custId}">修改</a>

		<a href="${pageContext.request.contextPath }/customer/CustomerServlet?method=removeCustomer&custId=${customer.custId}">删除</a>
	</TD>
</TR>
</c:forEach>
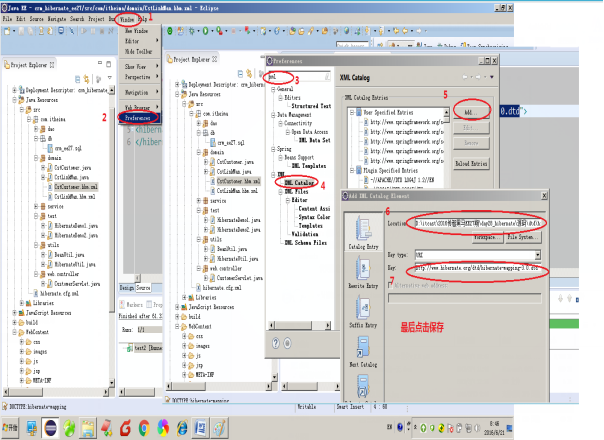
第5章 附录
5.1 关于struts.xml中没有提示的解决