课程链接:http://video.jessetalk.cn/course/explore
良心课程,大家一起来学习哈!
任务22:课程介绍
- 1.HTTP 处理过程
- 2.WebHost 的配置与启动
- 3.Middleware 与管道
- 4.Routing MiddleWare 介绍
任务23:Http请求的处理过程

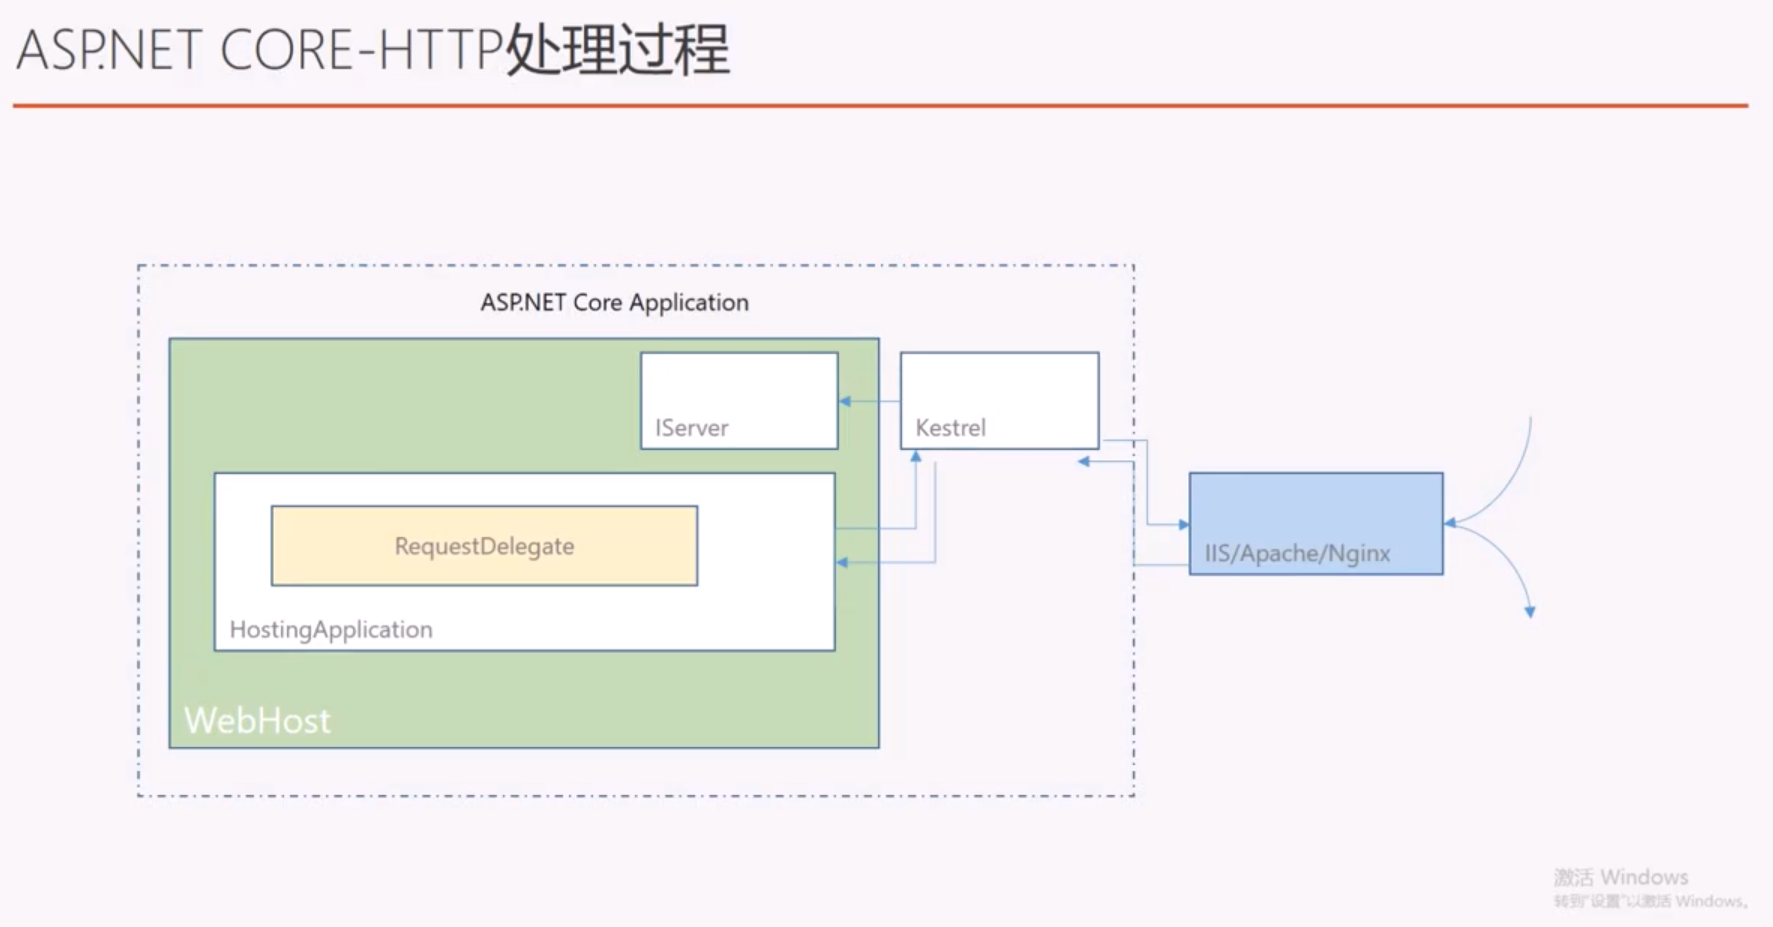
任务24:WebHost的配置
dotnet new webProgram.cs
public static IWebHostBuilder CreateWebHostBuilder(string[] args) =>
            WebHost.CreateDefaultBuilder(args)
            .ConfigureAppConfiguration(configureDelegate=>{
                configureDelegate.AddJsonFile("settings.json");
                configureDelegate.AddCommandLine(args);
            })
            .UseUrls("http://localhost:5001")
            .UseStartup<Startup>();
settings.json
{
    "ConnectionStrings":{
        "DefaultConnection":"Server=...;Database=...;"
    }
}
Startup.cs
using Microsoft.Extensions.Configuration;

public void Configure(IApplicationBuilder app, IHostingEnvironment env, IConfiguration configuration)
        {
            if (env.IsDevelopment())
            {
                app.UseDeveloperExceptionPage();
            }

            app.Run(async (context) =>
            {
                // await context.Response.WriteAsync("Hello World!");
                // JsonFile
                await context.Response.WriteAsync(configuration["ConnectionStrings:DefaultConnection"]);
                // CommandLine
                await context.Response.WriteAsync($"name={configuration["name"]}");
            });
        }
任务25:IHostEnvironment和 IApplicationLifetime介绍
Startup.cs
app.Run(async (context) =>
            {
                await context.Response.WriteAsync($"ContentRootPath = {env.ContentRootPath}");
                await context.Response.WriteAsync($"EnvironmentName = {env.EnvironmentName}");
                await context.Response.WriteAsync($"WebRootPath = {env.WebRootPath}");
            });
Startup.cs
// This method gets called by the runtime. Use this method to configure the HTTP request pipeline.
        public void Configure(IApplicationBuilder app, IHostingEnvironment env, IConfiguration configuration, IApplicationLifetime applicationLifetime)
        {
            if (env.IsDevelopment())
            {
                app.UseDeveloperExceptionPage();
            }

            applicationLifetime.ApplicationStarted.Register(() =>
            {
                Console.WriteLine("Started");
            });

            applicationLifetime.ApplicationStopped.Register(() =>
            {
                Console.WriteLine("Stopped");
            });

            applicationLifetime.ApplicationStopped.Register(() =>
            {
                Console.WriteLine("Stopped");
            });

            app.Run(async (context) =>
            {
                await context.Response.WriteAsync($"ContentRootPath = {env.ContentRootPath}");
                await context.Response.WriteAsync($"EnvironmentName = {env.EnvironmentName}");
                await context.Response.WriteAsync($"WebRootPath = {env.WebRootPath}");
            });
        }
我心中的ASP.NET Core 新核心对象WebHost(一)
我心中的ASP.NET Core 新核心对象WebHost(二)
任务26:dotnet watch run 和attach到进程调试
New Terminal
dotnet new web --name HelloCoreF5 Start Debug
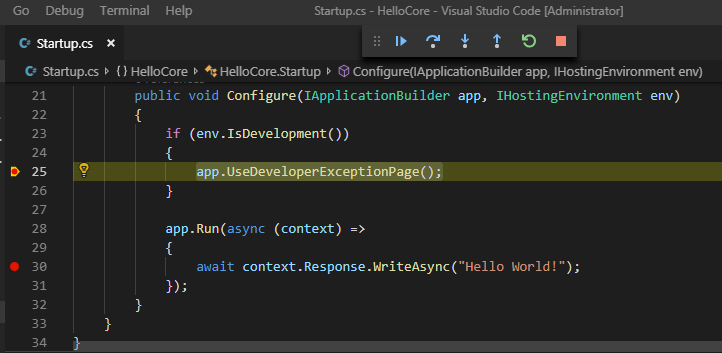
New Terminal
dotnet watch run修改代码保存后会自动重启
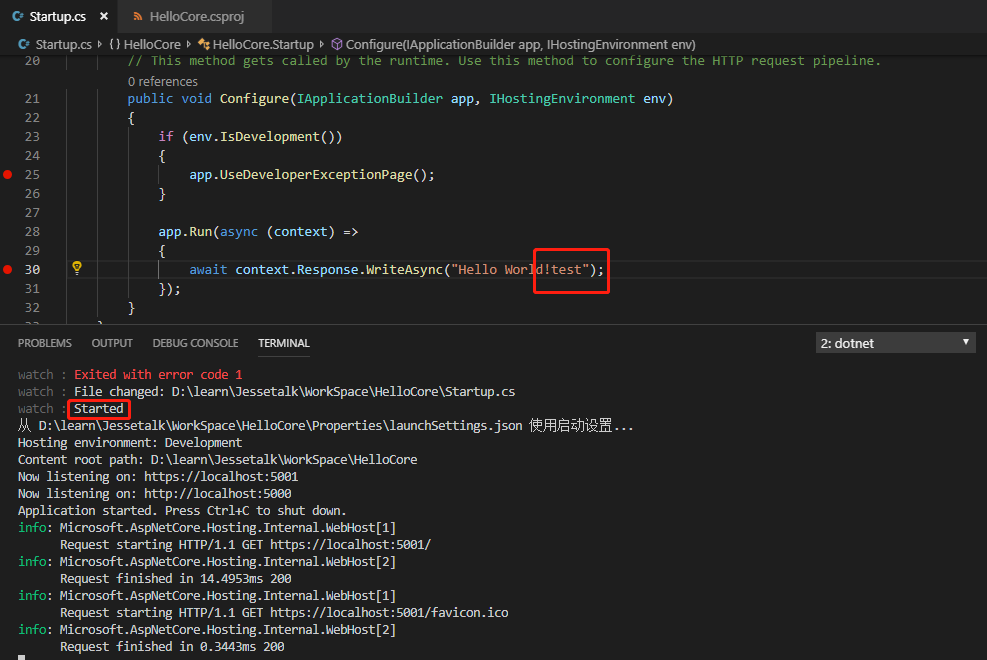
浏览器刷新即可看到更新结果
attach到进程调试
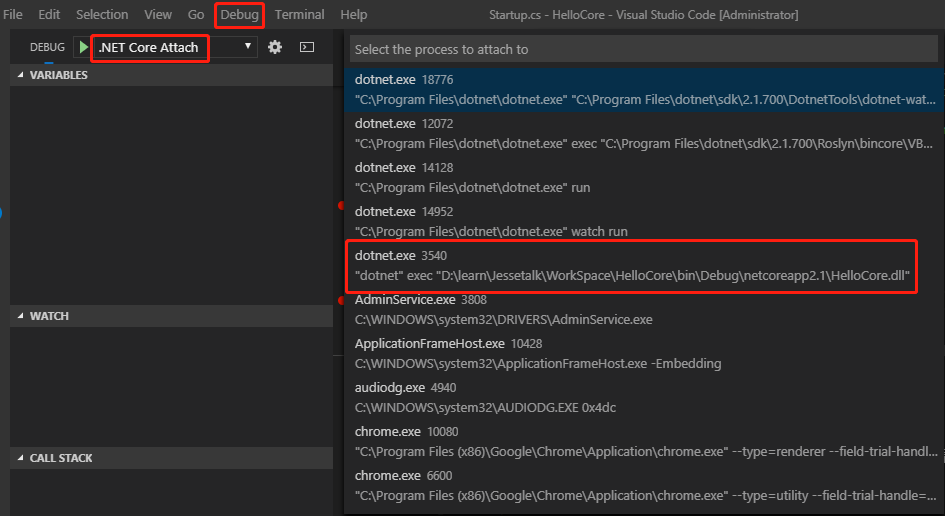
任务27:Middleware管道介绍
- 1.Middleware 与管道的概念
- 2.用 Middleware 来组成管道实践
- 3.管道的实现机制(RequestDelegate 与 ApplicationBuilder)
public class Startup
{
    // This method gets called by the runtime. Use this method to add services to the container.
    // For more information on how to configure your application, visit https://go.microsoft.com/fwlink/?LinkID=398940
    public void ConfigureServices(IServiceCollection services)
    {
    }

    // This method gets called by the runtime. Use this method to configure the HTTP request pipeline.
    // IApplicationBuilder用于构建管道
    public void Configure(IApplicationBuilder app, IHostingEnvironment env)
    {
        if (env.IsDevelopment())
        {
            app.UseDeveloperExceptionPage();
        }

        // 使用Map构建路由,通过localhost:5000/task访问
        app.Map("/task", taskApp=>{
            taskApp.Run(async context=>{
                await context.Response.WriteAsync("this is a task");
            });
        });

        // 添加一个中间件,传一个名字为next的request delegate
        app.Use(async (context,next)=>{
            await context.Response.WriteAsync("1: before start...");
            await next.Invoke();
        });

        // 如果不调用next,则管道终止,不会输出"3: start..."
        app.Use(next=>{
            return (context)=>{
                context.Response.WriteAsync("2: in the middle of start..");
                return next(context);
            };
        });

        app.Run(async (context) =>
        {
            await context.Response.WriteAsync("3: start...");
        });
    }
}
任务28:RequestDelegate管道实现思路
- 1.RequestDelegate
- 2.ApplicationBuilder
// 添加一个中间件,传一个名字为next的RequestDelegate
app.Use(async (context,next)=>{
    await context.Response.WriteAsync("1: before start...");// 完成自己处理
    await next.Invoke();// 调用下一步
});

// 封装一个function交给ApplicationBuilder处理
app.Use(next=>{
    return (context)=>{
        context.Response.WriteAsync("2: in the middle of start..");
        return next(context);
    };
});
任务29:自己动手构建RequestDelegate管道
新建一个控制台程序
dotnet new console --name MyPipelineusing System;
using System.Threading.Tasks;
namespace MyPipeline
{
public delegate Task RequestDelegate(Context context);
}using System;
using System.Threading.Tasks;
namespace MyPipeline
{
public class Context
{
}
}
using System;
using System.Collections.Generic;
using System.Threading.Tasks;

namespace MyPipeline
{
    class Program
    {
        public static List<Func<RequestDelegate,RequestDelegate>>
        _list = new List<Func<RequestDelegate, RequestDelegate>>();
        static void Main(string[] args)
        {
            Use(next=>{
                return context=>{
                    Console.WriteLine("1");
                    // return next.Invoke(context);
                    return Task.CompletedTask;// 结束管道调用,只输出1
                };
            });

            Use(next=>{
                return context=>{
                    Console.WriteLine("2");
                    return next.Invoke(context);
                };
            });

            RequestDelegate end = (Context)=>{
                Console.WriteLine("end...");
                return Task.CompletedTask;
            };

            foreach(var middleware in _list)
            {
                end = middleware.Invoke(end);
            }

            end.Invoke(new Context());
            Console.ReadLine();
        }

        public static void Use(Func<RequestDelegate,RequestDelegate> middleware)
        {
            _list.Add(middleware);
        }
    }
}
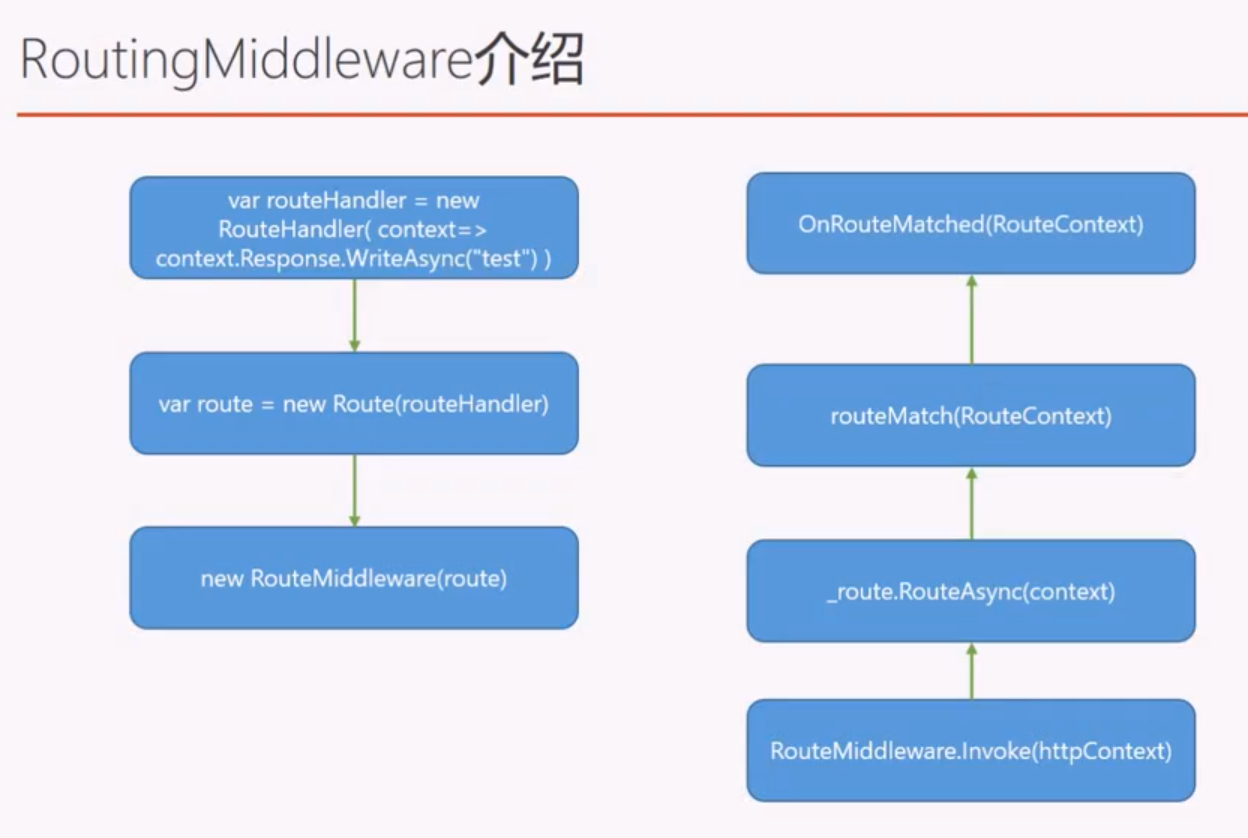
任务30:RoutingMiddleware介绍以及MVC引入
    public class Startup
    {
        // This method gets called by the runtime. Use this method to add services to the container.
        // For more information on how to configure your application, visit https://go.microsoft.com/fwlink/?LinkID=398940
        public void ConfigureServices(IServiceCollection services)
        {
            services.AddRouting();// 添加依赖注入
        }

        // This method gets called by the runtime. Use this method to configure the HTTP request pipeline.
        // IApplicationBuilder用于构建管道
        public void Configure(IApplicationBuilder app, IHostingEnvironment env)
        {
            if (env.IsDevelopment())
            {
                app.UseDeveloperExceptionPage();
            }

            // 使用UseRouter方法2
            // 通过localhost:5000/action访问
            RequestDelegate handler = context=>context.Response.WriteAsync("this is a action");
            var route = new Route(){
                new RouteHandler(handler),
                "action",
                app.ApplicationServices.GetRequiredService<IInlineConstrantResolver>()
            };
            app.UseRouter(route);

            // 使用UseRouter方法1
            // 通过localhost:5000/action访问
            app.UseRouter(builder=>builder.MapGet("action", async context=>{
                await context.Response.WriteAsync("this is a action");
            }));
        }
    }
本作品采用知识共享署名-非商业性使用-相同方式共享 4.0 国际许可协议进行许可。
欢迎转载、使用、重新发布,但务必保留文章署名 郑子铭 (包含链接: http://www.cnblogs.com/MingsonZheng/ ),不得用于商业目的,基于本文修改后的作品务必以相同的许可发布。
如有任何疑问,请与我联系 ([email protected]) 。
