课程链接:http://video.jessetalk.cn/course/explore
良心课程,大家一起来学习哈!
任务1:课程介绍
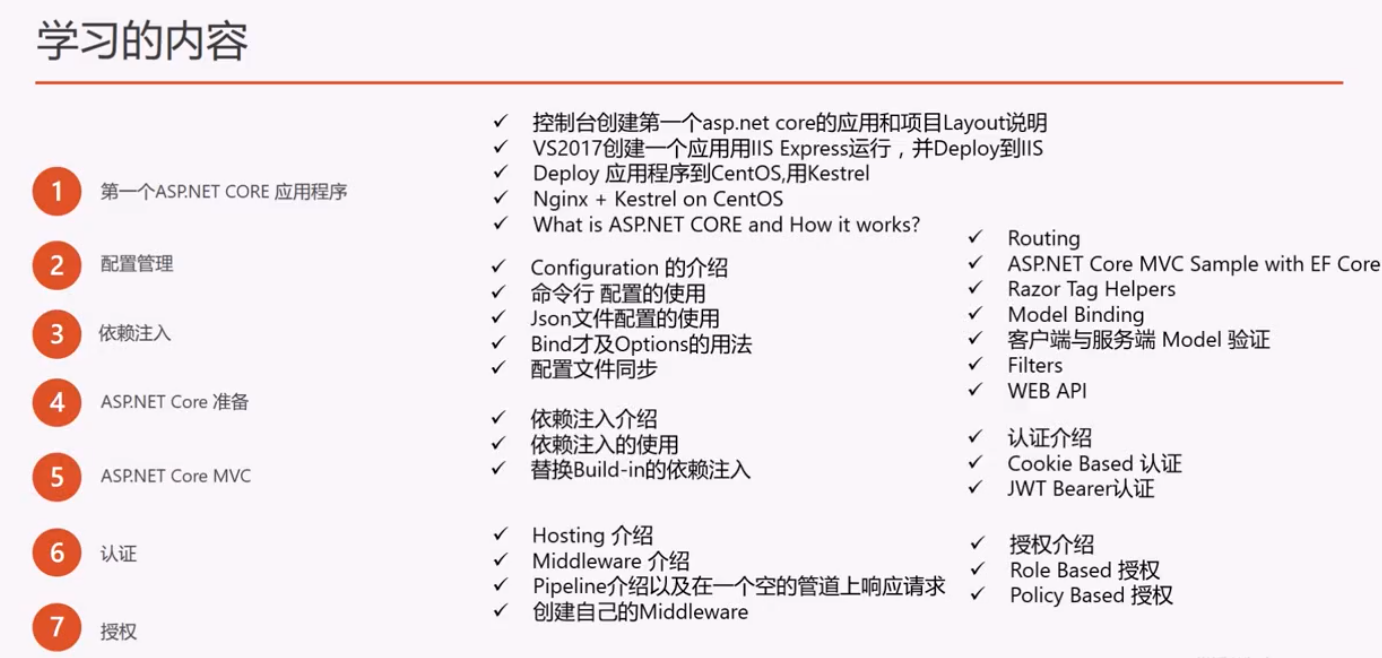
任务2:环境安装
下载地址:https://dotnet.microsoft.com/download
或者在 VS2017 安装时勾选 .NET CORE,如果已安装则在菜单栏上点击工具--获取工具和功能(T)

安装完成验证,在左下角 Windows 图标右键启动 Window PowerShell(管理员)
PS C:\WINDOWS\system32> dotnet任务3:在控制台创建ASP.NET Core应用程序
查看模板:
PS C:\WINDOWS\system32> dotnet new --help新建一个 ASP.NET Core Web App (Model-View-Controller)
PS D:\jessetalk> mkdir aspdotnetcore
PS D:\jessetalk> cd .\aspdotnetcore\
PS D:\jessetalk\aspdotnetcore> dotnet new mvc
启动项目
PS D:\jessetalk\aspdotnetcore> dotnet run浏览器访问:https://localhost:5001/

任务4:在VS2017中创建ASP.NET Core应用程序
在 VS2017 中通过 IIS Express 启动

官方推荐在开发和测试的时候通过控制台启动,切换启动方式
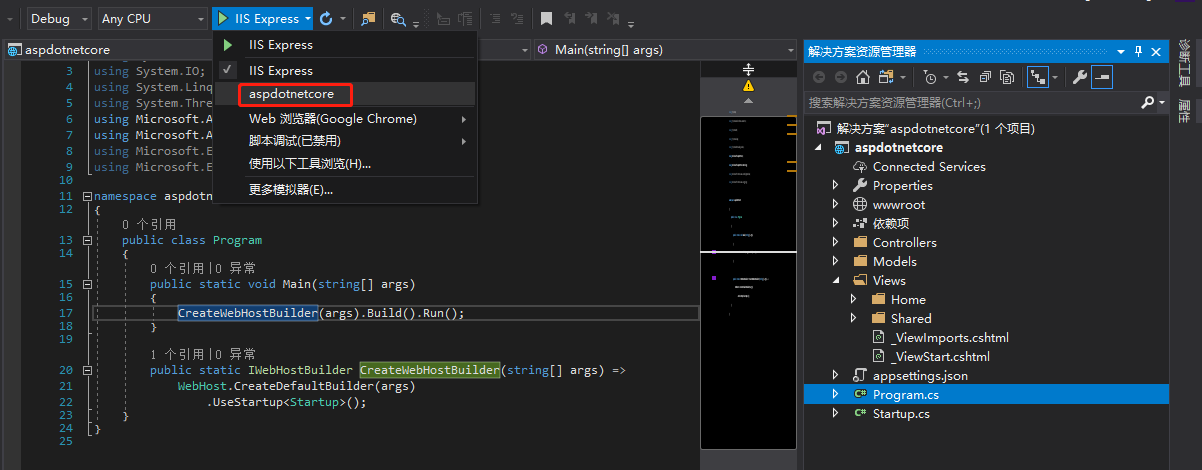
启动之后会自动把日志通过控制台输出

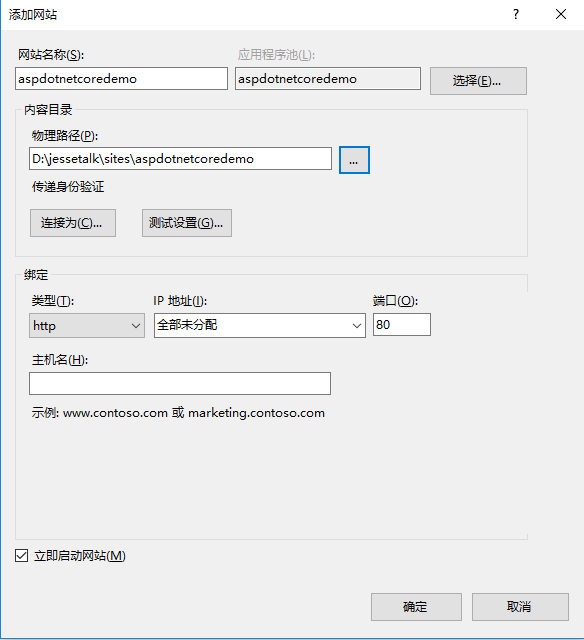
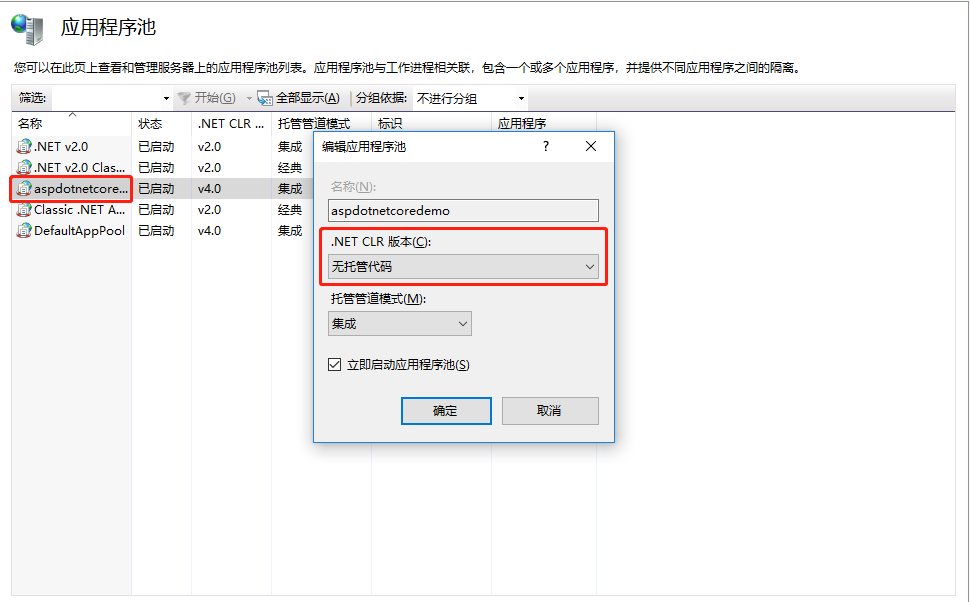
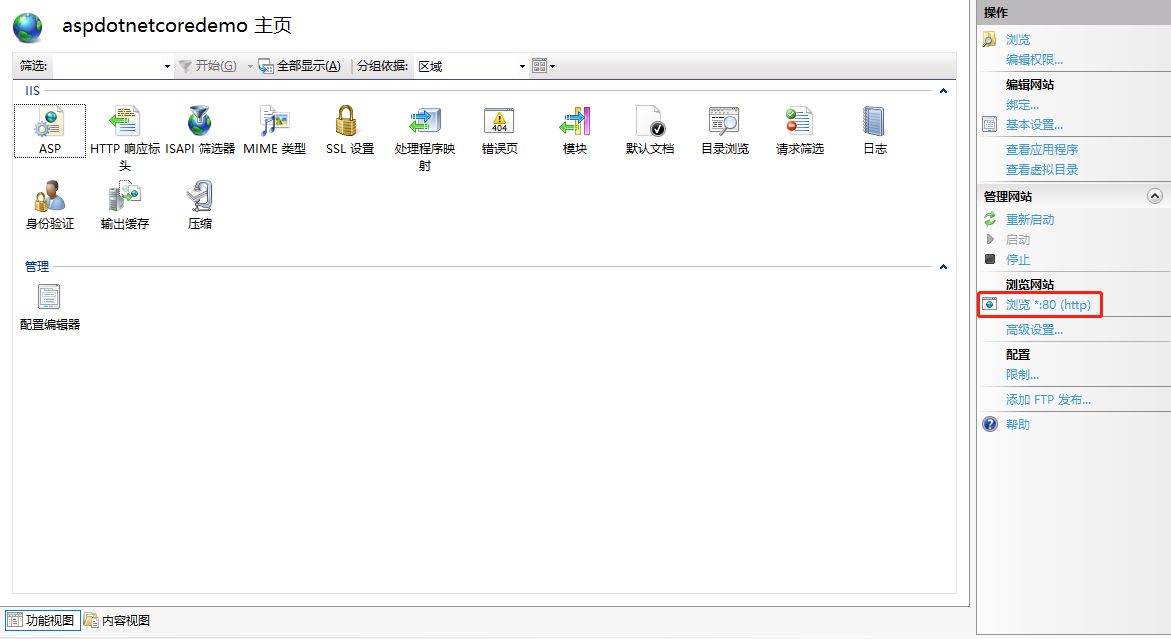
任务5:部署到IIS
安装完成后在 iis 的模块下面可以看到

在 iis 中新建一个网站,停掉 Default 的网站
在应用程序池中修改 .NET CLR 版本,不然无法运行
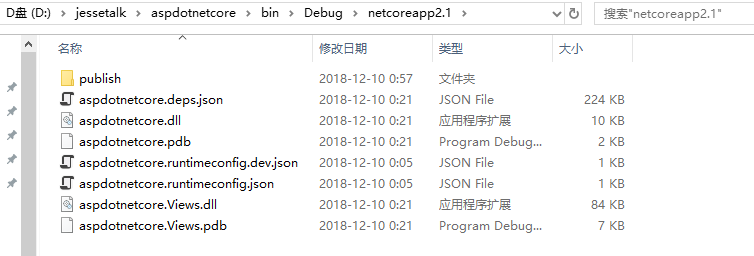
在控制台发布
PS D:\jessetalk\aspdotnetcore> dotnet publish发布结果
发布到指定目录
PS D:\jessetalk\aspdotnetcore> dotnet publish -o D:\jessetalk\sites\aspdotnetcoredemo浏览发布的网站

通过 VS2017 发布:
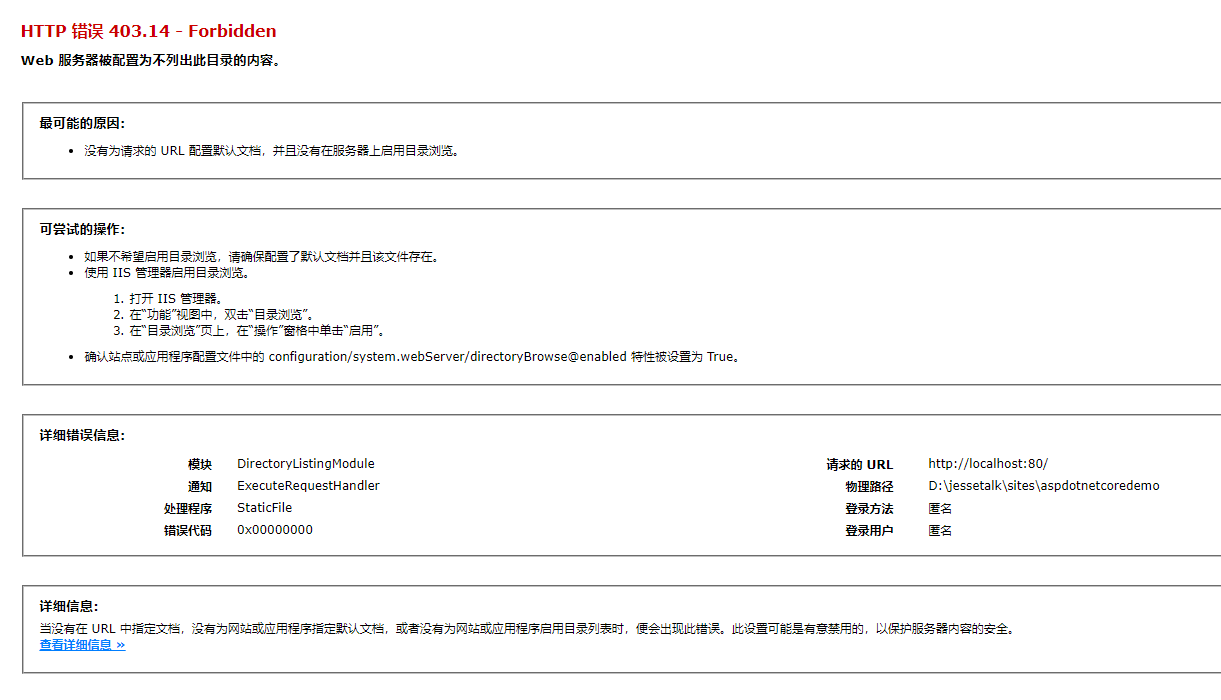
清空该目录下面的内容:D:\jessetalk\sites\aspdotnetcoredemo,刷新浏览器
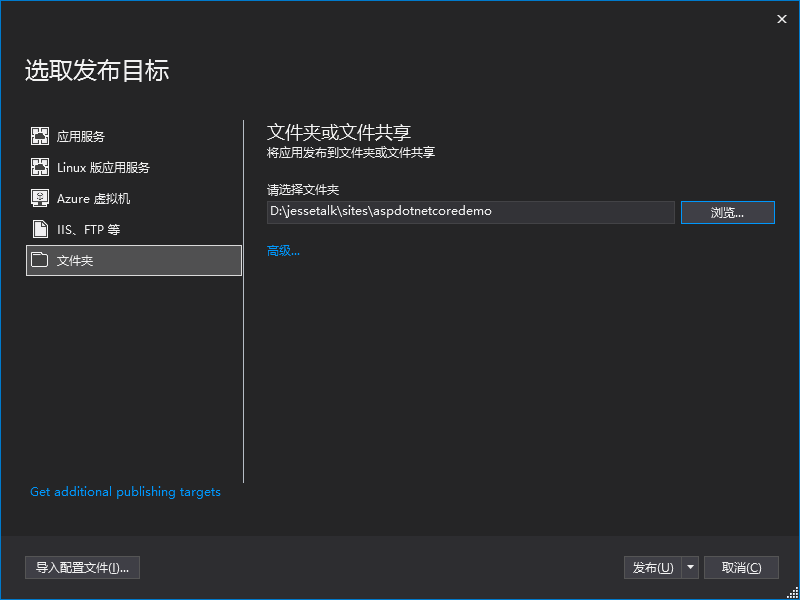
在 VS2017 中,项目右键--发布,通过文件夹发布
刷新浏览器
任务6:准备CentOS和Nginx环境
下载 vmware workstation
官网:https://www.vmware.com/products/workstation-pro/workstation-pro-evaluation.html
下载 CentOS,选择 Minimal ISO
官网:https://www.centos.org/download/
第一次启动可能出现
VMware与 Device/Credential Guard 不兼容
手动安装组件:
网卡

修改为 yes
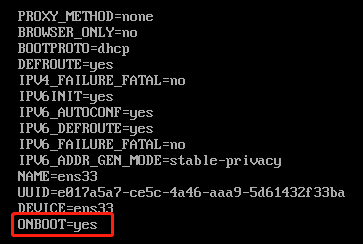
重启网卡

安装 ifconfig 命令


得到 ip 地址 192.168.204.128 之后可以通过 putty 连接
putty下载地址:https://putty.org/
使用 putty 连接 cenos 之后可以方便复制粘贴命令
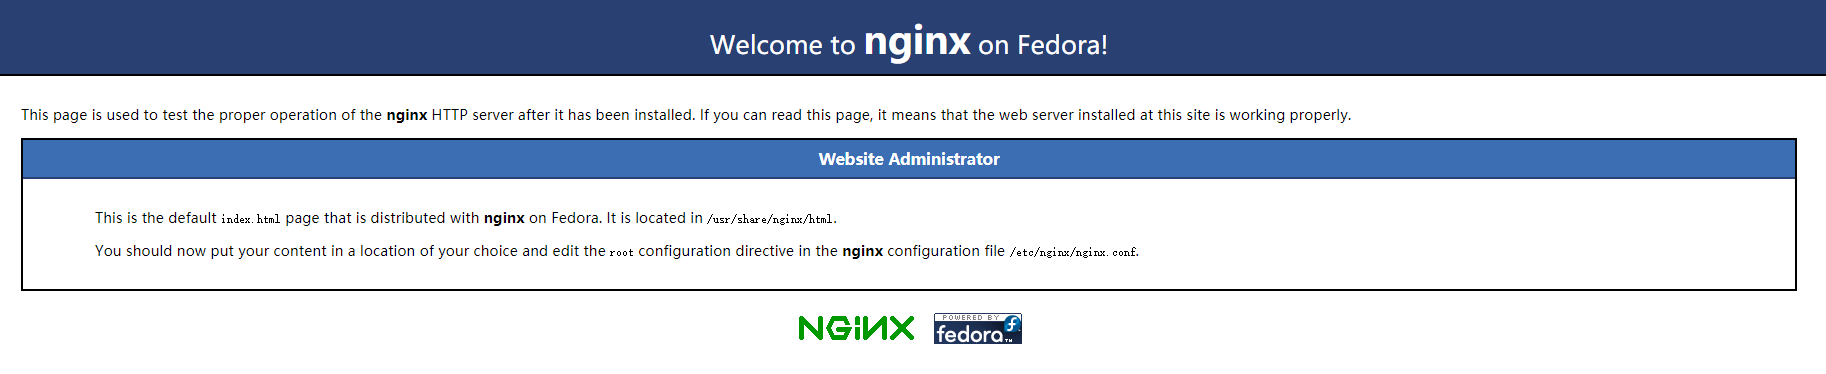
安装 Nginx:https://www.digitalocean.com/community/tutorials/how-to-install-nginx-on-centos-7
安装完成后浏览器访问:192.168.204.128
任务7:在CentOS上安装.NET Core运行时
cenos 安装 asp .net core 环境:[https://www.asp.net/core/overview/aspnet-vnext]https://www.asp.net/core/overview/aspnet-vnext)
安装后验证:
[root@localhost ~]# dotnet
[root@localhost ~]# dotnet --version
[root@localhost ~]# dotnet new --help
[root@localhost ~]# cd /
[root@localhost /]# cd home
[root@localhost home]# mkdir netcore
[root@localhost home]# mkdir helloCore
[root@localhost home]# cd helloCore
[root@localhost helloCore]# dotnet new webapi
[root@localhost helloCore]# dotnet run
通过另一个 putty 连接访问
[root@localhost ~]# curl http://localhost:5000/api/values任务8:部署到CentOS
下载 FileZilla :https://filezilla-project.org/
通过 ftp 将之前发布在 sites 目录下的文件上传到 cenos 上的 netcore 文件夹里

启动网站
[root@localhost home]# cd netcore
[root@localhost netcore]# ls
appsettings.Development.json  aspdotnetcore.pdb                 web.config
appsettings.json              aspdotnetcore.runtimeconfig.json  wwwroot
aspdotnetcore.deps.json       aspdotnetcore.Views.dll
aspdotnetcore.dll             aspdotnetcore.Views.pdb
[root@localhost netcore]# dotnet aspdotnetcore.dll
Hosting environment: Production
Content root path: /home/netcore
Now listening on: http://localhost:5000
Now listening on: https://localhost:5001
Application started. Press Ctrl+C to shut down.
通过另一个 putty 访问
[root@localhost ~]# curl http://localhost:5000使用 nginx 将 80 端口 映射到 5000 端口 下
[root@localhost ~]# cd /etc/nginx
[root@localhost nginx]# ls
conf.d                  koi-utf             scgi_params
default.d               koi-win             scgi_params.default
fastcgi.conf            mime.types          uwsgi_params
fastcgi.conf.default    mime.types.default  uwsgi_params.default
fastcgi_params          nginx.conf          win-utf
fastcgi_params.default  nginx.conf.default
[root@localhost nginx]# vi nginx.conf
注释掉 nginx.conf 文件中默认 80 的 server
#    server {
#        listen       80 default_server;
#        listen       [::]:80 default_server;
#        server_name  _;
#        root         /usr/share/nginx/html;
#
#        # Load configuration files for the default server block.
#        include /etc/nginx/default.d/*.conf;
#
#        location / {
#        }
#
#        error_page 404 /404.html;
#            location = /40x.html {
#        }
#
#        error_page 500 502 503 504 /50x.html;
#            location = /50x.html {
#        }
#    }
nginx.conf 文件中这一句将所有 .conf 文件引入进来
# include /etc/nginx/default.d/*.conf;修改 netcore.conf
[root@localhost nginx]# cd conf.d
[root@localhost nginx]# vi netcore.conf
netcore.conf
server {
        listen 80;
        location / {
                proxy_pass http://localhost:5000;
                proxy_http_version 1.1;
                proxy_set_header Upgrade $http_upgrade;
                proxy_set_header Connection keep-alive;
                proxy_set_header Host $host;
                proxy_cache_bypass $http_upgrade;
        }
}
重启 nginx
[root@localhost conf.d]# nginx -s reload
[root@localhost conf.d]# systemctl restart nginx
浏览器访问:http://192.168.204.128/

本作品采用知识共享署名-非商业性使用-相同方式共享 4.0 国际许可协议进行许可。
欢迎转载、使用、重新发布,但务必保留文章署名 郑子铭 (包含链接: http://www.cnblogs.com/MingsonZheng/ ),不得用于商业目的,基于本文修改后的作品务必以相同的许可发布。
如有任何疑问,请与我联系 ([email protected]) 。