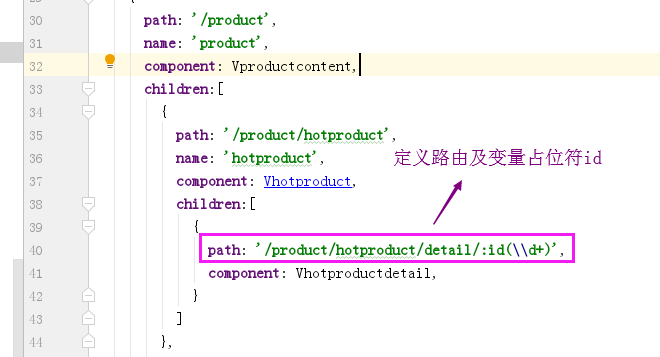
1、定义路由
  routes: [

    {
      path: '/product',  //第一层路由
      name: 'product',
      component: Vproductcontent,//父组件渲染的是子组件的内容<routerview/>写在父组件中
      children:[
        {
          path: '/product/hotproduct', //第二层路由
          name: 'hotproduct',
          component: Vhotproduct,
          children:[
            {
              path: '/product/hotproduct/detail/:id(\\d+)',  //第三层路由
              component: Vhotproductdetail,
            }
          ]
        },

      ]
    },


  ]
2、使用 router-link 组件来导航
在左侧菜单栏的Vleft组件中使用router-link
    <ul class="nav nav-sidebar">
      <router-link  tag="li" to="/product"><a href="#">产品管理</a></router-link>
    </ul>
2.1 加入默认样式
默认选中的样式是在li标签上加上class="active"
 #将其渲染成以下样式,这是默认选中的样式
  <ul class="nav nav-sidebar">
      <li class="active"><a href="#">产品管理</a></li>
    </ul>
2.1.1 tag
如果想要 <router-link> 渲染成某种标签,例如 <li>。 可以使用 tag prop 类指定何种标签,同样它还是会监听点击,触发导航。
    <ul class="nav nav-sidebar">
      <router-link  tag="li" to="/product"><a href="#">产品管理</a></router-link>
    </ul>
2.1.2 active-class
设置 链接激活时使用的 CSS 类名。默认值可以通过路由的构造选项 linkActiveClass 来全局配置。比如:li标签上渲染出class="active"
- 可在 <router-link> 上使用 active-class 属性,指定渲染后生成其他类名
<router-link tag="li" to="/product" active-class=“active”><a href="#">产品管理</a></router-link>
但是这样需要没一个router-link上都需要加,可以使用全局配置,避免麻烦
- 可以通过路由的构造选项 linkActiveClass 来全局配置
//在router文件夹下的index.js中配置


export default new Router({
  // 全局配置 router-link 标签生成的 CSS 类名
  linkActiveClass: 'active',
  routes: [
  ]
})
2.1.3 exact
如果完成上述配置后,会发现不管点击哪一个链接根路由(/)一直有高亮背景, 因为 /product都会去模糊匹配 / 和 /product, 所以 / 一直有高亮 ,可在router-link 标签上使用 exact 属性,针对根路由(/)开启精确匹配。
<router-link tag="li" to="/" exact><a href="#">首页</a></router-link>
此时就完成了点击哪个,哪个就会激活有背景色。
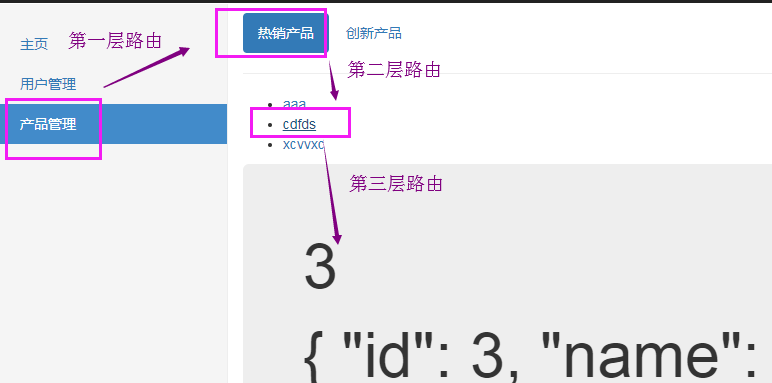
3、router-view渲染
这里注意每一层的路由最后渲染都应该渲染在它上一层录有对应的组件中,例如:
    {
      path: '/product',
      name: 'product',
      component: Vproductcontent,
      children:[
        {
          path: '/product/hotproduct',
          name: 'hotproduct',
          component: Vhotproduct,
         }
     ]
   }
children下的组件都应该渲染在Vproductcontent组件中,所以在Vproductcontent下写router-view的渲染出口。
<div class="col-sm-9 col-sm-offset-3 col-md-10 col-md-offset-2 main">
    <div class="header clearfix headeradd">
      <nav>
        <ul class="nav nav-pills">
          <router-link :to="{name:'hotproduct'}" tag="li">  //路由跳转连接
            <a>热销产品</a>
          </router-link>
        </ul>
      </nav>
      <hr>
    </div>

    <router-view></router-view> //渲染出口

  </div>
4、路由配置默认选中
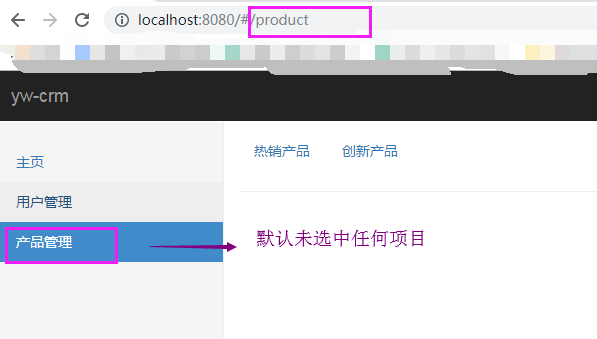
此时只需要在路由中加入,点击产品管理,默认跳转到热销产品即可。
    {
      path: '/product',
      name: 'product',
      component: Vproductcontent,//父组件渲染的是子组件的内容<routerview/>写在父组件中
      children:[
        {
          path: '/product/hotproduct',
          name: 'hotproduct',
          component: Vhotproduct,
          children:[
            {
              path: '/product/hotproduct/detail/:id(\\d+)',
              component: Vhotproductdetail,
            }
          ]
        },


       //点击产品管理默认选中
        {
          path: '/product',
          redirect: '/product/hotproduct',
        }
5、keep-alive
<keep-alive> 可缓存渲染的路由组件实例,比如一个form表单的组件,输入完成后切换到其它组件,回来后内容仍然存在

    <!-- <keep-alive缓存form表单的输入数据 -->
    <keep-alive>
    <router-view></router-view>
    </keep-alive>
6、路由传参
6.1 定义路由
6.1.1 接收参数(变量占位符)
用于接收路由参数的,可用于接收不同类型
    //路由将匹配id是整型的,params后面可以跟正则
    { path: '/params-with-regex/:id(\\d+)' },

    // * 可以匹配任何东西
    { path: '/asterisk/*' },

    // params用冒号“:”表示
    {path : ' / params /:foo /:bar ' },

    //通过添加“?”可以使param成为可选项
    {path : ' / optional-params /:foo?' },
详情参考:https://github.com/vuejs/vue-router/blob/dev/examples/route-matching/app.js
6.2 传参
       <ul>
          <li v-for="(product, index) in hotProductArray" :key="product.id">
            <router-link :to="'/product/hotproduct/detail/' + product.id">
              {{product.name}}
            </router-link>
          </li>
        </ul>


 <ul>
      <li v-for="(product, index) in hotProductArray" :key="product.id">
         <button @click="pushId(id)">  //相当于点击路由链接(后退1步,会返回当前路由界面)
              {{product.name}}
      </button>
          </li>
        </ul>


//
        methods:{
          pushId(id){
            this.$router.push(`/product/hotproduct/detail/${id}`)
          }
        },
其余编程式路由API:
this.$router.push(path)      //相当于点击路由链接(后退1步,会返回当前路由界面)
this.$router.replace(path)  // 用新路由替换当前路由(后退1步,不可返回到当前路由界面)
this.$router.back()     //后退回上一个记录路由
this.$router.go(n)     // 参数 n 指定步数
this.$router.go(-1)    // 后退回上一个记录路由
this.$router.go(1)      //向前进下一个记录路由
6.3 获取对应id的对象
 methods:{
          getProductById(){
            this.id=this.$route.params.id-0 //注意:获取路径上的id,减0是为了变成整型,路径上的id是字符

            //获取指定的对象,防止页面刷新数据丢失,存在localStorage,先去这里取值,因为页面刷新,重新生成Vue实例,内存的数据丢失
            let detailProduct=  window.localStorage.getItem('detailProduct');
              if(!detailProduct) {
                this.detailProduct = this.$store.getters['pm/getHotProductById'](this.id) //获取指定id的对象
              } else {
                window.localStorage.setItem('detailProduct', this.detailProduct)
              }

          }
      },
在创建这个组件时就应该获取id,否则页面刚开始会没有数据
      created(){
          //只会调用一次,创建时就会调用方法,获取id
          this.getProductById();

      },
点击不同的对象就应该监听路由变化,随时获取不同的id
      watch:{
          //监视路由变化,只要变化就会调用方法,重新获取id
          '$route':function () {
            this.getProductById()
          }
      }
id和对象初始化
data:function(){
         return {
           id:null,
           detailProduct:{}
         }
        },
渲染数据
  <div class="jumbotron">
    <h1>{{ id }}</h1>
    <h1>{{ detailProduct }}</h1>

  </div>
6.4 路由传参关系图
