- 关于第二路由,即命令路由和主路由无命名的区别:
- 命名路由和主路由互不依赖
- 命名路由可以和其他路由组合使用,而主路由只能支持一条无命名路由
- 命名路由可以显示在命令出口中
- 通俗的说;<router-outlet></router-outlet>是模块的路由出口;现在我想再加一个模块;这个模块也放在主模块中;即使用命名路由作为第二路由出口,显示这个模块在主要模块中;
- 使用方法:在主页面中app.component.html中,添加第二路由出口,并添加导航
-
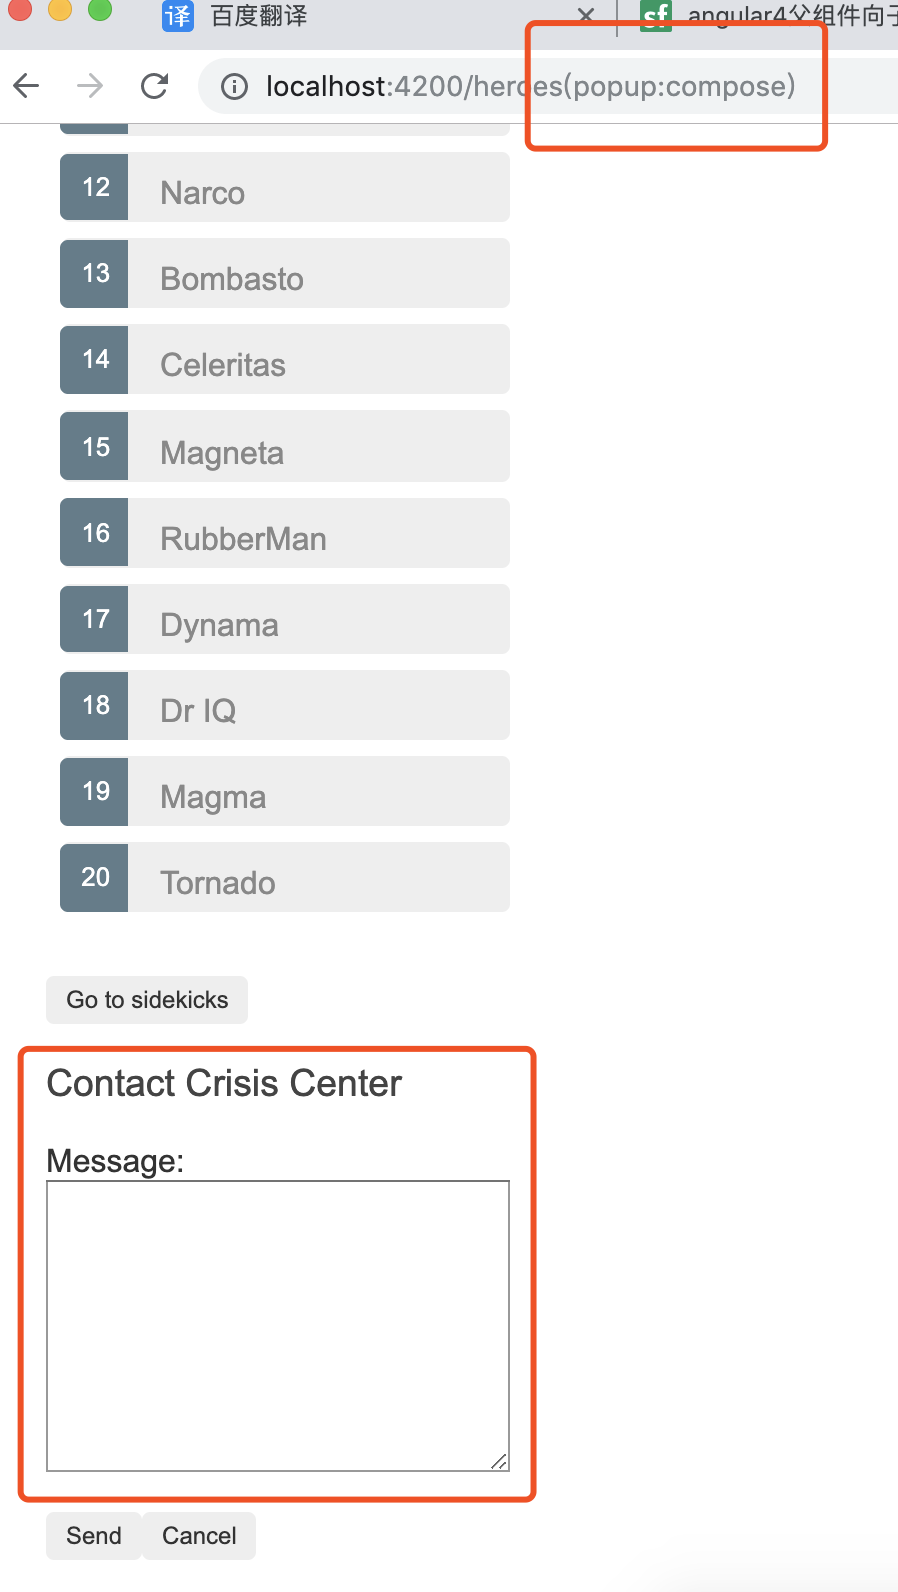
<!--The content below is only a placeholder and can be replaced.-->
<h1>Angular Router</h1>
<nav>
  <!-- 路由跳转一 -->
<a [routerLink]="[ '/crisis-center' ]" routerLinkActive="active">Crisis Center</a>
<a [routerLink]="[ '/heroes' ]" routerLinkActive="active">heroes</a>
<!-- 第二路由的导航显示 -->
<a [routerLink]="[{ outlets: { popup: ['compose']}}]">第二路由Contact</a>
  <!-- 路由跳转二 -->
<!-- <a routerLink="/crisis-center" routerLinkActive="active">Crisis Center</a>
<a routerLink="/heroes" routerLinkActive="active">heroes</a> -->
</nav>
<!-- 路由出口,占位符,可将显示在出口的组件显示在这里 -->
<!-- 转场:让@routeAnimation 触发器绑定到需要应用路由动画到元素上,routerOutlet 导出成outlet 变量,绑定一个到路由出口的引用
    函数根据activatedRoute 提供的data对象来返回动画属性
-->
<div [@routeAnimation]="getAnimationData(routerOutlet)">
    <router-outlet #routerOutlet="outlet"></router-outlet>
  </div>
<!-- 每个模块,路由器只能支持一个无名主路由出口,模块可以有多个命名路由出口,以此可以同时根据不同路由显示不同内容 -->
  <!-- 第二路由出口: 不依赖主路由,可以和其他路由组合使用,显示在命令出口位置 -->
  <router-outlet name="popup"></router-outlet>
- 创建一个组件,让这个组件作为这个第二路由出口的显示;ng g component compose-message
- 将第二路由导入主模块的路由中;
-
import { NgModule } from '@angular/core'; import { Routes, RouterModule } from '@angular/router'; import { PageNotFoundComponent } from './page-not-found/page-not-found.component'; import { ComposeMessageComponent } from './compose-message/compose-message.component'; // 添加第二路由 const routes: Routes = [ { path: 'compose' , component: ComposeMessageComponent, outlet: 'popup'}, { path: '', redirectTo: 'heroes', pathMatch: 'full' }, { path: '**', component: PageNotFoundComponent } ]; // .forRoot()-- 在应用的顶级配置路由器,提供路由需要的服务提供商和指令,基于浏览器当前URL执行首次导航 // enableTarcing -- 查看导航在生命周期中发生的事件,并输出到控制台 @NgModule({ imports: [ RouterModule.forRoot(routes, { enableTracing: false }) ], exports: [RouterModule] }) export class AppRoutingModule { } - compose-message 组件代码
-
<h3>Contact Crisis Center</h3>
<div *ngIf="details">
  {{ details }}
</div>
<div>
  <div>
    <label>Message: </label>
  </div>
  <div>
    <textarea [(ngModel)]="message" rows="10" cols="35" [disabled]="sending"></textarea>
  </div>
</div>
<p *ngIf="!sending">
  <button (click)="send()">Send</button>
  <button (click)="cancel()">Cancel</button>
</p>
-
import { Component, HostBinding } from '@angular/core'; import { Router } from '@angular/router'; @Component({ selector: 'app-compose-message', templateUrl: './compose-message.component.html', styleUrls: ['./compose-message.component.css'] }) export class ComposeMessageComponent { details: string; message: string; sending = false; constructor(private router: Router) { } send() { this.sending = true; this.details = 'Sending Message...'; setTimeout(() => { this.sending = false; this.closePopup(); }, 1000); } cancel() { this.closePopup(); } // 清除第二路由;即移除路由出口,清除导航url显示 closePopup() { // Providing a `null` value to the named outlet // clears the contents of the named outlet this.router.navigate([{ outlets: { popup: null } }]); } } - 视图显示