Apache Storm

Storm 是什么?
Apache Storm 是一个免费的而且开源的分布式实时计算系统。
Storm 能可靠地处理没有边界地流式数据,就像 Hadoop 批量处理那样进行实时处理。
Storm 是一个简单,可以和多种编程语言一起使用,用起来很爽。
Storm 有很多地应用场景:实时分析,在线机器学习,连续计算,分布式 RPC,ETL 等等。
Storm 很快:a benchmark clocked it at over a million tuples processed per second per node. It is scalable, fault-tolerant, guarantees your data will be processed, and is easy to set up and operate.
Storm 能和你使用过的消息队列和数据库集成。
Storm 的拓扑消费数据并以任意复杂的方式处理,repartitioning the streams between each stage of the computation however needed.
可以在 tutorial 中获得更多。
项目信息
集成:可以和 Kafka,RabbitMQ 等很多消息队列集成,和数据库的集成也很容易。
简单的 API:Storm 的 API 简单并并且容易使用。
可扩展:Storm 的拓扑本身就是并行的,并且运行在集群上。拓扑中的不同部分可以单独的扩展。
容错性:当 worker 宕掉后,Storm 会把它们自动重启。
保证数据的处理:Storm 保证每个 tuple 会被完全的处理。
可以使用任意的编程语言:Storm 的核心是定义和提交拓扑的 Thrift 定义。
容易部署和操作:Storm 集群很容易部署,只需要很少的配置就可以启动和运行。
免费和开源:你懂的。
设置和部署

直接上图了,打字有点累。
设置 Storm 集群
这节介绍了 设置和运行 Storm 集群的步骤。
如果你的 Storm 集群遇到问题了,请在 Troubleshooting 页面找一下解决方案。如果仍然解决不了,给邮件列表发送邮件。
安装过程大致包括以下步骤:
- 安装 zookeeper 集群
- 在 Nimbus 和 worker 机器上安装依赖
- 下载和解压 Storm 发行版到 Nimbus 和 worker 机器上
- 把必要的配置写入 storm.yaml
- 使用 "storm" 脚本启动后台进程
- 设置 DRPC 服务器 (可选的)
安装 Zookeeper 集群
Storm 使用 Zookeeper 来协调集群。Zookeeper 并不用于消息传递,因此 Storm 在 Zookeeper 上的负载是很低的。
在大多数情况下,单节点的 Zookeeper 集群已经足够了,如果你想故障恢复或者部署大规模的 Storm,那么还是要有更大的 Zookeeper 集群。
这里有部署 Zookeeper 的命令:here。
Zookeeper 部署的一些注意事项:
- Zookeeper 应该运行在 supervision 下,因为在遇到任何错误的情况下,Zookeeper 是 fail-fast 的,并且会进程退出。See here for more details.
- 应该用一个 cron 来压缩 Zookeeper's data and transaction logs。Zookeeper 的后台进程并不做这些事情,如果你不用 cron 的话,Zookeeper 将很快用完磁盘空间。See here for more details.
在 Nimbus 和 worker 机器上安装依赖
这些依赖包括:
- Java 8+ (Apache Storm 2.x is tested through travis ci against a java 8 JDK)
- Python 2.6.6 (Python 3.x should work too, but is not tested as part of our CI enviornment)
下载和提取 Storm 发行版本到 Nimbus and worker 机器
解压并移动到安装目录
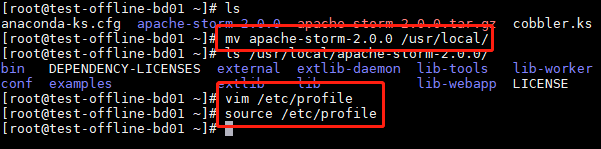
配置 /etc/profile

The Storm releases can be downloaded from here.
添加必要配置到 storm.yaml
Storm realse 的配置文件在 conf/storm.yaml ,用于配置 Storm 后台进程。
here 有 Storm 的默认配置。storm.yaml 会覆盖 defaults.yaml 中的配置。下面的配置对于运行 worker 集群是必须的:
1) storm.zookeeper.servers: This is a list of the hosts in the Zookeeper cluster for your Storm cluster. 看上去像下面这样:
storm.zookeeper.servers:
  - "111.222.333.444" - "555.666.777.888"
如果 Zookeeper 集群用的不是默认的端口号,你应该还要设置:storm.zookeeper.port。
2) storm.local.dir: Nimbus and Supervisor 守护进程需要本地磁盘的目录来存储少量的数据 (比如 jars, confs, and things like that)。
你应该在每台机器上都创建目录,并赋予合适的权限,然后再配置文件中写入配置。例如:
storm.local.dir: "/mnt/storm"
如果你在 windows 上运行 Storm,应该是:
storm.local.dir: "C:\\storm-local"
创建一个存放状态的目录:
mkdir /usr/local/apache-storm-2.0.0/storm-local
如果你使用相对路径,则应该是相对于 STORM_HOME 的路径。你可以用默认的值 $STORM_HOME/storm-local
3) nimbus.seeds: worker nodes 必须知道那个是候选的 master,来下载 topology jars 和配置。比如:
nimbus.seeds: ["111.222.333.44"] 最好是列出机器的 FQDN。如果你想要设置 Nimbus H/A,你必须列出所有运行 nimbus 机器的 FQDN。You may want to leave it to default value when you just want to set up 'pseudo-distributed' cluster, but you're still encouraged to fill out FQDN.
4) supervisor.slots.ports: For each worker machine, you configure how many workers run on that machine with this config. Each worker uses a single port for receiving messages, and this setting defines which ports are open for use. If you define five ports here, then Storm will allocate up to five workers to run on this machine. If you define three ports, Storm will only run up to three. By default, this setting is configured to run 4 workers on the ports 6700, 6701, 6702, and 6703. For example:
supervisor.slots.ports:
    - 6700
    - 6701 - 6702 - 6703
5) drpc.servers: If you want to setup DRPC servers they need to specified so that the workers can find them. This should be a list of the DRPC servers. For example:
drpc.servers: ["111.222.333.44"]
配置文件最后长这样:
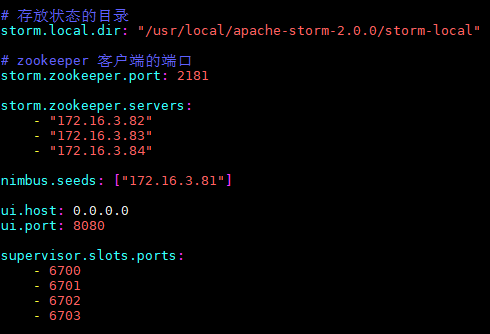
# 存放状态的目录
storm.local.dir: "/usr/local/apache-storm-2.0.0/storm-local"

# zookeeper 客户端的端口
storm.zookeeper.port: 2181

storm.zookeeper.servers:
    - "172.16.3.82"
    - "172.16.3.83"
    - "172.16.3.84"

nimbus.seeds: ["172.16.3.81"]

ui.host: 0.0.0.0
ui.port: 8080

supervisor.slots.ports:
    - 6700
    - 6701
    - 6702
    - 6703
启动
在 master 上:
storm nimbus &
storm ui &
storm logviewer &
在 slave 上启动:
storm supervisor &
storm logviewer &
Monitoring Health of Supervisors
Storm provides a mechanism by which administrators can configure the supervisor to run administrator supplied scripts periodically to determine if a node is healthy or not. Administrators can have the supervisor determine if the node is in a healthy state by performing any checks of their choice in scripts located in storm.health.check.dir. If a script detects the node to be in an unhealthy state, it must return a non-zero exit code. In pre-Storm 2.x releases, a bug considered a script exit value of 0 to be a failure. This has now been fixed. The supervisor will periodically run the scripts in the health check dir and check the output. If the script’s output contains the string ERROR, as described above, the supervisor will shut down any workers and exit.
If the supervisor is running with supervision "/bin/storm node-health-check" can be called to determine if the supervisor should be launched or if the node is unhealthy.
The health check directory location can be configured with:
storm.health.check.dir: "healthchecks"
The scripts must have execute permissions. The time to allow any given healthcheck script to run before it is marked failed due to timeout can be configured with:
storm.health.check.timeout.ms: 5000
Configure external libraries and environment variables (optional)
If you need support from external libraries or custom plugins, you can place such jars into the extlib/ and extlib-daemon/ directories. Note that the extlib-daemon/ directory stores jars used only by daemons (Nimbus, Supervisor, DRPC, UI, Logviewer), e.g., HDFS and customized scheduling libraries. Accordingly, two environment variables STORM_EXT_CLASSPATH and STORM_EXT_CLASSPATH_DAEMON can be configured by users for including the external classpath and daemon-only external classpath. See Classpath handling for more details on using external libraries.
Launch daemons under supervision using "storm" script and a supervisor of your choice
The last step is to launch all the Storm daemons. It is critical that you run each of these daemons under supervision. Storm is a fail-fast system which means the processes will halt whenever an unexpected error is encountered. Storm is designed so that it can safely halt at any point and recover correctly when the process is restarted. This is why Storm keeps no state in-process -- if Nimbus or the Supervisors restart, the running topologies are unaffected. Here's how to run the Storm daemons:
- Nimbus: Run the command
bin/storm nimbusunder supervision on the master machine. - Supervisor: Run the command
bin/storm supervisorunder supervision on each worker machine. The supervisor daemon is responsible for starting and stopping worker processes on that machine. - UI: Run the Storm UI (a site you can access from the browser that gives diagnostics on the cluster and topologies) by running the command "bin/storm ui" under supervision. The UI can be accessed by navigating your web browser to http://{ui host}:8080.
As you can see, running the daemons is very straightforward. The daemons will log to the logs/ directory in wherever you extracted the Storm release.
Setup DRPC servers (Optional)
Just like with nimbus or the supervisors you will need to launch the drpc server. To do this run the command bin/storm drpc on each of the machines that you configured as a part of the drpc.servers config.
DRPC Http Setup
DRPC optionally offers a REST API as well. To enable this set teh config drpc.http.port to the port you want to run on before launching the DRPC server. See the REST documentation for more information on how to use it.
It also supports SSL by setting drpc.https.port along with the keystore and optional truststore similar to how you would configure the UI.
步骤总结
- 安装 zookeeper 集群
- 安装依赖:JDK,python
- 下载 storm release,并解压到安装目录
- 配置环境变量 STORM_HOME 和 PATH
- 在安装目录下创建一个 storm-local 目录
- 在 $STORM_HOME/conf/storm.yaml 写好配置,上文中有
- 根据 nimbus 和 worker 来启动不同的进程
- 看下 nimbus 8080 的 storm UI
- over