十六:自定义拦截器
参考文档
16.1 编写拦截器类
extends WebMvcConfigurerAdapter 并重写WebMvcConfigurerAdapter,如下:


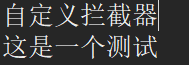
 1 package com.wu.interceptor;
 2
 3 import javax.servlet.http.HttpServletRequest;
 4 import javax.servlet.http.HttpServletResponse;
 5
 6 import org.springframework.context.annotation.Configuration;
 7 import org.springframework.web.servlet.HandlerInterceptor;
 8 import org.springframework.web.servlet.ModelAndView;
 9 import org.springframework.web.servlet.config.annotation.InterceptorRegistry;
10 import org.springframework.web.servlet.config.annotation.WebMvcConfigurerAdapter;
11
12 @Configuration//声明这是一个配置
13 public class MyInterceptor extends WebMvcConfigurerAdapter {
14
15     @Override
16     public void addInterceptors(InterceptorRegistry registry) {
17         //以内部类的创建拦截器
18         HandlerInterceptor interceptor=new HandlerInterceptor() {
19
20             @Override
21             public boolean preHandle(HttpServletRequest arg0, HttpServletResponse arg1, Object arg2) throws Exception {
22                 System.out.println("自定义拦截器");
23                 //返回true时放行
24                 return true;
25             }
26
27             @Override
28             public void postHandle(HttpServletRequest arg0, HttpServletResponse arg1, Object arg2, ModelAndView arg3)
29                     throws Exception {
30             }
31
32             @Override
33             public void afterCompletion(HttpServletRequest arg0, HttpServletResponse arg1, Object arg2, Exception arg3)
34                     throws Exception {
35             }
36         };
37         //注册拦截器并设置拦截路径
38         registry.addInterceptor(interceptor).addPathPatterns("/**");
39     }
40
41 }
注意:需要在拦截器类上添加 @Configuration,声明这是一个配置类,还需要在启动类中需要扫描到该类,如以下所示:
 1 package com.wu.app;
 2
 3 import org.springframework.boot.SpringApplication;
 4 import org.springframework.boot.autoconfigure.SpringBootApplication;
 5
 6 //@EnableAutoConfiguration
 7 //@ComponentScan("com.wu.controller")//默认扫描的是当前包和当前包的子包
 8 @SpringBootApplication(scanBasePackages={"com.wu.controller","com.wu.interceptor"})
 9 public class SpringApplications {
10         //程序启动入口
11         public static void main(String []args){
12             SpringApplication.run(SpringApplications.class, args);
13         }
14 }
16.2 测试定义的拦截器是否生效
编写Controller类简单测试刚刚定义的拦截器是否有效,如下:
 1 package com.wu.controller;
 2
 3 import org.springframework.web.bind.annotation.RequestMapping;
 4 import org.springframework.web.bind.annotation.RestController;
 5
 6 @RestController
 7 public class TestController {
 8     @RequestMapping("/test")
 9     public String test(){
10         System.out.println("这是一个测试");
11         return "test";
12     }
13 }
在控制台中可以看到输出顺序:
十七:全局异常处理器的简单实现
参考文档
17.1 编写异常处理器类
 1 package com.wu.controller;
 2
 3 import java.util.HashMap;
 4 import java.util.Map;
 5
 6 import org.springframework.web.bind.annotation.ExceptionHandler;
 7 import org.springframework.web.bind.annotation.RestControllerAdvice;
 8
 9 @RestControllerAdvice
10 public class GlobalExceptionHandler {
11     @ExceptionHandler(Exception.class)
12     public Map<String,Object> handleException(Exception e){
13         Map<String,Object> map=new HashMap<>();
14         map.put("errorCode","500");
15         map.put("Msg",e.toString());
16         return map;
17     }
18 }
17.2 编写测试类
 1 package com.wu.controller;
 2
 3 import org.springframework.web.bind.annotation.RequestMapping;
 4 import org.springframework.web.bind.annotation.RestController;
 5
 6 @RestController
 7 public class TestController {
 8     @RequestMapping("/test")
 9     public String test(){
10         int a=1/0;
11         return "test";
12     }
13 }
测试结果:
![]()
十八:SpringBoot中的异步调用
18.1 相关知识
参考文档:Java中的Future, Future接口
Future接口的作用:
- 代表异步计算的执行结果;
- 用于可取消的task;(比使用interrupt实现取消要方便 )
18.2在Service层中编写异步测试类
1 package com.wu.service;
2
3 import java.util.concurrent.Future;
4
5 public interface AsyncService {
6     Future<String> doTask1()throws Exception;
7     Future<String> doTask2()throws Exception;
8     Future<String> doTask3()throws Exception;
9 }
 1 package com.wu.service;
 2
 3 import java.util.Random;
 4 import java.util.concurrent.Future;
 5
 6 import org.springframework.scheduling.annotation.Async;
 7 import org.springframework.scheduling.annotation.AsyncResult;
 8 import org.springframework.stereotype.Service;
 9 @Service
10 public class AsyncServiceImp implements AsyncService {
11     @Async
12     @Override
13     public Future<String> doTask1() throws Exception {
14         System.out.println("任务一开始");
15         long start=System.currentTimeMillis();
16         Thread.sleep(new Random().nextInt(10000));
17         long end =System.currentTimeMillis();
18         System.out.println("任务一结束时间:"+(end-start)+"ms");
19         return new AsyncResult<String>("任务一结束");
20     }
21     @Async
22     @Override
23     public Future<String> doTask2() throws Exception {
24         System.out.println("任务二开始");
25         long start=System.currentTimeMillis();
26         Thread.sleep(new Random().nextInt(10000));
27         long end =System.currentTimeMillis();
28         System.out.println("任务二结束时间:"+(end-start)+"ms");
29         return new AsyncResult<String>("任务二结束");
30     }
31     @Async
32     @Override
33     public Future<String> doTask3() throws Exception {
34         System.out.println("任务三开始");
35         long start=System.currentTimeMillis();
36         Thread.sleep(new Random().nextInt(10000));
37         long end =System.currentTimeMillis();
38         System.out.println("任务三结束时间:"+(end-start)+"ms");
39         return new AsyncResult<String>("任务三结束");
40     }
41
42 }
 1 package com.wu.controller;
 2
 3 import java.util.concurrent.Future;
 4
 5 import org.springframework.beans.factory.annotation.Autowired;
 6 import org.springframework.web.bind.annotation.RequestMapping;
 7 import org.springframework.web.bind.annotation.RestController;
 8
 9 import com.wu.service.AsyncService;
10 import com.wu.service.AsyncServiceImp;
11
12 @RestController
13 public class TestController {
14     @Autowired
15     private AsyncService asyncService =new AsyncServiceImp();
16
17     @RequestMapping("/async")
18     public String testAsync() throws Exception{
19         long start=System.currentTimeMillis();
20         Future<String> task1 = asyncService.doTask1();
21         Future<String> task2 = asyncService.doTask2();
22         Future<String> task3 = asyncService.doTask3();
23         //判断三个任务是否结束
24         while(true){
25             if(task1.isDone()&&task2.isDone()&&task3.isDone()){
26                 break;
27             }
28             //当前线程停一会再判断
29             Thread.sleep(1000);
30         }
31         long end =System.currentTimeMillis();
32         return "总耗时:"+(end-start)+"ms";
33     }
34 }
 1 package com.wu.app;
 2
 3 import org.springframework.boot.SpringApplication;
 4 import org.springframework.boot.autoconfigure.SpringBootApplication;
 5 import org.springframework.scheduling.annotation.EnableAsync;
 6
 7
 8 @SpringBootApplication(scanBasePackages={"com.wu.controller","com.wu.service"})
 9 @EnableAsync//启用异步调用
10 public class SpringApplications {
11         //程序启动入口
12         public static void main(String []args){
13             SpringApplication.run(SpringApplications.class, args);
14         }
15 }
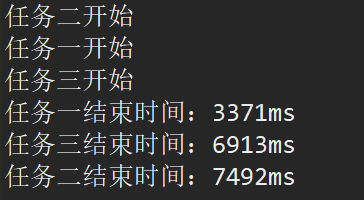
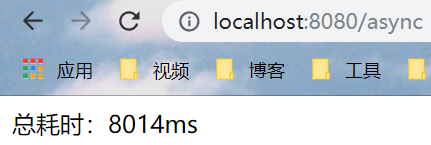
18.3 显示结果
18.4 总结
在需要异步加载的方法上加上注解 @Async
在启动类中需要扫描相应的包,和启动异步调用 @EnableAsync