项目组有把js接入C++服务求的需求,故开始了v8接入的工作,用了一天多时间,v8才在centos环境上成功安装,过程中踩了很多坑,下面将采坑过程记录如下:


#v8 install
mkdir -p /opt/v8/{lib,include}

cd /home/ldx/software/v8-instal/v8
/bin/cp -v out.gn/x64.release/lib*.so out.gn/x64.release/*_blob.bin out.gn/x64.release/icudtl.dat /opt/v8/lib/
/bin/cp -v out.gn/x64.release/lib*.so out.gn/x64.release/*_blob.bin out.gn/x64.release/icudtl.dat /usr/lib64
/bin/cp -v out.gn/x64.release/lib*.so out.gn/x64.release/*_blob.bin out.gn/x64.release/icudtl.dat /usr/local/lib
/bin/cp -vR include/* /opt/v8/include/

#并配置环境变量(PATH、LIB、LD_LIB、INCLUDE_PATH)
#使用了v8库的c++代码的编译方法
g++ -o main xx.cpp -std=c++11 -lpthread -lv8 -lv8_libplatform

#生成可执行文件后,即可运行:
./main
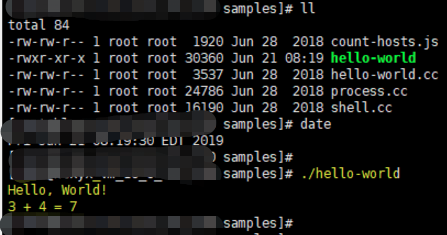
源代码hello-world.cc(v8/sample下面的示例文件)内容如下:
// Copyright 2015 the V8 project authors. All rights reserved.
// Use of this source code is governed by a BSD-style license that can be
// found in the LICENSE file.

#include <stdio.h>
#include <stdlib.h>
#include <string.h>

#include "include/libplatform/libplatform.h"
#include "include/v8.h"

int main(int argc, char* argv[]) {
  // Initialize V8.
  v8::V8::InitializeICUDefaultLocation(argv[0]);
  v8::V8::InitializeExternalStartupData(argv[0]);
  std::unique_ptr<v8::Platform> platform = v8::platform::NewDefaultPlatform();
  v8::V8::InitializePlatform(platform.get());
  v8::V8::Initialize();

  // Create a new Isolate and make it the current one.
  v8::Isolate::CreateParams create_params;
  create_params.array_buffer_allocator =
      v8::ArrayBuffer::Allocator::NewDefaultAllocator();
  v8::Isolate* isolate = v8::Isolate::New(create_params);
  {
    v8::Isolate::Scope isolate_scope(isolate);

    // Create a stack-allocated handle scope.
    v8::HandleScope handle_scope(isolate);

    // Create a new context.
    v8::Local<v8::Context> context = v8::Context::New(isolate);

    // Enter the context for compiling and running the hello world script.
    v8::Context::Scope context_scope(context);

    {
      // Create a string containing the JavaScript source code.
      v8::Local<v8::String> source =
          v8::String::NewFromUtf8(isolate, "'Hello' + ', World!'",
                                  v8::NewStringType::kNormal)
              .ToLocalChecked();

      // Compile the source code.
      v8::Local<v8::Script> script =
          v8::Script::Compile(context, source).ToLocalChecked();

      // Run the script to get the result.
      v8::Local<v8::Value> result = script->Run(context).ToLocalChecked();

      // Convert the result to an UTF8 string and print it.
      v8::String::Utf8Value utf8(isolate, result);
      printf("%s\n", *utf8);
    }

    {
      // Use the JavaScript API to generate a WebAssembly module.
      //
      // |bytes| contains the binary format for the following module:
      //
      //     (func (export "add") (param i32 i32) (result i32)
      //       get_local 0
      //       get_local 1
      //       i32.add)
      //
      const char* csource = R"(
        let bytes = new Uint8Array([
          0x00, 0x61, 0x73, 0x6d, 0x01, 0x00, 0x00, 0x00, 0x01, 0x07, 0x01,
          0x60, 0x02, 0x7f, 0x7f, 0x01, 0x7f, 0x03, 0x02, 0x01, 0x00, 0x07,
          0x07, 0x01, 0x03, 0x61, 0x64, 0x64, 0x00, 0x00, 0x0a, 0x09, 0x01,
          0x07, 0x00, 0x20, 0x00, 0x20, 0x01, 0x6a, 0x0b
        ]);
        let module = new WebAssembly.Module(bytes);
        let instance = new WebAssembly.Instance(module);
        instance.exports.add(3, 4);
      )";

      // Create a string containing the JavaScript source code.
      v8::Local<v8::String> source =
          v8::String::NewFromUtf8(isolate, csource, v8::NewStringType::kNormal)
              .ToLocalChecked();

      // Compile the source code.
      v8::Local<v8::Script> script =
          v8::Script::Compile(context, source).ToLocalChecked();

      // Run the script to get the result.
      v8::Local<v8::Value> result = script->Run(context).ToLocalChecked();

      // Convert the result to a uint32 and print it.
      uint32_t number = result->Uint32Value(context).ToChecked();
      printf("3 + 4 = %u\n", number);
    }
  }

  // Dispose the isolate and tear down V8.
  isolate->Dispose();
  v8::V8::Dispose();
  v8::V8::ShutdownPlatform();
  delete create_params.array_buffer_allocator;
  return 0;
}
运行结果如下:
下面都是环境准备中遇到的问题:
1 GCC升级
//gcc升级
CentOS把最新的开发者工具包放到了一个名为centos-release-scl的源仓库中,名称是devtools-6。GCC已经升级到7.1版本,CentOS目前尚未跟进,最高版本是devtools-6,其中包含GCC 6.2.1版本。具体做法如下:

sudo yum install centos-release-scl
sudo yum install devtoolset-6
scl enable devtoolset-6 bash
sudo yum list devtoolset-6\*


# 执行以下命令的一条,分别切换到 gcc 4.9.2, 5.3.1, 6.3.1, 7.3.1
# source /opt/rh/devtoolset-3/enable
# source /opt/rh/devtoolset-4/enable
# source /opt/rh/devtoolset-6/enable
# source /opt/rh/devtoolset-7/enable

gcc -v

#然后设置下环境变量即可,不修改系统的gcc
GCCPath=/opt/rh/devtoolset-4/root/usr
export CC=$GCCPath/bin/gcc
export CXX=$GCCPath/bin/g++
export CPP=$GCCPath/bin/cpp
export LD=$GCCPath/bin/g++
export LIBRARY_PATH=$GCCPath/lib64:$LIBRARY_PATH
export LD_LIBRARY_PATH=$GCCPath/lib64:$LD_LIBRARY_PATH

//gcc源码编译升级到支持C++14的gcc5+
tar -zxvf gcc-5.4.0.tar.gz
cd gcc-5.4.0
./contrib/download_prerequisites #下载依赖项
cd ../
mkdir build
cd build
../configure --enable-checking=release --enable-languages=c,c++ --enable-multilib  #--enable-multilib  --disable-multilib
make -j4  #多核编译
make install
gcc -v
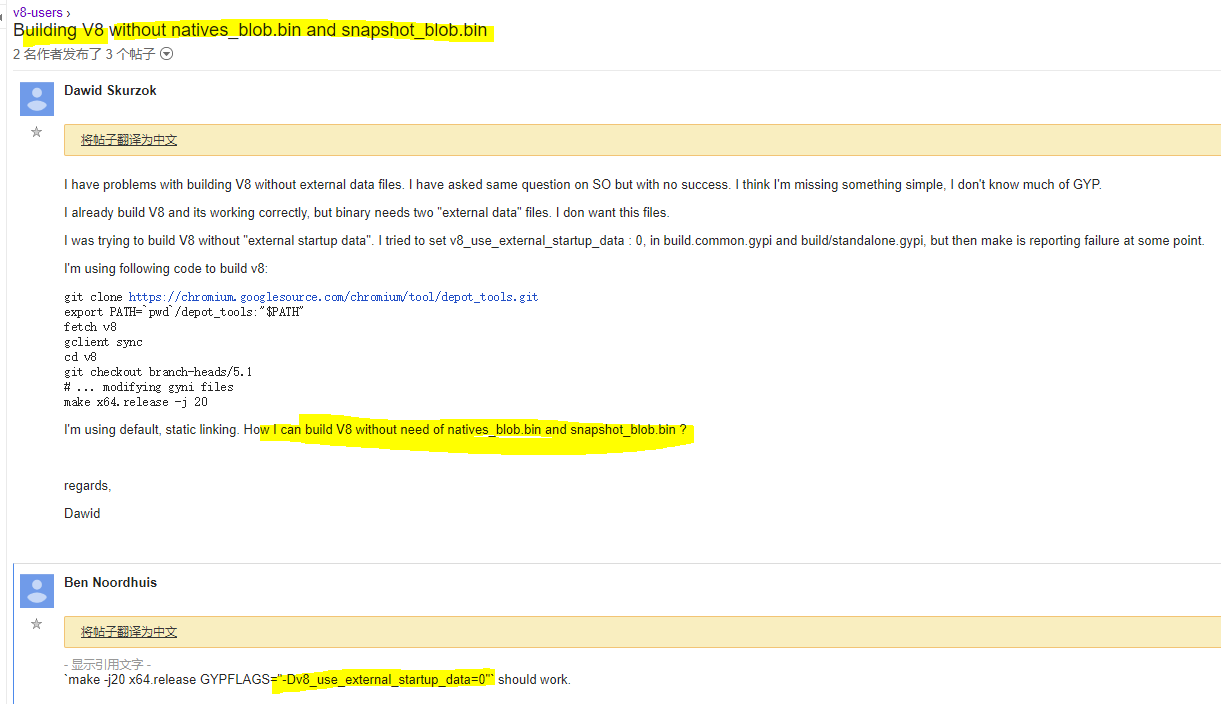
2 问题解决:Undefined reference to v8::platform::NewDefaultPlatform
#问题解决:
Undefined reference to v8::platform::NewDefaultPlatform
#解决方法:
./tools/dev/v8gen.py -vv x64.release增加以下选项设置:
Building with GN args:

     is_debug: false,
     is_official_build: true,
     is_component_build: true,
     is_cfi: false,
     is_clang: false,
     v8_use_external_startup_data: false,
     treat_warnings_as_errors: false,
     use_custom_libcxx: false,
     use_sysroot: false,
     use_gold: false
3 问题解决:software/v8-instal/local/depot_tools/ninja-linux64: /usr/lib64/libc.so.6: version `GLIBC_2.18' not found (required by /usr/lib64/libstdc++.so.6)
//解决software/v8-instal/local/depot_tools/ninja-linux64: /usr/lib64/libc.so.6: version `GLIBC_2.18' not found (required by /usr/lib64/libstdc++.so.6)
curl -O http://ftp.gnu.org/gnu/glibc/glibc-2.18.tar.gz
tar zxf glibc-2.18.tar.gz
cd glibc-2.18/
mkdir build
cd build/ .
./configure --prefix=/usr
make -j2
make install
4 问题解决:g++: error: unrecognized command line option ‘-std=gnu++14’
需要将GCC升级到5+
//问题解决1
g++: error: unrecognized command line option ‘-std=gnu++14’

解决方法:
Since Folly uses modern language and library features, GCC 4.8 is no longer supported.
GCC 4.9 currently works, but only as long as select internal projects require.
Best to use GCC 5+.
5 问题解决:
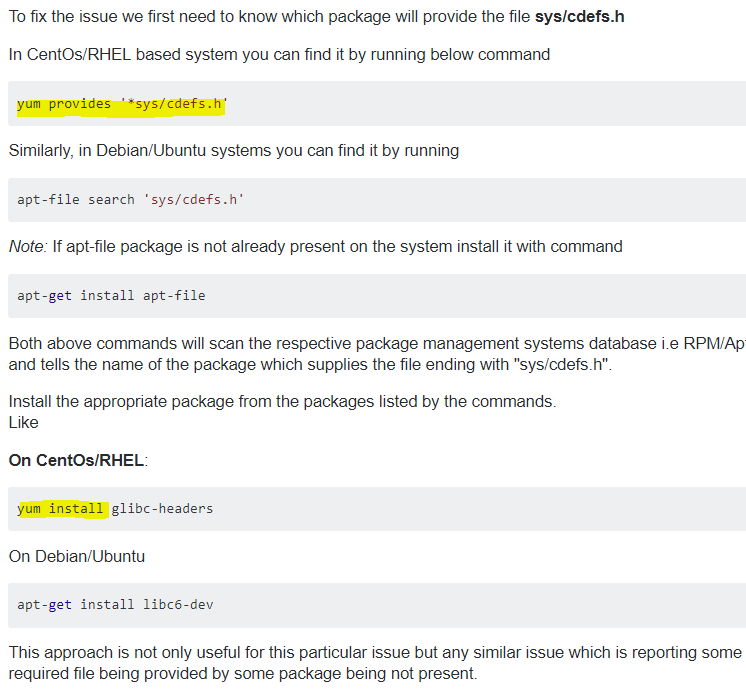
//问题解决
./../build/linux/debian_sid_amd64-sysroot/usr/include/features.h:424:25: fatal error: sys/cdefs.h: No such file or directory

解决方法:
apt-get --reinstall install libc6 libc6-dev //ubuntu环境
apt-get install gcc-multilib//ubuntu环境

//centos环境
find / -name "cdefs.h" // 系统中存在该文件/usr/include/sys/cdefs.h

vim /etc/profile
增加几行:
C_INCLUDE_PATH=/usr/include/ #gcc找到头文件的路径
export C_INCLUDE_PATH

CPLUS_INCLUDE_PATH=$CPLUS_INCLUDE_PATH #g++找到头文件的路径
export CPLUS_INCLUDE_PATH

并执行:
source /etc/profile
6 问题解决:
../../third_party/binutils/Linux_x64/Release/bin/ld.gold: error: cannot open crti.o: No such file or directory
配置动态链接库
//问题解决3
../../third_party/binutils/Linux_x64/Release/bin/ld.gold: error: cannot open crti.o: No such file or directory
find / -name "crti.o" // 首先查看系统中是否存在该文件/usr/lib/crti.o和/usr/lib64/crti.o

vim /etc/profile
增加几行:

LD_LIBRARY_PATH=$LD_LIBRARY_PATH:/usr/lib #找到动态链接库的路径
export LD_LIBRARY_PATH

LIBRARY_PATH=$LIBRARY_PATH:/usr/lib #找到静态库的路径
export LIBRARY_PATH

并执行:
source /etc/profile
7 问题解决:
Failed to open startup resource './natives_blob.bin'.
Failed to open startup resource './snapshot_blob.bin'.
解决方法:在v8编译时配置下面的编译选项
//问题解决
Failed to open startup resource './natives_blob.bin'.
Failed to open startup resource './snapshot_blob.bin'.

解决方法:
`make -j20 x64.release GYPFLAGS="-Dv8_use_external_startup_data=0"` should work.
google找到了解决方案:
8 问题解决:
../configure --enable-checking=release --enable-languages=c,c++ --enable-multilib
//设置enable-multilib后
/usr/include/gnu/stubs.h:7:27: fatal error: gnu/stubs-32.h: No such file or directory
解决方法:
解决方法:
yum install glibc-devel.i686
9 问题解决:
解决”fatal error: sys/cdefs.h: No such file or directory“的方法:
10 问题解决:
fetch v8 /usr/lib64/python2.7/subprocess.py in _execute_child OSError: [Errno 2] No such file or directory
#问题解决1
#fetch v8 /usr/lib64/python2.7/subprocess.py in _execute_child OSError: [Errno 2] No such file or directory
#解答
You miss the svn binary.
Make sure you follow the instructions here and in particular that you run build/install-build-deps.sh

//IN https://chromium.googlesource.com/chromium/src/+/master/docs/linux_build_instructions.md

Get the code
Create a chromium directory for the checkout and change to it (you can call this whatever you like and put it wherever you like, as long as the full path has no spaces):

$ mkdir ~/chromium && cd ~/chromium
Run the fetch tool from depot_tools to check out the code and its dependencies.

$ fetch --nohooks --no-history chromium
If you don't want the full repo history, you can save a lot of time by adding the --no-history flag to fetch.

Expect the command to take 30 minutes on even a fast connection, and many hours on slower ones.

If you've already installed the build dependencies on the machine (from another checkout, for example), you can omit the --nohooks flag and fetch will automatically execute gclient runhooks at the end.

When fetch completes, it will have created a hidden .gclient file and a directory called src in the working directory. The remaining instructions assume you have switched to the src directory:

$ cd src
Install additional build dependencies
Once you have checked out the code, and assuming you're using Ubuntu, run build/install-build-deps.sh

$ ./build/install-build-deps.sh
You may need to adjust the build dependencies for other distros. There are some notes at the end of this document, but we make no guarantees for their accuracy.
参考博客:https://lizijie.github.io/2018/07/03/%E6%BA%90%E7%A0%81%E5%AE%89%E8%A3%85v8%E6%8A%A5%E9%94%99.html#%E5%A6%82%E4%BD%95%E9%85%8D%E7%BD%AEdepot_tools
官方建议使用depot_tools来下载v8,而不是简单地从github仓库git clone。然而v8和depot_tools都存放再googlesource,在国内访问不到。
可以使用网友下载好的depot_tool&v8
depot_tools:https://pan.baidu.com/s/10lWOMwv0BuKi2R5hlVcI9g
v8 6.9源码:https://pan.baidu.com/s/1wHmOynP6YfLmfm7tMkIUig
#gclient sync
Error: 10>
10> ____ v8/third_party/depot_tools at b3853afe341f2c478f07edba8ac4e60ea833c3b1
10> You have unstaged changes.
10> Please commit, stash, or reset.
#gclient sync --with_branch_heads --with_tags -Rv --disable-syntax-validation
解决方法如下:


//GLIBC_2.18安装
curl -O http://ftp.gnu.org/gnu/glibc/glibc-2.18.tar.gz
tar zxf glibc-2.18.tar.gz
cd glibc-2.18/
mkdir build
cd build/ .
./configure --prefix=/usr
make -j2
make install
13 问题解决:Error getting repository data for remi-php71, repository not found
解决方法:添加源
//问题1:Error getting repository data for remi-php71, repository not found

添加epel源:
rpm -vih http://dl.fedoraproject.org/pub/epel/7/x86_64/Packages/e/epel-release-7-11.noarch.rpm

添加remi源:
rpm -Uvh http://rpms.remirepo.net/enterprise/remi-release-7.rpm

添加ELRepo源:
rpm --import https://www.elrepo.org/RPM-GPG-KEY-elrepo.org
14 问题解决:
//usr/local/lib/libv8.so: undefined reference to `std::__cxx11::basic_string<char, std::char_traits<char>, std::allocator<char> >::_M_assign(std::__cxx11::basic_string<char, std::char_traits<char>, std::allocator<char> > const&)@GLIBCXX_3.4.21'
解决方案:升级GCC到5以上
15 问题解决:
/tmp/cc6msrUw.o: In function `main':
hello-world.cc:(.text+0x75): undefined reference to `v8::platform::NewDefaultPlatform(int, v8::platform::IdleTaskSupport, v8::platform::InProcessStackDumping, std::unique_ptr<v8::TracingController, std::default_delete<v8::TracingController> >)'
/usr/lib64/libstdc++.so.6: undefined reference to `__cxa_thread_atexit_impl@GLIBC_2.18'
解决方案:在更高版本GCC版本下编译v8,并配置相关GN的 编译选项
     is_debug: false,
     is_official_build: true,
     is_component_build: true,
     is_cfi: false,
     is_clang: false,
     v8_use_external_startup_data: false,
     treat_warnings_as_errors: false,
     use_custom_libcxx: false,
     use_sysroot: false,
     use_gold: false